Waterford WABODDSS1 Specification sheet

Installation - Use - Maintenance
OVENS
OVEN MODELS CODES
SINGLE FAN OVEN - WABODDSS1
DOUBLE FAN OVEN - WABODDSS2
SIDE OPENING FAN OVEN - WABOSOSS1

TABLE OF CONTENTS
PAGE NO.
1. Introduction . . . . . . . . . . . . . . . . . . . . . . . . . . . . . . . . . . . . . . . . . . . . . . . . . . . . . . . . . . . . . .2
2. The Manufacturer . . . . . . . . . . . . . . . . . . . . . . . . . . . . . . . . . . . . . . . . . . . . . . . . . . . . . . . . .2
3. The First Time Using The Oven . . . . . . . . . . . . . . . . . . . . . . . . . . . . . . . . . . . . . . . . . . . . . .2
4. Respect For The Environment . . . . . . . . . . . . . . . . . . . . . . . . . . . . . . . . . . . . . . . . . . . . . . .3
5. Control Panel Functions . . . . . . . . . . . . . . . . . . . . . . . . . . . . . . . . . . . . . . . . . . . . . . . . . . . .3
6. Instructions For Use . . . . . . . . . . . . . . . . . . . . . . . . . . . . . . . . . . . . . . . . . . . . . . . . . . . . . . .3
7. Conventional Cooking . . . . . . . . . . . . . . . . . . . . . . . . . . . . . . . . . . . . . . . . . . . . . . . . . . . . .3
8. Fan Cooking . . . . . . . . . . . . . . . . . . . . . . . . . . . . . . . . . . . . . . . . . . . . . . . . . . . . . . . . . . . . .3
9. Defrosting . . . . . . . . . . . . . . . . . . . . . . . . . . . . . . . . . . . . . . . . . . . . . . . . . . . . . . . . . . . . . . .3
10. Grill Cooking . . . . . . . . . . . . . . . . . . . . . . . . . . . . . . . . . . . . . . . . . . . . . . . . . . . . . . . . . . . . .4
11. Cooling Fan . . . . . . . . . . . . . . . . . . . . . . . . . . . . . . . . . . . . . . . . . . . . . . . . . . . . . . . . . . . . .4
12. Thermostat . . . . . . . . . . . . . . . . . . . . . . . . . . . . . . . . . . . . . . . . . . . . . . . . . . . . . . . . . . . . . .4
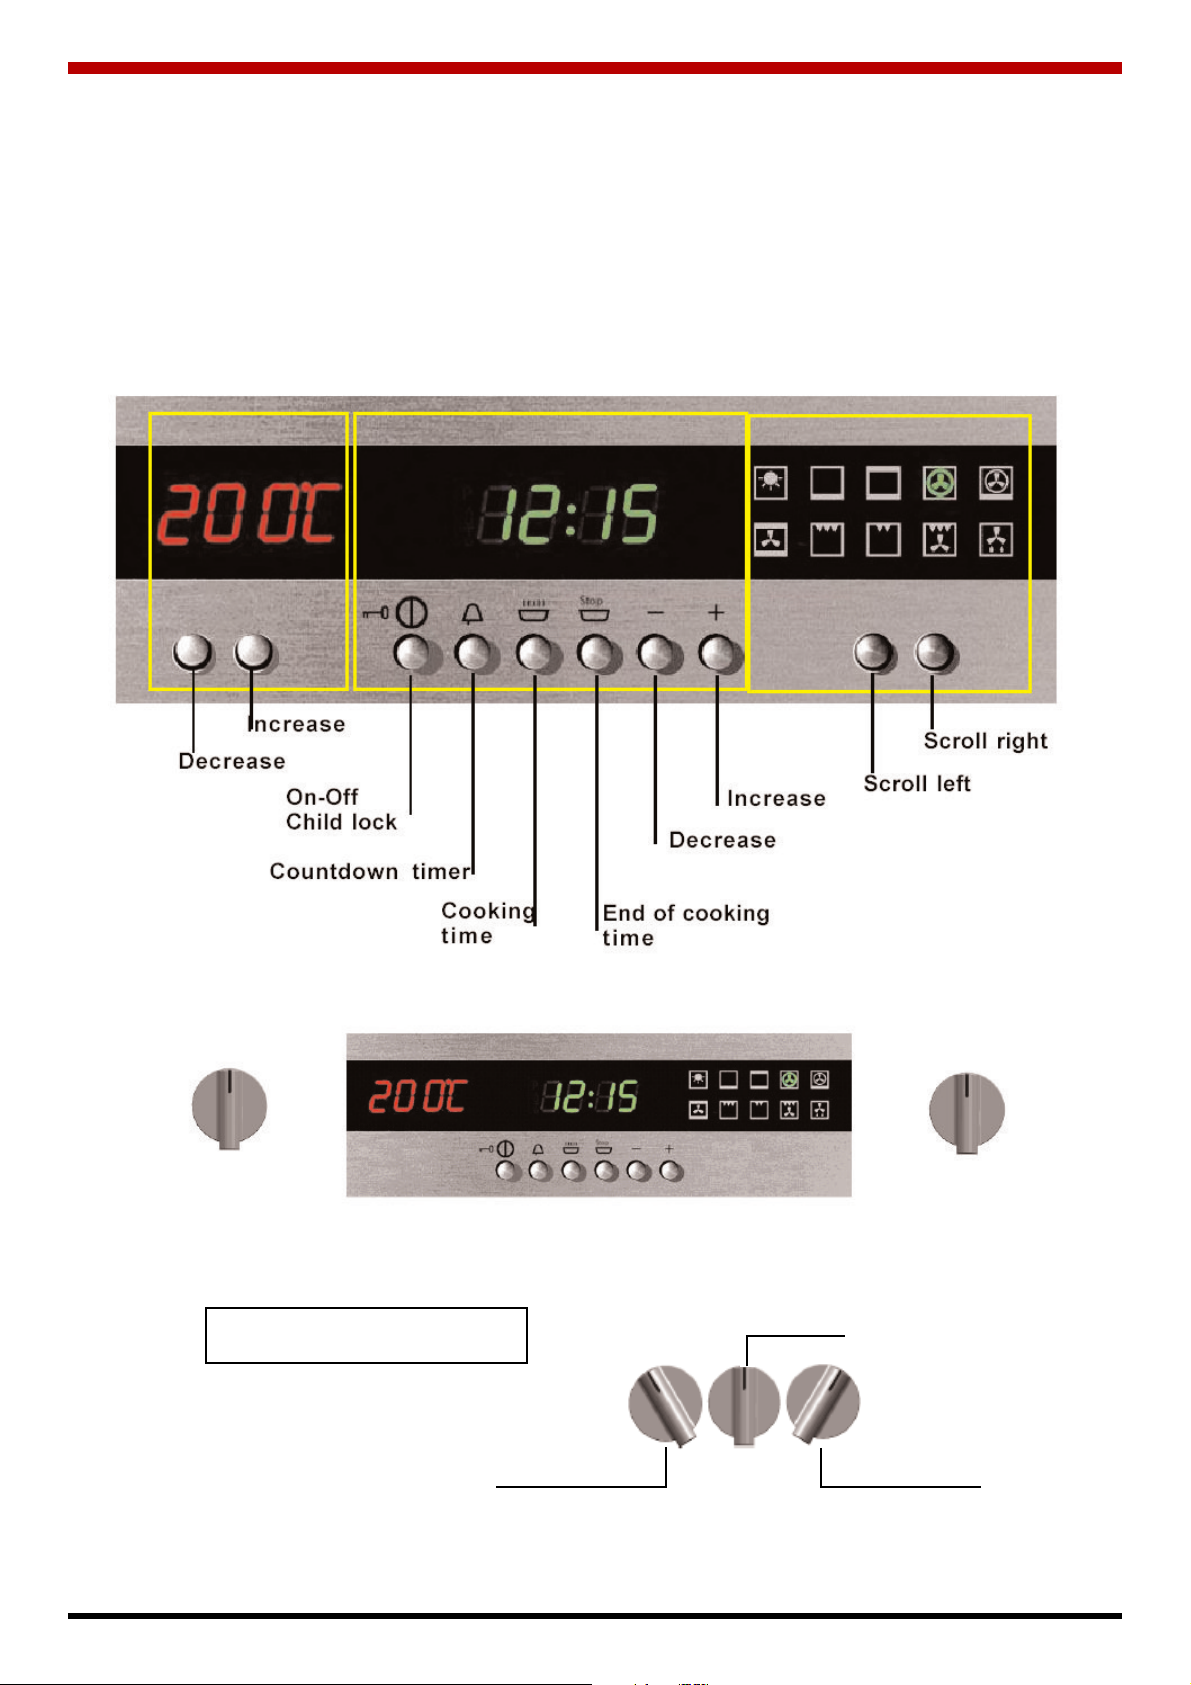
13. The Control Panel (Side Opening Fan Oven Model) . . . . . . . . . . . . . . . . . . . . . . . . . . . . . .5
14. The First Time Using The Oven . . . . . . . . . . . . . . . . . . . . . . . . . . . . . . . . . . . . . . . . . . . . . .6
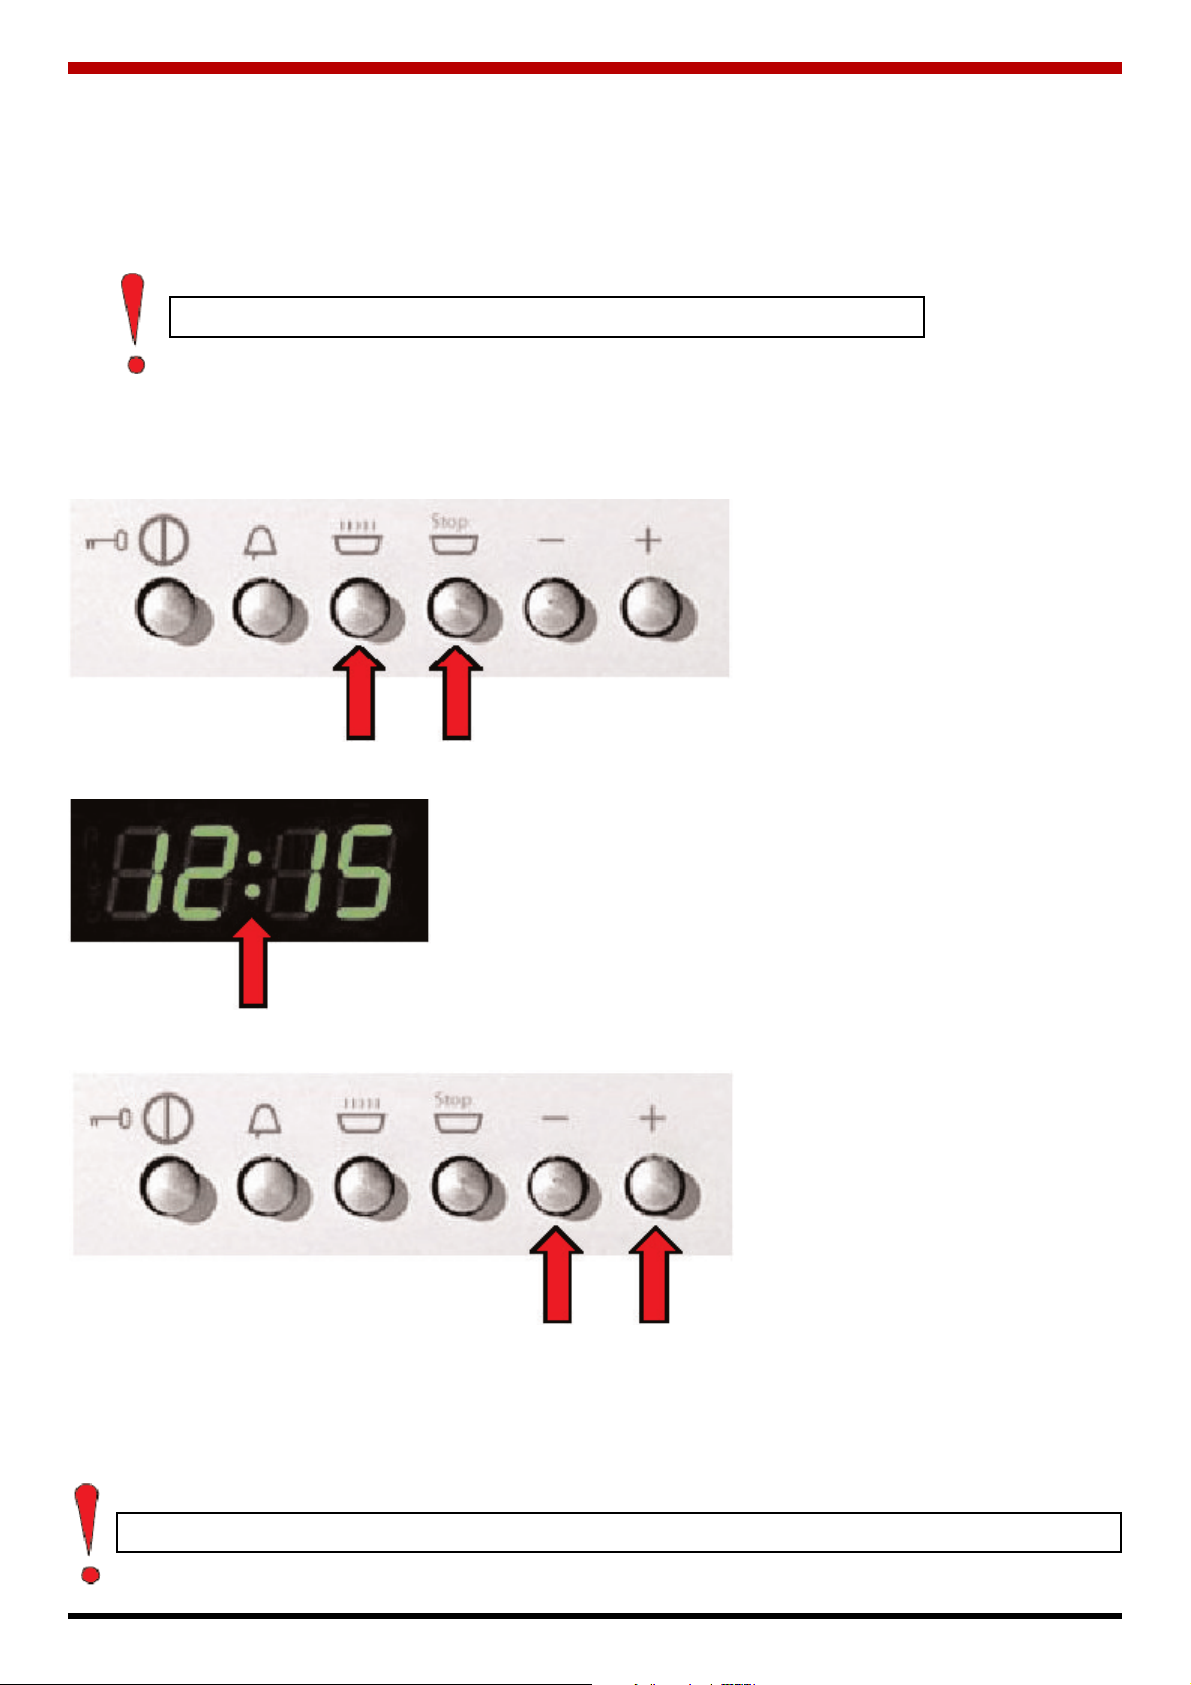
Setting The Clock . . . . . . . . . . . . . . . . . . . . . . . . . . . . . . . . . . . . . . . . . . . . . . . . . . . . . . .6
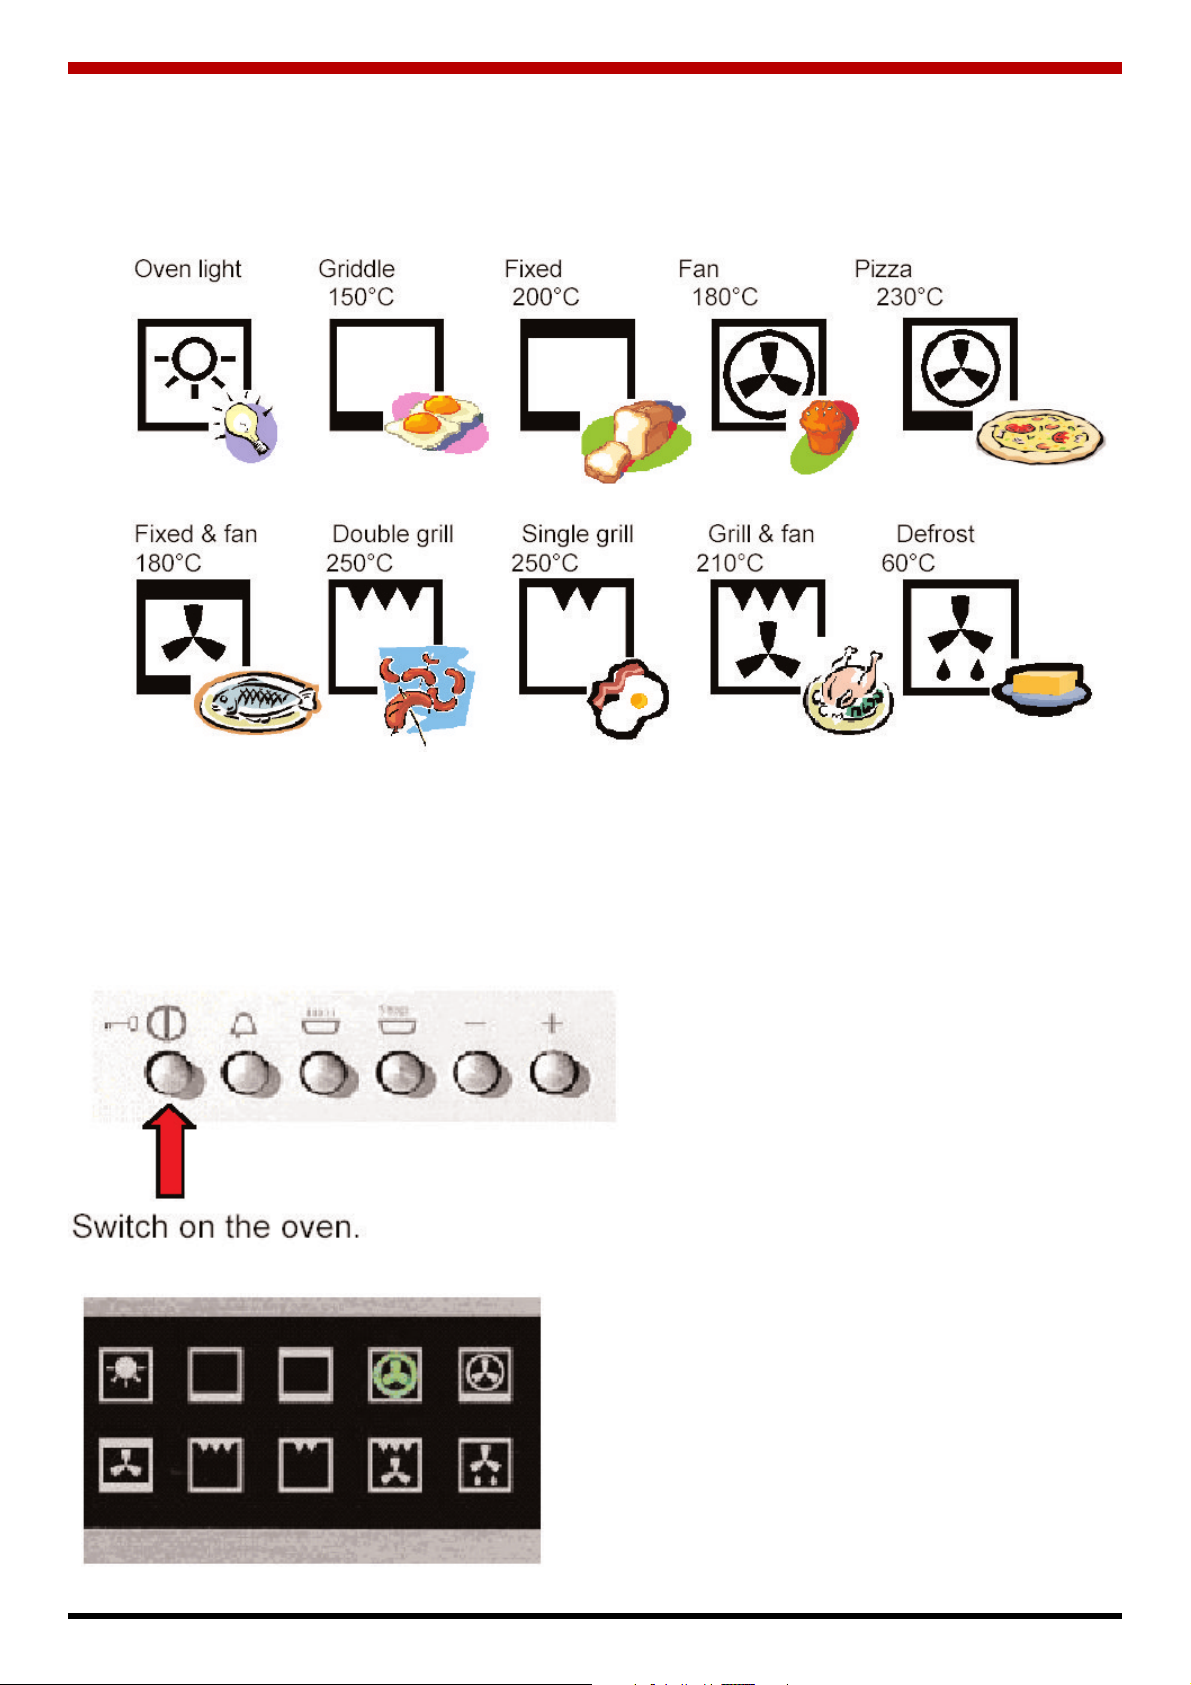
Cooking Functions . . . . . . . . . . . . . . . . . . . . . . . . . . . . . . . . . . . . . . . . . . . . . . . . . . . . . .7
Cooking . . . . . . . . . . . . . . . . . . . . . . . . . . . . . . . . . . . . . . . . . . . . . . . . . . . . . . . . . . . . . .7
Using The Oven Light . . . . . . . . . . . . . . . . . . . . . . . . . . . . . . . . . . . . . . . . . . . . . . . . . . . .8
Child Lock . . . . . . . . . . . . . . . . . . . . . . . . . . . . . . . . . . . . . . . . . . . . . . . . . . . . . . . . . . . . .8
Using Time Display . . . . . . . . . . . . . . . . . . . . . . . . . . . . . . . . . . . . . . . . . . . . . . . . . . . . . .9
Using Count Down Timer . . . . . . . . . . . . . . . . . . . . . . . . . . . . . . . . . . . . . . . . . . . . . . . . .9
Setting Cooking Time . . . . . . . . . . . . . . . . . . . . . . . . . . . . . . . . . . . . . . . . . . . . . . . . . . . .10
Setting End of Cooking Time . . . . . . . . . . . . . . . . . . . . . . . . . . . . . . . . . . . . . . . . . . . . . .11
Setting Cooking Start & End Time . . . . . . . . . . . . . . . . . . . . . . . . . . . . . . . . . . . . . . . . . .12
15. Single & Double Fan Oven Models . . . . . . . . . . . . . . . . . . . . . . . . . . . . . . . . . . . . . . . . . . .14
16. 6 Key Electronic Timer . . . . . . . . . . . . . . . . . . . . . . . . . . . . . . . . . . . . . . . . . . . . . . . . . . . . .14
17. Manual Operation . . . . . . . . . . . . . . . . . . . . . . . . . . . . . . . . . . . . . . . . . . . . . . . . . . . . . . . . .14
18. Setting Only The Duration of Cooking in Semi-Automatic Mode . . . . . . . . . . . . . . . . . . . . .14
19. Setting Only The End of Cooking Time In Semi-Automatic Mode . . . . . . . . . . . . . . . . . . . .14
20. Fully Automatic Operation . . . . . . . . . . . . . . . . . . . . . . . . . . . . . . . . . . . . . . . . . . . . . . . . . .14
21. Alarm Timer . . . . . . . . . . . . . . . . . . . . . . . . . . . . . . . . . . . . . . . . . . . . . . . . . . . . . . . . . . . . .14
22. Programming Errors . . . . . . . . . . . . . . . . . . . . . . . . . . . . . . . . . . . . . . . . . . . . . . . . . . . . . . .14
23. Cancelling a Cooking Programme . . . . . . . . . . . . . . . . . . . . . . . . . . . . . . . . . . . . . . . . . . . .14
24. Replacing The Oven Light . . . . . . . . . . . . . . . . . . . . . . . . . . . . . . . . . . . . . . . . . . . . . . . . . .14
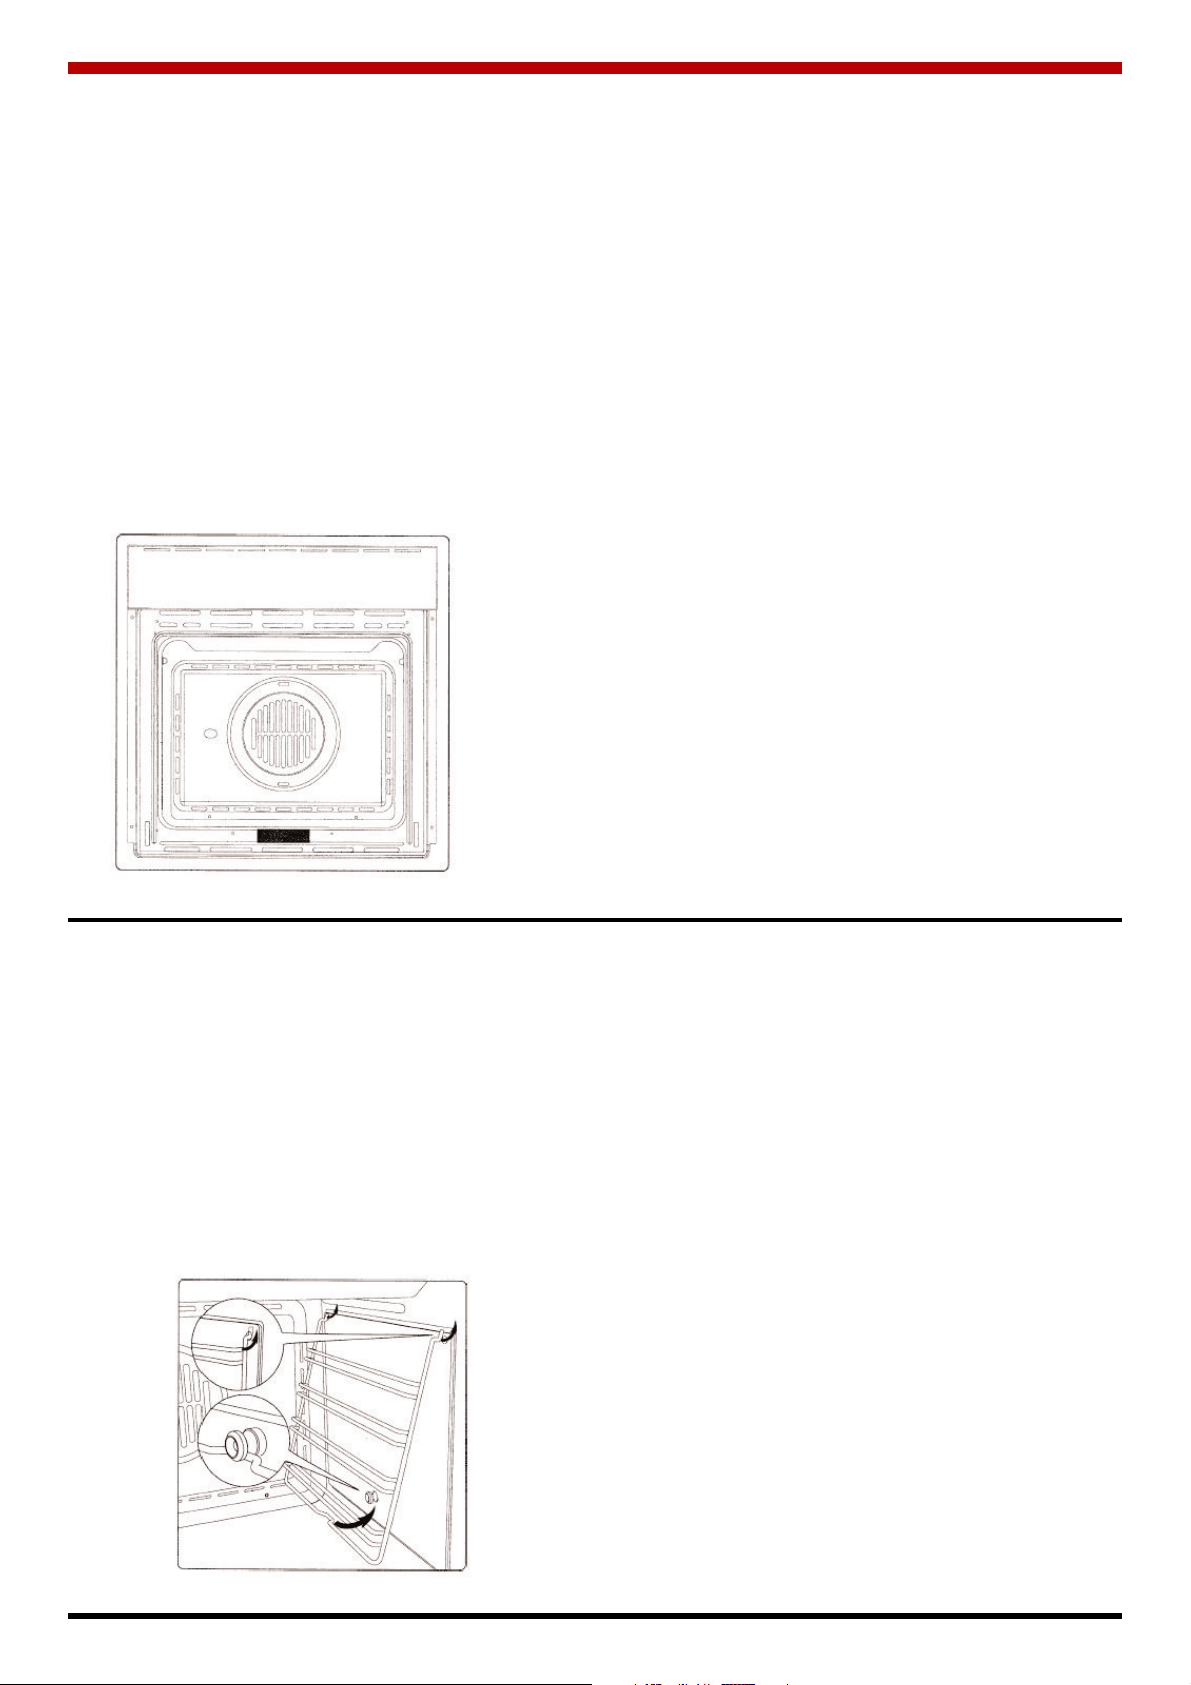
25. Side Door Opening Fan Oven . . . . . . . . . . . . . . . . . . . . . . . . . . . . . . . . . . . . . . . . . . . . . . .15
26. Rotating The Oven Door . . . . . . . . . . . . . . . . . . . . . . . . . . . . . . . . . . . . . . . . . . . . . . . . . . .15
27. Drop Down Door Opening Fan Oven . . . . . . . . . . . . . . . . . . . . . . . . . . . . . . . . . . . . . . . . . .15
28. Removing The Oven Door . . . . . . . . . . . . . . . . . . . . . . . . . . . . . . . . . . . . . . . . . . . . . . . . . .16
29. Installation Instructions . . . . . . . . . . . . . . . . . . . . . . . . . . . . . . . . . . . . . . . . . . . . . . . . . . . . .16
30. Gas or Electrical Connections . . . . . . . . . . . . . . . . . . . . . . . . . . . . . . . . . . . . . . . . . . . . . . .17
31. Electrical Connections . . . . . . . . . . . . . . . . . . . . . . . . . . . . . . . . . . . . . . . . . . . . . . . . . . . . .17
1

INTRODUCTION
Dear Customer, We thank you and congratulate you on your choice. This new carefully designed product,
manufactured with the highest quality materials, has been carefully tested to satisfy all your cooking
demands.
We would therefore request you to read and follow these easy instructions which will allow you to obtain
excellent results right from the start.
THE MANUFACTURER
IMPORTANT The oven’s data plate is accessible even with the oven fully installed. The plate is visible sim-
ply by opening the door. Always quote the details from it to identify the appliance when ordering spare
parts.
Fig.1
2
THE FIRST TIME USING THE OVEN
Clean the oven thoroughly with soapy water and
rinse well. To remove the lateral frames from
smooth-walled ovens, proceed as shown in the
Fig.2.
Operate the oven for about 30 minutes at maximum
temperature to burn off all traces of grease which
might otherwise create unpleasant smells when
cooking.
Fig.2
Important:
As a safety precaution, before cleaning the oven,
always disconnect the plug from the power socket
or the power cable from the
oven. Do not use acid or alkaline substances to
clean the oven (lemon juice, vinegar, salt, tomatoes
etc.). Do not use chlorine based
products, acids or abrasive products to clean the
painted surfaces of the oven.

Fig.3
RESPECT FOR THE ENVIRONMENT
The documentation provided with this oven has
been printed on chlorine free bleached paper or
recycled paper to show respect for the environ-
ment.
The packaging has also been designed to avoid
environmental impact. Packaging material is eco-
logical and can be re-used or recycled. By recy-
cling the packaging, you will help save raw materi-
als as well as reducing the bulk of domestic and
industrial waste.
CONTROL PANEL FUNCTIONS
Circular heating element with fan.
Thermostat setting from 50°C to MAX.
Fan for defrosting. Thermostat setting at
0°C.
Bottom heating element with fan.
Thermostat setting from 50°C to MAX.
Double top heating element with fan (large
area grill). Thermostat setting from 50°C to
200°C.
Double top heating element (large area
grill). Thermostat setting from 50°C to
200°C
Fig.4
3
Top heating element (small, low power
grill). Thermostat setting from 50°C to
200°C.
Bottom heating element + Circular
heating element with fan. Thermostat
setting from 50°C to MAX.
INSTRUCTIONS FOR USE
CONVENTIONAL COOKING
Conventional cooking uses top and bottom heat to
cook a single dish.
Place the food in the oven only once cooking tem-
perature has been reached, i.e. when the heating
indicator goes out.
If you want to increase top or bottom temperature
towards the end of the cooking cycle, set the tem-
perature control to the right position.It is advisable
to open the oven door as little as possible during
cooking.
FAN COOKING
For this type of cooking a fan positioned at the back
allows the circulation of hot air inside the oven, cre-
ating uniform heat. In this way cooking is more
rapid than conventional cooking. It is a suitable
method for cooking dishes on more than one shelf,
especially when the food is of different types (fish,
meat etc.)
DEFROSTING
By selecting one of the fan cooking functions and
setting the thermostat to zero, the fan allows cold
air to circulate inside the oven. In this way frozen
food can be rapidly defrosted.
Fig.5

It is not essential to preheat the oven, but you are
advised to do so when cooking pastries.
Fig.6
GRILL COOKING
Use the grill to grill or brown foods. Some ovens
may be equipped with an electric motor, spit and
skewers for turning on the spit. Place the shelf with
the food to be cooked in the 1st or 2nd position
from the top.
Pre-heat the oven for 5 minutes. Turn the thermo-
stat to a temperature between 50° and 200°.
4
Fig.7
COOLING FAN
The fan is positioned on the upper part of the oven
and create a circle of cooling air
on the inside of the furniture and through the door
of the oven.
It is turned on when the temperature of the outer
shell of the oven reaches 60°C. By switching on
the oven with the thermostat at 200°C the fan starts
working after approx.10 min. It is turned off when
the temperature of the outer shell of the oven
descends under 60°C. By switching off the oven
with the thermostat at 200°C the fan stops working
after approx. 30 min.
THERMOSTAT
Use the thermostat to set the
cooking temperature you need.
The thermostat can be adjusted
from 50° to 250° C.

Temperature display Time display Cooking functions
5
Functions on knob control
versions
Decrease/Scroll Left Increase/Scroll Right
Rest Position
THE CONTROL PANEL (SIDE OPENING FAN OVEN MODEL)
The panel shown here is purely indicative and may not be identical to the panel on the oven you have
purchased.
Depending on the model of oven you have purchased, the cooking functions and temperature functions may
be controlled by knobs instead of keys. The functions themselves are the same for keyboard and knob con-
trol ovens.

THE FIRST TIME USING THE OVEN
Three zeros flash on the display the first time you connect the oven to the mains electricity supply,
and every time power returns after a power failure. This warns you that you must set the time on
the clock before you can select any cooking function.
You must set the time on the clock before you can use the oven
• Setting the clock
Press the two keys shown below simultaneously to enter clock mode.
The two dots separating the hours and minutes flash to show you are in clock mode.
Press the + or - keys to increase or decrease the time.
After a few seconds the controller sets the time currently displayed and the two dots stop flashing.
6
Use one of the cooking functions to burn off any manufacturing residues from the heating elements and
oven walls before actually using the oven to cook food.
Important! If you change the time setting, you reset the timer and cancel all cooking settings.

• Cooking functions
For each cooking function, your new oven’s electronic controller suggests a default cooking temperature.
This is based on our own experience in obtaining the best results. You can nevertheless change the default
value to suit your own requirements.
The food types shown are purely indicative of the sort of meal you can prepare with that function. To dis-
cover the tremendous versatility of this oven, feel free to experiment with all the functions on the basis of
your own cooking experience.
7
• Cooking
You can start cooking in just a few simple moves.
Choose which cooking function you want to use.

Change the default temperature if you wish, or just wait 4 seconds
to accept the default temperature.
After 4 seconds the electronic controller automatically switches on the oven. The
degrees centigrade symbol flashes to show that the oven is warming up.
The cooking time symbol appears on
the display to show that the oven is
working.
The oven beeps and the degrees centigrade symbol stops flashing when the oven reaches the set temper-
ature. You can now put in the food you want to cook.
Important! The oven switches itself off automatically if you do not select a cooking function
within 8 seconds of switching the oven on. If this occurs, the time display reads “OFF” and
the oven beeps to tell you that it has switched off.
8
• Using the oven light
The oven is equipped with an intelligent light control to reduce electricity consumption.
The light stays on while the oven is warming up and for 3 minutes after set temperature is reached, and
then switches off.
Press any key to check on the food in the oven. The light comes on for another 3
minutes.
• Child lock
Your new electronic oven has a child lock function to prevent young children from
tampering with it or accidentally switching it on. You can activate the child lock at any
time, even when the oven is switched off.
Activating the child lock
Press and hold the “On/Off” key for at
least 3 seconds.

The time display shows
followed by
The electronic controller is now disabled. All you can do with the controls is switch the oven off (if it is on)
or use the countdown timer.
Countdown timer Off
Off
If you press any other key, a key symbol appears on the time display or temperature display to inform you
that the child lock is active.
9
Important! You must deactivate the child lock before you can use the oven again.
Deactivating the child lock
Press and hold the “On/Off” key for at least 3
seconds.
The time display shows
followed by
• Using the time display
1. Using the countdown timer
The countdown timer works independently of all other timer functions, and can be used as a practical timer
with buzzer even when the oven is switched off.

The time display appears and the dots
separating the hours and minutes flash.
Use the “+” and “-” keys to set the
countdown period, then simply wait a few
seconds for the controller to start the
countdown.
Countdown timer key
10
The normal time display returns with
the countdown symbol to show that
the countdown is running.
At the end of the countdown time the oven beeps twice at an interval of two seconds and the countdown
symbol flashes. Press any key to silence the buzzer.
The oven beeps three times and the countdown symbol disappears.
2. Setting cooking time
Use the cooking time function to set the duration of cooking starting from the
present time. You must select a cooking function before you can set cooking time
(see the “Cooking” section).
Oven active: a cooking function has
been selected.
Press this key to set
cooking time.
The time display appears and the dots
separating the hours and minutes flash. Use
the “+” and “-” keys to set cooking time, then
simply wait a few seconds for the controller to
start timing the cooking period.

3. Setting end of cooking time
Use the end of cooking time function to set the time at which you want cooking to finish. You must select a
cooking function before you can set end of cooking time (see the “Cooking” section).
The normal time display returns with the
autotimer cooking symbol to show that the
oven is working.
At the end of the cooking time the oven beeps twice at an interval of two seconds and the symbols flash.
Then the temperature display, the time display and the heating elements switch off.
Press any key to silence the buzzer. The oven beeps three times and the symbols disappear.
If you select no other functions within 8 seconds from silencing the
buzzer, the oven automatically switches off.
Oven active: a cooking function has
been selected.
Press this key to set end of
cooking time.
11
The time display appears and the dots
separating the hours and minutes flash. Note
that you must set a time different from the
present time!
Use the “+” and “-” keys to set end of cooking
time, then simply wait a few seconds for the
controller to register it.

At the end of cooking time the oven beeps twice at an interval of two seconds and the symbols flash. Then
the temperature display, the time display and the heating elements switch off.
Press any key to silence the buzzer. The oven beeps three times and the symbols disappear.
The normal time display returns with the autotimer cooking symbol to show that the oven is working.
The normal time display returns with the
autotimer cooking symbol to show that
the oven is working.
If you select no other functions within 8 seconds from silencing the
buzzer, the oven automatically switches off.
12
4. Setting cooking start and end times
You can combine the cooking time and end of cooking time functions to set the start and end times for
cooking. In this way you can program your electronic oven to cook while you are out or to defrost foods
ready for you to cook when you get back. A great help in the kitchen!
The order in which you set the two
functions is not important.
Place the dish in the oven and select the
cooking function you want (Grill + fan
shown by way of example only). Adjust the
default temperature as required.
Set a cooking time of 30 minutes.
Set the cooking time (see section 2. Setting cooking time).
Example: We want to start cooking a dish 30 minutes before we get home so that it will be ready for us
when we do.

Before you set end of cooking time, note
the present time.
When you set end of cooking time, the
timer display present time plus cooking
time by default.
Use the “+” key to set a time e.g. 10
minutes later. The timer registers this time
after a few seconds. The display switches
off and the oven enters stand-by mode.
The present time is displayed.
At 12:25, the oven switches on in Grill +
fan mode for 30 minutes, and switches off
at 12.55 according to our time settings.
Hint! This is a good time to activate the child lock to prevent young
children from tampering with or accidentally switching on the oven.
13

MANUAL OPERATION
To start cooking without setting end of cooking
time, press the manual key .
SETTING ONLY THE DURATION OF COOKING
IN SEMI-AUTOMATIC MODE
To set the duration of cooking, press the duration
key and press the +/- keys to set the duration of
cooking. A buzzer sounds when the cooking period
finishes, and the oven switches itself off. Turn the
thermostat and selector knobs back to 0 position
and press the manual key.
SETTING ONLY THE END OF COOKING TIME IN
SEMI-AUTOMATIC MODE
To set the end of cooking time, press the end of
cooking key and press the +/- keys to set the
time at which you want the oven to switch off. A
buzzer sounds when the clock oven switches itself
off. Turn the thermostat and selector knobs back to
0 position and press the manual key.
FULLY AUTOMATIC OPERATION
To set the end of cooking time, press the duration
key and press the +/- keys to set the duration
and press the +/- keys to set the time at which you
want the oven to switch off.
When you finish setting these times, the AUTO
symbol flashes and the buzzer sounds. Press any
key to silence it.
of cooking. Press the end of cooking key
ALARM TIMER
Press the alarm timer key and press the +/- keys to
set the required duration of cooking. The buzzer
sounds when the cooking time ends. Press any key
to silence it.
PROGRAMMING ERRORS
You cannot program in a cooking period which
starts earlier than the time displayed on the clock.
If you try to do so, the buzzer sounds and the AUTO
symbol flasher. Simply change the duration or
cooking time to correct the error.
CANCELLING A COOKING PROGRAMME
To cancel a cooking programme, simply press
the manual key.
REPLACING THE OVEN LIGHT
IMPORTANT:
The oven light must have these precise fea-
tures:
a) it must be able to resist high temperatures
(up to 300°C)
b) power supply: see V/Hz indicated on data
plate.
c) power 25W.
d) E 14 connection.
Before proceeding, disconnect the appliance
from the main electricity supply.
-to prevent damage, place a tea cloth in the
oven
- unscrew the glass cover of the light
- unscrew the old light bulb and replace it with
the new one
- put back the glass cover and remove the tea
cloth
- connect the appliance to the main electricity
supply.
Fig.9
14
6 KEY ELECTRONIC TIMER
Setting the clock
Press the duration
key simultaneously, then press the +/- keys to
key and the end of cooking
set the time.
SINGLE & DOUBLE FAN OVEN MODELS

ROTATING THE OVEN DOOR
1. Adjustment stop at 140°.
2. if you would like the door to open to
the left, it must be rotated before positioning
the appliance in the oven recess.
3. Fully open the door.
4. Remove the four fixing screws from the door
hinge.
5. Remove the four plastic caps from the
opposite side and unscrew the locking pin.
6. Turn the door 180°.
7. Secure the door in its new position using
the 4 screws removed previously.
8. Fix the oven in the oven recess using the
4 screws and the plastic spacers provided.
9. Screw in the locking pin and secure it in
horizontal position as shown in the figure,
then replace the 4 plastic caps.
15
SIDE DOOR OPENING FAN OVEN

Fig 10
Fig 10a
INSTALLATION INSTRUCTIONS
Flush fitting
Single oven see Fig. 11 & 11a.
Double oven see Fig.12.
The oven can be installed under a work top or in a
cooking column. Make sure that surrounding mate-
rials are heat resistant. Align the oven centrally with
respect to the side walls of the units surrounding
it and fix it in place with the screws and Allen
screws provided.
Fig.11
Fig.11a
16
DROP DOWN DOOR OPENING FAN OVEN
REMOVING THE OVEN DOOR
The oven door can be removed quickly and easily.
To do so, proceed as follows:
-Open the door fully.
- the two levers shown in fig.10
- Close the door as far as the first stop (caused
by the raised levers).
- Lift the door upwards and outwards to remove
it from its mountings, see Fig. 10a
To replace fit the door, fit the hinges in their mount-
ings and lower the two levers.
Fig. 12

GAS OR ELECTRICAL CONNECTIONS
Fig.13
ELECTRICAL CONNECTIONS
Before connecting the oven to the mains power
supply, make sure that:
- The supply voltage corresponds to the specifi-
cations on the data plate on the front of the
oven.
- The mains supply has an efficient earth
(ground) connection complying with all applica-
ble laws and regulations. Correct earthing
(grounding) is a legal requirement. If the appli-
ance is not pre-fitted with a power cable and/or
plug, use only suitable cables and plugs capa-
ble of handling the power specified on the
appliance’s data plate and capable of resisting
heat. The power cable should never reach a
temperature 50° C above ambient temperature
at any point along its length. If the appliance
* CABLE TYPES AND DIAMETERS 230V
H05RRF 3 x 1,5 mm2
Fig.14
is to be connected directly to mains terminals,
fit a switch with minimum aperture of 3 mm
between the contacts. make sure that the
switch is of sufficient capacity for the power
specified on the appliance’s data plate, and
compliant with applicable regulations. The
switch must not break the yellow-green earth
wire. The socket or switch must be easily
reachable with the oven fully installed.
N.B. The manufacturer declines all responsibil-
ity for damage or injury if the above instruc-
tions and normal safety precautions are not
respected.
Fig.15
The manufacturer declines all responsibility for possible inaccuracies contained in this pamphlet, due to print-
ing or copying errors. We reserve the right to make on our own products those changes to be considered nec-
essary or useful, without jeopardising the essential characteristics.
17

Rev: 001 DP 050707
Waterford Stanley Ltd.,
Bilberry, Waterford, Ireland.
Tel: +53 (051) 302300 Fax +53 (051) 302375
18
This manual suits for next models
2
Table of contents