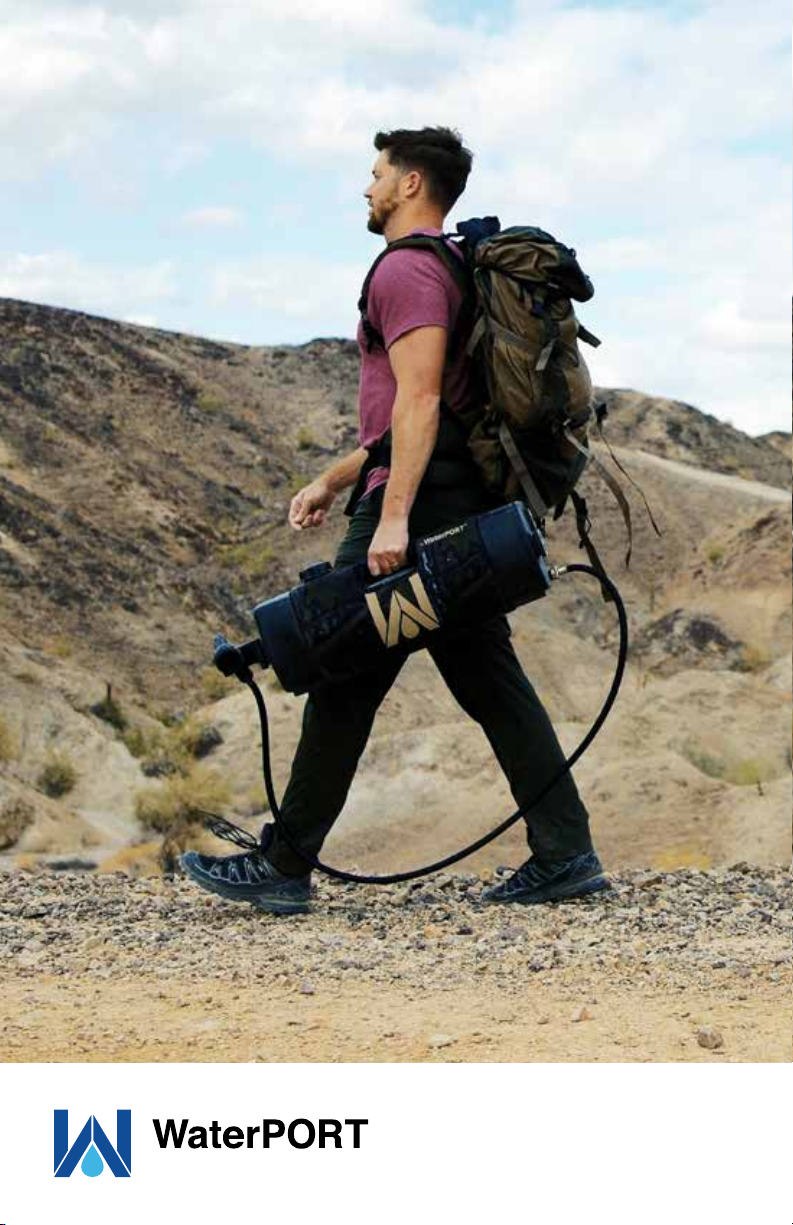
WaterPORT DAY TANK User manual

DAY TANK OWNER MANUAL
PORTABLE. PRESSURIZED. WATER.
PORTABLE. PRESSURIZED. WATER.

Shown with optional accessories. Please see www.thewaterport.com for more.
Congratulations! You now own a WaterPORT™ Day Tank™,
the world’s premiere self-pressurizing vehicle water release
system. With its rugged design, your Day Tank is sure to
last you a lifetime of adventure.

mounting options
Select mounting option
Bed Rail mount
A great location for those looking to keep
their tank protected from exterior elements.
Mounts to any standard bed rail.
Trailer hitch mount
This is our easiest and most accessible
mount location.
Fits any standard 2” Trailer Hitch
bar Mount
A great mounting option for those using
the Daytank as a shower.
Fits any 1-1.5” bar
Visit www.thewaterport.com for other
mounting options!
mounting instructions
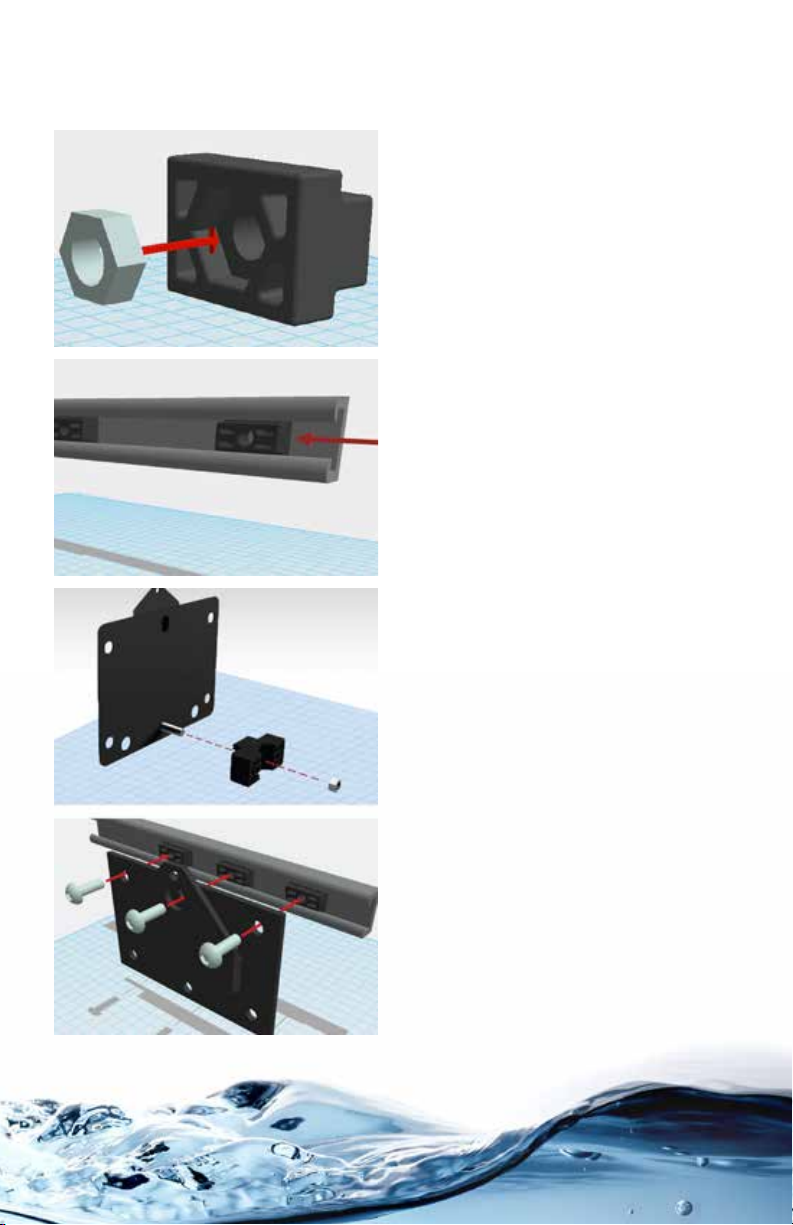
Bed rail mount
step 1
Prepare T-Nuts
Insert 5/16” jam nut (thin nut) into the
back of each T-slot nut.
step 2
insert into bed rail
Insert the T-slot nut into the bed rail by
sliding them into the front or back of
your bed rail. Make sure they are aligned
with the upper bolt holes on your
mounting bracket.
step 3
Attach Brace
Insert the 5/16” bolt through the bottom
center of your universal mount. Slide in the
5/16” lock nut into the center of the plastic
clamp. Tighten until the clamp is securely
fastened to the universal bracket.
Always lock your tank in the mount while driving. Slide a bolt or padlock through the
hole in the top of the mounting bracket to lock your tank in place.
step 4
mounting plate
Once aligned, thread bolts through.
Screw in all three 5/16” bolts into the
T-slot nuts. Fasten screws until the
mounting bracket is firmly attached to
your vehicle’s bed rails.

mounting instructions
trailer hitch mount
step 1
Attach bar AND bracket
Position the hitch bar over the center
holes of the mounting bracket.
step 2
lock into position
Fasten the hitch bar by using two 5/16”
bolts and two lock nuts.
step 3
insert into hitch
Insert the hitch bar into your standard
2” hitch receiver, ensuring the holes are
aligned for your cotter pin. Insert the
provided cotter pin through the receiver
hole, make sure clip is securely attached.
Always lock your tank in the mount while driving. Slide a bolt or padlock through the
hole in the top of the mounting bracket to lock your tank in place.
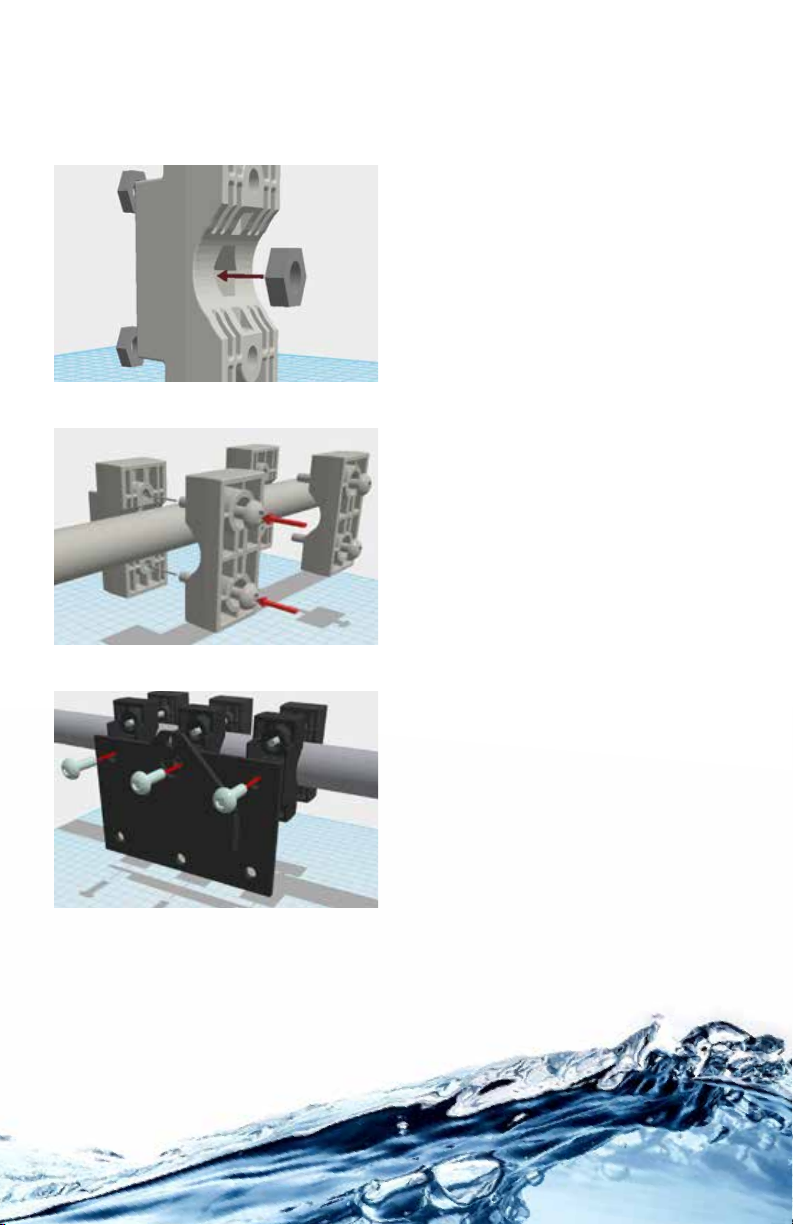
step 1
prepare clamps
Insert the 5/16” lock nut into the center of
Clamp A. Insert 1⁄4” nuts to both the top
and bottom holes of Clamp A.
step 2
Seat clamps on bar
Once all 3 clamps are securely fastened,
connect the mounting bracket to the
clamps using three 5/16” bolts.
step 3
mounting plate
Fasten clamp A and clamp B around the bar
using the long ¼” bolts. Before tightening,
check to confirm the bar clamps line up with
the 3 holes in the mounting bracket. Once
aligned, use the provided allen wrench to
tighten the clamps firmly to the bar.
mounting instructions
bar mount
Always lock your tank in the mount while driving. Slide a bolt or padlock through the
hole in the top of the mounting bracket to lock your tank in place.

mounting instructions
connecting tank to mount
Once you have selected your mounting location and securely fastened the Back
U-Bracket (1) to the Day Tank™, you will need to join both mounts by sliding the Day Tank
down onto the Universal Mounting Plate (2). To remove, lift your Day Tank upward and
slide the tank off of the mounting plate.
Always lock your tank in the mount while driving. Slide a bolt or padlock through the
hole in the top of the mounting bracket to lock your tank in place.
1
2

filling instructions
Quick connect filling
step 1
REGULAtor
Attach your regulator to your home’s
garden hose, making sure the valve is in
the OFF position.
WARNING: Do NOT connect the regulator
directly to the tank. Doing so will void
your warranty.
step 2
connect to tank
Attach your WaterPORT hose to your Day
Tank making sure you hear a click. Once
attached, make sure your Day Tank valve
is in the OFF position.
step 3
CLICK AND FILL
Insert your regulator into your Day Tank’s
hose, making sure you hear a click. Once
connected, turn your regulator and Day
Tank to the ON position. Once the tank
is done filling (approx. 60 seconds), turn
both on/off valves to the OFF position
and disconnect your garden hose and
your Day Tank’s hose. If you plan to use
your Day Tank right away leave your
WaterPORT hose attached.
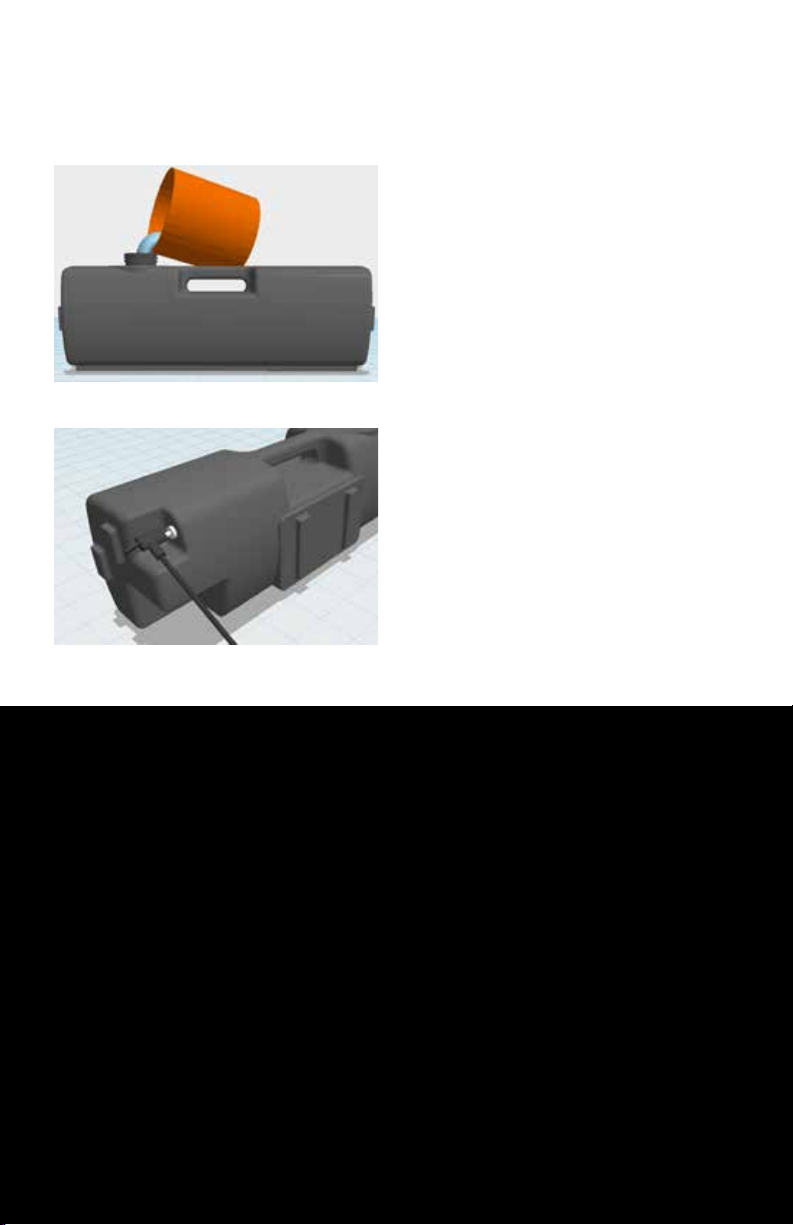
filling instructions
manually filling
step 1
fill with water
Remove large top cap and fill 85% of
the tank with water, leaving 15% air
for pressurization.
step 2
Re-pressurize
Re-pressurize using the schrader valve
located on the side of the tank. Pump air
into the tank using a compressor or
bike pump. Do not exceed 40 p.s.i.
And anything else that requires running water…
basic usage
what should I use it for?
Once you have chose your mounting location and securely fastened the mounting
bracket(1), you will need to join both mounts by sliding the WaterPORT™ Bracket(1) down
into the Mounting Bracket(2). To remove, lift your WaterPORT™ upward and slide the tank
out of the mounting bracket.
nRinsing Off Your Gear
nEmergency Water Source
nCleaning Your Camping Dishes
nShowering Off
nWashing Pets
nSurfing & Fishing


Why iS my tank not holding pressure?
Your Day Tank™ is designed to hold pressure for up to 3 months without use. If your
Day Tank has lost pressure it could be due to parts being loose. Make sure all parts are
securely fastened to the system. Hand tighten your 2 inch cap to insure that the O ring
has created an airtight seal. Make sure your on/off valve is tight and the valve remains in
the off position when not in use.
Why does my tank have low pressure after filling?
If your relief valve opens, it will release most of the tanks pressure. If this happens, you
will need to completely refill your tank. Empty your tank of all its water, then reconnect
the hose to fill and re-pressurize.
Why is my tank not spraying water when full?
First, check to see if your shut off valve is open. Second, make sure your tank is lying
horizontal and on a flat surface so that water is able to flow out the hose port.
Why does my water pressure only last 30 seconds
while spraying?
This is likely due to having left over water in the tank when refilling. In order for the tank
to fully pressurize, you need to completely empty the water out of the tank before
each refill.
How do I properly mount my tank to my Vehicle?
Visit thewaterport.com/videos to view our How-To videos
How do I lock my Day Tank to the vehicle mount?
While your tank is resting in the vehicle mount, locate the hole in the tip of the mounting
bracket, and slide a padlock through. The lock will block the tank from being removed.
Can I drive with my tank pressurized?
Yes, of course you can. It would defeat the point of the Day Tank if you couldn’t do that!
additional information
frequently asked questions

Add hot water:
To add hot water simply unscrew your 2” cap and add hot water from your home faucet.
Fasten the cap and re-pressurize the tank by using the schrader valve and a bike pump.
The Insulated tank will keep water hot up to 4 hours.
Keeping water cold for drinking:
The Day Tank’s 2” cap is large enough for ice fill. The insulated tank will keep ice up
to 4 hours.
Sunlight can be used as a heat source:
Place your tank in direct sunlight for 2-3 hours. Your tank’s water temperature will
increase by 10-15 degrees Fahrenheit.
Soap is your friend:
We recommend cleaning your system after every other use. To clean your system, add
a few drops of dish soap through the top cap. Next, flush your system with your garden
hose to be sure all soap has been removed. You may need to repeat the process to ensure
the tank has been fully sanitized.
Adding additional pressure:
Locate the schrader valve on the side of the tank. Attach a bike pump or compressor, and
pump air into the tank. Do not Exceed 40 PSI.
You can add any potable liquid:
Your Day Tank can handle any potable liquid. From water to sports drinks, you now have
the ultimate on board liquid dispensing system!
additional information
pro tips
Check out our accessories at www.theWaterPORT.com

additional information
warranty
Covered Product:
WaterPORT™ Portable Pressurized Water System and accessories.
Limitation of Damages:
In no event shall the manufacturer WaterPORT™, LLC, a California limited liability
company be liable for consequential damages for breach of this warranty. Some States
do not allow the exclusion or limitation of incidental or consequential damages, so the
above limitation or exclusion may not apply to the buyer.
Warranty Coverage:
WaterPORT™, LLC warrants the Covered Product to be free of all defects in material and
workmanship for 90 days from the date of original purchase. This warranty extends to
the original buyer only.
Within the period of this warranty, WaterPORT™, LLC will repair or replace, free of
charge, any part proving defective in material or workmanship. All warranty repairs and
service must be performed by an authorized WaterPORT™, LLC technician.
All expenses related to replacing or repairing a defective part under this warranty shall
be assumed by WaterPORT™, LLC except for the following expenses, which shall be
assumed by the buyer: The cost of transporting the product to the WaterPORT™ Returns
Department at the address listed below.
Warranty Exclusions:
nThis warranty does not apply to any costs, repairs, or services for the following:
nThis warranty does not apply to any costs, repairs, or services for the following:
nRepairs necessitated by use other than normal personal, family, or household use.
nDamage resulting from misuse, abuse, accidents, alterations, or improper installation.
nDamage arising from either road hazards or driving off road.
nCosmetic damages including, but not limited to, scratches or discoloration.
nDamage arising from liquids other than water.
nDamage arising from high temperatures.
Corrective work necessitated by repairs made by anyone other than a WaterPORT™, LLC
authorized service technician.

additional information
warranty
How To Obtain Warranty Service:
If the Covered Product needs to be returned, please email sales@thewaterport.com to
request an RMA number.
The buyer should then carefully pack the Covered Product, preferably in the original
packing materials, and deliver it, together with a copy of the original purchase receipt
and a description of the problem, to the following:
WaterPORT
935 Poinsettia Ave, Unit 205
Vista, CA 92081
Attn: WaterPORT Returns Department RMAXXXXXX
IMPORTANT: Please include a return address
Shipping Methods:
For your records, please select a tracked shipping method such as UPS, FedEx, or USPS to
monitor the shipment of the Covered Product to the WaterPORT™ Returns Department.
We recommend that the buyer insure the product being shipped. We accept no liability
for Covered Products lost or misplaced in shipment.
30 Day Money Back Guarantee:
This warranty is in addition to the 30 day money back guarantee.
Notice to Buyer:
This warranty gives you specific legal rights, and you may also have other rights which
vary from state to state. You have the right to bring any action at law or equity to resolve
disputes concerning or to enforce the provisions of this warranty.

www.theWaterPORT.com
Copyright © 2021 WaterPORT. All Rights Reserved.
Rev. WPB210623
Table of contents
Popular Water Heater manuals by other brands


Vaillant
Vaillant VC 156/5-7 operating instructions

State Water Heaters
State Water Heaters SBL85275NEA Service handbook

HARVER
HARVER CN75L-4kw instruction manual

Bradford White
Bradford White PDX1-40S6FBN Installation and operating instruction manual

SKYLUXE
SKYLUXE ONIX 11L GLP Owners and installation manual

ESP
ESP Ecocent 100L Installation and operation manual