Watkiss P2T User manual

Watkiss P2T 2-Knife Trimmer
User Manual
English, Issue 1a, October 2016

© Watkiss Automation Limited 2016
All Rights Reserved.
Reproduction, adaptation, or translation without prior written permission is prohibited, except as
allowed under the copyright laws.
Warranty
The information contained in this document is subject to change without notice. Watkiss Automa-
tion Limited makes no warranty of any kind with regard to this material, including, but not limited to,
the implied warranties of merchantability and fitness for a particular purpose.
Watkiss Automation Limited shall not be liable for errors contained herein or for incidental or con-
sequential damage in connection with the furnishing, performance or use of this material.

Watkiss P2T 2-Knife Trimmer User Manual i
1. Introduction to the Watkiss P2T 2-Knife Trimmer . . . . . 1
Description of the Side-Trimmer . . . . . . . . . . . . . . . . . . . . . . . 2
2. How to use the Side-Trimmer . . . . . . . . . . . . . . . . . . . . . . 5
Introduction . . . . . . . . . . . . . . . . . . . . . . . . . . . . . . . . . . . . . . . 5
Turn On the Side-Trimmer . . . . . . . . . . . . . . . . . . . . . . . . . . . . 5
Enter the Job Settings . . . . . . . . . . . . . . . . . . . . . . . . . . . . . . . 5
Adjust the Stacker . . . . . . . . . . . . . . . . . . . . . . . . . . . . . . . . . . 6
During the job . . . . . . . . . . . . . . . . . . . . . . . . . . . . . . . . . . . . . . 6
3. The User Interface . . . . . . . . . . . . . . . . . . . . . . . . . . . . . . . 7
The Job Mimic . . . . . . . . . . . . . . . . . . . . . . . . . . . . . . . . . . . . . 8
The BASIC Window . . . . . . . . . . . . . . . . . . . . . . . . . . . . . . . . . 9
The CONFIGURE Window . . . . . . . . . . . . . . . . . . . . . . . . . . . 10
4. Standard Tasks . . . . . . . . . . . . . . . . . . . . . . . . . . . . . . . . 11
Introduction . . . . . . . . . . . . . . . . . . . . . . . . . . . . . . . . . . . . . . 11
Adjust the Side-Trim Offset . . . . . . . . . . . . . . . . . . . . . . . . . . 11
Empty the Side-Trim Bin . . . . . . . . . . . . . . . . . . . . . . . . . . . . 13
Adjust the Side-Trimmer Stacker . . . . . . . . . . . . . . . . . . . . . . 14
Raise and Lower the Side-Trimmer Stacker . . . . . . . . . . . . . 15
Move the Side-Trimmer . . . . . . . . . . . . . . . . . . . . . . . . . . . . . 16
Remove and re-fit the Side-Trimmer Book Supports . . . . . . . 17
5. Error Conditions, Problems and Solutions . . . . . . . . . . 25
Side-Trimmer Error . . . . . . . . . . . . . . . . . . . . . . . . . . . . . . . . 25
Quality Problems . . . . . . . . . . . . . . . . . . . . . . . . . . . . . . . . . . 25
Side-Trimmer Message List . . . . . . . . . . . . . . . . . . . . . . . . . . 30
Paper Jams . . . . . . . . . . . . . . . . . . . . . . . . . . . . . . . . . . . . . . 33
Change the Fuses - Side-Trimmer . . . . . . . . . . . . . . . . . . . . . 33
Table of Contents
continued . . .
User Manual for Watkiss P2T 2-Knife Trimmer
English, Issue 1a, October 2016. Watkiss Part No. 960-971

ii Watkiss P2T 2-Knife Trimmer User Manual
6. Maintenance . . . . . . . . . . . . . . . . . . . . . . . . . . . . . . . . . . . 35
Service Maintenance . . . . . . . . . . . . . . . . . . . . . . . . . . . . . . . 35
Operator Maintenance . . . . . . . . . . . . . . . . . . . . . . . . . . . . . . 35
7. Specifications . . . . . . . . . . . . . . . . . . . . . . . . . . . . . . . . . 37
8. Declaration of Conformity . . . . . . . . . . . . . . . . . . . . . . . 39

Watkiss P2T 2-Knife Trimmer User Manual 1
CHAPTER 1 Introduction to the Watkiss
P2T 2-Knife Trimmer
Thank you for choosing the Watkiss P2T 2-Knife Trimmer.
Your Manual
This User Manual describes how to do these tasks.
• Operate the P2T 2-Knife Trimmer
• Find and correct error conditions
• Do normal maintenance tasks
Operator training is given when the machine is installed. To make sure you use
your machine correctly, read your manual.
This User Manual does not describe the operation of the booklet maker. If
needed, refer to your booklet maker user manual.
In this manual the ‘P2T Two Knife Trimmer’ is referred to as the ‘Side-Trimmer’.
Safety Information
Safety information is included in the separate “Safety Information Manual”.
Read the safety information before you use your PowerSquare.
Warning and Caution Messages
The warning and caution messages used in this manual are shown below.
WARNING: A WARNING message tells you that a procedure or operation
can be dangerous. To prevent injury, you must follow the instructions.
CAUTION: A CAUTION message tells you that a procedure or operation
can damage the machine or the product. To prevent damage, you must fol-
low the instructions.
1 - Introduction to the Watkiss P2T 2-Knife Trimmer - Description of the Side-Trimmer
2Watkiss P2T 2-Knife Trimmer User Manual
Installation
Your Side-Trimmer must be installed by a Watkiss approved service engineer.
Special knowledge is needed to install the machine.
CAUTION: Only connect the machine to a mains power supply of the cor-
rect voltage with a good earth-connection. The correct machine-voltage is
shown on the label at the mains power supply input on the rear of the
machine. If the machine is connected to the wrong supply, the warranty is
cancelled.
How to Get Help
If you have any questions or problems, refer to the problem solving section in
this manual (see “Error Conditions, Problems and Solutions” on page 25). Con-
tact your supplier for further help.
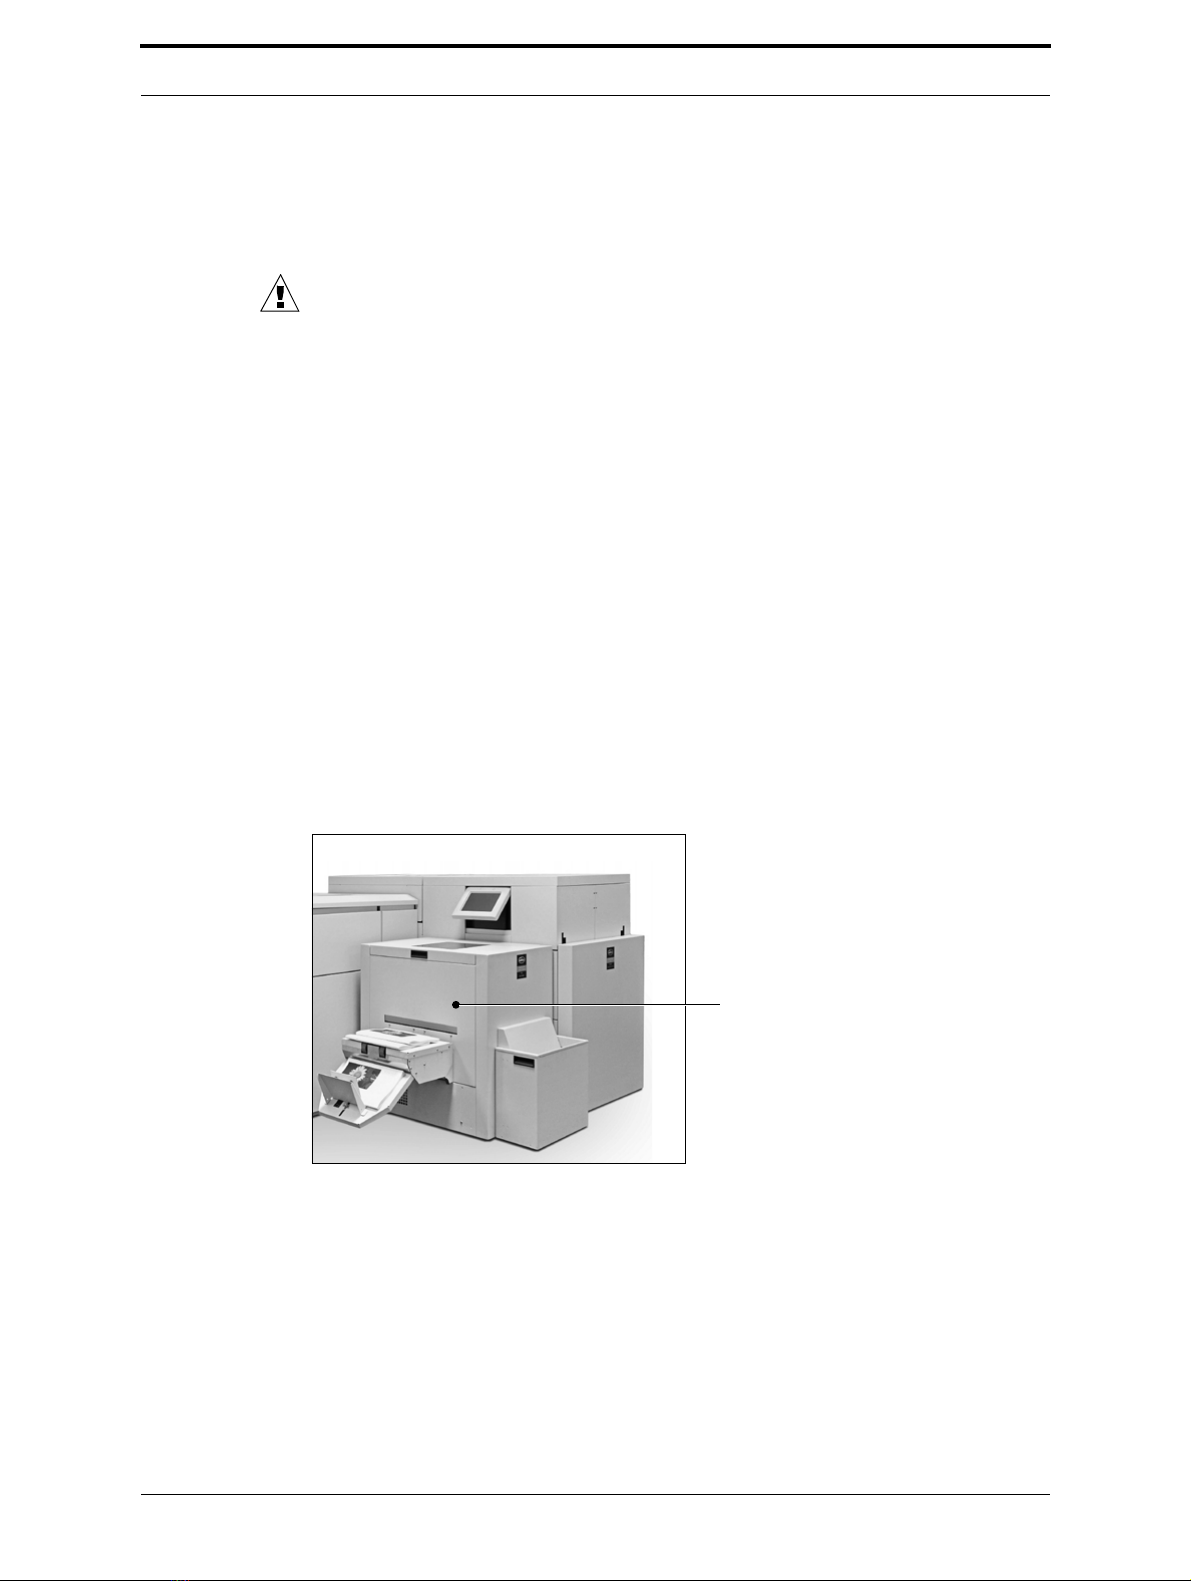
Description of the Side-Trimmer
Introduction
The Watkiss Side-Trimmer completes the booklet-making process by trimming
the top and bottom edges of the book. The fore-edge of the book is already
trimmed by the booklet maker, so this additional module provides a profes-
sional solution for full bleed printed work.
FIGURE 1. Side-Trimmer
P2T Side-Trimmer
1 - Introduction to the Watkiss P2T 2-Knife Trimmer - Description of the Side-Trimmer
Watkiss P2T 2-Knife Trimmer User Manual 3
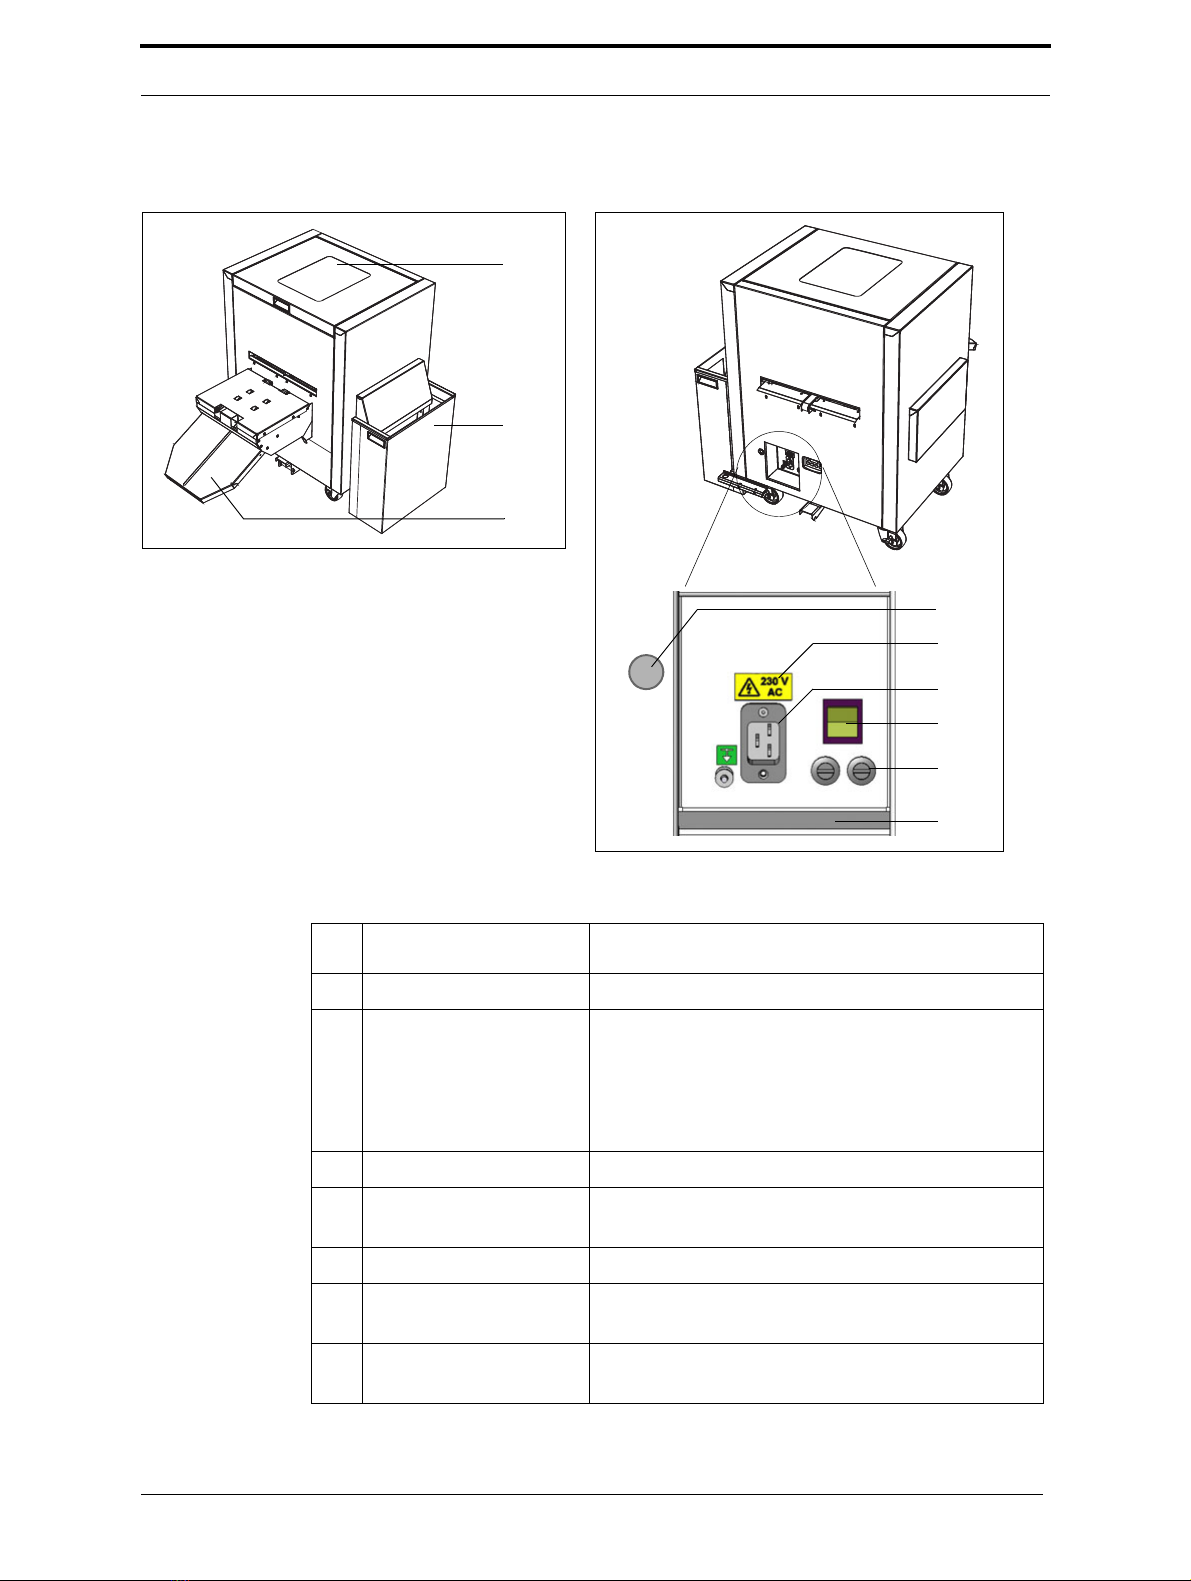
The Side-Trimmer
Component - Function Table
1
2
3
5
6
7
8
9
4
FIGURE 2. Side-Trimmer Components
No. Component Function
1 The Top Cover The top cover opens to allow error recovery.
2 The Trim Bin The trim bin collects the paper that is trimmed
from the top and bottom of the book.
If the PowerSquare is configured with a Book
Stacker and a P2T Side-Trimmer, the P2T trim bin
is located in the Book Stacker.
3 The Stacker The stacker collects the finished books.
4 Communications cable The communications cable connects the Side-
Trimmer to the PowerSquare.
5 Voltage label The voltage label displays the machine voltage.
6 Mains power input con-
nector
The mains power input connector is used to con-
nect the Side-Trimmer to mains electrical power.
7 Mains power ON/OFF
switch
The mains power ON/OFF switch turns ON the
Side-Trimmer or turns OFF the Side-Trimmer.

1 - Introduction to the Watkiss P2T 2-Knife Trimmer - Description of the Side-Trimmer
4Watkiss P2T 2-Knife Trimmer User Manual
8 Fuses The fuses make sure the operator and the
machine are protected if there is an electrical
problem or short circuit.
9 Rating and serial label The rating label displays the type of machine,
serial number, power use and fuse information.
No. Component Function

Watkiss P2T 2-Knife Trimmer User Manual 5
CHAPTER 2 How to use the Side-Trimmer
Introduction
This chapter gives information on how to use the Side-Trimmer.
For information on how to operate the booklet maker, refer to the booklet maker
documentation.
Information about the user interface is included in “The User Interface” on
page 7.
Information about standard procedures, for example opening covers to clear a
paper jam, is included in “Standard Tasks” on page 11.
Turn On the Side-Trimmer
Procedure
1. Connect the Side-Trimmer to the mains power supply.
2. Use the mains ON/OFF switch to turn ON the Side-Trimmer.
Enter the Job Settings
Make the settings in the BASIC window on the touch screen of the booklet
maker. See “The User Interface” on page 7 for more information.
• The side trim dimension is calculated automatically according to the PAGE
SIZE.
• To change the size and trim position, touch SIDE TRIM. See “Side-Trim” on
page 8.

2 - How to use the Side-Trimmer - Adjust the Stacker
6Watkiss P2T 2-Knife Trimmer User Manual
• If the side-trim size is 190mm or less, remove the book supports. See
“Remove and re-fit the Side-Trimmer Book Supports” on page 46.
Adjust the Stacker
Adjust the stacker according to the size and thickness of the finished book. See
“Adjust the Side-Trimmer Stacker” on page 14.
During the job
• Unload books from the stacker before the stacker is full.
• Empty the side-trim bin from time to time. The booklet maker displays a mes-
sage if the side-trim bin is full. See “Empty the Side-Trim Bin” on page 13.

Watkiss P2T 2-Knife Trimmer User Manual 7
CHAPTER 3 The User Interface
FIGURE 3. The booklet maker Touch Screen
Side-Trimmer
adjustment
3 - The User Interface - The Job Mimic
8Watkiss P2T 2-Knife Trimmer User Manual
The Job Mimic
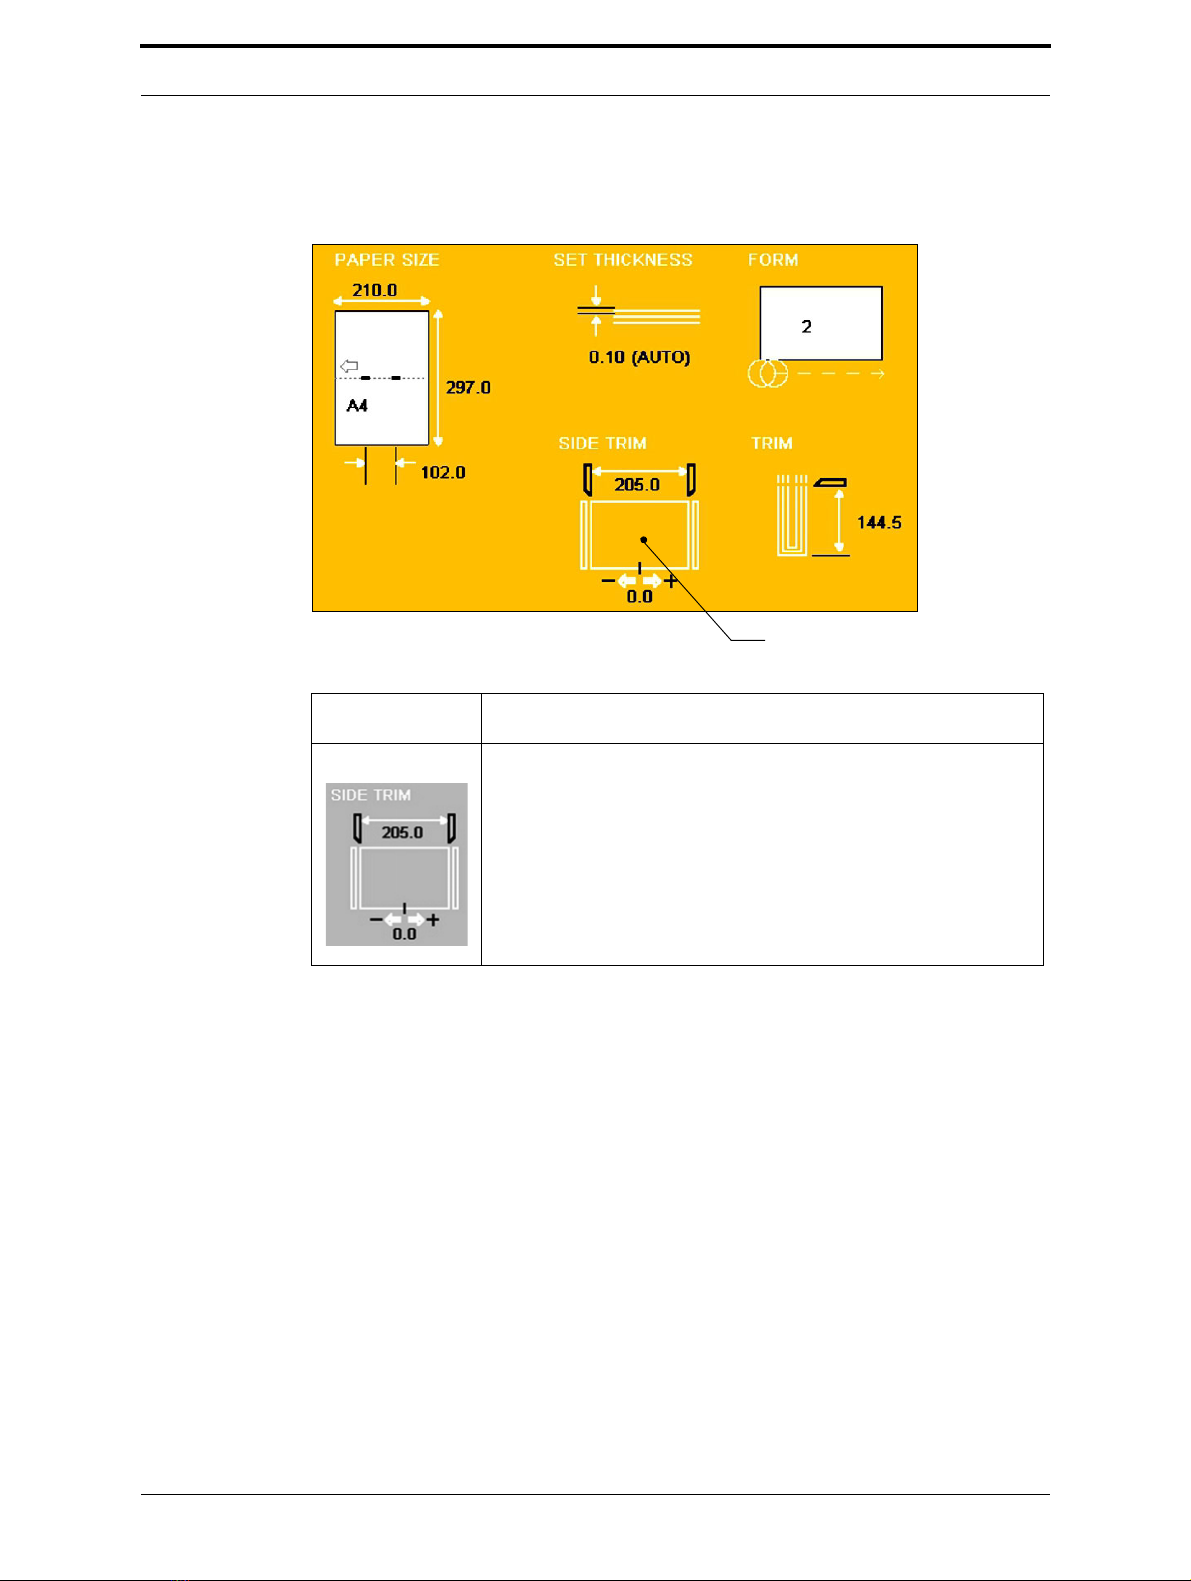
The job mimic shows the current machine status.
FIGURE 4. The Job Mimic Side-Trimmer status
Icon Information
Side-Trim The side-trim setting is displayed.
The number at the top shows the trim size.
The number at the bottom shows if the trim is offset from the
centre-line.
A red X shows that the side-trim function is not active.

3 - The User Interface - The BASIC Window
Watkiss P2T 2-Knife Trimmer User Manual 9
The BASIC Window
The BASIC window gives you access to frequently-changed machine set-
tings.
Button Information
SIDE TRIM The side-trim dimension is calculated automatically according
to the PAGE SIZE.
If needed, the side-trim dimension can be changed. Touch
SIDE TRIM to adjust the size of the finished book.
The default setting is 2.5mm from each side.
The maximum side-trim is 40mm from each side.
The minimum side-trim is 1mm from each side.
The machine will not permit a setting that conflicts with the
stitch position. Change the stitch pitch if necessary.
The side-trim function can be turned off.
- AUTO Touch AUTO to select the default side-trim position.
- TRIM SIZE Touch '+' or '-' to adjust the side-trim dimension.
- TRIM OFFSET By default, the book is trimmed equally on both sides. Touch
'+' or '-' to move the trim position away from the centre line.
The range is -40mm to +40mm, dependent on how much is to
be trimmed. The default setting is 0mm.

3 - The User Interface - The CONFIGURE Window
10 Watkiss P2T 2-Knife Trimmer User Manual
The CONFIGURE Window
The CONFIGURE window lets you make changes to the configuration of the
machine.
Some functions and buttons are only available at certain access levels. Refer to
your booklet maker manual.
Button Information
Operator
Supervisor
Hidden Active Visible
- SIDE TRIM
(P2T)
Touch SIDE TRIM (P2T) to switch off communication
to the Side-Trimmer. Only do this if the Side-Trimmer
is disconnected.

Watkiss P2T 2-Knife Trimmer User Manual 11
CHAPTER 4 Standard Tasks
Introduction
This chapter describes the standard tasks that are needed in the day-to-day
operation of your Side-Trimmer.
Adjust the Side-Trim Offset
Introduction
By default, the book is side-trimmed by an equal amount on each side. The
side-trim dimension is automatically calculated to trim 2.5mm from each side.
For example, if the book is 210mm wide, the default trim is 205mm. This side-
trim dimension can be changed. Touch BASIC > SIDE TRIM and then touch ‘+’ or
‘ - ’ to adjust the TRIM SIZE.
The side-trim can be offset from the centre line by a maximum of 40mm,
dependent on how much is to be trimmed. The machine will not permit a setting
that conflicts with the stitch position. Change the stitch pitch if necessary (see
“Adjust the Side-Trim Offset” on page 11).
If the TRIM OFFSET is changed, the icon changes to show the setting. The icon is
the same orientation as the book delivery out of the Side-Trimmer.

4 - Standard Tasks - Adjust the Side-Trim Offset
12 Watkiss P2T 2-Knife Trimmer User Manual
Select a non-standard side-trim offset
1. Touch BASIC > SIDE TRIM and then touch ‘+’ or ‘ - ’ to adjust the TRIM OFFSET.
2. Touch CLOSE to close the window.
Select the default side-trim offset
1. Touch BASIC > SIDE TRIM and then touch AUTO.
2. Touch CLOSE to close the window.
Offset = -5.0 Offset = 0.0 Offset = +5.0
Negative setting
More is trimmed from
the left side of the
book.
Zero setting
The same amount is
trimmed from each
side of the book.
Positive setting
More is trimmed from
the right side of the
book.

4 - Standard Tasks - Empty the Side-Trim Bin
Watkiss P2T 2-Knife Trimmer User Manual 13
Empty the Side-Trim Bin
When to do
• An error message CHECK THE SIDE TRIM BIN is displayed on the touch screen
when the trim bin is full.
• You can empty the side-trim bin when you choose. For example, before you
start a new job.
Note
The PowerSquare operates with the side-trim bin removed for a short time. The
printer waits while the side- trim bin is removed, then continues when the side-
trim bin is replaced. To prevent lost production, you must remove, empty and
return the side-trim bin to the PowerSquare as quickly as possible.
Procedure
(See Figure 5)
1. Use the handles to move the side-trim bin away from the machine.
2. Empty the side-trim bin.
3. Return the side-trim bin under the chute. Check the bin is positioned close to
the machine. Magnets hold the bin in position.
FIGURE 5. Side-Trim Bin
Trim Bin handle
Trim Bin
FIGURE 6. Side-Trim Bin with optional Book Stacker
Trimmings waste box
Trim Bin open

4 - Standard Tasks - Adjust the Side-Trimmer Stacker
14 Watkiss P2T 2-Knife Trimmer User Manual
Procedure - with the optional Book Stacker
(See Figure 6)
1. Open the side-trim bin waste drawer.
2. Remove the trimmings waste box.
3. Empty the trimmings waste box and replace it in the waste drawer.
4. Close the side-trim bin waste drawer.
Adjust the Side-Trimmer Stacker
The stacker must be adjusted according to the book size.
When to do
• When you start a new job.
Procedure
Set the collection table position according to the size of the book. Read the set-
ting through the window.
FIGURE 7. The stacker
Catch tray
Collection table
Book size in window
Collection table
Orange plastic hand-screw
Catch tray
FIGURE 8. Collection table position

4 - Standard Tasks - Raise and Lower the Side-Trimmer Stacker
Watkiss P2T 2-Knife Trimmer User Manual 15
Raise and Lower the Side-Trimmer Stacker
The stacker can be raised to allow access to other parts of the machine.
WARNING: Take care to keep your hands clear of the folding part of the
stacker.
Procedure - Raise the stacker
1. Press down on the top of the stacker, beside the green belts.
2. At the same time, push down on the stacker release handle.
3. Release pressure from the top of the stacker, the stacker will raise to a
folded position.
Procedure - Lower the stacker
1. Push down on the top of the stacker until it clicks into position.
FIGURE 9. The stacker
Stacker release handle
FIGURE 10. The stacker in raised position

4 - Standard Tasks - Move the Side-Trimmer
16 Watkiss P2T 2-Knife Trimmer User Manual
Move the Side-Trimmer
The Side-Trimmer locks in position onto the booklet maker. The docking latch is
released by a foot pedal.
When to do
• to access the mains ON/OFF switch
• to replace the mains input fuses
Procedure
Note: If a Book Stacker is fitted, first move the Book Stacker, then start at
step 3.
When needed, rotate the Side-Trimmer back to the docked position, the latch
will click closed.
FIGURE 11. The Side-Trimmer docking latch
Step Action Information
1 Remove the trim bin. See “The Side-Trimmer” on page 3
2 Raise the Side-Trimmer stacker. See “Raise and Lower the Side-
Trimmer Stacker” on page 15.
3 Use your foot to release the dock-
ing latch.
See Figure 11 on page 16.
4 Rotate the Side-Trimmer away
from the PowerSquare as far as
the safety chain allows.
The safety chain prevents damage
to the power and communication
cables.
Other manuals for P2T
1
Table of contents
Other Watkiss Trimmer manuals


