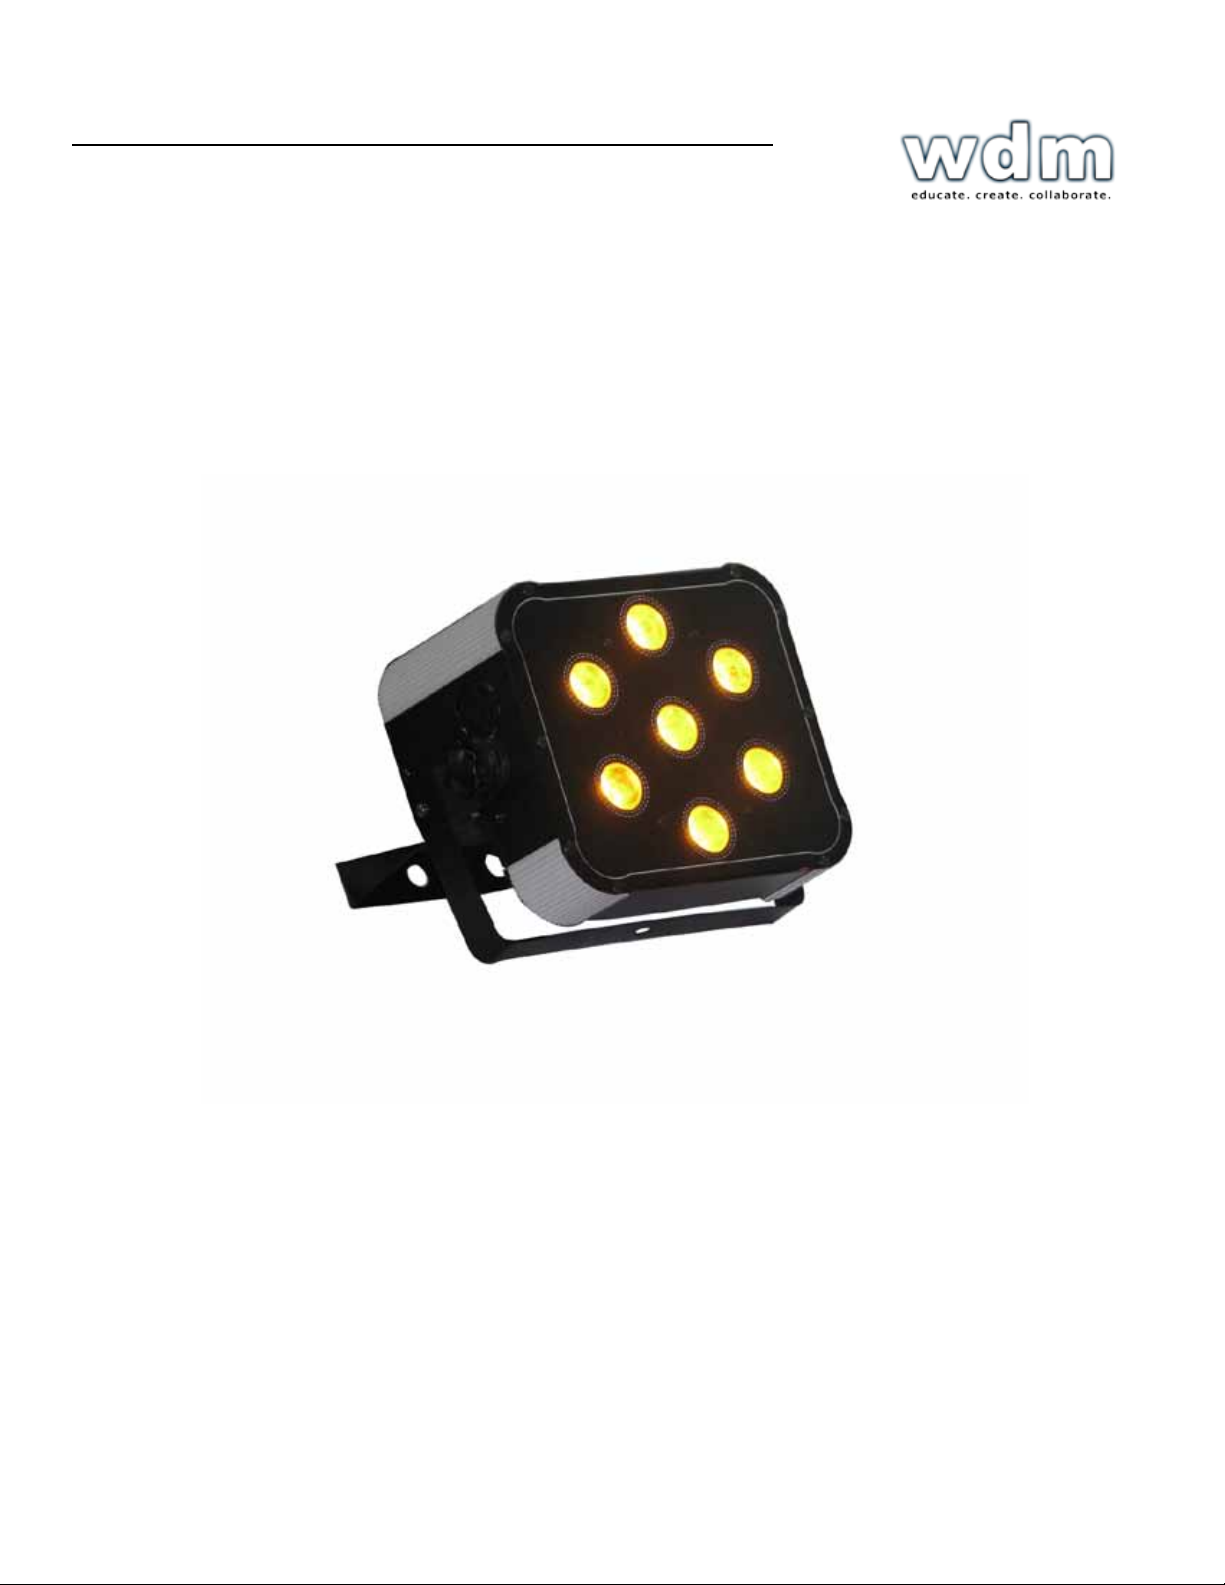
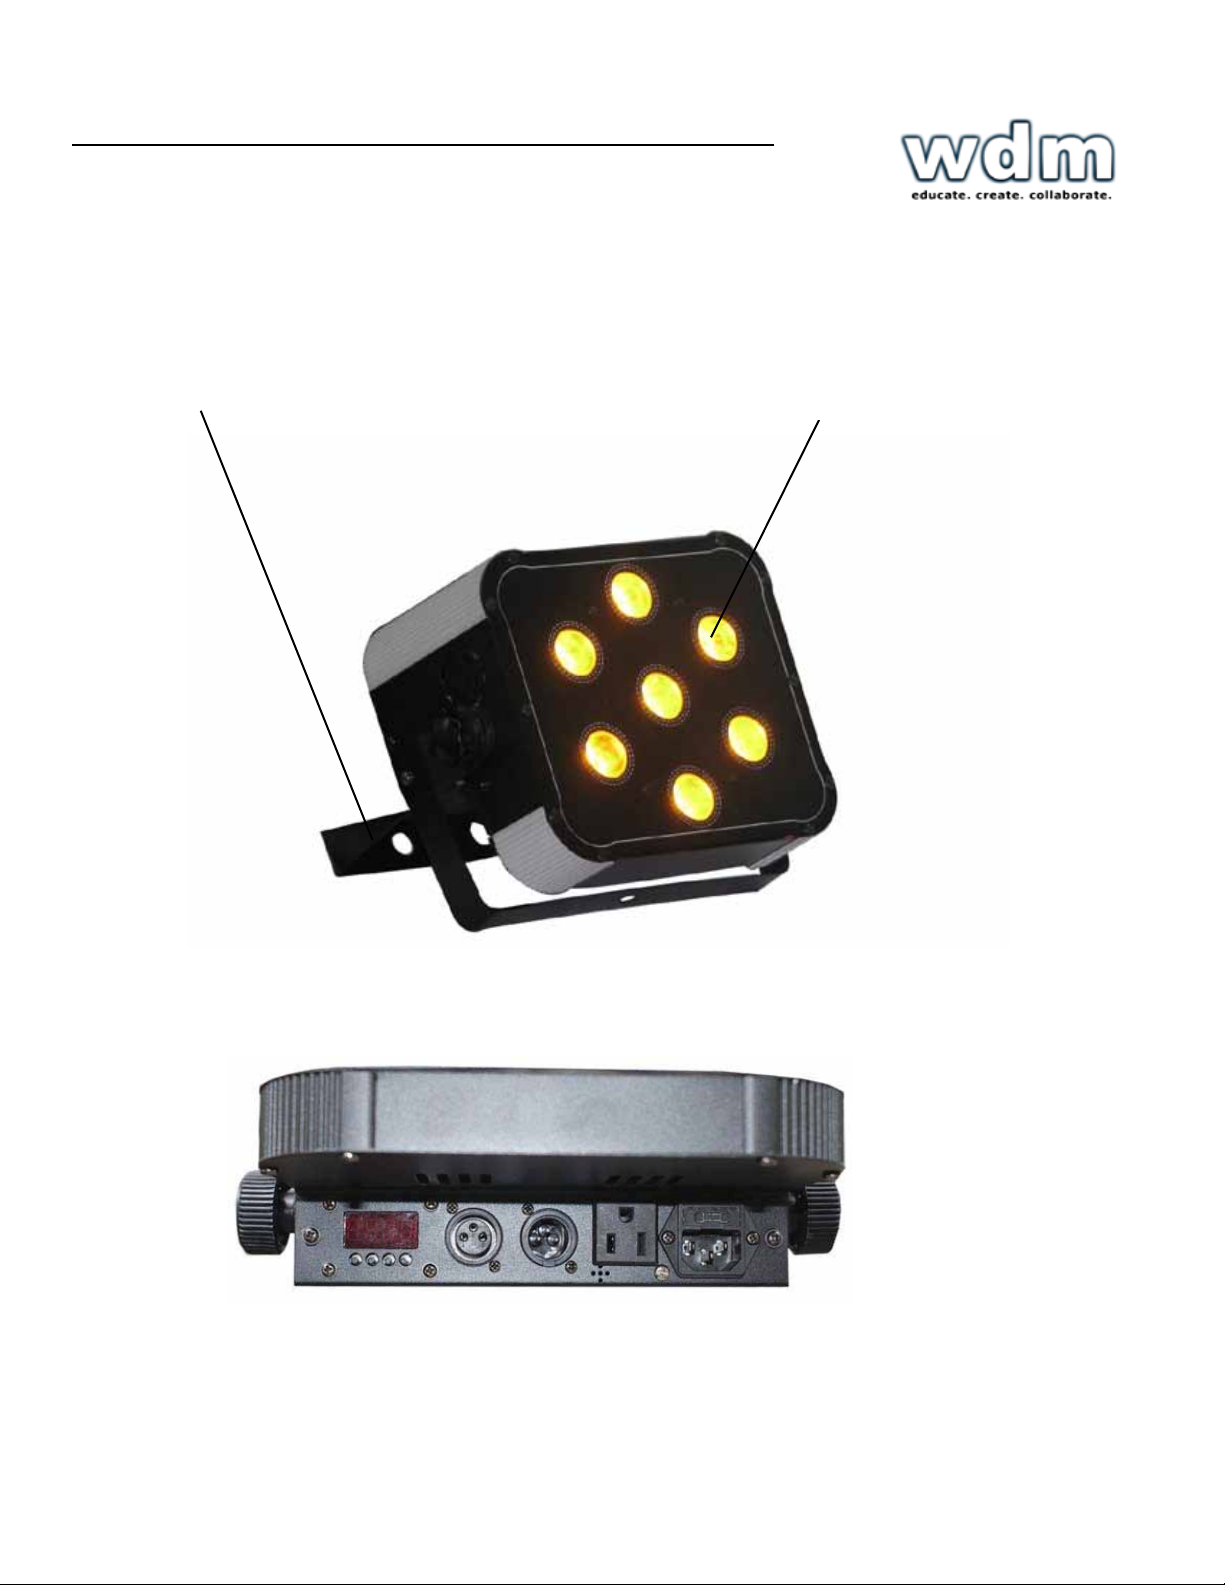
WDM ColorFlat7 RGB User manual

ColorFlat7 RGB
wdmlighting.com | 4106 Harry Hines Blvd, Dallas, Texas 75219 | 800-893-9787
ColorFlat7
RGBW/RGBA

ColorFlat7 RGB
wdmlighting.com | 4106 Harry Hines Blvd, Dallas, Texas 75219 | 800-893-9787
Page
2
ColorFlat 7 RGBW/RGBW
Rev.
A
Copyright (c) 2011 Blizzard Lighting,
LLC
TABLE OF
CONTENTS
The ColorFlat 7 LED PAR Can
1
1. Getting Started
3
What’s In The Box?
3
Getting It Out Of The Box
3
Powering Up!
3
Getting A Hold Of Us
3
Safety Instructions
4
2. Meet The ColorFlat 7LED PAR Can
5
Features
5
DMX Quick Reference (4 and 6-Channel Modes)
5
The ColorFlat™ 7
6
3. Setup
7
Fuse Replacement
7
Connecting ColorFlat™7 LED PAR Cans
7
Data/DMX Cables
7
4. Operating Adjustments
8
DMX Mode & DMX Mode Selection
8
Master/Slave Mode
8
Sound Active Mode
8
Custom Color Display
8
Fixture running hour display
8
Troubleshooting
9
5. Appendix
10
Maintenance
10
Returns
10
Shipping Issues
10
Tech Specs
11
ColorFlat7 RGB
wdmlighting.com | 4106 Harry Hines Blvd, Dallas, Texas 75219 | 800-893-9787

ColorFlat7 RGB
wdmlighting.com | 4106 Harry Hines Blvd, Dallas, Texas 75219 | 800-893-9787
Page
3
ColorFlat 7 RGBW/RGBW
Copyright (c) 2011 WDM Lighting
1. GETTING
STARTED
What’s In The
Box?
•1 x ColorFlat™ 7 Flat LED PAR
Fixture
•1x IEC Power
Cord
•User
Manual
Getting It Out Of The
Box
Now
that
you’ve got The ColorFlat™ 7 , you should
carefully
unpack the
box and check the contents to ensure that all parts
are
present and in
good condition. If anything looks as if it has been
dam-
aged in transit,
notify the shipper immediately and keep the
packing
material for
inspection. Again, please save the carton and all
packing
materials. If
a fixture must be returned to the factory, it is
important
that the
fixture be returned in the original factory box and
packing.
Powering
Up!
All fixtures must be powered directly off a switched circuit and
cannot
be run off a rheostat (variable resistor) or dimmer circuit,
even
if the rheostat or dimmer channel is used solely for a 0%
to
100%
switch.
AC Voltage Switch - Not all fixtures have a voltage select switch,
so
please verify that the fixture you receive is suitable for your local
pow
er supply. See the label on the fixture or refer to the fixture’s
specifi
cations chart for more information. A fixture’s listed current
rating
is
its average current draw under normal conditions. Check the
fixture
or
device carefully to make sure that if a voltage selection
switch
exists
that it is set to the correct line voltage you will
use.
Warning! Verify that the voltage select switch on your
unit
matches the line voltage applied. Damage to your fixture
may
result if the line voltage applied does not match the
voltage
indicated on the voltage selector switch. All fixtures must
be
connected to circuits with a suitable Ground
(Earthing).
ColorFlat7 RGB
wdmlighting.com | 4106 Harry Hines Blvd, Dallas, Texas 75219 | 800-893-9787

ColorFlat7 RGB
wdmlighting.com | 4106 Harry Hines Blvd, Dallas, Texas 75219 | 800-893-9787
Page
4
ColorFlat 7 RGBW/RGBW
Rev.
A
Copyright (c) 2011 Blizzard Lighting,
LLC
SAFETY
INSTRUCTIONS
• Please keep this User Guide for future use. If you sell the unit to
someone
else, be sure that they also receive this User
Guide.
• ALWAYS make sure that you are connecting to the proper voltage, and
that
the line voltage you are connecting to is not higher than that stated on the
de-
cal or rear panel of the
fixture.
• This product is intended for indoor use
only.
• To prevent risk of fire or shock, do not expose fixture to rain or
moisture.
• Make sure there are no flammable materials close to the unit while
operating.
• The unit must be installed in a location with adequate ventilation, at
least
20in (50cm) from adjacent surfaces. Be sure that no ventilation slots
are
blocked.
• ALWAYS disconnect from the power source before servicing or replacing
fuse
and be sure to replace with same fuse size and
type.
• ALWAYS secure fixture using a safety chain. NEVER carry the fixture by
its
cord. Use its carrying
handles.
• DO NOT operate at ambient temperatures higher than 104°F
(40°C).
• In the event of a serious operating problem, stop using the unit
immediately.
NEVER try to repair the unit by yourself. Repairs carried out by unskilled
people
can lead to damage or malfunction. Please contact the nearest authorized
tech
nical assistance center. Always use the same type spare
parts.
• NEVER connect the device to a dimmer
pack.
• Make sure the power cord is never crimped or
damaged.
• Never disconnect the power cord by pulling or tugging on the
cord.
• Avoid direct eye exposure to the light source while it is
on.
Caution! There are no user serviceable parts inside the unit. Do
not
open the housing or attempt any repairs yourself. In the unlikely
event
your unit may require service, please contact WDM Lighinging at
800-893-9787.
ColorFlat7 RGB

ColorFlat7 RGB
wdmlighting.com | 4106 Harry Hines Blvd, Dallas, Texas 75219 | 800-893-9787
Page
5
ColorFlat 7 RGBW/RGBW
Copyright (c) 2011 WDM Lighting
2. MEET The ColorFlat™ 7RGB LED
PAR Can
CONTROL
FEATURES
•RGB color mixing via 7 x 9 Watt TriColor LEDs
•Also available in RGB color mixing via 7 x 3 Watt TriColor LEDs
•Variable electronic
strobe
•Variable electronic
dimmer
•Built-in automated programs via DMX and
master/slave
•Built-in sound active
programs
ADDITIONAL
FEATURES
•Lightweight and Compact
•4-Button LED control panel for easy
programming
•Light source: 7 x 9-Watt LEDs,
Tri-Color or 7 x 3-Watt LEDs
•Dual bracket for flexibility in
mounting
•Power outlet for fixture linking (up to 10
fixtures)
DMX Quick Reference (6-Channel
Mode)
Channel
What It
Does
1
Red
Intensity
2
Green
Intensity
3
Blue
Intensity
4
Built-in
Programs
5
Strobe
6
Dimmer
DMX Quick Reference (3-Channel
Mode)
Channel
What It
Does
1
Red
Intensity
2
Green
Intensity
3
Blue
Intensity
ColorFlat7 RGB

ColorFlat7 RGB
wdmlighting.com | 4106 Harry Hines Blvd, Dallas, Texas 75219 | 800-893-9787
Page
6
ColorFlat 7 RGBW/RGBW
Rev.
A
Copyright (c) 2011 Blizzard Lighting,
LLC
Figure 1: The ColorFlat 7Pin-Up
Picture
Dual
Mounting
Yokes
Figure 2: The Rear
Connections
Quad-Color
LED’s
DMX In DMX
Out
LED Control Panel
AC Power
In/Out
Microphone
ColorFlat7 RGB
ColorFlat7
RGBW/RGBA
Tri Color LEDs

ColorFlat7 RGB
wdmlighting.com | 4106 Harry Hines Blvd, Dallas, Texas 75219 | 800-893-9787
Page
7
ColorFlat 7 RGBW/RGBW
Copyright (c) 2011 WDM Lighting
3.
SETUP
Fuse
Replacement
With a flat head screwdriver, wedge
the
fuse holder out of its housing. Remove
the
damaged fuse from its holder and
replace
with exact same type fuse. Insert the
fuse
holder back in its place and
reconnect
power.
Connecting A Bunch of ColorFlat 7Flat LED PAR
Cans
You will need a serial data link to run light shows using a
DMX-512
controller or to run shows on two or more fixtures set to sync in
mas-
ter/slave operating mode. The combined number of channels
required
by all the fixtures on a serial data link determines the number of
fix-
tures the data link can
support.
Fixtures on a serial data link must be daisy chained in one single
line.
Also, connecting more than 32 fixtures on one serial data link
without
the use of a DMX optically-isolated splitter may result in
deterioration
of the digital DMX
signal.
The maximum recommended cable-run distance is 500 meters
(1640
ft). The maximum recommended number of fixtures on a serial
data
link is 32
fixtures.
Data/DMX
Cabling
To link fixtures together you’ll need data cables. You should use
data-
grade cables that can carry a high quality signal and are less prone
to
electromagnetic
interference.
For instance, Belden© 9841 meets the specifications for EIA
RS-485
applications. Standard microphone cables will “probably” be OK,
but
note that they cannot transmit DMX data as reliably over long
distanc-
es. In any event, the cable should have the following
characteristics:
2-conductor twisted pair plus a
shield
Maximum capacitance between conductors – 30
pF/ft.
Maximum capacitance between conductor & shield – 55
pF/ft.
Maximum resistance of 20 ohms / 1000
ft.
Nominal impedance 100 – 140
ohms
ColorFlat7 RGB

ColorFlat7 RGB
wdmlighting.com | 4106 Harry Hines Blvd, Dallas, Texas 75219 | 800-893-9787
Page
8
ColorFlat 7 RGBW/RGBW
Rev.
A
Copyright (c) 2011 Blizzard Lighting,
LLC
4. OPERATING
ADJUSTMENTS
NOTE: After making any adjustment, the fixture will return to the correct
mode
after approximately 5
seconds.
DMX
Mode
Allows the unit to be controlled by any universal DMX
controller.
1.) The default mode for the fixture is DMX, which appears as Addr on the
LED
Readout. Use the <ENTER> button then the <UP> and <DOWN>
buttons
to
choose a channel between 1 and 512. Press <ENTER> again to
confirm.
2.) To change between 3 and 6 channel DMX mode, select
ChNd,
then
press
<ENTER>. Select either
6Ch
or
3Ch,
then press <ENTER> again to
con-
firm.
Master/Slave Mode (Auto/Sound Active/Color
Preset/Custom):
Allows you to link up to 32 units together without a
controller.
1.) Use standard DMX cables to daisy chain your units together via the DMX
con-
nector on the rear of the units. It may be necessary to use a
terminator at
the
last fixture. For more information about terminators, see
page
8.
2.) Choose a unit to function as the Master. Select MAST. The master unit
must
be the first unit. Finally, chain the units together using DMX
cable.
Master SLNd then NASt to
confirm.
3.) Select slave function by using the <UP>/<DOWN> keys to reach
SLAV
in
the Master/Auto menu on the slave units, and they will react in the
same as
the Master.
Slave SLNd then SLAu to
confirm.
4.) On the master fixture, use the <UP>/<DOWN> keys to reach SHND,
which
allows you to select the Master/Slave
mode.
Sound active SoUn then <ENTER> to
confirm.
Auto
mode
CoLo
then
Auto,
then <ENTER> to
confirm.
Color
preset
CoLo
then
CoL
1
-
CoL
7,
<ENTER>.
To set a custom color in Master/Slave / Standalone
Mode:
Using this function, you can select any color by adjusting the Red, Green and Blue
values
from 0-255. You can also use this function to adjust the overall white balance of
the
fix-
ture while running in any
mode.
Please note that modifying the values in this step will affect ALL modes,
therefore
we recommend resetting all levels to their highest value (255)
after using
this mode.
1.) Select
NAnu
from the control panel, then hit
<ENTER>.
2.) Choose rEd,
GrEE
or
bLuE,
then hit <ENTER> to
confirm.
3.) Using the <UP>/<DOWN> keys, select the color you wish to display
by
varying Red/Green/Blue intensity between 0 and 255, then hit <ENTER>
to
confirm each color
choice.
4.) Select Color preset mode as instructed above, then select
CoL
7.
then
<ENTER> to
confirm.
To Show the Fixture Running
Hours:
1.) Select
FhrS
from the control panel, then hit <ENTER> to
confirm.
ColorFlat7 RGB

ColorFlat7 RGB
wdmlighting.com | 4106 Harry Hines Blvd, Dallas, Texas 75219 | 800-893-9787
Page
9
ColorFlat 7 RGBW/RGBW
Copyright (c) 2011 WDM Lighting
Troubleshooting
Symptom
Solution
Fixture
Auto-
Shut
Off
Check the fan in the fixture. If it is stopped or
moving
slower than normal, the unit may have shut itself off due
to
high heat. This is to protect the fixture from
overheating.
Clear the fan of obstructions, or return the unit for
service.
Beam is
Dim
Check optical system and clean excess dust/grime.
Also
ensure that the 220V/110V switch is in the correct
position,
if
applicable.
No Light
Output
Check to ensure fixture is operating under correct mode,
IE
sound active/auto/DMX/Etc., if applicable. Contact
service
for more
information.
Chase
Speed
Too
Fast/Slow
Check to ensure proper setup of speed
adjustment.
No
Power
Check fuse, AC cord and circuit for
malfunction.
Blown
Fuse
Check AC cord and circuit for damage, verify that
moving
parts are not restricted and that unit’s ventilation is
not
obstructed
Slow
Movement
Verify that 220V/110V switch is in the correct position,
if
applicable. Also check that speed channels are set
appropriately.
No Response
to
Audio
Verify that the fixture is in “Sound Active”
mode.
Adjust Audio Sensitivity, If
Applicable.
Fixture
Not
Responding
/
Responding
Erratically
Make sure all connectors are seated properly and
securely.
Use Only DMX
Cables.
Install a
Terminator.
Check all cables for
defects.
Reset
fixture(s).
Intermittent
Lamp
Check lamp for properly
installation.
Re-lamp, lamp may have reached end of
life.
Remote
Doesn’t
Work
Verify remote control cable is installed properly and
securely.
Verify remote is correct type (CA-9 or other as
applicable.)
Fixture
Moving
On Its
Own
Verify proper mode of operation. Is the fixture in
“Auto”
mode?
ColorFlat7 RGB

ColorFlat7 RGB
wdmlighting.com | 4106 Harry Hines Blvd, Dallas, Texas 75219 | 800-893-9787
ColorFlat7 RGB
Page
10
ColorFlat 7 RGBW/RGBW
Rev.
A
Copyright (c) 2011 Blizzard Lighting,
LLC
Tech
Specs!
Weight &
Dimensions
Length
8 inches
Width
4.6 inches
Height
7 inches
Weight
6.5 lbs
Power
Operating
Voltage
90-230VAC, 50-60
Hertz
Fuse
3A
250V
Power
Consumption
70 watt
Light
Source
LED
7 x 9 Watt TriColor LED’s 60K
hrs.
7 x 3 Watt TriColor LED’s 60K
hrs.
Optical
Beam
Angle
25
degrees
Thermal
Max. Operating
Temp.
104 degrees F (40 degrees C)
ambient
Control
Protocol
USITT
DMX-512
DMX
Channels
4 or 6 (User
Selectable)
Input
3-pin XLR
Male
Output
3-pin XLR
Female
Other Operating
Modes
Standalone, Master/Slave, Sound
Active,
Color Preset, Standalone color
mixing
Warranty
2-year limited warranty, does not cover
mal-
function caused by damage to
LED’s.
Table of contents
Other WDM Dj Equipment manuals