manuals.online logo
Brands
  1. Home
  2. •
  3. Brands
  4. •
  5. Weather Guard
  6. •
  7. Indoor Furnishing
  8. •
  9. Weather Guard 8867 User manual

Weather Guard 8867 User manual

Other Weather Guard Indoor Furnishing manuals

Weather Guard 246-3-02 User manual

Weather Guard

Weather Guard 246-3-02 User manual

Weather Guard JUMBO VAN SHELVING User manual

Weather Guard

Weather Guard JUMBO VAN SHELVING User manual

Popular Indoor Furnishing manuals by other brands

Regency LWMS3015 Assembly instructions

Regency

Regency LWMS3015 Assembly instructions

Furniture of America CM7751C Assembly instructions

Furniture of America

Furniture of America CM7751C Assembly instructions

Safavieh Furniture Estella CNS5731 manual

Safavieh Furniture

Safavieh Furniture Estella CNS5731 manual

PLACES OF STYLE Ovalfuss Assembly instruction

PLACES OF STYLE

PLACES OF STYLE Ovalfuss Assembly instruction

Trasman 1138 Bo1 Assembly manual

Trasman

Trasman 1138 Bo1 Assembly manual

Costway JV10856 manual

Costway

Costway JV10856 manual

moss DESIGN Caisson Credenza Assembly instructions

moss DESIGN

moss DESIGN Caisson Credenza Assembly instructions

Aquaglide FULL DECK 15.0 owner's manual

Aquaglide

Aquaglide FULL DECK 15.0 owner's manual

AREBOS AR-HE-SW30 user manual

AREBOS

AREBOS AR-HE-SW30 user manual

Till-Hilft Fulda 87005.330 Assembly instructions

Till-Hilft

Till-Hilft Fulda 87005.330 Assembly instructions

Twoey Outside 2010 quick start guide

Twoey Outside

Twoey Outside 2010 quick start guide

Hettich Easys 200 operating instructions

Hettich

Hettich Easys 200 operating instructions

The bedboss RELAX 404 Series owner's manual

The bedboss

The bedboss RELAX 404 Series owner's manual

Oeseder Möbelindustrie Bern 991 720 Assembly instructions

Oeseder Möbelindustrie

Oeseder Möbelindustrie Bern 991 720 Assembly instructions

Costway HW68469 user manual

Costway

Costway HW68469 user manual

Next ALIX A27743 Assembly instructions

Next

Next ALIX A27743 Assembly instructions

BROSA Hans Assembly guide

BROSA

BROSA Hans Assembly guide

Prodigg MINIKA PBA015T-FUR installation manual

Prodigg

Prodigg MINIKA PBA015T-FUR installation manual

manuals.online logo
manuals.online logoBrands
  • About & Mission
  • Contact us
  • Privacy Policy
  • Terms and Conditions

Copyright 2025 Manuals.Online. All Rights Reserved.

PAGE 1IF YOU HAVE ANY QUESTIONS, PLEASE CONTACT US TOLL-FREE AT 1.800.456.7865
PARTS
Item Qty. Description
A1Work Top
1Bolt Kit #32-0101
INSTALLATION MANUAL
WORKTOP MODEL 8867
ATTENTION: PLEASE READ AND UNDERSTAND ALL INSTRUCTIONS AND WARNINGS BEFORE ASSEMBLING, INSTALLING OR USING THIS PRODUCT.
These instructions are to be followed using the parts and fasteners
supplied for proper installation. Any modifications or improper
installation of this product will create a hazardous condition that
can cause property damage, serious personal injury or death.
Anymodificationorunintendeduseofthisproductshallimmediately
voidallmanufacturerswarranties.Manufacturerdisclaimsallliability
for injuries to persons or property resulting from any modification
to, or unintended use of this product.
Approximate Assembly and Installation Time:
20 min. (.3 hours) depending on van equipment
installation experience.
WARNING – NOTICE –
1NOTE: The unit(s) this work top is to be
mounted on, must be the correct width or
properly spaced to accept the mounting
method.
Place the Work Top in position and mark the
center point of the bolt holes that will require
fastening.
NOTE: Mark center of bolt hole carefully
since an off-center Blind Fastener makes
installation difficult.
Remove work top and drill where marked
with 1/8" drill bit for pilot holes. Redrill
holes to enlarge them, using a 13/32"
drill bit. Install Blind Fasteners. (See
INSTALLATION INSTRUCTIONS
FOR BLIND FASTENERS on page 2).
Attach Work Top using four (4) 1/4-20 x 3/4"
Hex Head Bolts and 1/4" Lock Washers.
INSTALLATION IS NOW COMPLETE.
A
TOOLS REQUIRED
• Electric Drill
• Drill Bits: 13/32", 1/8"
• Open End Wrenches: 7/16", 9/16"
Part No. 24-0244 REV. B ECN 5305 04/13
PAGE 2IF YOU HAVE ANY QUESTIONS, PLEASE CONTACT US TOLL-FREE AT 1.800.456.7865
KNAACK LLC LIMITED WARRANTY
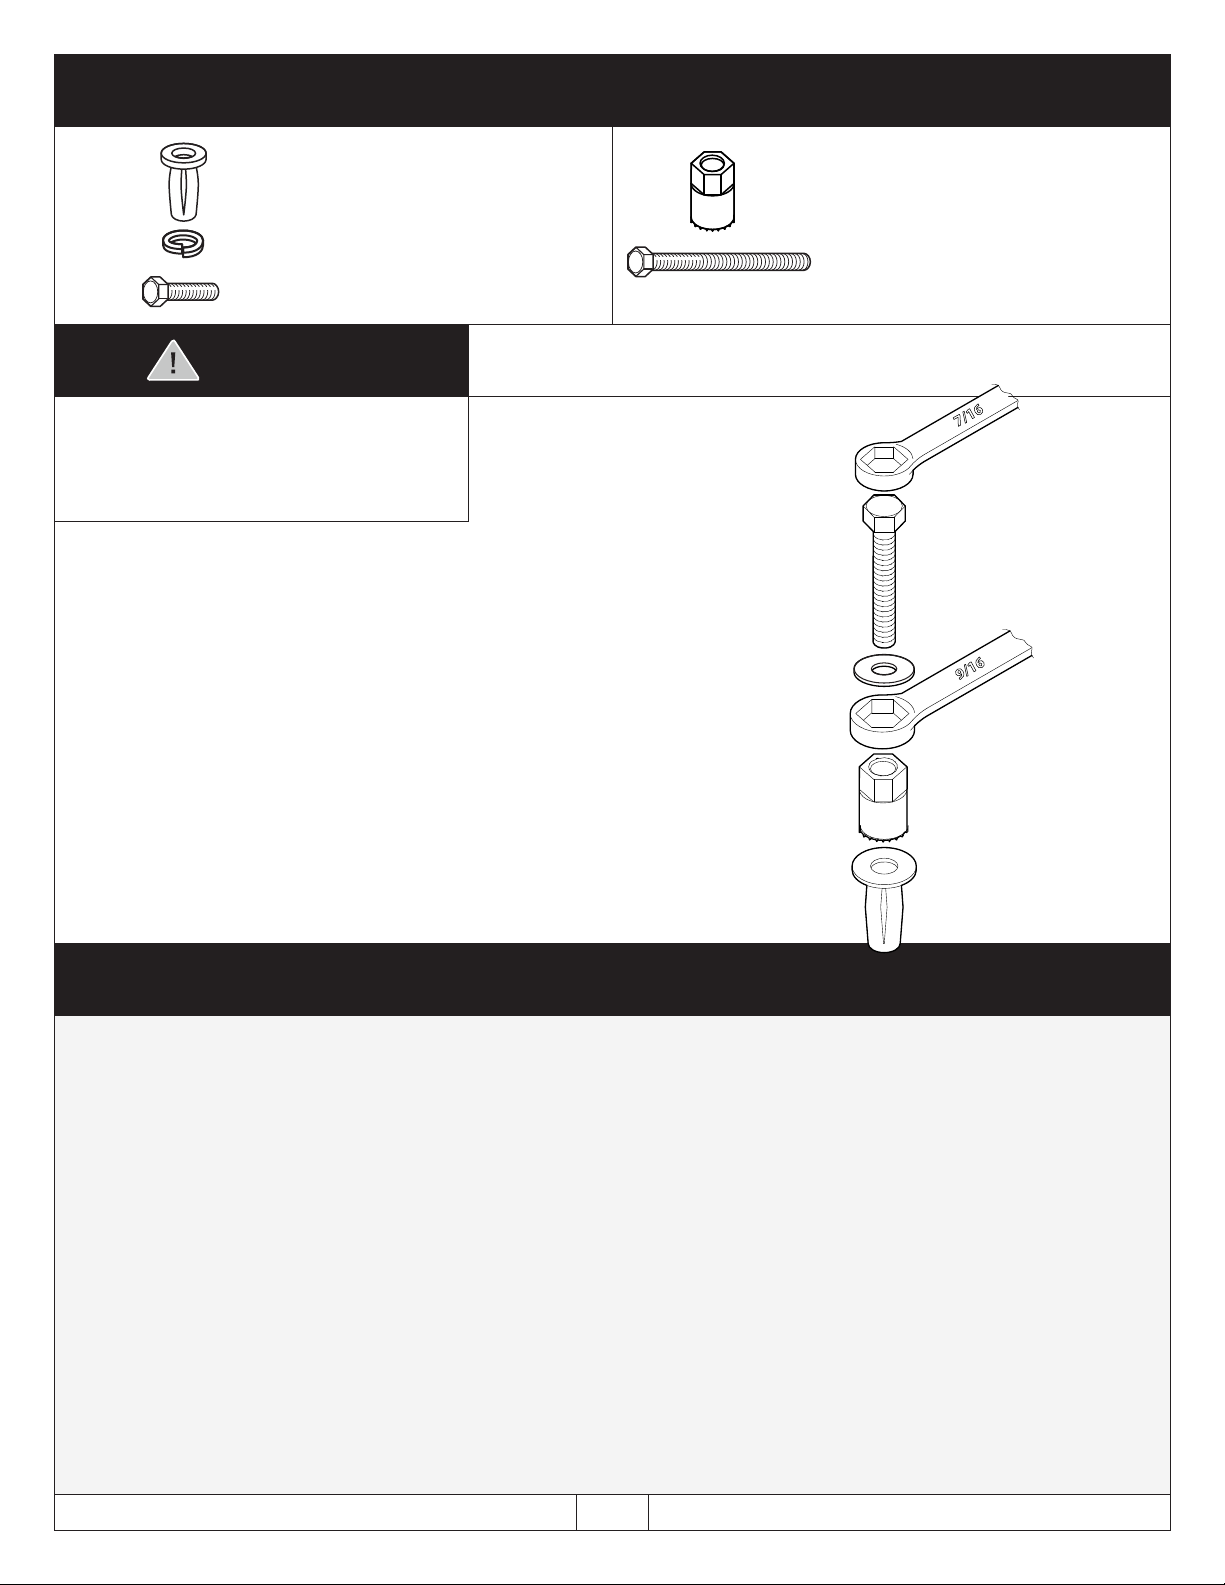
Place a drop of oil on the black oxide bolt before
assembling as shown on right. Place the Blind
Fastener in the hole and use a 7/16" wrench to
tighten black hex bolt until the Blind Fastener is
fully seated. When setting black hex bolt, it will
start out hard. As the Blind Fastener “bulbs” out
it will get easier, until it bottoms out or sets. Make
sure the Blind Fastener and Installation Tool do
not turn during installation.
To keep debris out of your eyes when drilling,
always wear protective eyewear.
INSTALLATION INSTRUCTIONS FOR BLIND FASTENERS
CAUTION
BOLT KIT #32-0101 NOTE: Depending on your application you may end up with extra hardware after installation is complete.
Flat Washer
9/16” Wrench
Installation Tool
Blind Fastener
Black Oxide Bolt
7/16” Wrench
(Or 7/16” Socket)
4 1/4-20 Blind Fasteners
4 1/4" Lock Washers
4 1/4-20 x 3/4" Hex Head Bolts
1 Blind Fastener Installation Tool
1 1/4-20 x 2-1/4" Hex Head Black Bolt
Part No. 24-0244 REV. B ECN 5305 04/13
This LIMITED WARRANTY is made by Knaack //&.420 E. Terra Cotta Ave., Crystal Lake, Illinois to the original retail purchaser of KNAACK®
Products.
KNAACK LLCWARRANTSTHATKNAACKPRODUCTS WILLBEFREEFROMDEFECTSINMATERIALANDWORKMANSHIP FOR A PERIOD OF
THREE (3) YEARS FROM DATE OF PURCHASE BY THE ORIGINAL RETAIL PURCHASER.
If, before the expiration of the Warranty period, purchaser discovers that the KNAACK Product fails to fulfill the Warranty, purchaser shall contact
Knaack LLC to make arrangements for an inspection of the product. If Knaack LLC determines a defect exists, Knaack LLC shall, at its option and
expense, repair or replace any defective part. All Warranty repairs shall be made by an authorized KNAACK Product dealer or Knaack LLC
approved service company.
This Warranty shall not apply if the KNAACK Product has been subjected to misuse, abnormal service or handling, improper maintenance, or
alterations made by anyone other than a KNAACK Product dealer or a Knaack LLC approved service company.
THE WARRANTY PRINTED ABOVE IS THE ONLY WARRANTY APPLICABLE TO THIS PURCHASE. ALL OTHER WARRANTIES, EXPRESS OR
IMPLIED, INCLUDING BUT NOT LIMITED TO THE IMPLIED WARRANTIES OF MERCHANTABILITY AND FITNESS FOR A PARTICULAR PURPOSE
ARE HEREBY DISCLAIMED.
KNAACK LLC. SHALL NOT BE LIABLE FOR ANY INCIDENTAL OR CONSEQUENTIAL DAMAGES ARISING OUT OF ANY BREACH OF THIS
WARRANTY. NOR SHALL THE DAMAGES EXCEED THE RETURN AMOUNT OF THE PURCHASE PRICE PAID BY THE ORIGINAL
PURCHASER.
This Warranty is in lieu of all Warranties express or implied. The terms of this Warranty shall not be modified by any party, their successors or assigns.
This Warranty gives you specific legal rights, and you may also have other rights which vary from state to state.