Web Warehouse WebHeat Frost 1 User manual

WebHeat is a brand of Web Warehouse BV www.webheat.eu Page 1
Frost installation manual
WebHeat Frost Protection Cables are designed for domestic and commercial requirements to protect the water from freezing. These
are twin conductor series resistance heating cable available in predetermined lengths with factory terminated connections thoroughly
tested.
WebHeat Frost Protection Cables consists of a resistance-heating element insulated with FP (Flouropolymer) compound having high
dielectric strength and high temperature withstand ability, which makes the heating cable totally safe. A metallic sheath is provided to
give additional mechanical strength and provide ground path. A final outer jacket is given to make it sturdier and provide corrosion
protection. The hot and cold junction is uniquely designed to make it 100% fool proof. The heating cable consists of a 2 meter cold lead
with a power plug, at the end of the heating cable the thermostat is installed.
These are available in a wide range of length to suit your requirements.
The following is the range of WebHeat Frost protection cables
Catalog number
LENGTH
(M)
WATTS
(W)
Resistance
(ohms)
Twin Conductor Rating: 10W/M at 230VAC
WebHeat Frost 1
1
10
5290.0
WebHeat Frost 2
2
20
2645.0
WebHeat Frost 4
4
40
1322.5
WebHeat Frost 6
6
60
881.7
WebHeat Frost 8
8
80
661.3
WebHeat Frost 10
10
100
529.0
WebHeat Frost 12
12
120
440.8
WebHeat Frost 14
14
140
377.9
WebHeat Frost 16
16
160
330.6
WebHeat Frost 18
18
180
293.9
WebHeat Frost 20
20
200
264.5
WebHeat Frost 24
24
240
220.4
WebHeat Frost 30
30
300
176.3
WebHeat Frost 42
42
420
126.0
WebHeat Frost 60
60
600
88.2
WebHeat Frost 80
80
800
66.1
WebHeat Frost 105
105
1050
50.4
WebHeat Frost 135
135
1350
39.2
SELECTION OF WEBHEAT FROSTPROTECTION CABLE FOR YOUR APPLICATION
WebHeat Frost Protection cables can be used for Metal as well as Plastic pipelines. Selection of required WebHeat Frost protection
cable depends upon the size of water pipe, lowest ambient temperature against which WebHeat Frost protection required and the type
of thermal insulation.

WebHeat is a brand of Web Warehouse BV www.webheat.eu Page 2
The following can be taken as a general guide considering 13 and 20 mm thick insulation
Heat loss table with 13 mm thermal insulation
Min Ambient Temperature
Pipe size
-30oC
-20oC
-10oC
½ " (21 mm) & Below
9 W/m
6 W/m
3 W/m
1 " (34 mm)
12 W/m
8 W/m
4 W/m
2 " (60 mm)
20 W/m
13 W/m
7 W/m
Heat loss table with 20 mm thermal insulation
Min Ambient Temperature
Pipe size
-30oC
-20oC
-10oC
½ " (21 mm) & below
7 W/m
5 W/m
2 W/m
1 " (34 mm)
10 W/m
6 W/m
3 W/m
2 " (60 mm)
15 W/m
10 W/m
5 W/m
In case the heat loss is smaller than 10 W/m (grey marked zones), heating can be installed without spiraling. In case the heat loss is
larger than 10 W/m, heating cable should be spiraled on the pipe.
Please note the above-indicated values are meant as a general guide, please consult qualified installer for actual requirements.
IMPORTANT INSTRUCTIONS BEFORE INSTALLATION OF THE SYSTEM
1. A qualified electrician should install and connect the heating cable to power source.
2. Installation shall be carried out as per the local statutory regulations.
3. WebHeat Frost Protection Cable should not cross or overlap itself at any point. This could cause the cable to overheat, requiring
replacement.
4. Heating cable should not be cut or its length altered in any circumstances. This may cause over heating resulting in damage to the
cable.
5. Take precautions to avoid damage to heating cable during installation.
6. Do not use any metal tie wires / binders to install the WebHeat Frost Protection Cable
7. Do not install the WebHeat Frost Protection Cable below -10oC ambient temperature.
8. Do not install the WebHeat Frost Protection Cable on a flexible joints of the pipeline.
9. Do not install the WebHeat Frost Protection Cables on pipe along with external heat sources which may cause over heating of pipe
and damage to the WebHeat Frost Protection Cable.
10. In case of plastic pipe applications, wrap an aluminum foil or tape around the plastic pipe before installing the WebHeat Frost
Protection Cable for even heat dissipation.
11. Minimum bending radius of the heating cable while installing shall not be less than about 65mm.
12. Always insulate the pipeline with adequate thermal insulation after installing WebHeat Frost protection cable.
13. Check the mains voltage and wattage of WebHeat Frost Protection Cable are as per the requirement. These are marked on the
label of WebHeat Frost Protection Cable.

WebHeat is a brand of Web Warehouse BV www.webheat.eu Page 3
14. Check the Resistance and Insulation Resistance of the WebHeat Frost Protection Cable you bought before installing and also after
installing. Resistance value of the cable shall match to the value given in product range table. A tolerance of -5% to +10% is
allowed. Insulation Resistance shall be more than 10Mohms. In case the when thermostat is below 3oC, you can use either ice-
cubs or ice-spray to decrease the temperature on the thermostat
15. WebHeat Frost Protection Cable should be connected to a Ground Fault Circuit Interrupter (GFCI) / Residual Current Device
(RCD) / equivalent having a rated residual operating current not exceeding 30mA.
16. In case GFCI / RCD trips during normal operation, and cannot be reset, there is likely a fault in the cable. No attempt should be
made to re-energize the system. GFCI / RCD must not be bypassed in any circumstances.
PRE-INSTALLATION PREPARATIONS
1. Turn ON the water and ensure the pipeline joints are leak proof.
2. Identify suitable power supply source location close to the starting point of the pipeline, preferably within 2 meter length.
3. Arrange the other accessories as below required for completing the installation of WebHeat Frost protection cable
a) 2” Self adhesive aluminum foil tape for fixing the WebHeat Frost protection cable to the pipe
b) Thermal insulation of adequate thickness to apply on the on the pipeline immediately after installing the Frost protection
cable.
4. Ensure the pipe is free from dust, oil, grease or sharp edges. Clean off the dust, oil, grease etc. If sharp edges exist, use heat
transfer aids like aluminum foil / heat transfer cement on those edges making them flat to avoid damage to the WebHeat Frost
protection cable.
5. As soon as you remove the WebHeat Frost Protection Cable from its packing
a) Check visually and make sure that it is not in a damaged condition.
b) Check Voltage & Wattage on the box and ensure it is as per your requirement.
c) Check resistance of heating cable as described in point 14.
d) Resistance value of the FPC shall match to the value given in product range table. A tolerance of -5% to +10% is allowed.
Insulation Resistance shall be more than 10Mohms. Record it in the control card, format given at the end of this instruction
manual.
6. Now you are ready for installing the WebHeat Frost protection cable.
INSTALLATION OF WEBHEAT FROST PROTECTION CABLE
1. Uncoil the WebHeat Frost protection cable by rolling out.
2. Start installing the WebHeat Frost Protection Cable from the nearest point on the
pipeline to power supply source and with Hot & Cold joint kept on the pipeline.
3. Make sure the thermostat (at the end of the heating cable) is positioned at the coldest
section of the pipe.
4. Use aluminum foil tape to tie the WebHeat Frost protection cable to the pipeline.
5. WebHeat Frost protection cable should always be installed on under side of the pipe and
secured to the pipeline with aluminum foil tape along its length for good heat
dissipation.
6. In case the main pipeline is branching out which is of small length run the cable and
return it back to the main pipe. If the branch line is a longer length use another unit of
WebHeat Frost protection cable as done for main pipeline.
7. Check the Resistance and Insulation Resistance of the WebHeat Frost
protection cable. This should be consistent with the value recorded prior to
installation. Record values in the control card, format given at the end of this manual.

WebHeat is a brand of Web Warehouse BV www.webheat.eu Page 4
8. Now apply the thermal insulation on the WebHeat Frost protected pipeline and protect the thermal insulation and ensure it is water
proof.
9. Check the Resistance and Insulation Resistance of the WebHeat Frost protection
cable after thermal insulation. This should be consistent with the value recorded
prior to thermal insulation. Record values in the control card.
10. Now you can switch on the power supply for cable to warm-up and protect the pipeline
from freezing.
OPERATING TIPS
1. When the pipe is empty switch OFF power supply to the WebHeat Frost Protection
Cable.
2. Always insulate the WebHeat Frost protected pipeline for an efficient WebHeat Frost Protection and low energy consumption.
WARRANTY
Web Warehouse B.V. provides a warranty for the WebHeat Frost Protection Cables for a period of 2 years from date of shipment, for
the material and workmanship under normal operating conditions.
In case of defective material, Web Warehouse B.V. obligation will be to repair or supply a new material, free of charge to the customer.
The warranty does not cover installations made by unauthorized persons or faults caused by incorrect design by others / misuse /
damage caused by others / damage in transit / incorrect installation and any other subsequent damage that may occur. Repair /
replacement will be fully chargeable if the damage is because of any of the above reasons.
Web Warehouse B.V. is under no circumstances liable for consequential damages or losses including without limitations the loss or
profit arising from any cause whatsoever. The guarantee is a material warranty only and does not cover field labor.
The warranty is void if there is any payment default and if data is not filled in the Control Card.
CONTROL CARD
Type:
Before
Installation
After
installation
Continuity
Resistance of Cable (Ohms)
Ohm
Ohm
Insulation Resistance (M Ohm)
Mega Ohm
Mega Ohm
Address of Installation:
Date of Installation :
Name and Signature of Qualified
Electrician:

WebHeat is a brand of Web Warehouse BV www.webheat.eu Page 5
Frost installatiehandleiding
WebHeat Frost vorstbeschermingskabels zijn ontworpen voor huishoudelijke en commerciële toepassingen om water te beschermen
tegen bevriezing. Dit zijn dubbel uitgevoerde weerstandsdraden beschikbaar in vaste lengtes met in de fabriek grondig geteste
verbindingen.
WebHeat Frost vorstbeschermingskabels bestaan uit een weerstand-verwarmingselement geïsoleerd met FP (Flouropolymer)
geïsoleerd met een hoge diëlektrische sterkte en hoge temperatuur bestand die de verwarmingskabel volkomen veilig maakt. Een
metalen scherm is aangebracht om extra mechanische sterkte te geven en voor een veilig aarding. Een laatste buitenmantel is
gegeven voor extra stevigheid en biedt bescherming tegen corrosie. Het knooppunt tussen aansluitkabel en verwarmingsdraad heeft
een uniek ontwerp en is 100% fool-proof. De verwarmingskabel bestaat uit een 2 meter koude leiding met een stekker, aan het einde
van de verwarmingskabel is de thermostaat geïnstalleerd.
Deze kabels zijn beschikbaar in een groot aantal maten om aan uw eisen te voldoen.
artikel nummer
LENGTE
(M)
WATTS
(W)
Weerstand
(ohms)
Vermogen: 10W/M at 230VAC
WebHeat Frost 1
1
10
5290.0
WebHeat Frost 2
2
20
2645.0
WebHeat Frost 4
4
40
1322.5
WebHeat Frost 6
6
60
881.7
WebHeat Frost 8
8
80
661.3
WebHeat Frost 10
10
100
529.0
WebHeat Frost 12
12
120
440.8
WebHeat Frost 14
14
140
377.9
WebHeat Frost 16
16
160
330.6
WebHeat Frost 18
18
180
293.9
WebHeat Frost 20
20
200
264.5
WebHeat Frost 24
24
240
220.4
WebHeat Frost 30
30
300
176.3
WebHeat Frost 42
42
420
126.0
WebHeat Frost 60
60
600
88.2
WebHeat Frost 80
80
800
66.1
WebHeat Frost 105
105
1050
50.4
WebHeat Frost 135
135
1350
39.2
SELECTIE VAN DE WEBHEAT FROST KABEL VOOR UW TOEPASSING
WebHeat Frost vorstbeschermingskabels kunnen worden gebruikt voor metalen en plastic leidingen. De selectie van de vereiste
WebHeat Vorstbeveiliging kabel is afhankelijk van de grootte van de waterleiding, laagste omgevingstemperatuur waartegen WebHeat
Frost bescherming geeft en het type van thermische isolatie.

WebHeat is a brand of Web Warehouse BV www.webheat.eu Page 6
De volgende tabel is een richtlijn voor toepassingen met 13 en 20 mm isolatie.
Warmteverlies tabel met 13 mm thermische isolatie
Min Omgevingstemperatuur
Leiding diameter
-30oC
-20oC
-10oC
½ " (21 mm) & kleiner
9 W/m
6 W/m
3 W/m
1 " (34 mm)
12 W/m
8 W/m
4 W/m
2 " (60 mm)
20 W/m
13 W/m
7 W/m
Warmteverlies tabel met 20 mm thermische isolatie
Min Omgevingstemperatuur
Leiding diameter
-30oC
-20oC
-10oC
½ " (21 mm) & kleiner
7 W/m
5 W/m
2 W/m
1 " (34 mm)
10 W/m
6 W/m
3 W/m
2 " (60 mm)
15 W/m
10 W/m
5 W/m
In het geval dat het warmteverlies kleiner is dan 10 W / m (grijs gemarkeerd zones), kan de verwarmingskabel recht langs de leiding
worden geïnstalleerd. In het geval dat het warmteverlies groter is dan 10 W / m, dient de verwarmingskabel spiraalsgewijs op de leiding
aangebracht te worden.
Let op: de hierboven vermelde waarden zijn bedoeld als een algemene gids, raadpleeg een gekwalificeerd installateur voor de
werkelijke warmteberekeningen.
BELANGRIJKE AANWIJZINGEN VOOR INSTALLATIE VAN HET SYSTEEM
1. Een geschoolde elektricien moet de verwarmingskabel aansluiten op de 230 V voeding.
2. De installatie dient te worden uitgevoerd volgens de plaatselijke wettelijke voorschriften.
3. WebHeat vorstbeschermingskabel mag niet kruisen of overlappen. Dit kan leiden tot oververhitting van de kabel, waarna
deze vervangen dient te worden.
4. De verwarming kabel mag in geen geval worden afgesneden of in lengte gewijzigd worden. Dit kan leiden tot oververhitting
leiden tot schade aan de kabel.
5. Neem voorzorgsmaatregelen om schade te voorkomen aan de verwarmingskabel tijdens de installatie.
6. Gebruik geen metalen draden/ ty-raps / om de WebHeat vorstbeschermingskabel te installeren
7. Installeer de WebHeat vorstbeschermingskabel niet beneden 10oC omgevingstemperatuur.
8. Installeer de WebHeat vorstbeschermingskabel niet op een soepele/flexibele waterslang.
9. Installeer de WebHeat vorstbeschermingskabel niet op de leiding samen met externe warmtebronnen die kunnen leiden tot
oververhitting van de leiding en de WebHeat vorstbeschermingskabel.
10. In het geval van kunststof leiding toepassingen, wikkel een aluminium folie of tape rond de plastic leiding voor een betere
warmtegeleiding voordat u de WebHeat vorstbeschermingskabel monteert.
11. De buigradius van de kabel tijdens het installeren mag niet minder dan ongeveer 65mm.

WebHeat is a brand of Web Warehouse BV www.webheat.eu Page 7
12. Isoleer de leiding altijd met voldoende thermische isolatie na het installeren van WebHeat Vorstbescherming kabel.
13. Controleer de netspanning en vermogen van WebHeat vorstbeschermingskabel. Deze staan aangegeven op het etiket van
WebHeat Frost Protection Kabel.
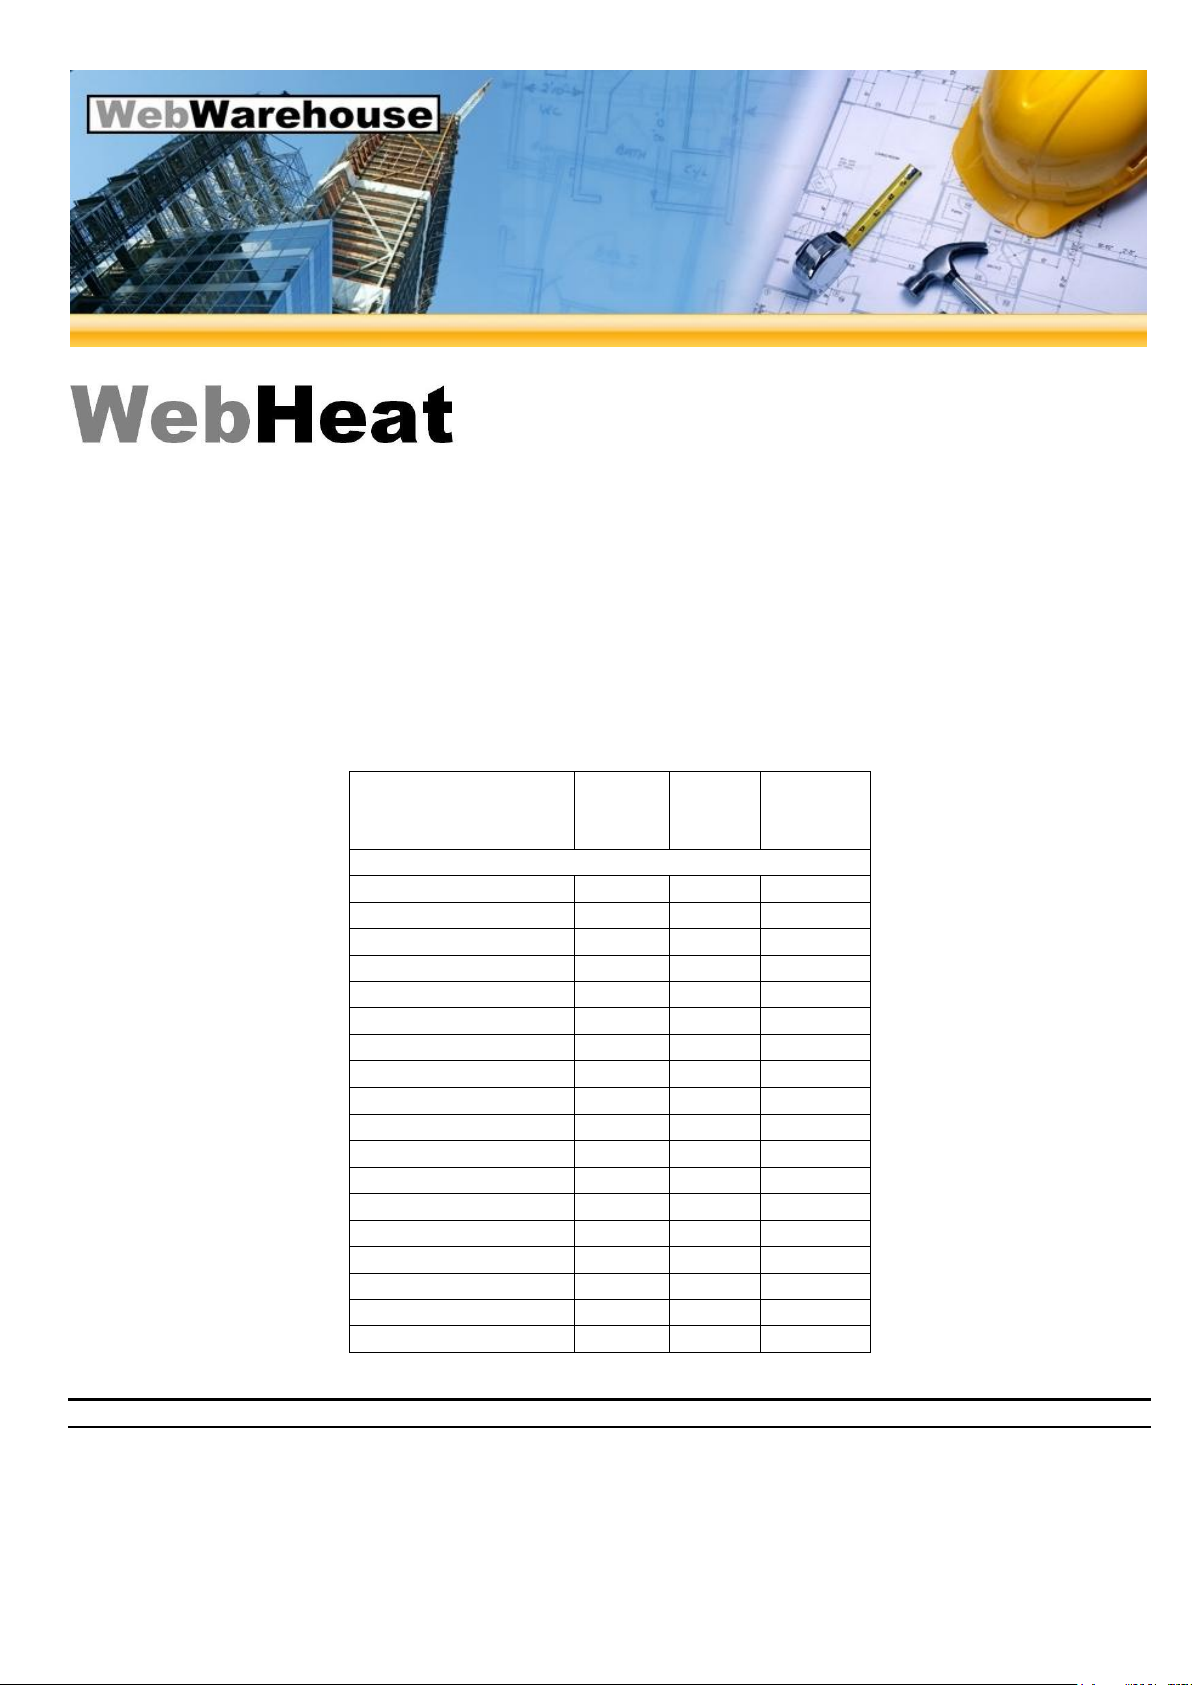
14. Controleer de weerstand en isolatieweerstand van de WebHeat vorstbeschermingskabel die je ingesteld bij het installeren en
ook na het installeren. Weerstand waarde van de kabel moet overeenkomen met de waarde in tabel assortiment. Een
tolerantie van -5% tot +10% is toegestaan. Isolatieweerstand moet groter zijn dan 10Mohms. . In het geval dat de thermostat
onder 3oC is, kunt u d.m.v. ijsblokje of ijs-spray de temperatuur bij de thermostat tijdelijk verlagen.
15. WebHeat vorstbeschermingskabel moet worden aangesloten op een aardlekschakelaar of gelijkwaardig met een nominale
reststroom bedrijfsstroom niet meer dan 30mA.
16. In het geval dat de aardlekschakelaar tijdens normaal gebruik uitschakelt en niet kan worden gereset, is er waarschijnlijk een
fout in de kabel. Er mogen geen pogingen worden gedaan om de kabel alsnog onder spanning te zetten.
PRE-INSTALLATIE VOORBEREIDINGEN
1. Zet de waterleiding aan en controller de waterleidingen op eventuele lekkages
2. Identificeer een geschikt voedingspunt (stopcontact), dicht bij het beginpunt van de leiding, bij voorkeur binnen 2 meter lengte.
3. Leg de andere accessoires, zoals hieronder wordt vereist voor de voltooiing van de installatie van WebHeat
Vorstbescherming kabel, gereed.
a. Zelfklevende aluminiumfolie tape voor de montage van de WebHeat vorstbeschermingskabel aan op de buis
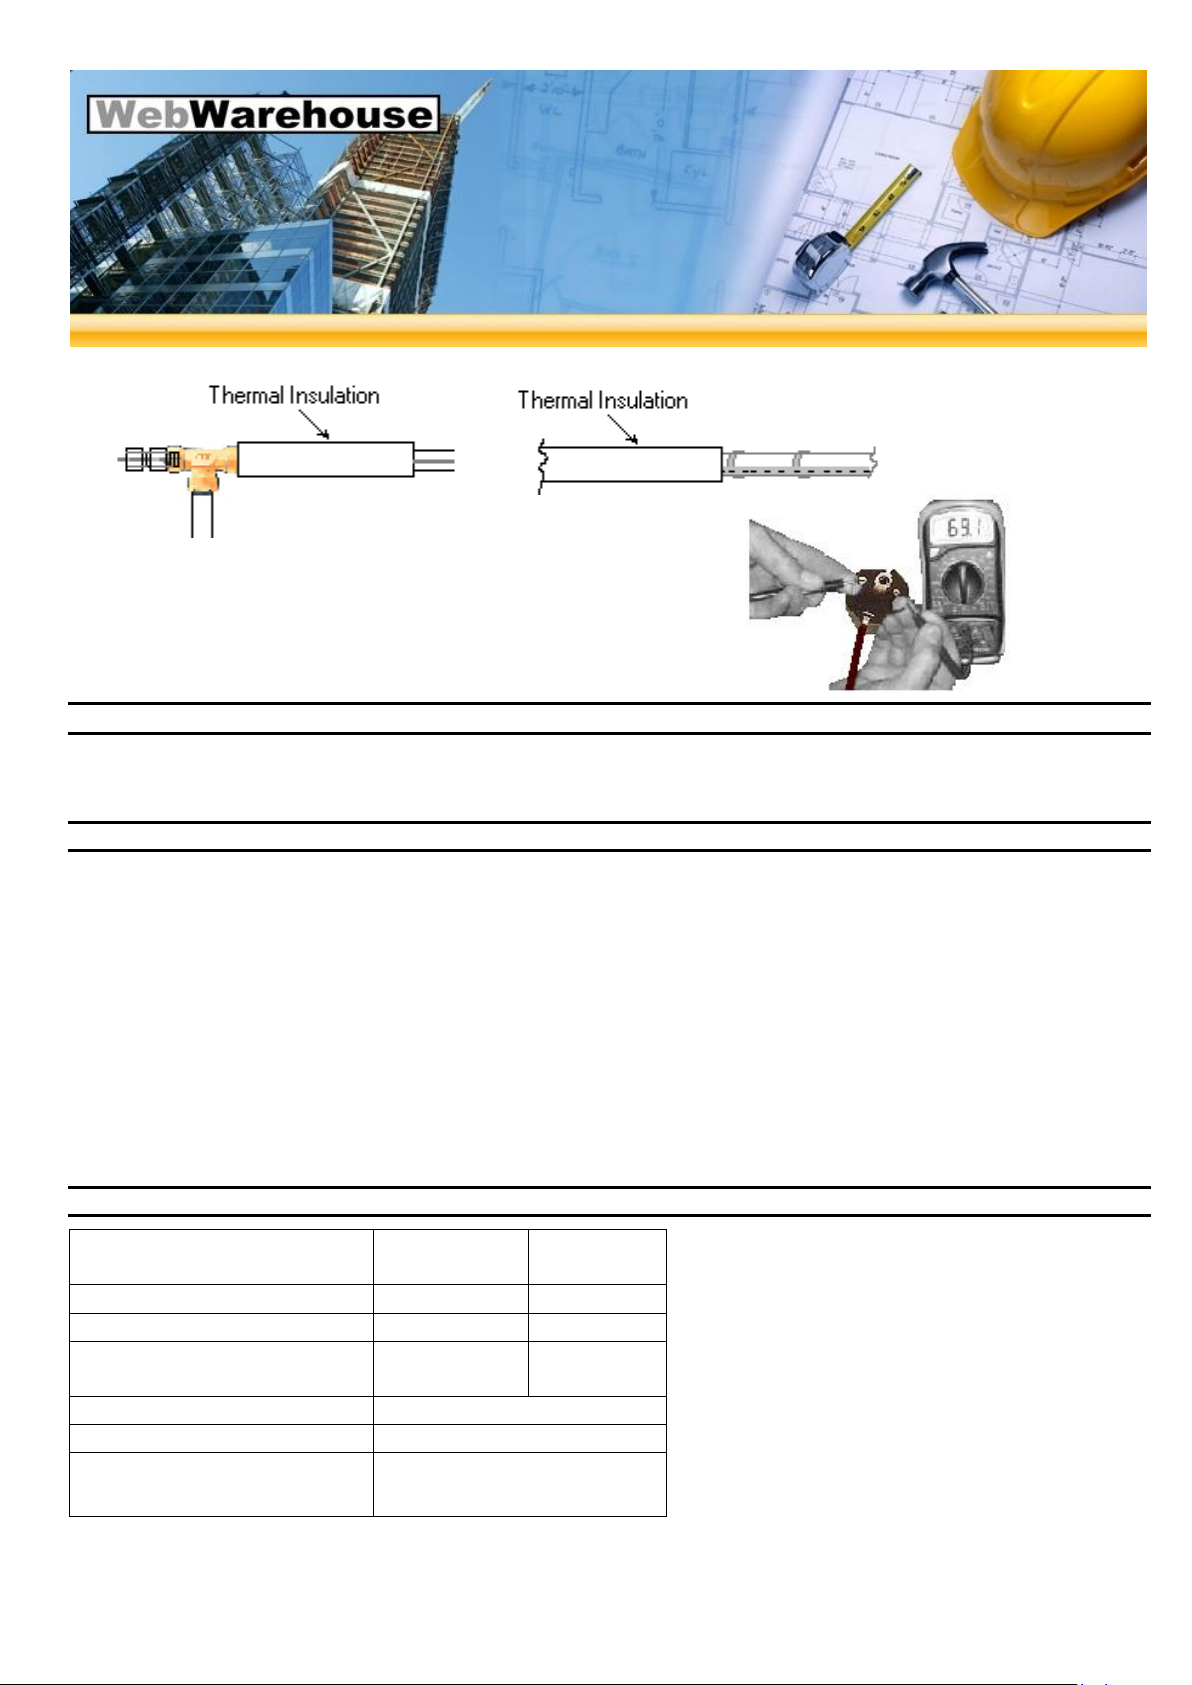
b. Thermische isolatie van voldoende dikte voor de gehele lengte van de waterleiding
4. Zorg ervoor dat de leiding vrij is van stof, olie, vet- of scherpe randen. Als er scherpe randen zijn, gebruik overdracht
hulpmiddelen zoals aluminium folie / warmteoverdracht cement op de randen zodat ze egaal zijn om schade aan de WebHeat
Vorstbescherming kabel te voorkomen.
5. Zodra je de WebHeat vorstbeschermingskabel uit de verpakking verwijdert:
a. controleer dat de kabel onbeschadigd is
b. controleer de spanning en vermogen op de doos en zorg ervoor dat als per uw eis.
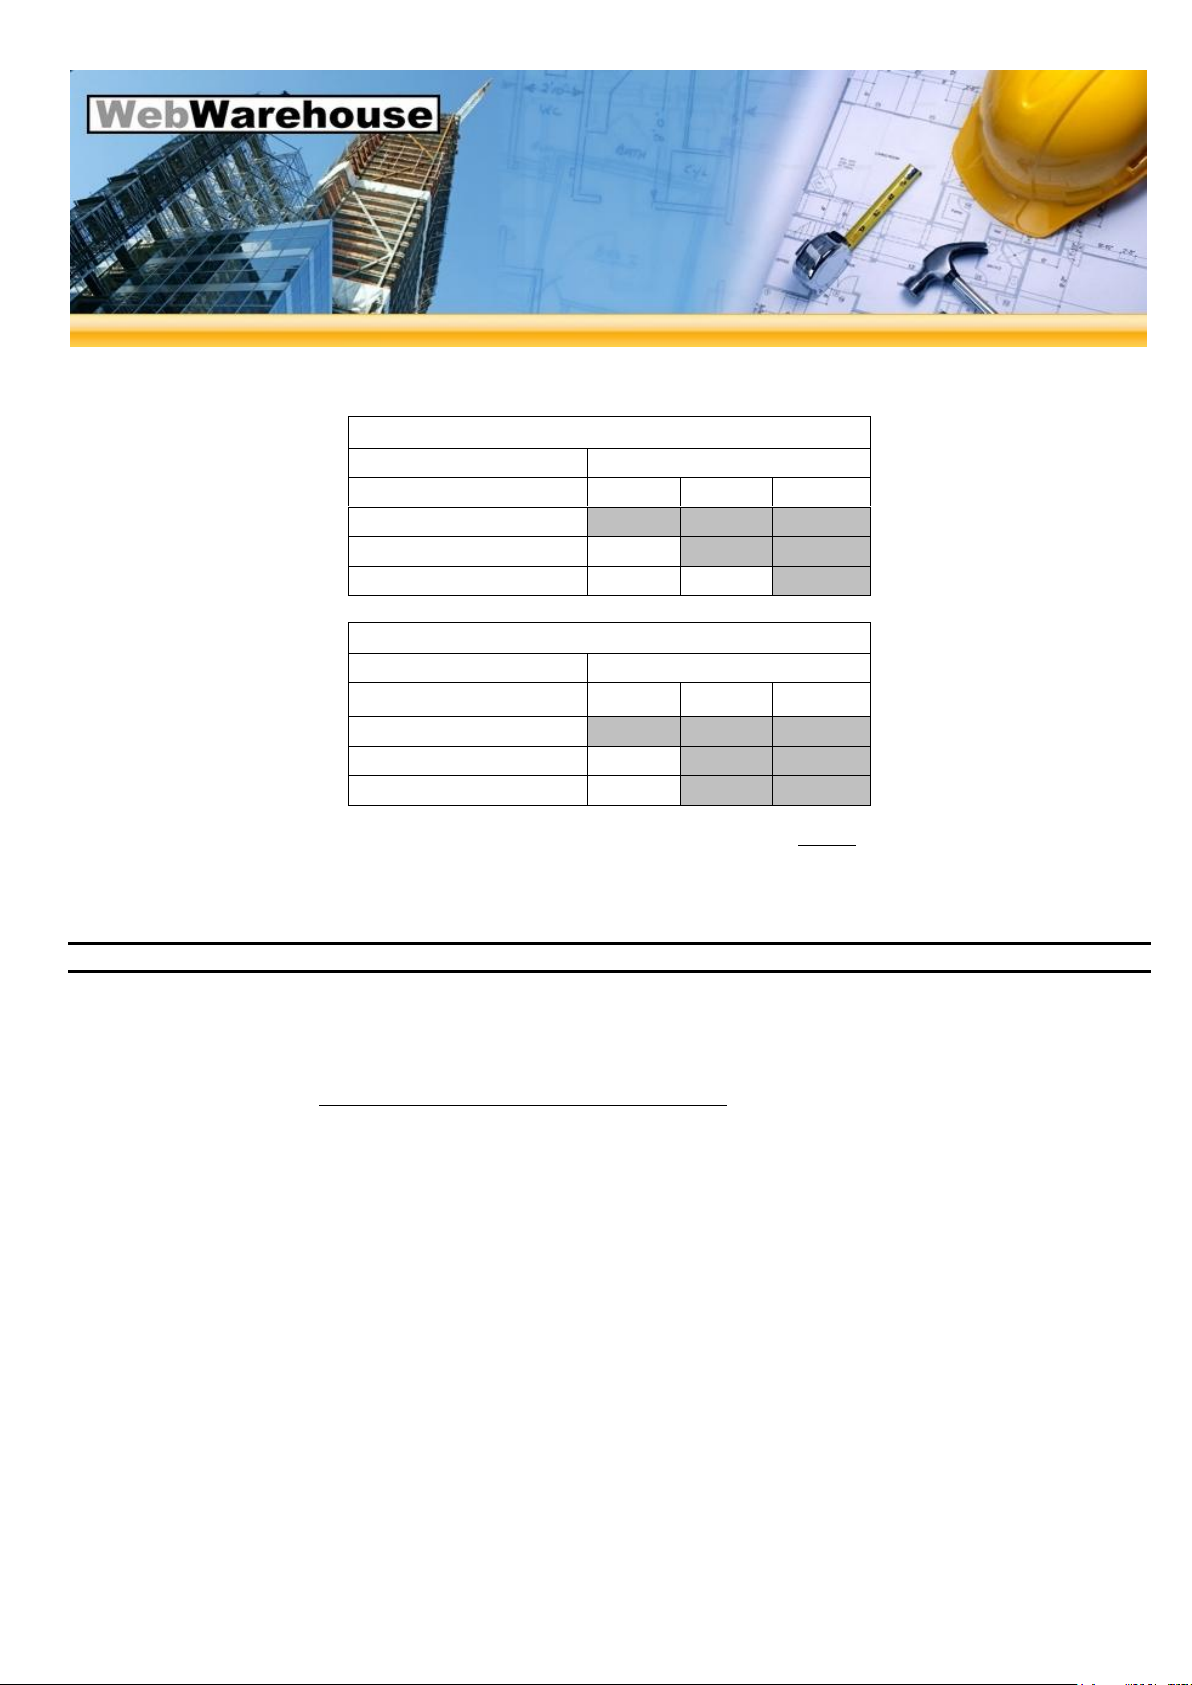
c. controleer de weerstand van de verwarmingskabel zoals omschreven bij punt 14.
d. Weerstand waarde van de kabel moet overeenkomen met de waarde vermeld in tabel assortiment. Een tolerantie
van -5% tot +10% is toegestaan. Isolatieweerstand moet groter zijn dan 10Mohms. Noteer de waarden op de
controlekaart aan het eind van deze handleiding.
6. Nu bent u klaar voor het installeren van de WebHeat Vorstbescherming kabel.
INSTALLATIE VAN DE WEBHEAT VORSTBESCHERMINGSKABEL
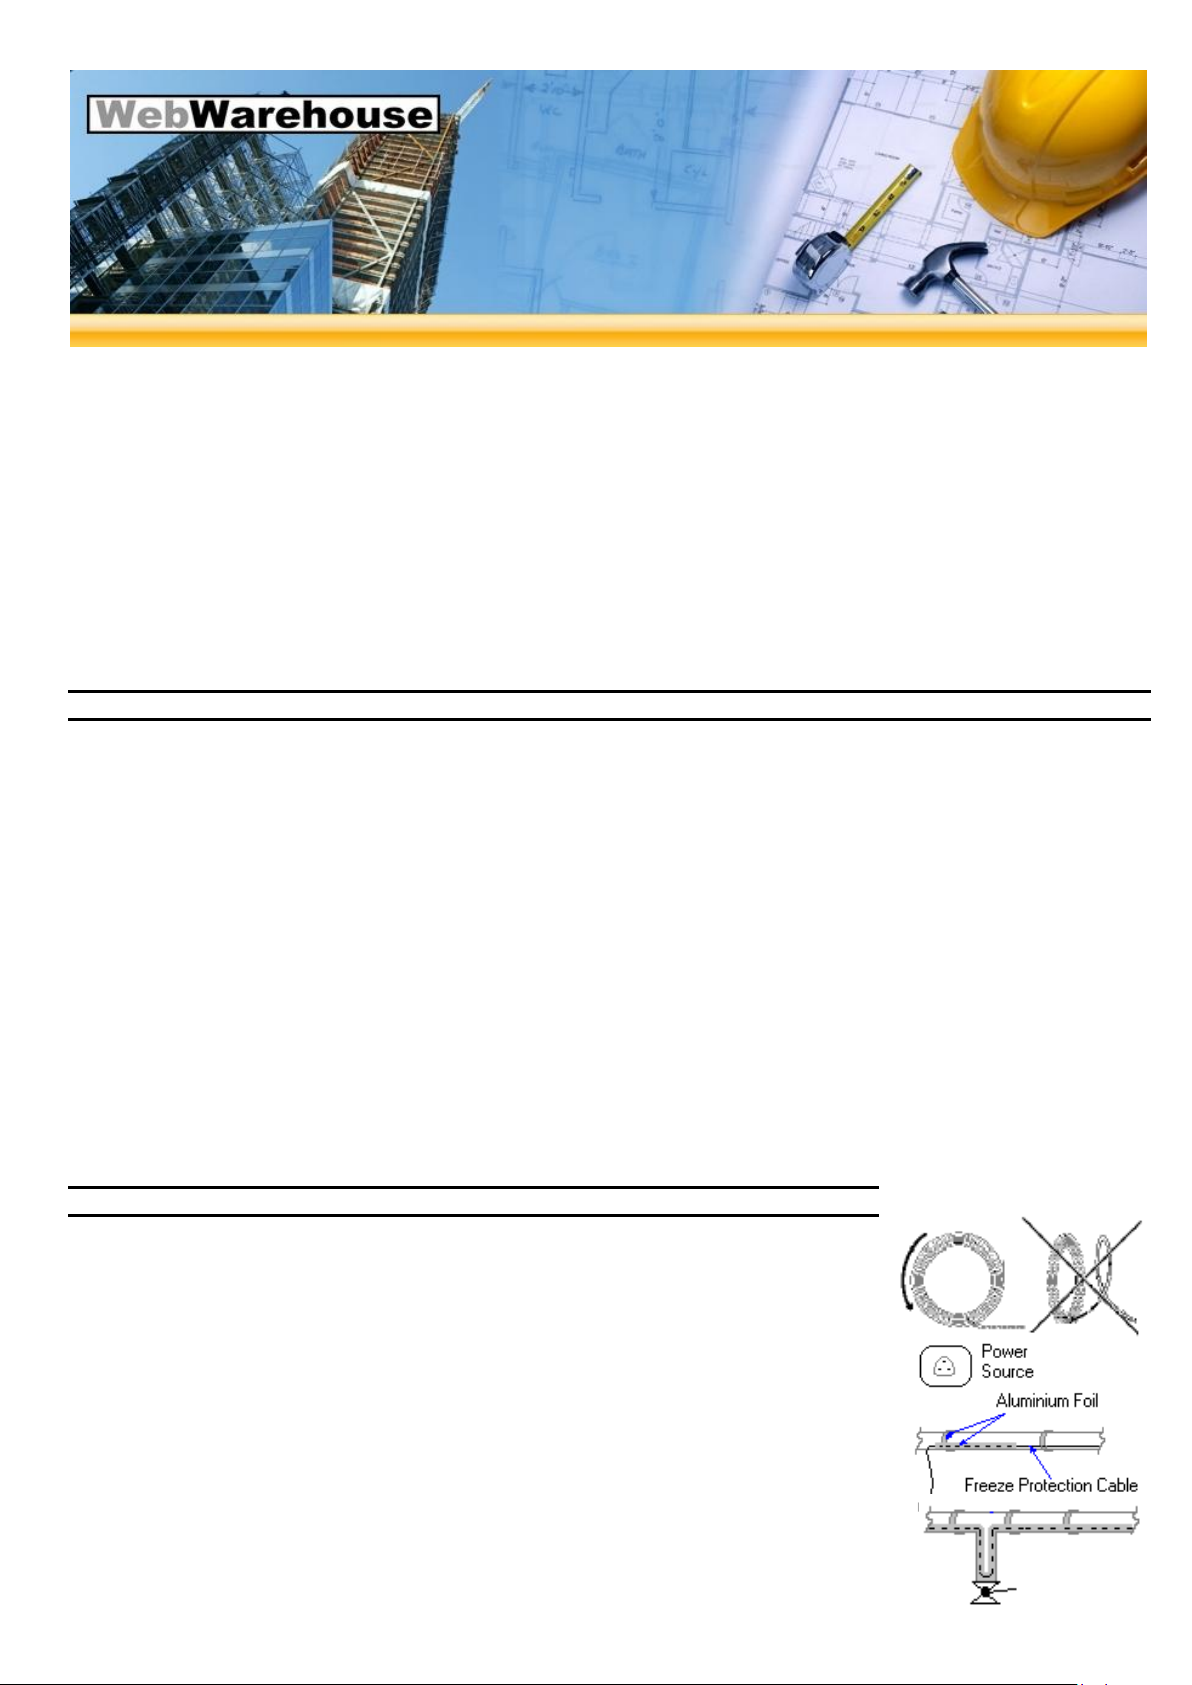
1. Rol de WebHeat Vorstbeschermingskabel helemaal uit.
2. Start de installatie van de WebHeat vorstbeschermingskabel van het dichtstbijzijnde punt op
de leiding naar spanningsbron (230 VAC) en zorg ervoor dat de verbinding tussen
voedingskabel en verwarmingskabel op de leiding ligt.
3. Zorg ervoor dat de thermostaat (aan het einde van de verwarmingskabel) geplaatst wordt
op het koudste punt van de leiding.
4. Gebruik aluminiumfolie tape om de WebHeat Vorstbeschermingskabel op de leiding te
bevestigen.
5. WebHeat Vorstbeschermingskabel moet altijd worden geïnstalleerd op de onderkant van de
leiding en worden bevestigd met aluminium folie tape voor een goede warmteafvoer.
6. In het geval vertakking van de waterleiding tot 1 meter kan de verwarmingskabel retour
worden gelegd. Bij langere aftakleidingen dient u aparte verwarmingskabels toe te passen.
7. Controleer de weerstand en isolatieweerstand van de WebHeat Vorstbescherming kabel. Dit
moet in overeenstemming zijn met de waarde voorafgaand aan de installatie. Noteer de
waarden op de controlekaart.

WebHeat is a brand of Web Warehouse BV www.webheat.eu Page 8
8. Nu dient u de thermische isolatie over de verwarmingskabel en leiding aan te brengen.
9. Controleer nogmaals de weerstand en isolatieweerstand van de
WebHeat Vorstbescherming kabel.
10. Nu kunt u de kabel aanslkuiten op de 230 VAC voedingsspanning.
OPERATIONELE TIPS
1. Als de leiding is leeg, schakel de voedingsspanning van de WebHeat vorstbeschermingskabel uit.
2. Isoleer altijd de gehele waterleiding voor een efficiënte bescherming tegen vorst en een laag energieverbruik.
GARANTIE
Web Warehouse BV biedt een garantie voor de WebHeat Frost vorstbeschermingskabel voor een periode van 2 jaar vanaf de datum
van verzending, voor het materiaal onder normale bedrijfsomstandigheden.
In geval van een defect product zal Web Warehouse BV het product repareren of een vervangend artikel aanbieden.
De garantie heeft geen betrekking op installaties door onbevoegden of defecten veroorzaakt door verkeerd ontwerp door anderen /
misbruik / door anderen veroorzaakte schade / beschadiging tijdens het vervoer / foutieve installatie en een eventuele latere schade
die zou kunnen optreden. Reparatie / vervanging zal worden berekend indien de schade is als gevolg van een van de bovenstaande
redenen.
Web Warehouse BV is in geen geval aansprakelijk voor gevolgschade of verliezen inbegrip van en zonder beperkingen het verlies of
de winst als gevolg van welke oorzaak dan ook. De garantie is een materiaal garantie alleen en heeft geen betrekking op
werkzaamheden op het veld en/of installatiekosten.
De garantie is ongeldig als er sprake is van wanbetaling en indien de gegevens niet zijn ingevuld in de controlekaart.
CONTROLE KAART
Type:
Voor Installatie
Na installatie
Continuity
Weerstand van de kabel (Ohms)
Ohm
Ohm
Isolatie weerstand (M Ohm)
Mega Ohm
Mega Ohm
Adres van de installatie:
Datum van de installatie:
Naam en handtekening van de
bevoegde installateur:

WebHeat is a brand of Web Warehouse BV www.webheat.eu Page 9
Frost Installationsanleitung
WebHeat Frost Frostschutz Kabel sind für private Anwendungen entwickelt, um Wasser vor dem Einfrieren zu schützen. Dies sind zwei
Heizdrähte in Fixlängen im Fabrik gründlich getestet Verbindungen.
WebHeat Frost Frostschutz Kabel bestehen aus einem Widerstands-Heizelement mit FP isoliert (Flouropolymer) isoliert mit hoher
Spannungsfestigkeit und hohe Temperaturbeständigkeit, damit die Kabel vollständig sicher ist. Ein Metall-Bildschirm ist so angeordnet
um zusätzliche mechanische Festigkeit zu geben und für eine sichere Erdung. Eine abschließende Abdeckung ist für zusätzliche
Festigkeit vorgesehen und schützt gegen Korrosion. Die Verbindung zwischen Kabel und Heizdraht hat ein einzigartiges Design und ist
100% narrensicher. Das Heizkabel besteht aus 2 Meter mit einem kalten Pfeife Stecker, am Ende der Heizleitung ist der Thermostat
eingebaut.
Diese Kabel sind in vielen Größen erhältlich für Ihre Anforderungen.
Artikelnummer
Länge
(M)
Leistung
(W)
Widerstand
(ohms)
Leistung: 10W/M bei 230VAC
WebHeat Frost 1
1
10
5290.0
WebHeat Frost 2
2
20
2645.0
WebHeat Frost 4
4
40
1322.5
WebHeat Frost 6
6
60
881.7
WebHeat Frost 8
8
80
661.3
WebHeat Frost 10
10
100
529.0
WebHeat Frost 12
12
120
440.8
WebHeat Frost 14
14
140
377.9
WebHeat Frost 16
16
160
330.6
WebHeat Frost 18
18
180
293.9
WebHeat Frost 20
20
200
264.5
WebHeat Frost 24
24
240
220.4
WebHeat Frost 30
30
300
176.3
WebHeat Frost 42
42
420
126.0
WebHeat Frost 60
60
600
88.2
WebHeat Frost 80
80
800
66.1
WebHeat Frost 105
105
1050
50.4
WebHeat Frost 135
135
1350
39.2
AUSWAHL VON FROST WEBHEAT KABEL FÜR IHRE BEWERBUNG
WebHeat Frost Frostschutz Kabel können für Metall- und Kunststoffrohre verwendet werden. Die Auswahl der benötigten WebHeat
Frost Kabel hängt von der Größe des Wassers, niedrigste Temperatur bei der WebHeat Frostschutz und die Art der Wärmedämmung.

WebHeat is a brand of Web Warehouse BV www.webheat.eu Page 10
Die folgende Tabelle ist eine Richtlinie für Anwendungen mit 13 und 20 mm Isolierung.
Wärmeverlust Tabelle mit 13 mm Wärmedämmung
Min Temperatur
Rohrdurchmesser
-30oC
-20oC
-10oC
½ " (21 mm) & kleiner
9 W/m
6 W/m
3 W/m
1 " (34 mm)
12 W/m
8 W/m
4 W/m
2 " (60 mm)
20 W/m
13 W/m
7 W/m
Wärmeverlust Tabelle mit 20 mm Wärmedämmung
Min Temperatur
Rohrdurchmesser
-30oC
-20oC
-10oC
½ " (21 mm) & kleiner
7 W/m
5 W/m
2 W/m
1 " (34 mm)
10 W/m
6 W/m
3 W/m
2 " (60 mm)
15 W/m
10 W/m
5 W/m
Für den Fall dass der Wärmeverlust von weniger ist als 10 W / m (schattiert in Grauzonen), können Sie das Heizband gerade entlang
dem Rohr installieren. Falls den Wärmeverlust größer als 10 W / m ist, soll die Heizleitung auf der Spirale Rohr eingesetzt werden.
Hinweis: die oben angegebenen Werte sind als allgemeine Anleitung dienen, konsultieren Sie einen qualifizierten Installateur für die
eigentliche Wärme-Berechnungen.
WICHTIGE HINWEISE ZUR INSTALLATION DES SYSTEMS
1. Ein qualifizierter Elektriker soll dem Kabel an die 230 V in Verbindung stellen.
2. Die Installation muss in Übereinstimmung mit örtlichen Gesetzen werden.
3. WebHeat Frostschutz Kabel müssen nicht kreuzen oder überlappen. Dies kann zu einer Überhitzung des Kabels enden, dann
müss die Kabel ausgetauscht werden.
4. Das Heizkabel darf nicht gekürzt oder geändert in der Länge werden. Dies kann zu Überhitzung führen, mit Erfolg einer
Beschädigung des Kabels.
5. Treffen Sie Vorsichtsmaßnahmen, um Schäden an der Heizung Kabel während der Installation zu vermeiden.
6. Verwenden Sie keine Metalldrähte / -Kabelbinder um die WebHeat Frostschutz Kabel zu installieren.
7. Installieren Sie die WebHeat Frostschutz Kabel nicht unter 10oC der Umgebungstemperatur.
8. Installieren Sie die WebHeat Frostschutz Kabel nicht auf einen flexiblen Wasserschlauch.
9. Installieren Sie die WebHeat Frostschutz-Kabel nicht an einem Rohr mit externen Wärmequellen, se können zu Überhitzung
von der Leitung und der WebHeat Frostschutz-Kabel führen.
10. Im Falle der Kunststoffrohr Anwendungen, Sie müssen einen Wrap oder Aluminiumfolie Band um das Kunststoffrohr machen
für eine bessere Wärmeleitung vor WebHeat Frostschutz Kabelkonfektion.
11. Der Biegeradius des Kabels während der Installation darf nicht kleiner sein als etwa 65mm.

WebHeat is a brand of Web Warehouse BV www.webheat.eu Page 11
12. Isolieren Sie die Kraftstoffleitung immer mit ausreichender Wärmedämmung nach der Installation das WebHeat Frostschutz-
Kabel.
13. Überprüfen Sie die Spannung und das Netz der WebHeat Frostschutz-Kabel. Diese sind auf dem Etikett der WebHeat
Frostschutz Kabel angegeben.
14. Prüfen Sie den Widerstand und Isolationswiderstand der WebHeat Frostschutz Kabel Sie während der Installation und nach
der Installation. Widerstand des Kabels muss mit dem Wert in der Tabelle Bereich sein. Eine Toleranz von -5% bis 10% ist
zulässig . Isolationswiderstand muss größer sein als 10mohm. Wann die Temperaturen von Sensor unter 3°C ist, können Sie
die Temperatur der Thermostat Absenken mit Eis oder Eis-Spray.
15. WebHeat Frostschutz-Kabel muss an einen Schutzschalter oder gleichwertig mit einem Bemessungsauslösestrom von
maximal 30 mA angeschlossen werden.
16. Für den Fall, dass der Leistungsschalter ausgeschaltet und während des normalen Betriebs nicht zurückgesetzt werden kann,
gibt es wahrscheinlich ein Fehler im Kabel. Es darf nicht versucht werden um das Kabel noch mit Energie gemacht zu
werden.
VORMONTAGE ZUBEREITUNGEN
1. Schalten Sie die Wasser-Linie an und kontrollieren Sie den Regler auf Wasser Leckagen
2. Identifizieren Sie einer geeigneten Steckdose (Buchse), in der Nahe dem Ausgangspunkt des Rohres, vorzugsweise
innerhalb von 2 Metern Länge.
3. Legen Sie die andere Zubehören, wie unten, für die Fertigstellung der Installation von der WebHeat Frostschutz-Kabel bereit.
a. Alufolie Klebeband für die Montage der WebHeat Frostschutz-Kabel an das Rohr
b. Wärmedämmung von ausreichender Dicke über die gesamte Länge das Wasserrohr.
4. Stellen Sie sicher, das Rohr ist frei von Staub, Öl, Fett oder scharfe Kanten. Wenn es scharfe Kanten sind, Einsatz Transfer
Geräte wie Aluminiumfolie / Wärmeübertragung Zement an den Rändern, so dass sie glatt um eine Beschädigung der
WebHeat Frostschutz Kabel zu verhindern.
5. Sobald Sie WebHeat Frostschutz-Kabel aus dem Paket entfernt:
a. Überprüfen Sie, ob das Kabel unbeschädigt ist.
b. überprüfen Sie die Spannung und Leistung auf dem Feld und stellen Sie sicher, dass wie pro Ihre Anforderung.
c. Prüfen Sie den Widerstand der Heizleitung (nur bei Temperaturen unter 3 ° C ) und der Isolationswiderstand mit
einem Multimeter und Megger jeweils.
d. Widerstand des Kabels muss korrespondieren mit dem Wert in der Tabelle aufgeführten Sortiment. Eine Toleranz
von -5% bis 10% ist zulässig. Isolationswiderstand muss größer sein als 10mohm. Notieren Sie die Werten auf der
Steuerkarte am Ende dieses Handbuchs.
6. Nun sind Sie bereit, um das Kabel WebHeat Frostschutz zu installieren.
INSTALLATION VON WEBHEAT FROSTSCHUTZ-KABEL
1. Rollen Sie die WebHeat Frostschutz Kabel vollständig aus.
2. Starten Sie die Installation von Frostschutz WebHeat Kabel vom nächstgelegenen Punkt auf
der Linie mit der Stromversorgung (Stromquelle) und stellen Sie sicher das die Verbindung
zwischen das Stromkabel und Heizkabel völlig am Rohr montiert ist.
3. Achten Sie darauf, dass den Thermostat (am Ende der Heizleitung) an der kältesten Stelle
des Rohres angeordnet ist.
4. Verwenden Sie Alufolie Band um die WebHeat Frostschutz-Kabel auf das Rohr zu montieren.
5. WebHeat Frostschutz- Kabel sollte immer auf der Unterseite des Rohres angebracht werden
und sind mit Aluminiumfolie Band für die richtige Wärmeableitung gesichert.
6. Bei der Verzweigung von Wasserrohr bis zu 1 Meter, kann die Heizkabel zurück übermittelt
werden. Für längere Verzweigungen, sollen Sie mehrere WebHeat Frostschutz-Kabel
montieren.

WebHeat is a brand of Web Warehouse BV www.webheat.eu Page 12
7. Prüfen Sie die Isolation und Beständigkeit des Kabels WebHeat Frostschutz. Dies muss im Einklang mit dem Wert vor der
Installation sein. Notieren Sie die Werte auf der Steuerkarte.
8. Montieren Sie jetzt die Wärmedämmung von ausreichender Dicke.
9. Überprüfen Sie nochmals der Widerstand und die Isolierung des WebHeat Frostschutz.
10. Jetzt können Sie das Stromkabel verbinden mit die Netspannung.
OPERATIVES TIPPS
1. Wenn das Rohr leer ist, schalten Sie die Stromversorgung zum WebHeat Frostschutz-Kabel ab.
2. Isolieren Sie immer die gesamte Wasserleitung für einen effizienten Schutz gegen Frost und niedrigen Stromverbrauch.
GARANTIE
Web Warehouse BV bietet eine Garantie für WebHeat Frost Frostschutz-Kabel für einen Zeitraum von 2 Jahren ab Datum der
Auslieferung das Material unter normalen Betriebsbedingungen.
Im Falle eines defekten Produkts Web Warehouse BV repariert das Produkt oder bietet einem Ersatzartikel an.
Die Garantie gilt nicht für unbefugte Installationen oder Defekten durch fehlerhafte Ausführung durch andere / Missbrauch / Schäden,
die durch andere / Transportschäden / gebrochen Installation und Folgeschäden, die auftreten können verursacht werden. Reparatur /
Ersatz wird berechnet, wenn der Schaden durch eine der oben genannten Gründe zurückzuführen.
Web Warehouse BV ist in keiner Fall haftbar für Folgeschäden oder Verluste, einschließlich ohne Einschränkung entgangenen Gewinn
auf Grund welcher Ursache immer. Die Garantie ist ein Material- Garantie nur und nicht für Tätigkeiten im Bereich und /oder
Installationskosten.
Die Garantie erlischt, wenn in Verzug oder wenn die Daten nicht in die Steuerkarte eingetragen sind.
STEUERKARTE
Type:
Vor Installation
Nach
Installation
Continuity
Widerstand des Kabels (Ohms)
Ohm
Ohm
Isolationswiderstand (M Ohm)
Mega Ohm
Mega Ohm
Adresse der Installation:
Datum der Installation:
Name und Unterschrift des
qualifizierter Elektriker:
This manual suits for next models
17
Table of contents
Languages:
Popular Cables And Connectors manuals by other brands

solarwatt
solarwatt AZ-TM-PME-1125 installation guide

Eagle
Eagle A145HA product manual

Monster
Monster ICRUZE INTERFACE CABLE MPC FX IM-MB1 Installation & user guide

Philips
Philips SWV2432W Specifications

Tektronix
Tektronix KEITHLEY 4200-MAG-BASE installation instructions

Grip
Grip G-SWA Assembly and operating manual