Weidmüller PVNCM1I3S1F3V101TXPX10 User manual

PV Next String Combiner Box
with fireman switch functionality
Operating instructions

7770019215/15.10.2021
2

3
Contents
1 About this documentation 4
1.1 Target group 4
1.2 Symbols and notes 4
2 Safety 5
2.1 General safety note 5
2.2 Switching off and on safely 5
2.3 Intended use 5
2.4 Personnel 6
2.5 Legal notice 6
2.6 Warnings on the product 6
3 Product description 8
3.1 Product overview 8
3.2 Enclosure 11
3.3 Switch-disconnector 11
3.4 Connections 11
3.5 SL SET PV Next seal set 11
3.6 Surge protection device 11
3.7 PCB terminals 11
3.12 Fuse holder with fuse link 13
3.13 Surge protection according to DIN EN 50539-12 13
133.14 Regarding the LPL
3.15 Technical data 14
4 Transport and storage 16
4.1 Transport 16
4.2 Unpacking the delivery 16
4.3 Storage 16
5 Installation 17
5.1 Installation site 17
5.2 Mounting the product 18
5.3 Enclosure and mounting dimensions 19
6 Commissioning 20
6.1 Preconditions for commissioning 20
6.2 Commissioning the PV Next String Combiner Box 20
7 Cleaning 22
8 Maintenace 23
8.1 Annual visual inspection 23
8.2 Checking and replacing fuse links 23
8.3 Checking surge protection arresters 24
8.4 Replacing surge protection arresters 24
8.5 Checking insulation resistance 24
8.6 Service 24
8.7 Spare parts and accessories 25
9 Decommissioning and disposal 26
9.1 Decommissioning 26
9.2 Disposal 26
APPENDIX 27
Electrical connection layout 27
Revision 15 October 2021
7770019215/15.10.2021
3.8 DC power contactors 12
3.9 Fireman switch 12
3.10 Fireman switch terminals 12
Manufacturer
Weidmüller Sweden
Axel Danielssons väg 271
215 82 Malmö, Sweden
Tel. +46 771 43 00 44
www.weidmuller.se
Document No. 7770019215
3.11 Surge protection status contact 12

4
1.1 Target group
These operating instructions are intended for the operator
of the photovoltaic system (PV system) and for all persons
handling the product during its life cycle.
The required knowledge of this group of persons is dened
in the safety chapter.
1.2 Symbols and notes
The warnings contained in the documentation are divided
into hazard categories.
DANGER
Imminent risk to life!
Notes with the signal word "DANGER" warn
you of situations which will result in serious
injury or death if you do not observe the speci-
ed instructions.
WARNING
Danger to life!
Notes with the signal word "WARNING" warn
you of situations which may result in serious
injury or death if you do not observe the speci-
ed instructions.
CAUTION
Risk of injury!
Notes with the signal word "CAUTION" warn
you of situations which may result in injury if
you do not observe the specied instructions.
ATTENTION
Material damage!
Notes with the signal word "ATTENTION" warn you about
hazards which may result in damage to property.
The situation-dependent warnings may contain the follow-
ing warning symbols:
Symbol Meaning
Warning of dangerous electrical voltage
Warning of electrostatically charged compo-
nents
Mandatory: Observe the documentation
Additional formatting is used in the rest of the text which
has the following meaning:
Sections of text next to this arrow contain infor-
mation which is not related to safety, but which
provides important information regarding correct
and eective work.
► All instructions can be identied by the black triangle
next to the text.
– Lists are indicated with dashes.
►Store the instructions such that they are
available at all times. Do not store the in-
structions in the product enclosure.
The document is available to download from
Weidmüller Website.
https://www.weidmueller.com/pvnext
►Also refer to the inverter manufacturer's
documentation.
1 About this documentation
7770019215/15.10.2021

5
2 Safety
This section includes general safety notes for handling the
product. Specic warnings for specic tasks and situations
are given at the appropriate places in the documentation.
Failure to observe the safety notes and warnings can result
in physical injury and property damage.
2.1 General safety note
– Before carrying out any work on the product, it must be
switched o and free of dangerous voltage (see section
2.2). This reduces the risk of electric shocks or arcing.
– The product is not suitable for use in potential-
ly explosive atmospheres. Work on the PV Next
String Combiner Box can produce sparks that can ignite
a potentially explosive air mixture.
– The approved environmental conditions for the installa-
tion site must be observed.
– The operator must ensure that the product is not acces-
sible to unauthorised persons.
– No combustible or electrically conductive materials may
be stored inside the enclosure.
– The PV Next String Combiner Box must not be operated
with damaged cables or connectors, as they may cause
electric shock, short circuit or re. Do not touch dam-
aged areas and ensure the system is not live. Have the
system checked and repaired by a specialist.
– Fuse links must not be removed or inserted under load
as this may result in life-threatening arcing.
– Suitable personal protective equipment must be worn
during all work on the product.
– During installation and maintenance work, make sure
that no moisture can penetrate into the enclosure.
– The PV system must be designed in such a way that all
components are operated exclusively within their per-
missible operating range.
– Local installation regulations must be observed.
– If a fault in the product cannot be remedied by the meas-
ures described in these instructions, you must return the
product to Weidmüller. Weidmüller does not provide a
guarantee if the product has been tampered with.
– The outputs of the PV Next String Combiner Box must
never be connected to the inverter (load) while it is live.
Even when the inverter is switched o, charging the in-
ternal capacitors can lead to dangerous arcing.
– Never touch exposed live parts or cables.
– Do not disconnect PV connectors under load.
– Disconnect the inverter before carrying out any main-
tenance work. Inverters contain capacitors that store
life-threatening voltages. Wait until the capacitors are
discharged.
– Follow the operating instructions of the inverter you are
using. Contact the manufacturer for more information
and advice.
2.2 Switching off and on safely
DANGER
Risk of fatal electric shock when touch-
ing live DC cables and live parts in the
opened product!
PV systems can generate dangerous voltag-
es. Before starting work, ensure that the PV
system and devices are disconnected from the
mains and from the PV generators.
►Before carrying out any work on the prod-
uct, it must be disconnected from the power
supply and secured against being switched
on again.
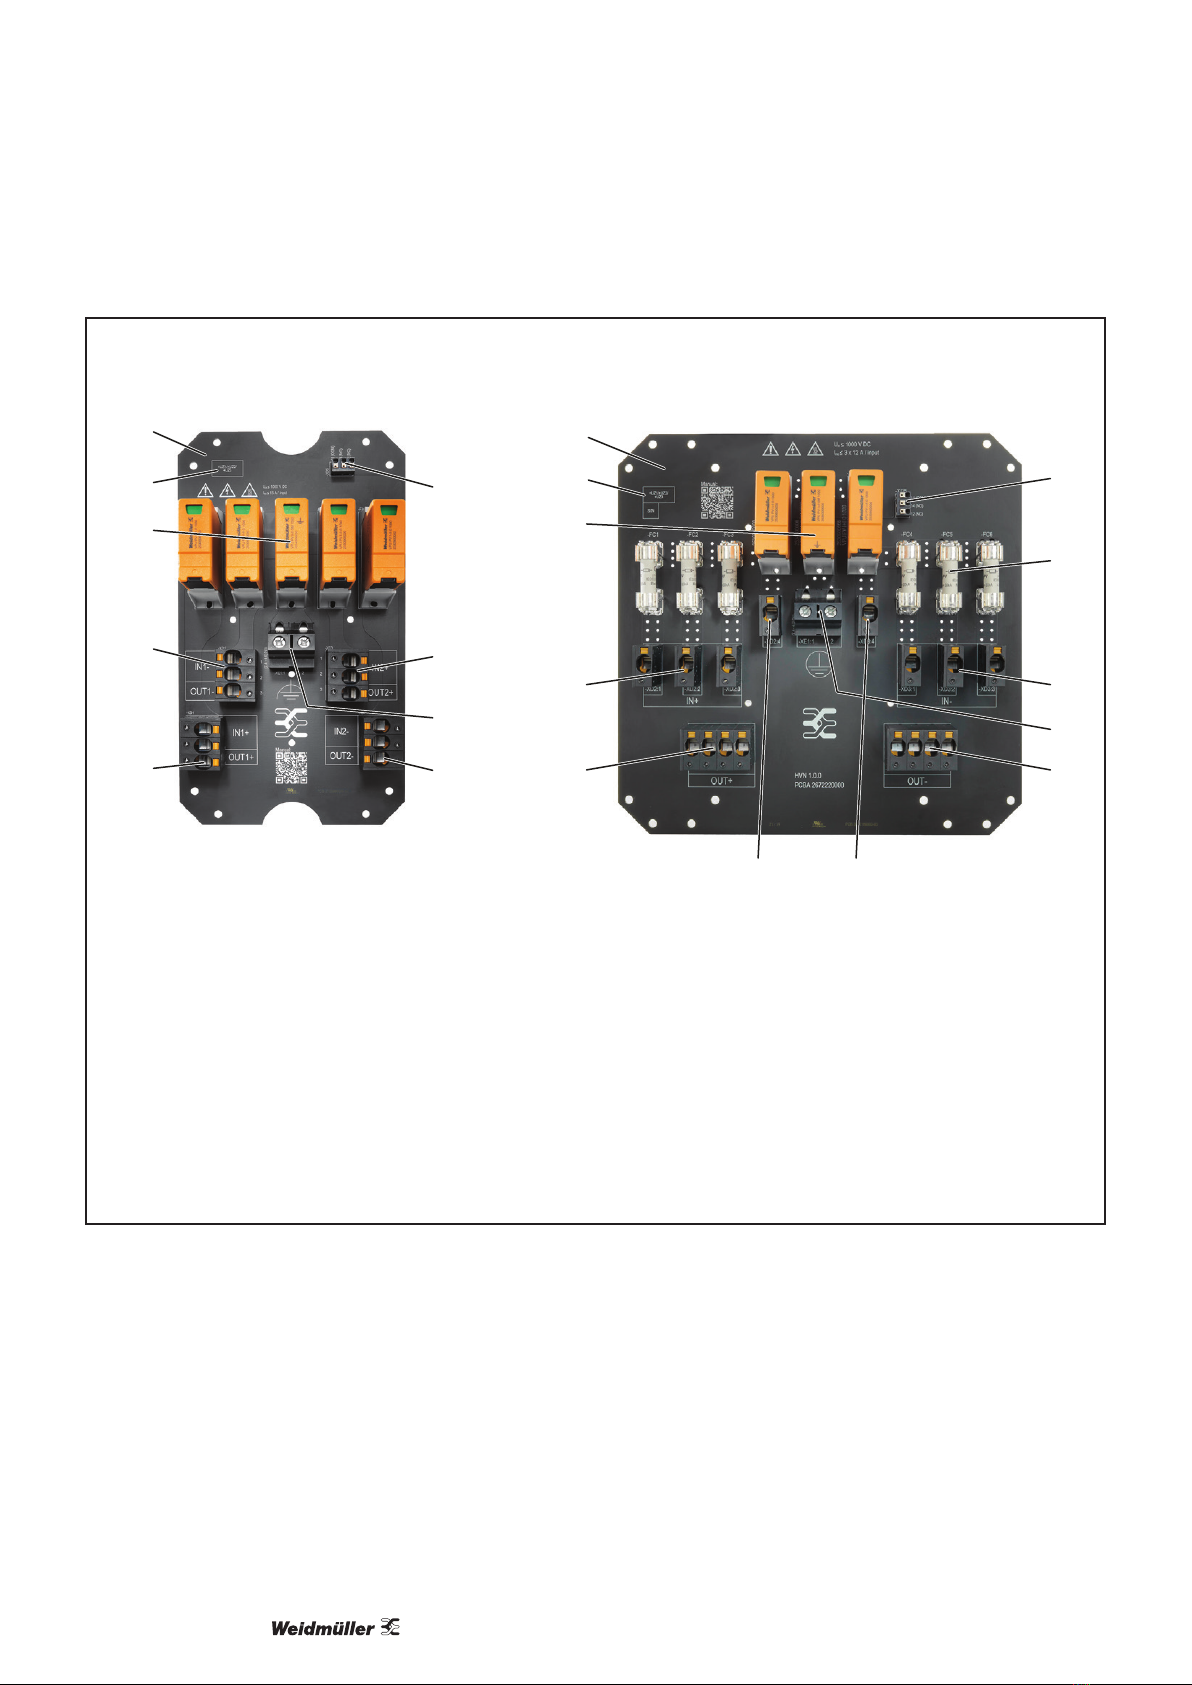
Switching off safely
►Make sure there is no voltage before you open the
PV Next String Combiner Box. Proceed exactly in this
order:
1. Switch o the inverter.
2. Switch the switch-disconnector of the PV Next
String Combiner Box or of the inverter to the o-position.
3. Disconnect all string cables to the inputs of the PV Next
String Combiner Box. Both the positive and negative
connections must be disconnected.
You can now open the PV Next String Combiner Box.
Switch on once all work has been completed:
►Close the PV Next String Combiner Box with the cover.
►Check the voltage, polarity and absence of earth faults
of the string cables.
►Reconnect the string cables to the connectors on the
underside of the PV Next String Combiner Box.
– Pay attention to the correct polarity and assignment
of the string cables.
– Only connect string cables with identical open-circuit
voltages.
►Switch the inverter on again using the switch-disconnec-
tor on the output side.
2.3 Intended use
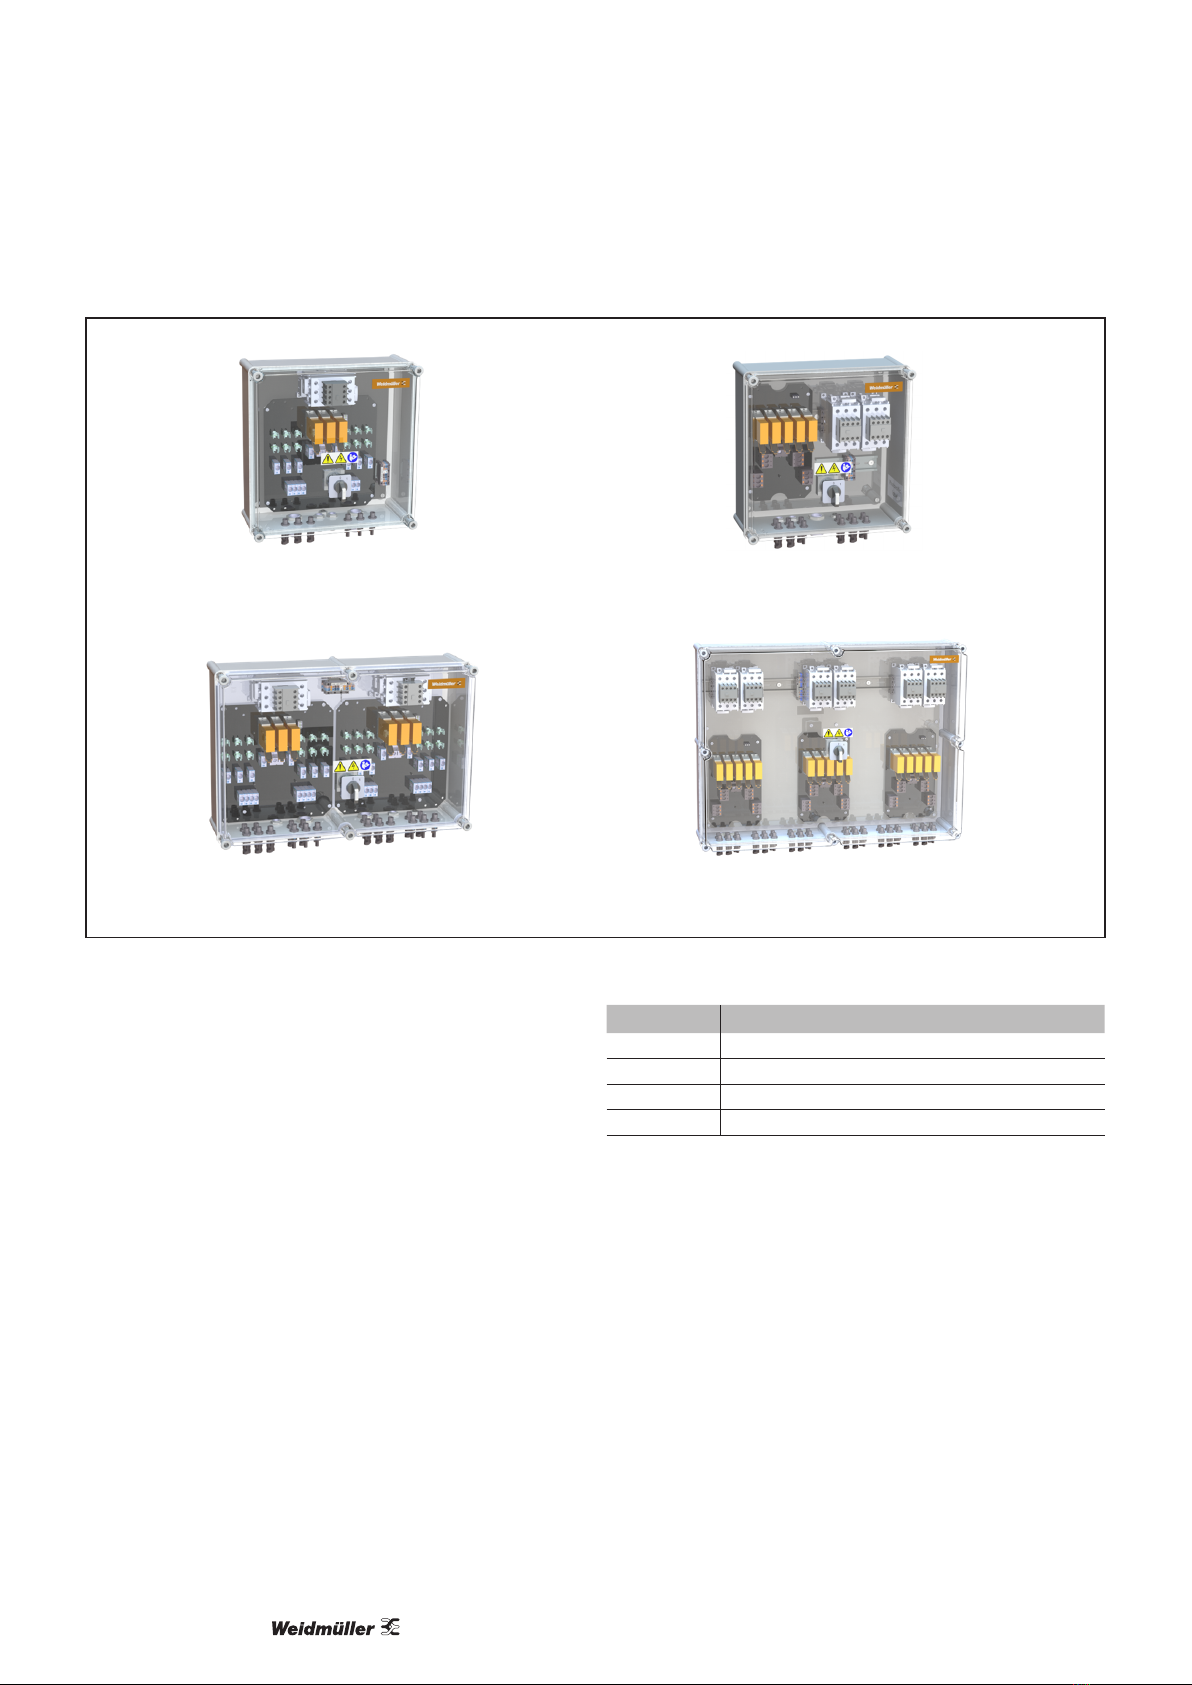
The PV Next String Combiner Box is intended to be in-
stalled in the DC connection between photovoltaic modules
and inverters. Any other use is considered improper. Mod-
ications to the product and the installation of further com-
ponents are only permitted if recommended by Weidmüller.
Observance of the documentation is also part of the intend-
ed use.
7770019215/15.10.2021

Safety
6
2.4 Personnel
All activities described in this document may
only be carried out by specialists and instruct-
ed persons with the following qualications:
– Knowledge of the functionality and principle
of PV systems
– Training in handling dangers and risks dur-
ing installation and handling electrical devic-
es and systems
– Knowledge of applicable standards and
guidelines
– Knowledge and observance of these oper-
ating instructions and the safety instructions
contained therein
It is a common practice in the sector to apply the ve safety
rules contained in standard EN 50110. In all cases, quali-
ed electricians must analyse each system individually to
determine the best approach to safety.
The ve safety rules are the following:
1. Disconnect the system completely from the power
supply
2. Secure against re-connection
3. Check that the system is not live
4. Carry out earthing and measures against short-cir-
cuiting.
5. Provide protection against adjacent live parts
2.5 Legal notice
The product is CE compliant according to Directive
2014/35/EU (Low Voltage Directive).
The product meets the requirements of IEC 61439-2:2011
and the integrated surge protection meets the require-
ments of EN 50539-11:2015, EN 50539-12:2014.
2.6 Warnings on the product
The following warnings are attached to the cover of the
PV Next String Combiner Box as a sticker:
The symbols must be clearly visible throughout the service
life of the product. If the legibility decreases, the operator
of the system must arrange for the warning sticker to be
replaced.
7770019215/15.10.2021

7
7770019215/15.10.2021

7770019119, max. 6 strings
on 2 MPPTs
7770019121, max. 12 strings
on 6 MPPTs
Figure 3.1 Overview of the variants
3.1 Product overview
The Weidmüller PV Next String Combiner Boxes are
standardised string combiners with which photovoltaic
string cables in private or commercial PV systems can be
connected safely and easily to the inverters.
The product family is comprised of two power variants
without string protection and two power variants with
string protection (gPV fuse links) to protect against
impermissibly high return currents.
Depending on the design of the PV system, up to six elec-
trically isolated Maximum Power Point Trackers (MPPT)
can be connected.
Per MPPT, each PV Next String Combiner Box contains a
replaceable DC surge protection of type I/II or type II.
All four boxes are also equipped with power contactors for
switching off the entire installation. The power contactors
can be operated either with the manual switch on the front
of the box or remotely by a fireman switch.
The connections to string cables and inverters are made
either with PV connectors on the underside of the enclo-
sure or via a direct connection to the circuit board within
the enclosure.
The type designation of your product can be found on the
type plate inside the enclosure.
2690250000/19.05.2021
3 Product description
7770019118, max. 3 strings
on 1 MPPT
7770019120, max. 4 strings
on 2 MPPTs
Order No. Type
7770019118 PVNCM1I3S1F3V101TXPX10
7770019119 PVNCM2I4S1FXV101TXPX10
7770019120 PVNCM2I6S1F3V101TXPX10
7770019121 PVNCM6I12S1FXV101TXPX10
87770019215/15.10.2021

9
Product description
6
7
9
11
12
2
1
13
3
4
Figure 3.2 Product overview (example) and view from below
1 Enclosure base part (type plate on the inside)
2 Enclosure cover
3 PV connectors for string inputs and outputs
4 Cable gland for functional earth
6 Mounting screws for cover
9
10
11
Switch-disconnector
Cable gland for remote fireman switch and power contactor auxiliary contacts
Cable gland for string outputs (only on 7770019118 and 7770019119)
12 Pressure equalisation element
13 Bottom side with PV connectors and cable glands.
8
5
5 Power contactor
7 Surge protections
8 Sticker with warning symbols
10
7770019215/15.10.2021

Product description
10
6
8
3
1
4
2
5
4
5
3
4
9
6
7
8
4
9
1
2
Figure 3.3 Overview of the PCB components (examples, right: variant with fuse links)
1 Printed circuit board (PCB)
2 Equipment identifier
3 Surge protection
4 DC PCB terminal for string input
5 DC PCB terminal for output to the power contactors
6 Remote signalling contact surge protection
7 Fuse links
8 PCB terminal for functional earth
5 5
9 DC PCB terminal for output to the inverter
7770019215/15.10.2021

11
Product description
3.2 Enclosure
Figure 3.4 Enclosure (example)
The enclosure base part of the PV Next String Combiner
Box is made of glass-bre reinforced polyester (GFRP),
the transparent cover is made of polycarbonate. The en-
closure corresponds with protection class IP65 (according
to IEC 60529). The label with warning symbols must be
legible at all times.
3.3 Switch-disconnector
Figure 3.5 Switch-disconnector
The switch-disconnector can be used to manually operate
the power contactors in order to switch off the entire
installation.
3.4 Connections
BA
3.5 SL SET PV Next seal set
The combiner box is supplied with one bag per M25
cable gland containing the SL SET PV Next seal set.
The seal set consists of the following pats:
–1x multiple sealing insert 3x7,0 mm
–3x blind pin Ø7x28mm
–1x reducing sealing insert 9–16 mm
3.6 Surge protection device
Figure 3.7 Surge protection device
The surge protection device complies with IEC 61643-32
Type I+II or Type II.
3.7 PCB terminals
Figure 3.8 PCB terminal with PUSH IN function
The PUSH IN PCB terminals enable faster and safer con-
nection of the DC cables and require no maintenance. We
recommend using a slotted screwdriver 0.8 mm x 4 mm
(Weidmüller Order No. 9008340000) to operate the
pusher.
Connection to the PCB terminal is optionally and only valid
for combiner box 777009118 and 7770019119 in case of
output current >30A (above the limit for PV connectors).
Figure 3.6 Cable glands (A) and PV connectors (B)
The PV Next String Combiner Box is equipped with cable glands (A) and
with PV connectors (B).
PV connectors reduce installation and maintenance time. The
connectors meet the requirements of the DIN EN 50521 standard.
7770019215/15.10.2021

3.8 DC power contactor
Figure 3.9 DC power contactors
Each combiner box are equipped with one or up to six
DC power contactors. These are used to disconnect the
solar panels from the entire installation.
The power contactors can be operated either locally by
the manual disconnector-switch on the box front or
remotely by a fireman switch.
The contactors will also automatically switch off the
panels in case of low AC voltage in the building (230
VAC). The contactors are equipped with potential free
auxiliary contacts wich can be connected to an external
device for remote status check of the contactors. Refer
to connection diagram for details.
3.9 Fireman switch
Figure 3.10 The fireman switch
The fireman switch is used to remotely switch off the
power contactors.
In case of installation at larger premises, it is possible
to use several fireman switches connected in serial for
maximum safety.
An activated fireman switch can only be released by
using a key, normally performed by authorised
personnel.
3.10 Fireman switch terminals
Figure 3.10 Fireman switch terminals
The 230 VAC power supply required to operate the
power contactors is normally connected to the terminals
inside the combiner box.
For enabling a remote control of the contactors the
power supply should be wirered via the fireman switch.
For further details refer to the connection diagrams
related to the actual box type.
127770019215/15.10.2021
3.11 Surge protection status contact
Figure 3.11 Status contact connection terminal on the PCB
The surge protection on the PCB are equipped with a
signal contact for remote reading of the status.
For further details on the function and connection refer
to the connection diagrams.

Product description
13
3.12 Fuse holder with fuse link
Figure 3.12 Fuse holder with fuse link
Note: fuse holders are present on boxes 7770019118 and
7770019119 only. Each fuse holder is covered with a silver
layer and supplied with a spring. This ensures a long life
contact between the fuse link and the fuse holder.
The fuse links with gPV fuses according to IEC 60269-
6:2010 protect the PV string cables against overcurrent.
The fuse links are equipped with silver-coated end caps for
the lowest possible contact resistance.
3.13 Surge protection according to DIN EN
50539-12
The use of the PV Next String Combiner Box as surge pro-
tection according to DIN EN 50539-12:2014 depends on
the distance between the PV generators and the inverter.
SPD SPD SPDSPD
I IVIIIII
1 2 3 4
56
Figure 3.13 Surge protection in the PV system
1 Mains connection
2 Main distribution
3 PV inverter
4 PV generator
5 Earthing system
6 Additional earthing connection
Outer light-
ning protec-
tion system
present
Separation
distance
S ≥ 0.7 … 1.0 m
fulfilled
Cable
length
I2 < 10 m
In front of
the inverter
Behind the
PV generators
– – –
Type II
Type II
– – x –
– – – Type II
– – x –
x x –
Type II
Type II
x x x –
x x – Type II
x x x –
x – –
Type I Type I
x – x
x – –
x – x
DIN EN 50539-12: Requirements for surge voltage arresters depending
on application
Observe the cross-sections of the functional
earth cable required in DIN EN 50539-12:2014:
Type II: minimum 6 mm2or equal to the
cross-section of the active conductor if this is
greater than 6 mm2.
Type I: minimum 16 mm2or equal to the
cross-section of the active conductor if this is
greater than 16 mm2.
3.14 Regarding the LPL
Choose the products in a way that they meet the
lightening protection level (LPL) at the installation
site.
Please ask your building insurance company for
the appropriate LPL.
LPL 10/350 µs 8/20 µs
LPL I Iimp ≥ 5 kA, Itotal ≥ 10 kA In ≥ 10 kA, Itotal ≥ 20 kA
LPL II Iimp ≥ 3,75 kA, Itotal ≥ 7,5 kA In ≥ 7,5 kA, Itotal ≥ 15 kA
LPL IIi/iV Iimp ≥ 2,5 kA, Itotal ≥ 5 kA In ≥ 5 kA, Itotal ≥ 10 kA
7770019215/15.10.2021

14
Product description
3.15 Technical data
General data
MPPT suitable for connection 1 ... 6
String inputs per MPPT 2 ... 3
Outputs per MPPT 1 ... 2
Permissible ambient temperature in operation -40ºC ... +40ºC
Permissible ambient temperature for storage and transport -40ºC ... +70ºC
Relative humidity for storage and transport 5 to 50%
Permissible height above sea level 3,000 m
Input connectors string cables PV connectors (type WM4 C)
Output connections PV connectors (type WM4 C) or cable glands
Enclosure
Enclosure base part
Enclosure cover Polycarbonate, transparent
Enclosure mounting Wall mounting
Degree of protection according to IEC 60529 IP65 for the entire product
Seal material Polyurethane
Impact resistance IK08 (IEC 62208), IK10 (IEC 62262)
Flammability rating according to UL94 V-2
Cover attachment Cross-head screws (Nylon)
Screws for wall mounting (not included) Example: ∅ 4.8 mm, head: ∅ 9.5 mm, e.g. ISO 14585
Connections
PV connectors (WM4 C), connectable wire cross-sections 4 mm² ... 6 mm²
PV connectors (WM4 C), stripping length 8 mm ± 1 mm
DC PCB terminals string input, output, connectable conductors 2.5 mm² to 16 mm² solid, stranded, with/without wire-end ferrule
DC PCB terminal string input, output, stripping length 18 mm ± 1 mm
PCB terminal remote signalling contact and switch-disconnector,
connectable wire cross-section
0.25 mm² ... 1.5 mm² with/without wire-end ferrule
PCB terminal remote signalling contact, stripping length ≤ 0.75 mm²: 10 mm ± 1 mm; 1.5 mm²: 7 mm ± 1 mm
PCB terminal for functional earth, connectable conductor 6 mm² ... 16 mm² solid, 6 mm² ... 25 mm² stranded, with wire-end
ferrule max. 16 mm²
PCB terminal for functional earth, stripping length 15 mm ± 1 mm
Torques and clamping ranges
PCB terminal for functional earth 2.4 ... 4 Nm
Cable gland M16 cap nut 3.0 Nm ± 0.2 Nm
Clamping range cable gland M16 5 ... 7 mm
Cable gland M25 cap nut 8.0 Nm ± 0.2 Nm
Clamping range cable gland M25 5 ... 7 mm , (triple reducing insert)
9 ... 16 mm (single reducing insert)
Cover attachment screws 1.5 Nm ± 0.15 Nm
Switch-disconnector 1.7 Nm
7770019215/15.10.2021
Glass-fiber reinforced polyester (GFRP)

Product description
15
Electrical data
Maximum input voltage 1,000 V DC
Maximum current per string input (Inc)15 A DC
Maximum short-time withstand current per string input 1.25 × Inc
Maximum current per PV connector 30 A DC
Maximum current per MPPT 30 ... 50 A DC
Maximum current per spring terminal 50 A DC
Overvoltage category according to IEC 60644-1 III (8 kV pulse strength)
Pollution degree within the box 2
Surge protection Type I+II Type II
PV system voltage, max. Ucpv 1.1 kV
Imp (10/350 µs) 6,25 kA (2IN1 = 3.125 kV) –
Discharge current In/Imax (8/20 µs) 20 kA / 40 kA
Itotal (10/350 µs) 12,5 kA (2IN1 = 6.25 kV) –
Overall leakage current Itotal (8/20 µs) 50 kA
Short-circuit resistance Iscpv 11 kA
Protection level Up at 20 kA (8/20 µs) +/-, -/PE, +/PE ≤ 3.8 kV
Ures at 15 kA / 5 kA 3.5 kV / 3 kV
Remote signalling contact 24 V / max. 100 mA; 48 V / max. 200 mA
Standards EN 50539-11:2015, EN 50539-12:2014
Spare arrester 2530600000 (outside)
2534300000 (middle)
2530660000
DC power contactor
Switching current at 600 V / 1000 V 80 A DC / 60 A DC
Maximum switching voltage 1000 V DC
Coil operating voltage 230 VAC
Coil operating voltage range Uc 0,85 - 1,1 (195 - 253 VAC)
Power consumption of coil Inrush 250 VA (approx. 1,1A), sealed 18VA(approx. 80mA)
Standards Data according to IEC 60947-4-1, VDE 0660
Please refer to the data sheet enclosed with the
product.
7770019215/15.10.2021
Auxiliary contact switching capacity AC15 230VAC, 3A

16
4.1 Transport
►Observe the total weight and use appropriate
transportation equipment.
4.2 Unpacking the delivery
ATTENTION
The product can be destroyed!
The connectors and the cable glands on the enclosure
bottom can be damaged.
►Always place the product on the rear side after un-
packing.
►Check whether the product contained in the packaging
corresponds with your order.
►Check that the delivery is complete and is not damaged.
For the scope of delivery, see the enclosed data sheet
and dispatch documents.
Do not install the device if you have noticed a
problem or damage!
If you have not received the product you ordered,
or if the delivery is incomplete or damaged,
please contact your Weidmüller representative or
distributor.
4.3 Storage
For longer storage periods, the approved environmental
conditions must be observed (see "Technical data").
ATTENTION
The product can be destroyed!
The connectors and the cable glands on the enclosure
bottom can be damaged.
► Always store the product so that it lies at on the rear
side.
If dirt, moisture or damage has occurred to the
product during storage, you must not use the
product.
Contact your Weidmüller representative or dis-
tributor.
4 Transport and storage
7770019215/15.10.2021

17
5 Installation
5.1 Installation site
The PV Next String Combiner Box is suitable for protected
outdoor installation. For safe operation and to avoid dam-
age to the product, the following requirements must be
observed when selecting the installation site.
– The installation site must not be located in an environ-
ment where ammable liquids, gases or dusts may be
present. Work on the PV Next String Combiner Box can
produce sparks that can ignite a potentially explosive air
mixture.
– Direct exposure to sunlight and precipitation over long
periods of time, as well as excessively high or low tem-
peratures, can damage the product and shorten its ser-
vice life. Select an installation site where the product is
protected from rain and direct sunlight.
– The environment must be free of gases which, in com-
bination with humidity, have an aggressive eect on sur-
faces (e.g. ammonia).
– The installation site must be chosen such that the prod-
uct is easily accessible for installation work and subse-
quent maintenance, and can be worked on safely.
– The site for wall mounting must be suciently load-bear-
ing and must not be made of combustible material.
– Unauthorised persons must not have access to the
product.
– The PV Next String Combiner Box and all cables must
be mounted and installed in such a way that they cannot
be damaged by rodents.
– Observe the permissible ambient conditions. The tem-
perature range is indicated on the label inside the com-
biner box.
– The PV Next String Combiner Box must be mounted on
a at wall. Unevenness can cause the enclosure to warp
and leak.
– The distance from adjacent objects should be at least
250 mm, ideally 400 mm. This ensures sucient cooling
of the enclosure and free access for maintenance work.
Orientation
The PV Next String Combiner Box is designed for wall
mounting in vertical orientation. PV connectors and cable
glands must face downwards. The forward or backward
inclination should not exceed 20°.
90°
Figure 5.1 Vertical orientation
max. 20°
max. 20°
Figure 5.2 Maximum permissible forward or backward inclination
– The PV Next String Combiner Box may only
be mounted horizontally on its rear side, if it is
ensured that the box is protected from direct
sunlight at all times.
– The PV Next String Combiner Box must not
be suspended under a ceiling.
7770019215/15.10.2021

18
Installation
5.2 Mounting the product
During installation, make sure that no moisture,
dust or foreign objects can penetrate into the
product.
ATTENTION
Damage to property due to unsuitable screws!
If the diameter of the screw or screw head is too small or
too large, the screw may become wedged in the mount-
ing hole and damage the enclosure. For the same rea-
son, countersunk screws are unsuitable.
►For wall mounting, use screws with the properties de-
scribed below.
Half-round head screws or cylinder head screws are suita-
ble, e.g. according to DIN 7049, DIN 7981 or ISO 14585.
L
9,5 mm 4,8 mm
Figure 5.3 Dimensions of the mounting screws
The length X (penetration depth into the wall) must be di-
mensioned in such a way that a secure hold in the wall is
guaranteed.
L
X
15 mm
Figure 5.4 Drilling depth for wall mounting
ATTENTION
The product can be destroyed!
The IP protection class described only applies if the en-
closure is not damaged.
►Under no circumstances must you drill any additional
holes in the enclosure.
►Do not change the existing openings under any cir-
cumstances.
►Lift the PV Next String Combiner Box out of the packag-
ing.
► Measure the exact distance between the xing holes
and mark the positions on the wall (see dimension ta-
bles in chapter 5.3).
►Drill the holes in the wall and insert suitable dowels as
required.
►Remove the enclosure cover from the PV Next
String Combiner Box.
►Screw the PV Next String Combiner Box to the wall
through the mounting holes.
Cable entries
The cable glands ensure both the strain relief and the tight-
ness of the cable entries.
►Always ensure that the correct torques are used.
►Seal all unused cable entries. For this purpose, please
use the accessories from the enclosed SL SET PV next
seal set (multiple sealing inserts, reducing sealing in-
serts, blind pins).
PV connectors
►If your product is equipped with PV connectors, protect
unused connectors with protective caps to prevent dust
and moisture from penetrating inside.
Protective caps: VSSO WM4 C (Order No. 1254870000)
Take care not to cover the pressure equalisation
element on the underside of the product. This
element signicantly reduces the formation of
condensation in the enclosure.
7770019215/15.10.2021

Installation
19
5.3 Enclosure and mounting dimensions
D
DD
Y Y
X
W
Y H
X
W
H
D
Y
X
W
H
X X
W
H
X
W D
DD
Y
Y Y
H
X
W
H
D
Y
X
W
H
X X
W
H
Order No. Type mm Order No. Type mm
7770019118
7770019120
PVNCM1I3S1F3V101TXPX10
PVNCM2I4S1FXV101TXPX10
W360 W540
H 360 H 360
D168 D168
X335 X515
Y335 Y335
X
W D D
D
Y
Y
H
X
W
Y H
D
Y
X
W
H
X X
W
H
X
W D D
D
Y
Y
H
X
W
Y H
X
W
H
D
Y
X
W
H
Order No. Type mm
W720
H540
D202
X348
Y515
7770019215/15.10.2021
7770019119PVNCM2I6S1F3V101TXPX10
7770019121 PVNCM6I12S1FXV101TXPX10
Z359
V359
Mounting with brackets:
D
X
Y
W
H
257,5
D
W
H
Y
257,5
X X
V
X
Z
Y
H
W
4x45°
D
Mounting feet
Screw
View from back
Mounting with brackets

20
6 Commissioning
6.1 Preconditions for commissioning
The PV Next String Combiner Box is fully mounted.
►Before commissioning, check that the product is not
damaged.
If the enclosure, printed circuit board or individ-
ual components are damaged or heavily soiled,
do not operate the product. Contact your Weid-
müller representative or distributor.
During commissioning, ensure that no moisture,
dust or foreign objects can penetrate into the
product.
Two procedures are permitted for installation
work:
– Working on live components: Only electricians
who are qualied to work on live components
may work under voltage. They must comply
with local regulations (e.g. personal protective
equipment and risk assessment).
– Voltage-free working: Input and output cables
must be properly disconnected and secured
against being switched on again. Voltage-free
work may be carried out by electricians and
trained personnel.
►Refer to the inverter manufacturer's documen-
tation.
The Weidmüller WM4C and PV-Stick PV connectors are
compatible with each other. Weidmüller accepts no liability
for damage caused by the use of connectors from other
manufacturers.
6.2 Commissioning the PV Next String Com-
biner Box
DANGER
Imminent risk to life!
Work on live components may only be carried
out by qualied electricians.
► Observe the country-specic regulations for
working on live components.
►When working on live components, always
use suitable tools and aids that eliminate
the risk of electric arcs and electric shocks.
DANGER
Imminent risk to life!
Up to 1,000 V DC can be present on live parts.
►Make sure that the voltage is not restored
until the work has been completed.
►Switch off the inverter. If there is a switch-
disconnector on the inverter, it must be in the off-
position.
►The switch-disconnector on the PV Next String
Combiner Box, must be in the off-position.
►Insert the functional earth cable and the remote
signalling cable into the enclosure.
►Disconnect the functional earth cable, crimp a wire-end
ferrule onto the cable and connect it.
►Disconnect the wires of the remote signalling cable,
crimp the wire end ferrules onto the wires and connect
them to the terminal of the remote signalling contact.
►Check that all cables are connected with the correct po-
larity.
►Carry out the further steps according to your product
variant.
7770019215/15.10.2021
This manual suits for next models
7
Table of contents
Other Weidmüller Industrial Electrical manuals
Popular Industrial Electrical manuals by other brands

Teka
Teka LFE 101 ST1 operating instructions

SELF
SELF FAME2 Series Mounting instruction

Murata
Murata GRM188R61E475KE11 Series Reference sheet

Greenheck
Greenheck AMD-42-TD Installation, operation and maintenance manual

Daniamant
Daniamant ODEO Strobe Installation and maintenance instructions

Danfoss
Danfoss CI 5 Series instructions

Murata
Murata GRM219R61C475KE15 Series Reference sheet

Murata
Murata GRM2165C1H331JA01 Series Reference sheet

Murata
Murata GRM033R60J273KE01 Series Reference sheet

Murata
Murata GRJ216R72A103KE01 Series Reference sheet

Murata
Murata GJM0225C1E7R0DB01 Series Reference sheet

Murata
Murata GRM1555C1H1R1BA01 Series Reference sheet