Well AWAKE User manual

USER MANUAL
Model: AWAKE
(LED Projection Clock radio)
Thank you for choosing WELL. Please read carefully the following instructions and keep them within reach.
Reorder No: CLOCK-DESK-AWAKE-WL

OVERVIEW
TOP VIEW
FRONT VIEW

BACK VIEW
BOTTOM VIEW
1. “AL. OFF” button 8. “HOUR/TUN-” button 15. POWER CABLE
2. “SNOOZE NAP/SLEEP” button 9. “PROJECTION ON/OFF” button
3. “TIME SET” button 10. “AL2/VOL+” button
4. “DIMMER” button 11. “MIN/TUN+” button
5. “PRESET” button 12. “TIME PROJECT / FOCUS” DIAL
6. “180FLIP” button 13. BATTERY COMPARTMENT
7. “AL1/VOL-” button 14. ANTENNA

INDICATORS
A. Alarm 1 BUZZER
B. Alarm 1 RADIO
C. NAP
D. Alarm 2 BUZZER
E. Alarm 2 RADIO
F. Sleep
PREPARATION FOR USE
This clock radio is AC powered. Use two ‘AAA’ size batteries to keep accurate time during temporary power
interruption. Insert batteries by matching the polarity (+/-) markings in the battery compartment (13).
Please replace all batteries at the same time with only new batteries. Remove all batteries when the clock
radio is not in use for extended periods of time.
Place the clock radio only on protected furniture. Avoid direct sunlight and any area that is exposed to
water or moisture.
Plug power cable (15) into electrical outlet with correct voltage. Check rating labels on the radio. DO NOT
PLUG THE RADIO INTO AN ELECTRICAL OUTLET IF YOU ARE UNSURE OF THE VOLTAGE.
Unwind the radio antenna (14) on the back of the clock radio. Extend and reposition the antenna for best
radio reception.
CLOCK and ALARM CLOCK OPERATION
Note: The time and alarm times can only be set when the radio is turned off.
SETTING THE TIME AND DAY
1. The digits will flash after connecting power, or press and hold down “TIME SET” button (3) for
approximately 3 seconds until the display flashes.
2. Press “HOUR/TUN-” button (8) repeatedly to change the hour setting.
3. Press “MIN/TUN+” button (11) repeatedly to change the minute setting.
4. Press “TIME SET” button (3) to confirm the time.
SETTING THE ALARM TIME
This clock radio has dual alarms that can be set and used concurrently. The procedure to set both alarms
are the same. Both alarms can either sound the buzzer or wake up to radio. Follow the instructions below
to set alarm time 1. For alarm time 2, substitute “AL1/VOL-” button (7) with “AL.2/VOL+” button (10)
1. Press “AL1/VOL-” button (7) to view alarm time 1. The digits will flash.
2. Press “HOUR/TUN-” button (8) repeatedly to change the hour setting.
3. Press “MIN/TUN+” button (11) repeatedly to change the minute setting.
4. Press “AL1/VOL-” button (7) once to confirm and digits will stop flashing.
(Note: This will turn on the alarm buzzer.)

ACTIVATING THE ALARM
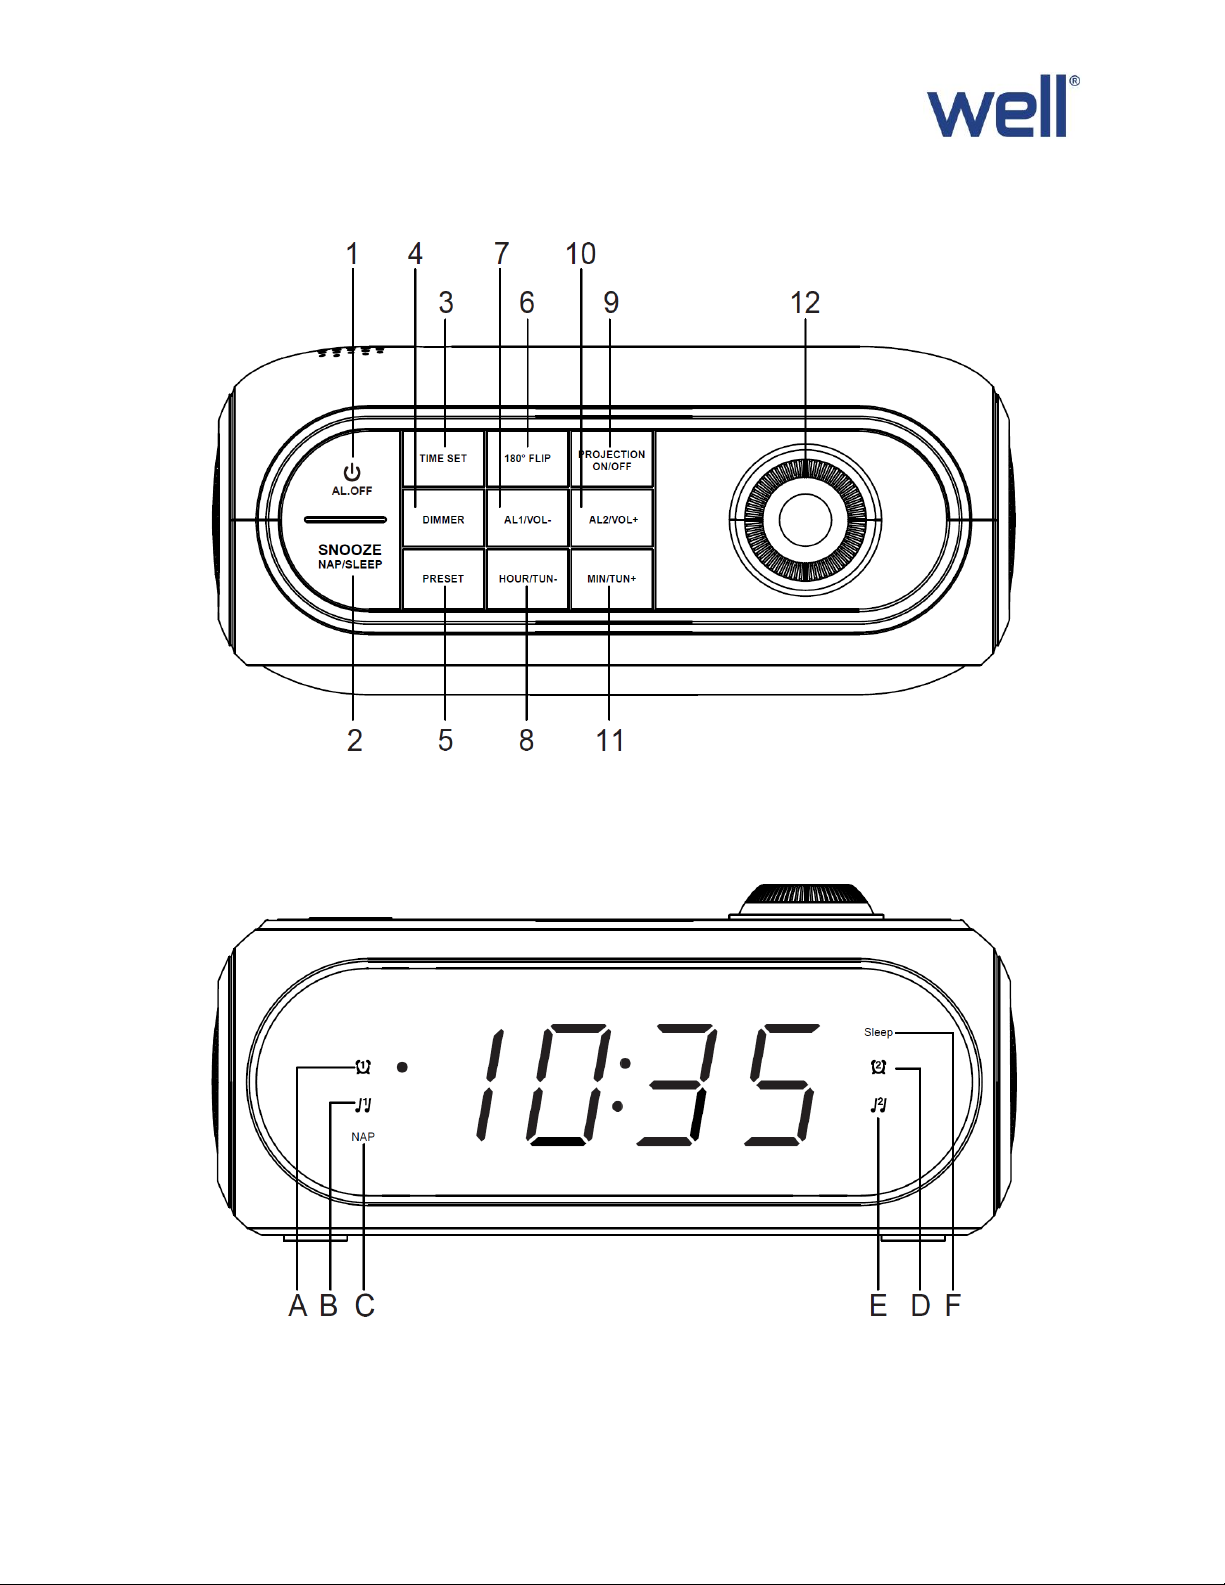
1. Once the alarm time is set, press “AL1/VOL-” button (7) once for alarm with buzzer (Indicator A will be
on) and twice for alarm with radio (Indicator B will be on).
2. Digits will stop flashing after a short while.
3. Press “AL1/VOL-” button (7) until all indicators off to turn off alarm.
WHEN THE ALARM SOUNDS
1. When the alarm sounds, press “ AL.OFF” button (1) to turn off alarm or press “SNOOZE NAP/SLEEP”
button (2) for snooze.
2. Once in snooze, alarm will sound again after 9 minutes.
DISPLAY BRIGHTNESS
When the radio is off and the current time showing, press “DIMMER” button (4) to change the brightness
of the display between high and low.
(Note: Do not change the display brightness while setting the clock radio and when the alarm is on.)
TIME PROJECTION
Press “PROJECTION ON/OFF” button (9) to turn time projection on and off. It is most visible on a flat white
surface. Press “180FLIP” button (6) to rotate time projection by 180. Tilt and adjust “time projection /
focus dial” (12) as needed.
RADIO OPERATIONS
General Operations
1. Press “AL.OFF” button (1) to turn radio on and off. The radio station frequency will appear on the
display.
2. Press “HOUR/TUN-” button (8) or “MIN/TUN+” button (11) to change radio frequency. Or, press and
hold down “HOUR/TUN-” button (8) or “MIN/TUN+” button (11)for approximately 3 seconds to auto
scan for the next available station.
3. Press “AL1/VOL-” button (7) or “AL2/VOL+” button (10) to adjust volume level.
4. Radio will show the time in a few seconds after changing frequency. Press “HOUR/TUN-” button (8) or
“MIN/TUN+” button (11) to view radio frequency.
Pre-set Station Memory
1. The radio can store up to 10 FM stations.
1. To store a station in memory, tune to the desired radio station. Press and hold down “PRESET” button
(5) and a number starting with “P” on the display will flash. This “P” number represent one of the ten
memory stations. Press “HOUR/TUN-” button (8) or “MIN/TUN+” button (11) to change the station
number. Press “PRESET” button (5) to confirm.
2. To recall a pre-set station, turn the radio on. Press “PRESET” button (5) repeatedly until station number
is found. The station frequency will be display momentarily.

Sleep mode
With the radio on, press “SNOOZE NAP/SLEEP” button (2) to enter sleep mode. Digits represents radio to
be automatically turned off in minutes. (Indicator F will be on).
Nap mode
With the radio off, press “SNOOZE NAP/SLEEP” button (2) to enter NAP mode. Digits represents radio to
be turned on in minutes. (Indicator C will be on).
Waste electrical and electronic equipment are a special waste category,
collection, storage, transport, treatment and recycling are important because
they can avoid environmental pollution and are harmful to health. Submitting
waste electrical and electronic equipment to special collection centers makes
the waste to be recycled properly and protecting the environment. Do not
forget! Each electric appliance that arrives at the landfill, the field, pollutes the
environment!
Importer & distributor:
SC VITACOM ELECTRONICS SRL
CIF: RO 214527
Tel. 0264-438401*
Table of contents
Other Well Clock Radio manuals