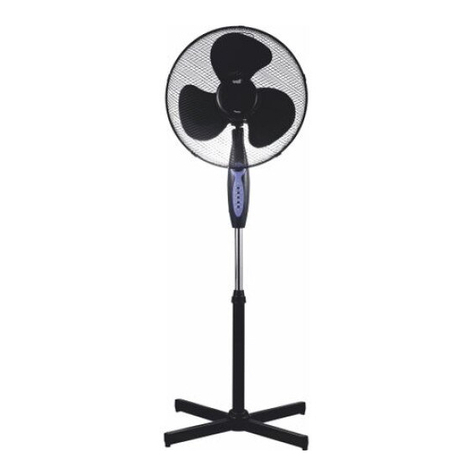
Well FAN-STAND-BREEZE-WL User manual

MANUAL DE UTILIZARE
Cod: FAN-STAND-BREEZE-WL
ENGLISH
Thank you for choosing a WELL product. Please read carefully the following instructions and keep them within reach in order to avoid damage due to incorrect use.
Please pay particular attention to the safety information.
SPECIFICATIONS:
Diameter: 40 cm
Power: 45W
Voltage: 220-240V
Frequency: 50/60 Hz
3 speed motor: 950RPM- 1100RPM- 1250RPM
Color: white
Cross base: 60* 60 cm
Height: 1.1 M- 1.3 M adjustable
Oscillation: 90 degree
Noisy level: : <65 dB
Mesh grill
INSTRUCTION FOR ASSEMBLY.
1. Be sure to shut off electric supply at main switch or circuit breaker before installation.
2. Secure lower pipe with pipe support to the hub of cross base with screws provided.
3. Extend upper pipe, insert the pipe connector through upper pipe onto lower pipe and tighten.
4. Attach the motor with switch compartment onto the upper pipe. Ensure the switch compartment is pushed fully onto the upper pipe and secured with the screw provided.
5. Loosen guard mounting nut from the motor housing.
6. Position back guard firmly to motor housing and then fasten by turning guard mounting nut clockwise tightly.
7. Push the blade along motor shaft and fasten firmly with the mounting nut..
8. Hang the front guard to back guard with the position fixer provided at the rim of guard, and then fix together with clips provided. The guard bottom nut & bolt must be fitted to ensure secure fitting.

WARNING:
1. Improper installation may result risk of fire, electric shock, or serious injury to persons.
2. If the supply cord is damaged, it must be replaced by qualified service persons in order to avoid a hazard.
3. To reduce the risk of fire or electric shock, do not use this fan with any solid-state speed control device.
4. This appliance is not intended for use by children or other persons without assistance or supervision if their physical, sensory or mental capabilities prevent them from using it safely. Children should be supervised to ensure
that they do not play with the appliance.
5. Never insert fingers, pencil or any other object through the guard.
6. Unplug the fan when moving from one location to another, when removing guards for cleaning, during cleaning or servicing and when not in use.
7. To clean fan blades, simply lift the clips on ring of the fan guard and remove the front guard. Plastic part should be only cleaned with mild soap and a damp cloth or sponge. Never use abrasive cleaners.
8. Avoid the use of gasoline, benzene, thinner etc. as they may result in damage to the fan.
9. The fan should be placed on a flat and stable surface when operating to avoid overturning.
10. Do not use fan in any open window, rain may create an electrical hazard, keep it away from humidity.
11. Unplug the device immediate in case of any defection.
12. It is the end user’s responsibility to use this product in an appropriate manner. The importer takes no responsibility for defections caused of improper use/ assembly, damages caused by end user abuse, voltage fluctuation or
if any situation of the product has been altered or modified.
13. This appliance is only intended for householduse and for indoor use, do not use the device in bathroom.
HOW TO OPERATE:
1. Connect the plug of the power cable to mains voltage
2. Start/ stop the fan and select the speed with the buttons from the switch box.
HOW TO OSSCILLATE:
The oscillating control button is located on the top of the motor housing. Simply press button down to start oscillation, and lift the button up to stop oscillation.
ECOLOGICAL INFORMATION
Waste electrical and electronic equipment are a special waste category, collection , storage, transport , treatment and recycling are important because they can avoid environmental pollution and are
harmful to health
Submitting waste electrical and electronic equipment to special collection centers makes the waste to be recycled properly and protecting the environment.
Do not forget ! Each electric appliance that arrive at the landfill, the field , pollute the environment!
Importer & distributor:
SC VITACOM ELECTRONICS SRL
CIF: RO 214527
Tel. 0264-438401*
sales@vitacom.ro , www.vitacom.ro

ROMANA
Vă mulţumim că aţi ales un produs WELL! Vă rugăm citiţi cu atenţie instrucţiunile de mai jos şi să le păstraţi la îndemână.
În manual apar cele mai importante instrucţiuni de sigurantăşi atenţionări, dar acesta nu acoperătoate posibilităţile ce pot apărea pe parcursul folosirii. Este responsabilitatea şi interesul fiecărei utilizator folosirea aparatelor cu
atenţie, grijă, şi cu respectarea instrucţiunilor de protecţie în vederea evitării accidentelor şi deteriorării produsului.
SPECIFICAŢII:
VENTILATOR CU PICIOR
Diametru: 40 cm
Putere: 45W
Alimentare: 230V~ 50 Hz
3 trepte de viteze: 950RPM- 1100RPM- 1250RPM
Culoare: alb
Picioare antialunecare: 60* 60 cm
Înălţime: 1.1M- 1.3M reglabilă
Oscilaţie: 90° ( stânga- dreapta)
Nivel zgomot: <65 dB
Grilaj tip plasă
Parti Componente:
1. Grilaj de protecţie frontal
2. Paletăventilator
3. Piuliţa pt. montare
4. Grilaj de protecţie partea din spate
5. Ax de susţinere motor
6. Carcasa motor
7. Buton control oscilaţie
8. Întrerupătoare
9. Cutie de control viteze/ întrerupătoare
10. Element de fixare
11. Tub de extensie
12. Element de asamblare tub de susţinere
13. Stâlp (tub) de susţinere
14. Picior sub formăde cruce
15. Capac

INSTRUCŢIUNI DE ASAMBLARE:
1. Pentru eviterea accidentelor, înainte de asamblare asiguraţi-văcăaparatul este deconectat de la reţeaua electrică.
2. Fixaţi stâlpul de susţinere în baza ventilatorului cu ajutorul şuruburilor şi aşezaţi capacele din plastic pe piciorul ventilatorului.
3. Ataşaţi tubul de extensie în stâlpul de susţinere al ventilatorului şi fixaţi-l cu ajutorul elementului de fixare.
4. Înseraţi cutia de control pe tubul de extensie asigurându-văcăa intrat la locul potrivit, fixaţi-l bine strângând cu cu ajutorul şurubului
5. Deşurubaţi piuliţa de strângere de pe carcasa de motor.
6. Alunecaţi grilajul spate pe axul de susţinere şi fixaţi-l pe faţada carcasei motorului cu ajutorul piuliţei strângând bine.
7. Alunecaţi paleta pe axul de susţinere motor , fixaţi-l cu ajutorul elementului de fixare.
8. Îmbinaţi grilajul frontal cu grilajul spate cu ajutorul şuruburilor, piuliţelor şi a clemelor de prindere
9. Pentru ajustarea înălţimii slăbiţi elementul de fixare al tubului de extensie, setaţi înălţimea dorită, dupăcare strângeţi elementul de fixare.
INSTRUCŢIUNI DE SIGURANŢĂ
1. Instalarea necorespunzătoare poate rezulta electrocutare, risc de incendiu şi rănirea persoanelor.
2. Înlocuirea cordonului de alimentare se face doar de către personal calificat sau de către service autorizat.
3. Pentru prevenirea şocurilor electrice ventilatorul nu poate fi folosit împreunăcu alte aparate sau dispozitive de control al vitezei/ rotaţiei.
4. Pentru evitarea accidentelor nu-l lăsaţi la îndemâna copiilor sau a persoanelor cu capacitate mentală redusă.
5. Nu introduceţi degetele sau orice alte obiecte în interiorul grilajelor.
6. Întotdeauna deconectaţi aparatul de la sursa de alimentare când îl mutaţi de la un loc la altul, sau când îl curăţaţi.
7. Niciodatănu desfaceţi grilajele dacăaparatul este conectat la sursa de alimentare.
8. Pentru curăţire pur si simplu îndepărtaţi grilajul frontal şi stergeţi paleţii cu o lavetă moale îmbibatăîntr- un detergent, niciodatănu folosiţi produse abrazive la curăţat.
9. Niciodatănu folosiţi benzină sau dizolvanţi, va rezulta deteriorarea ventilatorul.
10. Asezaţi ventilatorul pe o suprafatăplatăşi stabilăpentru a evita răsturnarea .
11. Nu folosiţi aparatul lângă geam deschis, evitaţi contactul cu umezeala, apa.
12. Deconectaţi aparatul de la sursa de alimentare imediat dacăapare o defecţiune.
13. Importatorul nu-şi asumă răspunderea pentru defecţiuni datorate folosirii/ asamblări incorecte, provenite din cauza folosirii abuzive al produsului, a fluctuatiei de tensiune sau în cazul in care produsul a fost modificat.
14. Acest aparat este destinat exclusiv uzului casnic, pentru spatii interioare, a nu fi folosit in camera de baie si mediu umed.
MOD DE UTILIZARE
1. Conectaţi mufa de alimentare la reţea ( 220-230V)
2. Porniţi ventilatorul cu ajutorul butoanelor de pe cutia de comandă,
3. Selectaţi viteza dorităcu ajutorul butoanelor de selectare de pe cutia de comandă.
OSCILARE- În partea de sus a carcasei motorului se aflăbutonul de control al oscilaţiei. Printr-o simplă mutare în jos/sus al acestui buton puteţi porni/ opri oscilaţia ventilatorului.
INFORMATII ECOLOGICE
Deșeurile de echipamente electrice și electronice sunt o categorie specială de deșeuri, colectarea, depozitarea, tratarea și reciclarea sunt importante deoarece se pot evita poluari ale mediului cu gaze de efect de sera sau
metale grele, și care pot fi dăunatoare sănătății. Depunând la centrele speciale de colectare a DEEE, vă debarasați responsabil de aceste deșeuri, vă asigurați că acestea ajung sa fie reciclate corect și totodată protejați natura.
Nu uitați! Fiecare aparat electric ajuns la groapa de gunoi, pe camp sau pe malul apei poluează! Simbolul (pubela taiată cu un x) reprezintă obiectul unei colectări separate a DEEE:
Importator şi distribuitor:
SC VITACOM ELECTRONICS SRL
CIF: RO 214527
400495 Cluj-Napoca, Str. Bună Ziua FN
Tel: 0264-438401*
sales@vitacom.ro
www.vitacom.ro

MAGYAR
Köszönjük, hogy WELL terméket választott! Kérjük olvassa el figyelmesen és tartsa kéznél a használati utasítást! A termék helytelen használata károkat okozhat!
Kérjuk fordítson figyelmet a használati utasításban feltüntetett legfontosabb biztonsági eljárásokra, használja a terméket vigyázattal és odafigyeléssel a balesetek elkerülése végett.
TECHNIKAI ADATOK:
SZOBAI ÁLLÓ VENTILÁTOR
Átmérő: 40 cm
Teljesitmény: 45W
Feszültség: 230V~ 50 Hz
3 sebességfokozat: 950RPM- 1100RPM- 1250RPM
Szin: fehér
Talapzat: 60 * 60 cm
Magasság: 1.1m- 1,3m ( állitható magasság)
Oszcilláció: forgó mozgás, 90°
Zajszint: <65 dB
Sűrű szövésű védőrács
Alkotó elemek:
1. Elülsővédőrács
2. Forgólapát
3. Védőrács rőgzítőanyacsavar
4. Hátulsóvédőrács
5. A lapát tartótengelye
6. Motorház
7. Oszcillációt vezerlőgomb
8. Kapcsolók
9. Kapcsoló doboz
10. Rogzítő elem
11. Hosszabító cső
12. Tartóoszlop csatlakozó
13. Tartóoszlop
14. Talapzat
15. Csavar és anya

ÖSSZESZERELÉSI ÚTMUTATÓ:
1. Mielőtt az összeszerelést elkezdené, a balesetek elkerülése végett bizonyosodjon meg, hogy a tápkábel csatlakozója el van távolítva a hálózati konnektorból.
2. Rögzítse a ventilátort tartóoszlopot a talapzathoz a rendelkezésre állócsavarok segítségével és helyezze a 4 csuszás gátlóta talapzat lábaira.
3. Illessze a hosszabítócsövet a tartóoszlopba, majd rögzítse a rögzítő elem segítségével.
4. Csúsztassa a kapcsolódobozt a hosszabítócsőhöz és rögzítse szorosan a csavarral.
5. Csavarja le az anyacsavart a lapát tartótengelyről az óra mutató forgásával ellenkező irányba.
6. Csusztassa a hátsóvédőrácsot a tengelyre, majd rögzítse az anyacsavarral a motorház elülsőrészére.
7. Csusztassa a lapátot a tengelyre majd rögzítse a lapát rögzítőelemmel
8. Rögzítse az elülsővédőrácsot a hátsóvédőrácshoz az ezt a célt szolgálóösszetartó elemek segítségével .
9. A tartóoszlop magasságának beállításához lazítsa meg a tartóoszlopon lévőrögzítőanyát, állítsa be a kívánt magasságot, majd rögzítse újból.
BIZTONSÁGI ELJÁRÁSOK:
1. A termék helytelen összeszerelése balesetet, áramütést eredményezhet, tűzveszélyt, illetve személyi sérüléseket okozhat.
2. Hibásodás esetén a tápkábel cserét föltétlenül bízza szakemberre.
3. Tűz vagy áramütés elkerülése végett soha ne használja a ventilátort olyan termékekkel együtt amik a forgássebességet szabályozzák vagy korlátozzák.
4. Ne hagyja a terméket gyerekek, illetve mentálisan korlátozott személyek kézügyében.
5. Ne csúsztasson semmiféle tárgyat a védőrácsok közé,
6. Húzza ki a csatlakozót az aljzatból helyválltoztatáskor, illetve tisztításkor.
7. Soha ne szedje szét a védő rácsot csak miután eltávolította a tápkábel csatlakozóját a hálózati konnektorból.
8. Tisztításhoz használjon puha, kíméletes tisztítószerrel enyhén átitatott rongyot, ezzel törülje át a lapátokat.
9. Ne használjon benzint illetve bármilyen oldószert , a termék károsodásához vezet.
10. Helyezze mindig sima, egyenes felületre a ventilátort a felborulás elkerülése végett.
11. Ne helyezze a ventilátort nyitott ablak közelébe, védje a nedvességtől, vízzel valóérintkezéstől.
12. Azonnal allítsa le a ventilátort , illetve húzza ki a csatlakozót az aljzatból ha barmilyen meghibásodást észlel.
13. A beszállítónem vállal felelőséget azokért a hibásodásokért amik a nem helyes használatból, helytelen összeszerelésből, figyelmetlenségből adódórongálódásból, áramfeszültség ingadozásból adódnak, illetve ha a
terméket módosították.
14. Ez a termek kizarolag haztartasi celokra es belteri hasznalatra alkalmas, ne hasznalja nedves kornyezetben.
HASZNÁLATI ÚTMUTATÓ
1. Csatlakoztassa az áramkábel dugaszát a hálózati feszültséghez.
2. Indítás a kapcsolódobozon találhatóindítógomb segítségével történik.
3. A különbözőforgás sebesség kiválasztása a kapcsolódobozon lévő gombok segítségével történik.
OSZCILLÁCIÓ: FORGÓ MOZGÁS- a kapcsolódoboz tetején található oszcillaciót vezérlő gomb megnyomásával történik.
A hasznalt elektromos es elektronikus keszulekek specialis hulladek kategoriaba tartoznak, begyujtesuk, tarolasuk es ujrafeldolgozasuk fontos, ezalltal elkerulhetjuk az uveghaz hatast okozo gazok vagy nehezfemek alltal
okozott kornyezeti szennyezodest, melyek artalmasak az emberi egeszsegre es testi epsegere.
Ez okbal kifolyalag kerjuk a hasznalt elektromos es elektronikus keszulekeket, berendezeseket, leadni az erre a celra letrehozott specialis hulladek gyujto kozpontokba, ezalltal hozzajarulvan a helyes ujrahasznositasi
folyamathoz, oltalmazvan kornyezetunket es eroforrasainkat.
Ne feledje! Minden egyes elektromos es elektronikus keszulek amely a hulladek lerakohoz, a foldre , vagy a viz partjara kerul szennyezi a kornyezetet!
Az elkulonitett gyujtest igenylo , hulladekka valt elektromos , elektronikus berendezes jelolese:
Beszállító és forgalmazó:
VITACOM ELECTRONICS Kft.
Egyéni nyilvántartási kód: RO 214527
400495 Kolozsvár (Cluj-Napoca), Bună Ziua u. SZ.N.
Tel: +40-264-438401*
export@vitacom.ro
www.vitacom.ro

DECLARATIE DE CONFORMITATE EC
Noi, SC VITACOM ELECTRONICS SRL, cu sediul in Cluj-Napoca, str. Buna Ziua FN, CIF RO214527, inregistrat la Reg Com. cu nr. J12/1992/1991, declaram pe propriea raspundere ca produsul
VENTILATOR CU PICIOR
Model: FAN-STAND-BREEZE-WL
la care se refera aceasta declaratie, respecta cerintele de protectie si este in conformitate cu urmatorul/urmatoarele standard/standarde sau cu alt/alte document/documente normativ/normative :
EN 60335-1:2012+A11:2014
EN 60335-2-80:2003+A1:2004+A2:2009
EN 62233:2008
EN 55014-1:2006+A1:2009+ A2:2011
EN 55014-2:2015
EN-61000-3-2:2014
EN 61000-3-3:2013
Directiva: LVD 2014/35/EU
Directiva: EMC 2014/30/EU
Directiva Eco Design 2009/125/CE
Declaratia de conformitate respecta cerintele HG 457/18.04.2003, Directiva LVD 2006/95/EC;
HG 982/21.09.2007, Directiva EMC 2004/108/EC, Eco Design Directive 2009/125/CE, Regulamentul EU nr. 206/2012.
An de aplicare marcaj CE: 16
Prezenta declaratia a fost intocmita pe baza documentatiei obtinuta de la furnizor.
Kun-Iager Francisc Locul si data emiterii declaratiei:
Manager suport comercial Cluj-Napoca 28.11.2016

Table of contents
Languages:
Other Well Fan manuals
Popular Fan manuals by other brands

Monte Carlo Fan Company
Monte Carlo Fan Company 5CU52XX Series instructions

Hunter
Hunter 51883 installation manual

Marta
Marta MT-FN2554 user manual

Suntec Wellness
Suntec Wellness Klimatronic CoolBreeze 3000 TV instruction manual

Salda
Salda KF T120 EC Series Installation and operation manual

Lunos
Lunos AB 30/60 installation manual

Livoo
Livoo DOM412 instruction manual

Greenwood
Greenwood Samika LE100 installation instructions

LIMODOR
LIMODOR LZE-RD Fitting instructions

V-TAC
V-TAC VT-6053-5 instruction manual

LUCCI Air
LUCCI Air AIRFUSION BALI LD-BALI-52 installation instructions

Helios
Helios ultra Silence ELS-GUBA Installation and operating instuction