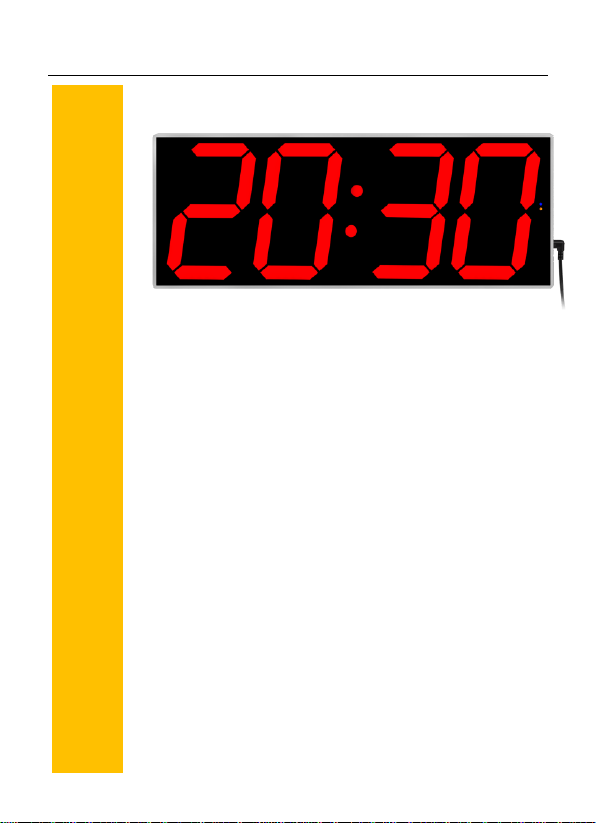
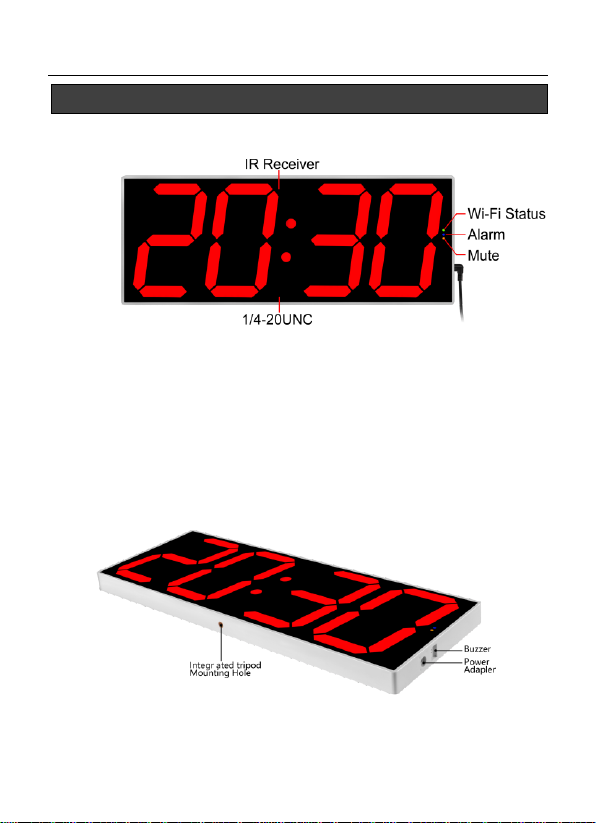
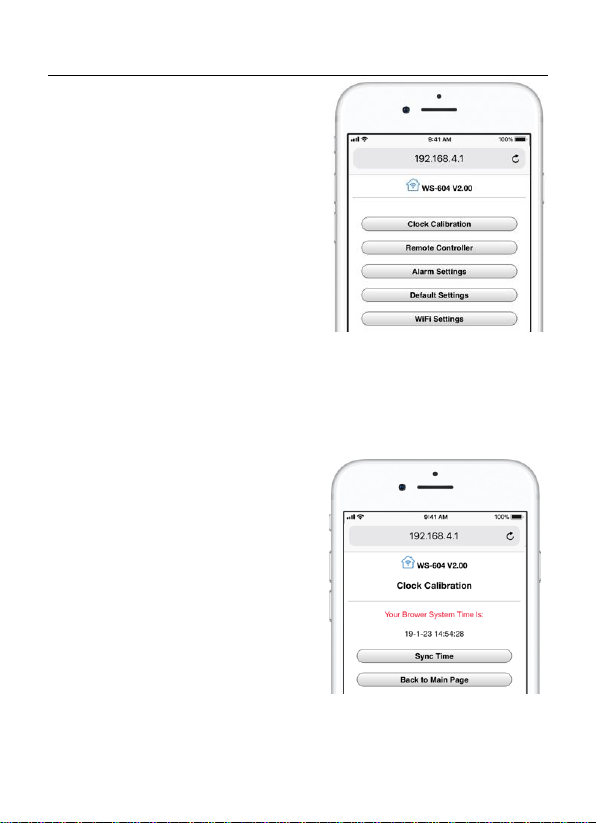
West Ocean WS-604 User manual

West Ocean WS-604 Digital LED Clock User Guide
1/ 21
Installation and User Guide
WS-604 V2.00
DIGITAL LED CLOCK

West Ocean WS-604 Digital LED Clock User Guide
2/ 21
Contents:
1. What’s in the box
2. Get to know your LED Clock
3. Getting started
4. Using the Remote Controller
5. Wireless control via your smart phone or PC
6. Connect the Clock with Internet
7. Calibrating your Clock
8. Multiple Mounting options
9. Customer Support
10. Specifications
11. Using Tips
12. Update your Clock

West Ocean WS-604 Digital LED Clock User Guide
3/ 21
1. What’s in the box
Digital
LED Clock
User
Guide
Remote
Controller
Power Adapter
(2m cord)
2 Screws
2 wall plugs
Electrical wire
for concealed
installation

West Ocean WS-604 Digital LED Clock User Guide
4/ 21
2. Get to know your LED Clock
The Front:
Yellow light on: Buzzer on Blue light on: Alarm set
Yellow light off: Mute Blue light off: No Alarm set
Green light on: Wi-Fi connected
Green light off: Wi-Fi connect lost
The Side:

West Ocean WS-604 Digital LED Clock User Guide
5/ 21
The Back:
3. Getting Started
Power up your LED Clock using included
power adapter.
The clock will show current time of Pacific
Time Zone immediately.
Note: To calibrate the clock or change default time
zone, please refer to section 5 of “Wireless Control”
or section 7 Calibrating your clock”.

West Ocean WS-604 Digital LED Clock User Guide
6/ 21
4. Using the Remote Controller
1. Press M1 to display current Time.
2. Press M2 for 1-99 SECONDS Countdown
•Using numeric keypad until your desired Countdown
SECONDS is displayed in SS:MS.
•Press to start or pause Countdown.
•Upon completion, it will beep one time.
3. Press M3 for MINUTES Countdown
•Using numeric keypad until your desired Countdown
MINUTES is displayed in MM:SS.
•Press to start or pause Countdown.
•Upon completion, it will beep one time.
4. Press M4 for HOURS Countdown
•Using numeric keypad until your desired Countdown
HOURS is displayed in HH:MM.
•Press to start or pause Countdown.
•Upon completion, it will beep one time.
5. Set up 0-99 SECONDS Timer
•Press until number 5 is displayed.
•Press to confirm selected mode. Display format
is 00:00 (SS:MS).

West Ocean WS-604 Digital LED Clock User Guide
7/ 21
•Press to start timer or pause.
•It will beep one time when the timer reaches 99
Seconds and stop.
6. Set up 0-99 MINUTES Timer
•Press until number 6 is displayed.
•Press to confirm selected mode. Display format
is 00:00 (MM:SS).
•Press to start timer or pause.
•It will beep one time when the timer reaches 99 Min.
and 59 Sec and stop.
7. Set up 0-99 HOURS Timer
•Press until number 7 is displayed.
•Press to confirm selected mode. 00:00 (HH:MM)
will be displayed. Under this mode, the colon ‘:’ will
flash at timing and stop at pause.
•Press to start timer or pause.
•It will beep one time when the timer reaches 99 Hours
and 59 Minutes and stop.
8. Set up desired number display
•Press until number 8 is displayed.

West Ocean WS-604 Digital LED Clock User Guide
8/ 21
•Press to confirm selected mode. The LED
screen will be dark. Using numeric keypad to show
your desired number or time or score to display.
•Press to choose to show colon ‘:’ or not
•Press to change.
9. ON/OFF
To turn on or off the screen when you are using it as clock.
10. 12/24
Press this button to switch between 24/12-Hour Time.
Note: You don’t need Wi-Fi to use Remote Controller.
However, if you want to calibrate the clock, set up alarms or change
default setting of Countdowns, you will need to connect your Clock with
Wi-Fi.

West Ocean WS-604 Digital LED Clock User Guide
9/ 21
5. Wireless control via your smart phone or PC
Important: To calibrate the clock, control the clock via web
browser, set up alarm and change default settings of
Countdowns, please make sure your LED clock is connected
with your device.
ONE STEP to connect your device with your LED Clock:
Go to the Wi-Fi settings of your
smart phone or computer and
connect to the Wi-Fi network
name started with “WS-XXXX”
Enter Password
“12345678” to connect.
.
Note: This network provides access to the LED Clock setup page only. If
you see an “Unsecured Network” or “No Internet Connection” Message,
please ignore it and connect anyway.

West Ocean WS-604 Digital LED Clock User Guide
10 / 21
Once your device is connected
to your LED Clock, open your
web browser and in the url
address bar enter 192.168.4.1
and press Enter or Go.
Tap on the loaded Menu to
manage your LED clock.
To calibrate the Clock: (Recommended)
Note: there are 2 other options to calibrate the Clock, please refer to
section 7 “Calibrating your Clock”
Tap on “Clock Calibration”.
On the loaded screen tap on
“Sync time” to calibrate your
LED clock.
Upon completion, you will see a
message “Successfully
Calibrated”

West Ocean WS-604 Digital LED Clock User Guide
11 / 21
To control your Clock
remotely via Web Browser:
Tap on “Remote Controller”.
Manage your LED clock like
using a Remote Controller on the
loaded screen.
Note: If the screen stopped to
respond, just refresh the page.
Go back to main page for other
options.
To Set up Alarm:
Tap on “Alarm Settings”.
On the loaded screen, tap to
manage your desired alarm and
save.
Once the alarm has been set up
successfully, blue light on the
screen will be on automatically.

West Ocean WS-604 Digital LED Clock User Guide
12 / 21
•When setting up Daily Alarm, remember to check “Day
of the Week”.
•When setting up Hourly Alarm, just input “Minute” you
want the Clock to sound at.
To change default settings
of Countdowns (M2,M3,M4):
Tap on “Default Settings”
On the loaded screen, tap to
manage your default settings
upon your personal preference
and tap Save.
6. Connect the Clock with Internet
Q: Do I need to connect my clock with Internet?
A: the answer is YES, if you wish to
•surfer online while viewing and controlling your LED Clock.
•Control the clock despite any distance.
Important: Before you start, you will need to know your Wi-Fi
name and password. Incorrect Wi-Fi name and/or password
will lead to connection errors.

West Ocean WS-604 Digital LED Clock User Guide
13 / 21
Connect your LED Clock with Internet
STEP 1: Go to the Wi-Fi settings
of your smart phone or computer
and connect to the Wi-Fi network
name started with “WS-XXXX”
Enter Password
“12345678” to
connect.
STEP 2: Once your device is
connected to your LED Clock,
open your web browser and in the
url address bar enter 192.168.4.1
and press Enter or Go.
On the loaded screen tap on
“Wi-Fi Settings”.

West Ocean WS-604 Digital LED Clock User Guide
14 / 21
STEP 3:
On the next screen, enter name of
your Wi-Fi network and password,
tap Save.
Unplug the clock and
plug it back in.
Upon success connection, green
light on the screen will be on
automatically.
STEP 4:
On the refreshed screen, you will
see a STA IP address assigned by
your network automatically.
Mark down this IP address.

West Ocean WS-604 Digital LED Clock User Guide
15 / 21
Upon completion:
Go back to Wi-Fi settings of your smart phone or computer,
connect back to your Wi-Fi network.
Open your web browser and in
the url address bar enter the
assigned STA IP address to
lunch the Menu.

West Ocean WS-604 Digital LED Clock User Guide
16 / 21
7. Calibrating your Clock
Important: We highly recommend you to calibrate your
Clock through wireless control via web browser as
described in section 5 of “Wireless control via your smart
phone or PC”.
Calibrating your clock via Internet automatically:
Connect your clock with Internet as described in section 6 of
“Connect the Clock with Internet”.
Upon completion of
internet connections,
please make sure to
•check “Auto Snyc Time”
•and select correct
Time zone where you are
•Tap on “Save”

West Ocean WS-604 Digital LED Clock User Guide
17 / 21
Calibrating your clock via Remote Controller:
•Unplug your Clock
•Hold on “MODE” button on the back of the clock, plug in
power adapter. The clock will be in “Time Setup Mode”.
•Release the “MODE” button.
•Follow instructions below, we take 17:41, Sunday,
November, 04, 2018 as example:
By incorrect entering, it will beep and won’t go to next step.
Note: To set up Day of The WEEK
01 for Monday 02 for Tuesday
03 for Wednesday 04 for Thursday 5 for Friday
06 for Saturday 00 for Sunday

West Ocean WS-604 Digital LED Clock User Guide
18 / 21
8. Multiple Mounting options
We offer you with multiple mounting options.
Place it on tripod via
integrated tripod mounting
hole.
2 Screws and 2 plastic expansion anchors for
mounting in-wall.
Electrical wire for concealed installation in-wall.
Note: With built-in G sensor, the clock has auto-rotate function. You
can place it or install it in any direction you want despite of position of
the power cord.

West Ocean WS-604 Digital LED Clock User Guide
19 / 21
9. Customer Support
Should you have any questions, please contact our friendly
support team at [email protected].
10. Specifications
•Dimensions: 18”×6.85”×0.95”
•Size of single digital(H x W): 6.1”×3.4”
•Weight:2.2 lbs
•WiFi: 802.11 b/g/n
•Battery: 1 LIR1220 (included)
•Power Supply:
Power adapter, DC 9-28V / 6.4 Watt (Max)
•Working environment:
Operating Temp: 0 to 40 C〫/ 32 to 104 F
Storage Temp: 0 to 60 C〫/ 32 to 140 F
Operating Humidity: 10% to 90% RH
11. Using Tips
•Before you start, you will need to know your Wi-Fi network name
and password.
•Always calibrate your Clock via Internet, your smart phone or PC.
•Batteries are a backup power source to preserve settings in case
of a power outage. Power adapter is required as the power source
of this product.

West Ocean WS-604 Digital LED Clock User Guide
20 / 21
•The setup process must be completed on the WiFi network in
which it will be used.
•If network environment is changed (you want to use it in a different
location), before you start, you will need to re-config your clock
network settings. Follow these steps:
✓Unplug your Clock
✓Hold on “ON/OFF” button on the back of the clock, plug
in power adapter.
✓Release the “ON/OFF” button.
✓Previous WiFi-settings will be cleared and your clock is
ready to set up for use under new network environment.
Alarm and default settings will be cleared at the same time.
•If you find it difficult to connect your device with the Clock. Try the
steps above to clear current WIFI-settings and try again.
•If the green light on the screen went off, that means it lost Wi-Fi
connection. You can still use your Remote Controller and the Clock
will still work. But you can’t control or manage your clock via your
smart phone or PC. Repeat section 6 to connect your LED Clock
with internet.
Other manuals for WS-604
1
Table of contents