Westmark DELUXE User manual

1017 2260
MESSERSCHÄRFER | KNIFE
SHARPENER »DELUXE«
WESTMARK QUALITY


Wichtige Sicherheits-Warnhinweise
Diese Vorsichtsmaßnahmen sollten immer
ergriffen werden, um das Risiko von Verlet-
zungen oder Beschädigungen zum minimie-
ren :
1. Lesen Sie sämtliche Anweisungen, bevor
Sie den Messerschärfer benutzen und be-
wahren Sie diese dann sorgfältig auf, um
sie später nochmals nachlesen zu können.
2. Das Gerät ist nicht dafür bestimmt,
von Kindern oder Menschen mit einge-
schränkten physischen, sensorischen oder
mentalen Fähigkeiten genutzt zu werden.
Bitte halten Sie den Messerschärfer ausser
Reichweite von Kindern.
3. Versuchen Sie nicht, ganz neue Messer zu
schärfen.
4. Nicht geeignet für Keramik-Klingen oder
ganz empfindliche japanische Stahlklin-
gen.
5. Ziehen Sie das Messer nicht mit Gewalt
durch das Gerät.
Nutzungsanleitung
1. Stellen Sie den Messerschärfer auf den
Tisch und halten Sie diesen während des
Schärfvorganges am hierfür vorgesehenen
Griff fest. Ziehen Sie das Messer mehrmals
(z.B. 3 x ) durch jede Station.
Die Stationen haben die folgenden Funkti-
onen:

Station 1:
Diamant Surface
(Preparation = Vorbereitung)
Dient dazu, beschädigte Klingenkanten zu
reparieren, begradigt die Klinge vor dem
eigentlichen Schärfen
Station 2:
Tungsten Steel (Sharpen = Schärfen)
Schärft die Klinge und stellt die Schneidkan-
te in ‚V‘-Form wieder her
Station 3:
Ceramic stone (Fine Tune = Feinschliff)
Poliert die Klinge und gleicht nochmals
eventuelle - auch durch den Schärfvorgang -
entstandene Unebenheiten aus
2. So schärfen Sie ein Messer
a. Schärfen Sie nur saubere - trockene Klin-
gen. Legen Sie die Klinge mit dem breiten
Klingenende nahe des Messergriffs in die
Station 1 ein und ziehen Sie das Messer
dann sanft in Ihre Richtung.
Achtung: keine Vorwärts-und Rückwärts-
bewegung mit der Klinge vornehmen -
immer nur in eine Richtung ziehen.
b. Wir empfehlen, diesen Vorgang mindes-
tens 3 x pro Station zu wiederholen. Je
nach Klingenzustand auch häufiger.
c. Spülen Sie das Messer sorgfältig ab, nach-
dem Sie die Klinge geschärft haben.

Important safety warnings
Always take these precautions to minimise
the risk of injuries or damage:
1. Read all the instructions before using the
knife sharpener and keep the instructions
in a safe place so you can consult them
later.
2. The appliance is not intended to be used
by children or persons with limited phy-
sical, sensory or mental abilities. Please
keep the knife sharpener out of the reach
of children.
3. Do not try to sharpen very new knives.
4. Not suitable for ceramic blades or very
sensitive Japanese steel blades.
5. Do not pull the knife through the appli-
ance with force.
Instructions for use
1. Place the knife sharpener on the table and
hold it firmly by the handle when sharpe-
ning. Pull the knife through each slot several
times (eg 3 times).
The slots have the following functions:
Slot 1: Diamond surface (preparation)
For repairing damaged blades and straighte-
ning blades before actually sharpening them
Slot 2: Tungsten steel (sharpen)

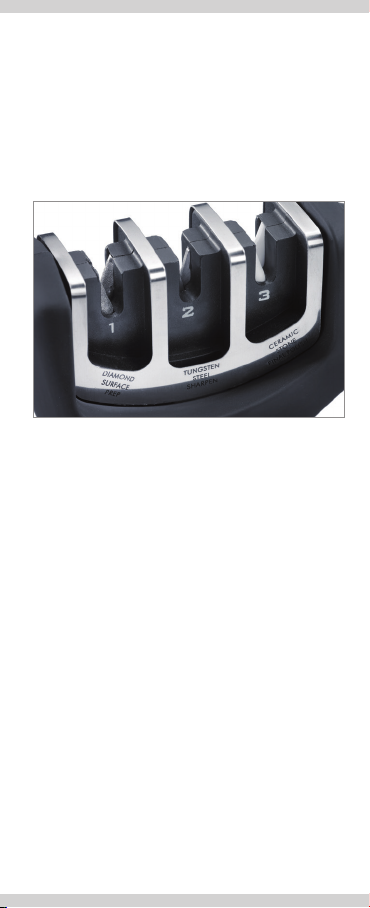
Sharpens the blade and restores the cutting
edge to a ‘V’ shape
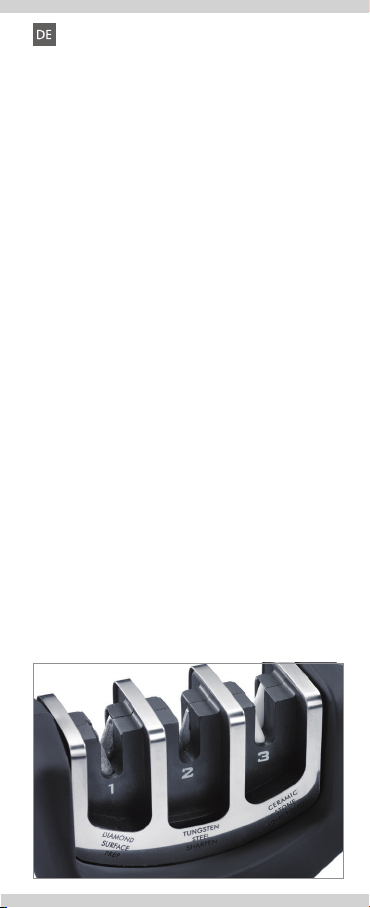
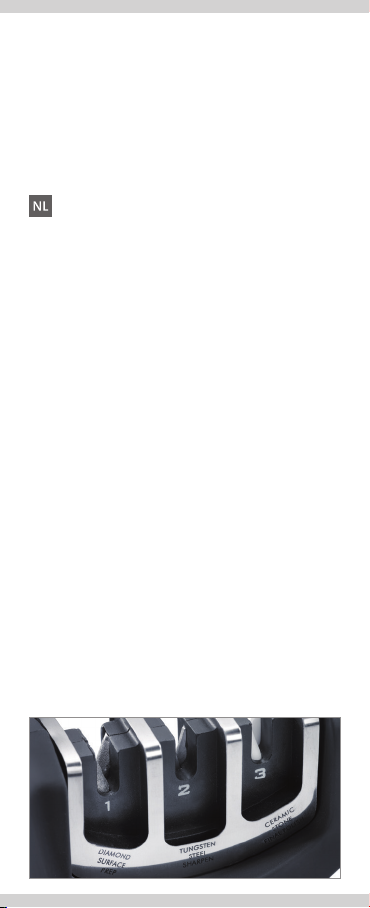
Slot 3: Ceramic stone (fine tune)
Polishes the blade and equalises any surface
irregularities that may have been caused –
including by the sharpening procedure
2. How to sharpen a knife
a. Sharpen only clean and dry blades. Place
the blade with the broad end near the
knife handle into slot 1 and pull the knife
gently towards you. Attention: do not
move the blade backwards and forwards –
pull in one direction only
b. We recommend repeating this procedure
at least three times per slot, or more often,
depending on the condition of the blade.
c. Rinse the knife carefully after sharpening
the blade.
Instructions de sécurité importantes
Ces mesures de précaution doivent toujours
être prises afin de minimiser le risque de
blessures ou de dommages :
1. Lisez l‘ensemble des instructions avant
d‘utiliser l‘aiguiseur de couteaux et
conservez-les soigneusement afin de
pouvoir les consulter ultérieurement.
2. L‘appareil n‘est pas destiné à être utilisé
par des enfants ou des adultes ayant
des capacités physiques, sensorielles et
intellectuelles réduites. Veuillez tenir
l‘aiguiseur de couteaux hors de la portée
des enfants.
3. Ne tentez pas d‘aiguiser des couteaux
neufs.
4. Non adapté aux lames en céramique et
aux lames japonaises en acier très fragi-
les.
5. Ne tirez pas le couteau avec force à travers

Instructions d‘utilisation
1. Posez l‘aiguiseur de couteaux sur une
table et tenez-le fermement par la poignée
prévue à cet effet pendant le processus
d‘aiguisage. Tirez le couteau plusieurs fois
(par exemple 3 fois) dans chaque module.
Les modules ont les fonctions suivantes :
Module 1 : Diamant Surface (Preparation =
préparation)
Sert à réparer les lames endommagées,
rectifie la lame avant l‘aiguisage
Module 2 : Tungsten Steel (Sharpen = aigu-
isage)
Aiguise la lame et redessine les bords cou-
pants en V
Module 3 : Ceramic stone (Fine Tune =
finition)
Polit la lame et égalise les éventuelles as-
pérités pouvant perdurer après le processus
d‘aiguisage.
2. Méthode d‘aiguisage d‘un couteau
a. N‘aiguisez que des lames propres et
sèches. Placez l‘extrémité large de la lame
située à proximité du manche du couteau
dans le module 1 et tirez le couteau vers
vous avec une légère pression. Attention
: ne pas réaliser de mouvement de va-et-

vient avec la lame, toujours la tirer dans
une seule direction
b. Nous recommandons de répéter ce pro-
cédé au minimum 3 fois par module ou
plus selon l‘état de la lame.
c. Rincez soigneusement le couteau après
aiguisage de la lame.
Belangrijke veiligheidsvoorschriften
Deze veiligheidsmaatregelen moeten altijd
genomen worden, om de kans op letsels of
beschadigingen te beperken:
1. Lees alle voorschriften voor u de messens-
lijper gebruikt en bewaar deze zorgvuldig
voor latere raadpleging.
2. Het apparaat mag niet gebruikt wor-
den door kinderen of volwassenen met
beperkte fysische, sensorische of mentale
vaardigheden. Houd de messenslijper
buiten het bereik van kinderen.
3. Probeer niet om volledig nieuwe messen
te slijpen.
4. Niet geschikt voor keramische messen of
heel gevoelige Japanse stalen messen.
5. Trek het mes niet met geweld door het
apparaat.
Gebruiksaanwijzing
1. Plaats de messenslijper op de tafel en
houd deze tijdens het slijpen aan de hiervoor
voorziene greep vast. Trek het mes meerdere
keren (bijv. 3 keer) door ieder station.
De stations hebben de volgende functies:

Station 1: Diamant Surface (Preparation =
voorbereiding)
Dient om beschadigde mesranden te repa-
reren, corrigeert het mes voor het eigenlijke
slijpen.
Station 2: Tungsten Steel (Sharpen = slijpen)
Slijpt het mes en geeft de snijkant weer een
‘V’-vorm.
Station 3: Ceramic stone (Fine Tune = fijn
slijpen)
Polijst het mes en werkt nogmaals eventuele
– ook door het slijpen – ontstane oneffenhe-
den weg.
2. Zo slijpt u een mes
a. Slijp uitsluitend schone, droge messen.
Leg het mes met het brede uiteinde dicht
bij de greep in station 1 en trek het mes
dan zachtjes in uw richting. Opgelet: geen
voorwaartse en achterwaartse beweging
met het mes uitvoeren – altijd in één
richting trekken.
b. Wij raden aan, deze procedure ten minste
3 x per station te herhalen. Naar gelang
van de toestand van de messen kan dit
vaker herhaald worden.
c. Spoel het mes zorgvuldig af, nadat u het
geslepen hebt.
Advertencias de seguridad importantes
Tenga siempre en cuenta estas precauciones
para reducir el riesgo de lesiones o daños:
1. Lea con atención las instrucciones antes
de utilizar el afilador de cuchillos y guár-
delas con cuidado para poder consultarlas
de nuevo en el futuro.
2. El producto no está pensado para ser
utilizado por niños o personas con disca-

pacidades físicas, sensoriales o mentales.
Mantenga el afilador de cuchillos fuera del
alcance de los niños.
3. No intente afilar cuchillos nuevos.
4. No es apto para hojas de cerámica u hojas
de acero japonesas altamente delicadas.
5. No introduzca el cuchillo con fuerza en el
aparato.
Instrucciones de uso
1. Coloque el afilador de cuchillos sobre la
mesa y sujételo durante el proceso de afilado
por el mango previsto para ello. Introduzca
el cuchillo varias veces (p. ej. 3 veces) en cada
ranura.
Las ranuras tienen las siguientes funciones:
Ranura 1: Diamamond Surface (Preparation
= preparación)
Sirve para reparar las hojas dañadas, corrige
la hoja antes del afilado
Ranura 2: Tungsten Steel (Sharpen = afilado)
Afila la cuchilla y recupera el canto de corte
en forma de ‘V’
Ranura 3: Ceramic stone (Fine Tune = pulido)
Pule la hoja y nivela posibles irregularidades
originadas de nuevo, también por el proceso
de afilado

2. Así debe afilar el cuchillo:
a. Afile únicamente hojas limpias y secas.
Introduzca la hoja por la zona más ancha y
próxima al mango del cuchillo en la ranura
1 y deslice el cuchillo suavemente hacia
atrás Atención: no realice movimientos
hacia adelante y hacia atrás con la hoja,
deslícela únicamente en una dirección
b. Le recomendamos repetir este proceso al
menos 3 veces por ranura. Dependiendo
del estado de la hoja, también puede
hacerlo con mayor frecuencia.
c. Limpie el cuchillo con cuidado después de
haber afilado la cuchilla.
Avisos de segurança importantes
Devem sempre ser tomadas as medidas de
precaução seguintes, para evitar perigos ou
danos:
1. Ler todas as instruções antes de utilizar
o afiador de facas e guardar as mesmas,
para referência futura.
2. O aparelho não se destina a ser utilizado
por crianças ou pessoas com capacidades
físicas, sensoriais ou mentais diminuídas.
Manter o afiador de facas fora do alcance
das crianças.
3. Não tentar afiar facas em estado total-
mente novo.
4. Inadequado para facas com lâminas
cerâmicas e facas japonesas com lâminas
muito delicadas.
5. Não puxar a faca de forma violenta pelo
aparelho.
Instruções de utilização
1. Pouse o afiador de facas sobre a mesa
e, durante o processo de afiação, segure-o
pela pega prevista para o efeito. Passe a faca
várias vezes (por ex. 3 x) por cada uma das
ranhuras.

As ranhuras têm as seguintes finalidades:
Ranhura 1: Diamant Surface (preparation =
preparação)
Destina-se a reparar extremidades de lâmi-
nas danificadas, retifica a lâmina antes de a
mesma ser afiada
Ranhura 2: Tungsten Steel (sharpen = afiar)
Afia a lâmina e restabelece o gume em
formato ‚V‘
Ranhura 3: Ceramic stone (fine tune = retifi-
cação de precisão)
Procede ao polimento da lâmina e volta a
uniformizar eventuais irregularidades, que
também possam ter surgido durante o pro-
cesso de afiação
2. Como afiar uma faca
a. Afiar apenas lâminas limpas e secas. Colo-
car a extremidade larga da lâmina, junto
à pega da faca, na ranhura 1 e puxar a
faca suavemente na direção do utilizador.
Atenção: não puxar a lâmina para a frente
e para trás – puxá-la sempre e apenas
numa direção
b. Recomendamos repetir este processo, pelo
menos, 3 x em cada uma das ranhuras.
Aumentar o número de vezes em função
do estado da lâmina.
c. Lavar bem a faca depois de afiar a lâmina.

Importanti avvertenze sulla sicurezza
Queste misure precauzionali dovrebbero
essere sempre adottate per minimizzare il
rischio di lesioni o danni:
1. Prima di usare l’affilacoltelli leggere at-
tentamente le istruzioni e conservarle con
cura per consultazioni successive
2. L’apparecchio non deve essere usato da
bambini o persone con capacità fisiche,
sensoriali o mentali limitate. Tenere
l’affilacoltelli lontano dalla portata dei
bambini.
3. Non cercare di affilare coltelli nuovi.
4. Non adatto per lame di ceramica o lame
d’acciaio giapponese estremamente deli-
cate.
5. Non tirare il coltello attraverso
l’apparecchio con forza.
Istruzioni per l’uso
1. Mettere l’affilacoltelli sul tavolo e affer-
randolo saldamente per l’apposito manico
durante il processo di affilatura. Far passare
il coltello ripetutamente (p. es. 3 volte) attra-
verso ogni stazione.
Le stazioni hanno le seguenti funzioni:
Stazione 1: Diamant Surface (Preparation =
Preparazione)
Serve per riparare il filo danneggiato della

lama, rettifica la lama prima dell’affilatura
vera e propria
Stazione 2: Tungsten Steel (Sharpen =
Affilatura)
Affila la lama e ripristina il filo nella forma
a ‘V’
Stazione 3: Ceramic stone (Fine Tune =
Microfinitura)
Lucida la lama ed elimina eventuali irregola-
rità createsi – anche in seguito al processo di
affilatura
2. Ecco come affilare un coltello
a. Affilare solo lame pulite, asciutte. Inserire
la lama con l’estremità larga vicino al
manico nella stazione 1 e poi tirare delica-
tamente il coltello verso di sé. Attenzione:
non spostare la lama in avanti e indietro –
tirare sempre e solo in un’unica direzione.
b. Consigliamo di ripetere questo processo
almeno 3 volte per stazione, secondo lo
stato della lama anche più spesso.
c. Lavare con cura il coltello dopo aver affila-
to la lama.
Důležitá bezpečnostní upozornění
Tato preventivní opatření byste měli vždy
dodržovat, abyste snížili na minimum riziko
zranění nebo poškození:
1. Přečtěte si veškeré pokyny, než začnete
ostřič nože používat a uschovejte pak
návod pečlivě, abyste si ho mohli případně
později ještě přečíst.
2. Přístroj není určen k tomu, aby ho
používali děti nebo osoby s omezenými
fyzickými, smyslovými nebo mentální-
mi schopnostmi. Udržujte ostřič nožů v
bezpečné vzdálenosti od dětí.
3. Neostřete zcela nové nože.

4. Není vhodné pro keramická ostří nebo
velmi citlivá japonská ocelová ostří.
5. Neprotahujte nůž přístrojem násilně.
Návod k použití
1.Postavte ostřič nožů na stůl a držte jej po
celou dobu ostření za rukojeť, která je k tomu
určená Protáhněte nůž několikrát (např. 3x)
každou stanicí.
Stanice mají následující funkce:
Stanice 1: Diamant Surface (Diamantový
povrch – Preparation = příprava)
Slouží k opravě poškozených hran ostří, na-
rovnává ostří před samotným ostřením.
Stanice 2: Tungsten Steel (Wolframová ocel –
Sharpen = ostření)
Ostří čepel a formuje opět řeznou hranu do
podoby ‚V‘
Stanice 3: Ceramic stone (Keramický brousek
– Fine Tune = jemné zabroušení)
Vyleští ostří a vyrovná ještě případně – také
broušením – vzniklé nerovnosti
2. Jak nabrousíte nůž
a. Provádějte ostření jen na čistých a suchých
čepelích. Položte ostří širokým koncem
čepele v blízkosti rukojeti nože do stanice
1 a táhněte nůž jemně směrem k sobě.

Pozor: neprovádějte s ostřím žádné pohy-
by vpřed nebo vzad – táhněte vždy pouze
jedním směrem.
b. Doporučujeme opakovat tento úkon
minimálně 3 x v každé stanici. Podle stavu
ostří také častěji.
c. Po ostření čepele nůž pečlivě opláchněte.
Indicaţii de siguranţă şi avertismente impor-
tante
Aceste măsuri de precauţie trebuie între-
prinse întotdeauna, pentru a reduce riscul
leziunilor sau deteriorărilor:
1. Citiţi toate instrucţiunile înainte de
utilizarea ascuţitorului de cuţite şi păstraţi
instrucţiunile cu grijă, pentru a le putea
consulta ulterior.
2. Dispozitivul nu este destinat utilizării de
către copii sau persoane cu aptitudine
fizice, senzoriale sau mentale limitate. Nu
ţineţi acest ascuţitor de cuţite la îndemâ-
na copiilor.
3. Nu încercaţi să ascuţiţi cuţite noi.
4. Neindicat pentru lame ceramice sau lame
japoneze sensibile, din oţel.
5. Nu trageţi cuţitul cu putere prin dispozitiv.
Instrucţiuni de folosire
1. Aşezaţi ascuţitorul de cuţite pe masă şi
ţineţi-l bine în timpul procedurii de ascuţire,
utilizând mânerul prevăzut în acest sens.
Trageţi cuţitul de mai multe ori (de ex. 3 ori)
prin fiecare staţie.
Staţiiile au următoarele funcţii:

Staţia 1: Diamant Surface (Preparation =
pregătire)
Are rolul de a repara muchiile deteriorate
ale lamelor, îndreptând lama înainte de
ascuţirea efectivă
Staţia 2: Tungsten Steel (Sharpen = ascuţire)
Ascute lama şi reface forma de ‚V‘ a muchiei
de tăiere
Staţia 3: Ceramic stone (Fine Tune = şlefuire
fină)
Şlefuieşte lama şi nivelează încă o dată
eventualele neregularităţi rezultate - chiar şi
din cauza procedurii de ascuţire
2. Modul de ascuţire a cuţitelor
a. Ascuţiţi numai lame curate şi uscate.
Aşezaţi lama cu partea lată din apropierea
mânerului cuţitului în staţia 1 şi trageţi
uşor cuţitul în direcţia dumneavoastră
Atenţie: nu efectuaţi cu lama mişcări de
înainte şi înapoi: - trageţi întotdeauna
într-o singură direcţie
b. Recomandăm repetarea acestei proceduri
de cel puţin 3 ori pentru fiecare staţie. Chi-
ar şi de mai multe ori, în funcţie de starea
lamei.
c. După ce aţi ascuţit lama, clătiţi cuţitul cu
grijă.
Ważne wskazówki bezpieczeństwa
Zawsze przestrzegać podanych tu środków
ostrożności, aby zminimalizować ryzyko
obrażeń lub uszkodzenia :
1. Przed użyciem ostrzałki należy przeczytać
wszystkie instrukcje; instrukcje starannie
przechowywać, aby móc z nich korzystać
w przyszłości.
2. Urządzenie nie może być używane
przez dzieci lub osoby o ograniczonej

sprawności fizycznej, sensorycznej lub
umysłowej. Ostrzałkę do noży należy
przechowywać w miejscu niedostępnym
dla dzieci.
3. Nie próbować ostrzyć noży zupełnie
nowych.
4. Nie nadaje się do ostrzy ceramicznych ani
do bardzo wrażliwych stalowych ostrzy
japońskich.
5. \ozy nie przeciągać przez urządzenie siłą.
Instrukcja użytkowania
1. Ostrzałkę do noży postawić na stole,
podczas ostrzenia noży przytrzymać ją za
przewidziany do tego uchwyt. Przeciągnąć
nóż kilka razy (np. 3x) przez każdą 3x przez
każdy stopień.
Stopnia maja następujące funkcje:
Stopień 1: Diamant Surface (Preparation =
przygotowanie)
Służy do naprawy uszkodzonych ostrzy, pros-
tuje ostrze przed właściwym ostrzeniem
Stopień 2: Tungsten Steel (Sharpen = ostrze-
nie)
Ostrzy ostrze i odtwarza kształt krawędzi
tnącej ‚V‘
Stopień 3: Ceramic stone (Fine Tune = pole-
rowanie)

Poleruje ostrze i usuwa ewentualne –
spowodowane także w procesie ostrzenia
– nierówności
2. Ostrzenie noża
a. Ostrza muszą być czyste i suche. Szerokie
zakończenie ostrza przy uchwycie włożyć
w stopień 1 i pociągać delikatnie nożem w
swoim kierunku. Nie wykonywać ostrzem
ruchów posuwisto-zwrotnych – zawsze
pociągać tylko w jedną stronę.
b. Zalecamy wykonanie tych czynności
co najmniej 3 x w każdym stopniu. A
w zależności od stanu ostrza - nawet
częściej.
c. Po naostrzeniu ostrza należy starannie je
wypłukać.
Σημαντικές υποδείξεις ασφαλείας και
προειδοποίησης
Να λαμβάνονται πάντα τα ακόλουθα μέτρα
ασφαλείας, για να μειωθεί στο ελάχιστο ο
κίνδυνος τραυματισμών ή ζημιών:
1. Πριν χρησιμοποιήσετε το ακονιστήρι
μαχαιριών, διαβάστε όλες τις οδηγίες και
φυλάξτε τις προσεκτικά για ενδεχόμενες
μελλοντικές απορίες.
2. Αυτή η συσκευή δεν προορίζεται για άτομα
με περιορισμένες σωματικές, αισθητικές ή
πνευματικές ικανότητες. Παρακαλούμε να
φυλάξετε το ακονιστήρι μαχαιριών μακριά
από τα παιδιά.
3. Μην προσπαθείτε να ακονίσετε πολύ
καινούργια μαχαίρια.
4. Το ακονιστήρι δεν είναι κατάλληλο για
κεραμικές λεπίδες ή πολύ ευαίσθητες
ιαπωνικές ατσάλινες λεπίδες.
5. Μην περνάτε το μαχαίρι με βία μέσα από τη
συσκευή.
Οδηγίες χρήσης
1. Τοποθετήστε το ακονιστήρι μαχαιριών στο
τραπέζι και κρατάτε το κατά τη διαδικασία
ακονίσματος από τη λαβή που είναι

προορισμένη για αυτό το σκοπό. Περνάτε το
μαχαίρι μερικές φορές (π. χ. 3 φορές) μέσα
από κάθε θέση ακονίσματος.
Οι θέσεις ακονίσματος έχουν τους
ακόλουθους σκοπούς:
Θέση 1: διαμάντινη επιφάνεια (Preparation
= προετοιμασία) Επισκευάζει την φθαρμένη
κόψη των λεπίδων και ισιώνει τη λεπίδα πριν
από το κύριο ακόνισμα.
Θέση 2: βολφραμιούχος χάλυβας (Shar-
pen = ακόνισμα) Ακονίζει τη λεπίδα και
ξαναμορφώνει την κόψη σε μορφή ‚V‘.
Θέση 3: Κερμαική πλάκα (Fine Tune =
λεπτό ακόνισμα) Γυαλίζει και εξαλείφει
τυχαίες– ενδεχομένως και από τη διαδικασία
ακονίσματος δημιουργηθείσες – ανωμαλίες.
2. Με τον ακόλουθο τρόπο ακονίζεται ένα
μαχαίρι
a. Να ακονίζετε μόνο καθαρές- στεγνές
λεπίδες. Τοποθετήστε τη λεπίδα με την
πλατιά άκρη κοντά στη λαβή του μαχαιριού
μέσα στη θέση ακονίσματος 1 και τραβήξτε
το μαχαίρι απαλά προς τη κατεύθυνσή σας.
Προσοχή: Μην τραβάτε τη λεπίδα μπροστά
και πίσω – να τραβάτε πάντα μόνο προς μία
μοναδική κατεύθυνση.
b. Συνιστάμε να επαναλαμβάνετε αυτή τη
διαδικασία τουλάχιστον 3 φορές σε κάθε
θέση ακονίσματος, ή πιο συχνά ανάλογα με
την κατάσταση της λεπίδας.
c. Μετά το ακόνισμα ξεπλύνετε το μαχαίρι
καλά.
This manual suits for next models
1
Table of contents
Languages:
Popular Power Tools manuals by other brands

Dremel
Dremel 4000 Original instructions

Motomaster
Motomaster 299-6912-4 instruction manual

Dynabrade
Dynabrade Mini-Dynisher 13300 Operating, maintenance and safety instructions

Würth
Würth ANG 310 Original operating instructions

King Industrial
King Industrial CT-204 Service manual

Axminster
Axminster Hobby Series Original instructions

Senco
Senco PalletPro Series operating instructions

Festool
Festool OF 1010 EQ instruction manual

SUHNER ABRASIVE
SUHNER ABRASIVE ROTOfix Technical document

Gordon
Gordon 93682 Assembly & operating instructions

Scheppach
Scheppach TPX710 Translation from the original instruction manual

YATO
YATO YT-82055 Original instructions