Wetelux 820698 User manual

Westfalia Bedienungsanleitung
Nr. 109900
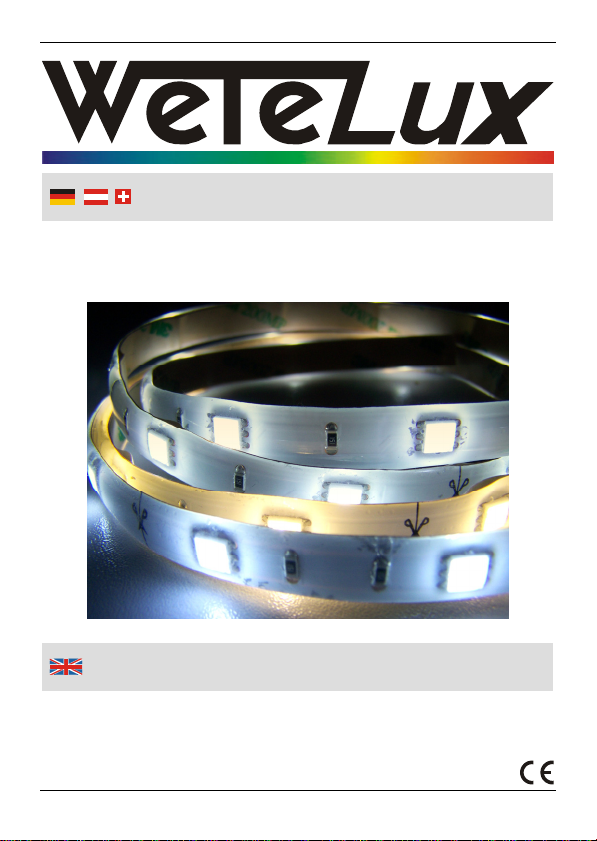
LED-System-Strip warm weiß + kalt weiß
Artikel Nr. 820698, 820699, 820700, 820701, 820702, 820703
LED Strip System warm white + cool white
Article No. 820698, 820699, 820700, 820701, 820702, 820703
Bedienungsanleitung
Instruction Manual

II
Instruction manuals provide valuable hints for using your new device.
They enable you to use all functions, and they help you avoid misun-
derstandings and prevent damage.
Please take the time to read this manual carefully and keep it for future
reference.
Bedienungsanleitungen enthalten wichtige Hinweise für den Umgang
mit Ihrem neuen Produkt. Sie ermöglichen Ihnen, alle Funktionen zu
nutzen, und sie helfen Ihnen, Missverständnisse zu vermeiden und
Schäden vorzubeugen.
Bitte nehmen Sie sich die Zeit, diese Bedienungsanleitung in Ruhe
durchzulesen und bewahren Sie diese für späteres Nachlesen gut auf.
Sehr
g
eehrte Damen und Herren
Dear Customers

III
Übersicht
|
Overview
1
2
4
3
5
9
7
8
6

IV
1 LED-System-Strip
30 cm warm weiß – Art. 820698
60 cm warm weiß – Art. 820699
100 cm warm weiß – Art. 820700
30 cm kalt weiß – Art. 820701
60 cm kalt weiß – Art. 820702
100 cm kalt weiß – Art. 820703
LED Strip
30 cm warm white – Art. 820698
60 cm warm white – Art. 820699
100 cm warm white – Art. 820700
30 cm cool white – Art. 820701
60 cm cool white – Art. 820702
100 cm cool white – Art. 820703
2 4-fach Verteiler 4 Output Receptacle
3 Netzgerät 15 W – Art. 820705 15 W Driver – Art. 820705
4 EIN/AUS-Schalter ON/OFF Switch
5 4-fach Verteiler 4 Output Receptacle
6 Netzgerät 48 W – Art. 820706 48 W Driver – Art. 820706
7 EIN/AUS-Schalter ON/OFF Switch
8 Anschlusskabel
100 cm – Art. 820708
200 cm – Art. 820707
Connection Cable
100 cm – Art. 820708
200 cm – Art. 820707
9 Verbindungskabel
10 cm – Art. 820713
50 cm – Art. 820711
100 cm – Art. 820710
Extension Cable
10 cm – Art. 820713
50 cm – Art. 820711
100 cm – Art. 820710
Übersicht
|
Overvie
w

1
Inhaltsverzeichnis
Table of Contents
Sicherheitshinweise ................................................................. Seite 2
LED-System-Strips .................................................................. Seite 3
Bei Westfalia erhältliche Einzelteile und Zubehör.................... Seite 3
Montage................................................................................... Seite 4
Auswahl des passenden Netzteils ........................................... Seite 5
Benutzung................................................................................ Seite 6
Reinigung und Lagerung.......................................................... Seite 6
Technische Daten.................................................................... Seite 6
Safety Notes ............................................................................ Page 7
LED Strip System..................................................................... Page 8
Available Parts and Accessory ................................................ Page 8
Mounting .................................................................................. Page 9
Finding the suitable Power Supply........................................... Page 10
Using........................................................................................ Page 11
Cleaning and Storing ............................................................... Page 11
Technical Data......................................................................... Page 11

2
Sicherheitshinweise
Beachten Sie bitte zur Vermeidung von Fehlfunktionen,
Schäden und gesundheitlichen Beeinträchtigungen
folgende Hinweise:
Diese Bedienungsanleitung gehört zu diesem Produkt. Sie enthält
wichtige Hinweise zur Inbetriebnahme und Handhabung. Bitte legen
Sie die Bedienungsanleitung dem Produkt bei, wenn Sie es an Dritte
weitergeben!
Lassen Sie Verpackungsmaterial nicht achtlos herumliegen. Plastiktü-
ten etc. können zu einem gefährlichen Spielzeug für Kinder werden.
Schalten Sie die LED-Leuchten aus und ziehen Sie das Netzteil aus
der Steckdose, wenn Sie die LED-Leuchten nicht benutzen oder sie
reinigen.
Verwenden und installieren Sie die LED-Leuchten nur im Innenbereich
an einem trockenen Ort. Schützen Sie die LED-Leuchten und das
Zubehör vor Feuchtigkeit und extremen Temperaturen.
Halten Sie die LED-Leuchten und das Zubehör außer Reichweite von
Kleinkindern. Es handelt sich um kein Spielzeug.
Schauen Sie nicht direkt in die LEDs und richten Sie den Lichtstrahl der
LEDs nicht direkt gegen die Augen von Menschen oder Tieren.
Vermeiden Sie eine starke mechanische Beanspruchung der LED-
Leuchten und setzten Sie diese keinen starken Vibrationen aus.
Montieren Sie die LED-Leuchten nur auf normal oder schwer ent-
flammbaren Untergründen.
Schließen Sie nicht mehr LED-Leuchten (parallel oder in Reihe) an ein
Netzteil an, als in den technischen Daten für das verwendete Netzteil
angegeben. Beachten Sie immer die maximale Leistungsabgabe des
jeweils verwendeten Netzteils!
Verwenden Sie zum Betrieb der LED-Leuchten nur die in dieser
Anleitung aufgelisteten Netzteile. Betreiben Sie keine anderen Geräte
mit diesen Netzteilen.
Zerlegen Sie die LED-Leuchten und das Zubehör nicht und unterneh-
men Sie keine Reparaturversuche. Alle Teile enthalten keine durch Sie
auswechselbaren oder zu reparierenden Teile. Bitte wenden Sie sich
bei Fragen oder Problemen an unseren Kundenservice.

3
Inbetriebnahme
LED-System-Strips
Die LED-System-Strips werden mit zwei unterschiedlichen Lichtfarben
(warm weiß und kalt weiß) und in je drei Längen (30 cm, 60 cm und
100 cm) angeboten. Die LED-Strips können per Klebestreifen an allen
glatten Oberflächen montiert werden.
Die LED-Leuchten lassen sich einzeln betreiben oder auf unterschiedliche
Art und Weise individuell kombinieren.
Bei Westfalia erhältliche Einzelteile und Zubehör
LED-System-Strip, 30 cm warm weiß – Art. 82 06 98
LED-System-Strip, 60 cm warm weiß – Art. 82 06 99
LED-System-Strip, 100 cm warm weiß – Art. 82 07 00
LED-System-Strip, 30 cm kalt weiß – Art. 82 07 01
LED-System-Strip, 60 cm kalt weiß – Art. 82 07 02
LED-System-Strip, 100 cm kalt weiß – Art. 82 07 03
Netzgerät 15 W mit 4-fach Verteiler – Art. 82 07 05
Netzgerät 48 W mit 4-fach Verteiler – Art. 82 07 06
Anschlusskabel, 100 cm – Art. 82 07 08
Anschlusskabel, 200 cm – Art. 82 07 07
Verbindungskabel, 10 cm – Art. 82 07 13
Verbindungskabel, 50 cm – Art. 82 07 11
Verbindungskabel, 100 cm – Art. 82 07 10
4
Inbetriebnahme
Montage
1. Suchen Sie geeignete Montageorte (Regal, Schrank, Vitrine, etc.) zur
Installation der LED-Unterbauleuchte(n).
2. Reinigen Sie die Oberfläche gründlich, auf die die LED-Elemente
geklebt werden sollen. Die Oberfläche muss trocken und frei von Staub
und Fett sein.
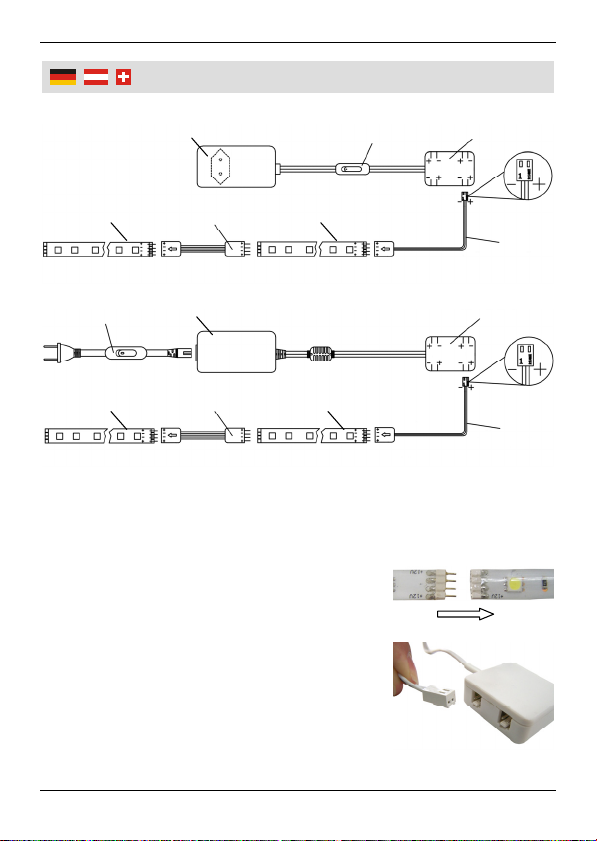
3. Setzen Sie ein Verbindungskabel (9) in der
gewünschten Länge zwischen zwei LED-
System-Strips (1), oder verbinden Sie die
Elemente direkt miteinander, um so einen
elektronischen Kontakt zwischen den verwen-
deten Elementen herzustellen
4. Für eine sternförmige Verkabelung verwenden
Sie den 4-fach Verteiler (2) bzw. (5).
5. Verbinden Sie das Anschlusskabel (8) mit
dem ersten LED-System-Strip-Element in der
von Ihnen hergestellten Kette und mit dem 4-fach Verteiler.
48 W
15 W
4 2
9
8
3
1
1
6
7 5
8
9
1
1

5
Inbetriebnahme
6. Ziehen Sie die Schutzfolie von der Rückseite der LED-System-Strips
und von den Steckern der Verbindungskabel bzw. Anschlusskabel.
Üben Sie beim Ankleben der Elemente leichten Druck aus.
Hinweis:
Das jeweils letzte Element einer LED-System-Strip-Kette kann auf
Wunsch auch gekürzt werden. Verwenden Sie dazu einen Seitenschnei-
der oder Ähnliches, um das Element an der mit dem Scherensymbol
gekennzeichneten Stelle zu trennen.
Auswahl des passenden Netzteils
Verwenden Sie eines der aufgelisteten Netzteile (nicht im Lieferumfang
enthalten) zum Betrieb der LED-Leuchte(n). Bei der Kombination meh-
rerer LED-Leuchtenelemente wird ein Netzteil mit einer größeren Aus-
gangsleistung vorausgesetzt, als dies beim Betrieb eines einzelnen
Elementes der Fall ist.
Die Netzteile sind mit einem Überlastschutz ausgestattet. Achten Sie
bei der Auswahl des Netzteils jedoch immer darauf, dass die max.
Ausgangsleistung des Netzteils größer ist als die gesamte Leistungs-
aufnahme der verwendeten LED-Leuchtenelemente. Verwenden Sie
ggf. mehrere Netzteile.

6
Inbetriebnahme
Netzteil Element 30 cm, 2,16 W Element 60 cm, 4,32 W Element 100 cm, 7,2 W
15 W 6 x 3 x 2 x
48 W 21 x 10 x 6 x
Benutzung
Betreiben Sie die LED-Leuchte(n) mit einem geeigneten Netzteil (siehe
Auswahl des passenden Netzteils). Stellen Sie sicher, dass es über
eine ausreichend hohe Ausgangsleistung verfügt.
Verwenden Sie den EIN/AUS-Schalter (4) bzw. (7), um alle ange-
schlossenen LED-Leuchten-Elemente (in Reihe oder sternförmig ange-
schlossen) ein- bzw. auszuschalten.
Reinigung und Lagerung
Reinigen Sie alle Teile nur mit einem weichen, trockenen, oder leicht
angefeuchteten Tuch. Verwenden Sie keine Reinigungsmittel oder
Chemikalien, diese könnten die Oberflächen beschädigen.
Lagern Sie alle Teile im Innenbereich außerhalb der Reichweite von
Kindern an einem trockenen, vor Staub, Schmutz und extremen Tem-
peraturen geschützten Ort.
Technische Daten
Artikel-Nr. Länge (L) Anzahl
LEDs Leistung Lichtfarbe
82 06 98 30 cm 9 2,16 W warm weiß
82 06 99 60 cm 18 4,32 W warm weiß
82 07 00 100 cm 30 7,2 W warm weiß
82 07 01 30 cm 9 2,16 W kalt weiß
82 07 02 60 cm 18 4,32 W kalt weiß
82 07 03 100 cm 30 7,2 W kalt weiß

7
Safet
y
Notes
Please note the following safety notes to avoid malfunctions,
damage or physical injury:
This manual belongs to the product. It contains important notes on
operating the unit. Please pass it on along with the unit if it is handed
over to a third party!
Dispose of the packaging materials carefully; the plastic bags may
become a deadly toy for children.
Switch of the LED lights and unplug the power supply if you do not
use the LED lights for a longer period of time or before cleaning.
Use and install the LED strips and the accessory only indoors in a dry
place. Protect the LED strips and the accessory from humidity and
extreme temperatures.
Keep the LED strips and the accessory out of reach of children. They
are no toys.
Do not stare directly into the LEDs and avoid pointing the light beam of
the LEDs directly at the eyes of humans or animals.
Do not expose the LED strips to strong mechanical stresses or to
strong vibrations.
Mount the LED strips only on normally flammable or flame resistant
surfaces.
When connecting more than one LED strip to one power supply,
make sure not to exceed the output power of the used power supply.
Always observe the max. output power stated in the technical data.
Operate the LED strips only with the power supplies recommended in
this manual. Do not operate other devices with those power supplies.
Do not modify any parts of the units in any way. Do not disassemble
the units or attempt to repair them yourself. They do not contain parts
serviceable by you. In case of questions or problems, please turn to
our customer service.

8
Usin
g
LED Strip System
The LED strip system is available in 2 different luminous colours (warm
white and cool white) and in three lengths each. Use the double sided
adhesive tape to easily attach the LED strips to any even and clean
surfaces.
The LED strips can be operated separately or you can combine them
individually in various ways.
Available Parts and Accessory
LED Strip, 30 cm warm white – Art. 82 06 98
LED Strip, 60 cm warm white – Art. 82 06 99
LED Strip, 100 cm warm white – Art. 82 07 00
LED Strip, 30 cm cool white – Art. 82 07 01
LED Strip, 60 cm cool white – Art. 82 07 02
LED Strip, 100 cm coo white – Art. 82 07 03
15 W Driver/Power Supply with 4 Output Receptacle – Art. 82 07 05
48 W Driver/Power Supply with 4 Output Receptacle – Art. 82 07 06
Connection Cable, 100 cm – Art. 82 07 08
Connection Cable, 200 cm – Art. 82 07 07
Extension Cable, 10 cm – Art. 82 07 13
Extension Cable, 50 cm – Art. 82 07 11
Extension Cable, 100 cm – Art. 82 07 10

9
Usin
g
Mounting
1. Find suitable locations (shelf, cupboard, display cabinet, etc.) to install
the LED strip(s).
2. Thoroughly clean the surface where you intend to stick the LED strips.
The surface has to be dry and free from dust and grease.
3. Connect two LED strips (1) using an extension
cable (9) of the desired length or directly
connect two elements to establish an electri-
cal contact between the used elements.
4. If you prefer cabling in a star shaped configu-
ration, use the 4 output receptacle (2) respec-
tively (5).
5. Connect a connection cable (8) with the first
element of the LED strip chain and with the
4 output receptacle.
48 W
15 W
4 2
9
8
3
1
1
6
7 5
8
9
1
1

10
Usin
g
6. Remove the protection foil from the back of the LED strips and from the
plugs of the connection cables and the extension cables. Use little
pressure when sticking the items to the mounting surface.
Note:
The last element of each LED strip chain can be shortened, if desired. Use
a side cutter or similar to cut the element at the position that is marked
with the scissors symbol.
Finding the suitable Power Supply
Use one of the specified power supplies (not included) to operate the
LED strip(s). If you want to combine several LED strips, a power supply
with a higher power output is required in contrast to a single LED strip
configuration.
The power supplies feature an overload protection circuit. When
selecting the power supply ensure that the max. output power of the
power supply is higher than the overall power consumption of the LED
strip elements. If necessary, connect the LED strip elements to various
power supplies.
Power
Supply Element 30 cm, 2.16 W Element 60 cm, 4.32 W Element 100 cm, 7.2 W
15 W 6 x 3 x 2 x
48 W 21 x 10 x 6 x

11
Usin
g
Using
Use a suitable power supply to operate the LED strip(s) (refer to the
chapter Finding a suitable Power Supply). Ensure it provides a suffi-
ciently high output power rate.
Use the ON/OFF switch (4) respectively (7) to switch on and off all
connected LED strips (connected in series or connected in a star
shaped cabling configuration).
Cleaning and Storing
Clean all parts only with a soft dry or slightly moistened cloth. Do not
use detergents or chemicals as this may damage the surfaces.
Store all parts indoors out of reach of children in a dry place that is
protected from dust, dirt and extreme temperatures.
Technical Data
Article No. Length (L) LEDs Power Luminous
Colour
82 06 98 30 cm 9 2.16 W warm white
82 06 99 60 cm 18 4.32 W warm white
82 07 00 100 cm 30 7.2 W warm white
82 07 01 30 cm 9 2.16 W cool white
82 07 02 60 cm 18 4.32 W cool white
82 07 03 100 cm 30 7.2 W cool white

12
Notizen
|
Notes
V
Wir, die Westfalia Werkzeugcompany,
Werkzeugstraße 1, D-58093 Hagen,
erklären in alleiniger Verantwortung, dass das Produkt
LED-System-Strip warm weiß + kalt weiß
Artikel Nr. 820698, 820699, 820700, 820701, 820702, 820703
den wesentlichen Schutzanforderungen genügt, die in den Europäischen Richtlinien
2004/108/EG Elektromagnetische Verträglichkeit (EMV)
2006/95/EG Niederspannungsrichtlinie (LVD)
und deren Änderungen festgelegt sind.
Für die Konformitätsbewertung wurden folgende Dokumente herangezogen:
EN 55022:2010, EN 55024:2010,
EN 61000-3-2:2006+A1+A2, EN 61000-3-3:2008
EN 60950-1:2006+A1+A11+A12, EN 62233:2008,
EN 62471:2008
Hagen, den 17. November 2011
(Thomas Klingbeil, Qualitätsbeauftragter)
We, the Westfalia Werkzeugcompany,
Werkzeugstraße 1, D-58093 Hagen,
declare by our own responsibility that the product
LED Strip System warm white + cool white
Article No. 820698, 820699, 820700, 820701, 820702, 820703
is according to the basic requirements, which are defined in the European Directives
2004/108/EC Electromagnetic Compatibility (EMC)
2006/95/EC Low Voltage Directive (LVD)
and their amendments.
For the evaluation of conformity, the following documents were consulted:
EN 55022:2010, EN 55024:2010,
EN 61000-3-2:2006+A1+A2, EN 61000-3-3:2008
EN 60950-1:2006+A1+A11+A12, EN 62233:2008,
EN 62471:2008
Hagen, November 17th, 2011
(Thomas Klingbeil, QA Representative)
EG-Konformitätserklärun
g
EC-Declaration of Conformit
y
Gestaltung urheberrechtlich geschützt VI © Westfalia 11/11
Deutschland Österreich
Westfalia Westfalia
Werkzeugstraße 1 Moosham 31
D-58093 Hagen A-4943 Geinberg OÖ
Telefon: (0180) 5 30 31 32 Telefon: (07723) 4 27 59 54
Telefax: (0180) 5 30 31 30 Telefax: (07723) 4 27 59 23
Internet: www.westfalia.de Internet: www.westfalia-versand.at
Schweiz UK
Westfalia Westfalia
Utzenstorfstraße 39 Freepost RSBS-HXGG-ZJSC
CH-3425 Koppigen 8 Fairfax Road, N. Abbot TQ12 6UD
Telefon: (034) 4 13 80 00 Phone: (0844) 5 57 50 70
Telefax: (034) 4 13 80 01 Fax: (0870) 0 66 41 48
Internet: www.westfalia-versand.ch Internet: www.westfalia.net
Kundenbetreuun
g
|
Customer Services
Entsor
g
un
g
|
Dis
p
osal
Werter Kunde,
bitte helfen Sie mit, Abfall zu vermeiden.
Sollten Sie sich einmal von diesem Artikel trennen wollen, so bedenken Sie
bitte, dass viele seiner Komponenten aus wertvollen Rohstoffen bestehen und
wiederverwertet werden können.
Entsorgen Sie ihn daher nicht in die Mülltonne, sondern führen Sie ihn bitte
Ihrer Sammelstelle für Wertstoffe zu.
Dear Customer,
Please help avoid refuse.
If you at some point intend to dispose of this article, then please keep in mind
that many of its components consist of valuable materials, which can be
recycled.
Please do not discharge it in the garbage bin, but check with your local council
for recycling facilities in your area.
This manual suits for next models
5
Table of contents
Languages:
Other Wetelux Light Fixture manuals

Popular Light Fixture manuals by other brands

RAB Lighting
RAB Lighting YBLED 3 pin PCT installation instructions

Zumtobel
Zumtobel SLOTLIGHT II installation instructions

LUCIS
LUCIS MAIA LB Mounting instructions

Cooper Lighting
Cooper Lighting HALO H1310 Specification sheet

Chauvet
Chauvet TFX-UVLED Appendix

Saxby Lighting
Saxby Lighting Luxway quick start guide


