manuals.online logo
Brands
  1. Home
  2. •
  3. Brands
  4. •
  5. Whirlpool
  6. •
  7. Oven
  8. •
  9. Whirlpool AKP 605 IX User manual

Whirlpool AKP 605 IX User manual

Other Whirlpool Oven manuals

Whirlpool GBD277PDT User manual

Whirlpool

Whirlpool GBD277PDT User manual

Whirlpool AKZM 654 Operating instructions

Whirlpool

Whirlpool AKZM 654 Operating instructions

Whirlpool AKZM 784 Operating instructions

Whirlpool

Whirlpool AKZM 784 Operating instructions

Whirlpool OAKZ9 7961 SP IX User manual

Whirlpool

Whirlpool OAKZ9 7961 SP IX User manual

Whirlpool GMC305PD User manual

Whirlpool

Whirlpool GMC305PD User manual

Whirlpool RB220PXY User manual

Whirlpool

Whirlpool RB220PXY User manual

Whirlpool RBS245PR User manual

Whirlpool

Whirlpool RBS245PR User manual

Whirlpool AKP 733 IX Operating instructions

Whirlpool

Whirlpool AKP 733 IX Operating instructions

Whirlpool AKZM 835 Operating instructions

Whirlpool

Whirlpool AKZM 835 Operating instructions

Whirlpool W10045000 User manual

Whirlpool

Whirlpool W10045000 User manual

Whirlpool GBD277PR User manual

Whirlpool

Whirlpool GBD277PR User manual

Whirlpool SBl3OPER User manual

Whirlpool

Whirlpool SBl3OPER User manual

Whirlpool MSA 3G3F IX User manual

Whirlpool

Whirlpool MSA 3G3F IX User manual

Whirlpool AKP 755 IX User manual

Whirlpool

Whirlpool AKP 755 IX User manual

Whirlpool WFG550S0HV User manual

Whirlpool

Whirlpool WFG550S0HV User manual

Whirlpool GY396LXP User manual

Whirlpool

Whirlpool GY396LXP User manual

Whirlpool AKZ 286/IX User manual

Whirlpool

Whirlpool AKZ 286/IX User manual

Whirlpool AKG65901IX User manual

Whirlpool

Whirlpool AKG65901IX User manual

Whirlpool AKP 681 User manual

Whirlpool

Whirlpool AKP 681 User manual

Whirlpool AKZ 560 Operating instructions

Whirlpool

Whirlpool AKZ 560 Operating instructions

Whirlpool SB130PER User manual

Whirlpool

Whirlpool SB130PER User manual

Whirlpool RM275PXK User manual

Whirlpool

Whirlpool RM275PXK User manual

Whirlpool RS610PXGV10 User manual

Whirlpool

Whirlpool RS610PXGV10 User manual

Whirlpool AMW 582 Operating and maintenance manual

Whirlpool

Whirlpool AMW 582 Operating and maintenance manual

Popular Oven manuals by other brands

Brandt FC 222 user manual

Brandt

Brandt FC 222 user manual

aumate TOA20M04N-1E instruction manual

aumate

aumate TOA20M04N-1E instruction manual

Maytag CWE4100AC - 24" Single Electric Wall Oven Dimension Guide

Maytag

Maytag CWE4100AC - 24" Single Electric Wall Oven Dimension Guide

Kernau KBO 1076 S PT B instruction manual

Kernau

Kernau KBO 1076 S PT B instruction manual

Bosch HB 37 N Series User manual and installation instructions

Bosch

Bosch HB 37 N Series User manual and installation instructions

Electrolux EOD5420AA user manual

Electrolux

Electrolux EOD5420AA user manual

Mx Onda MX-HC2183 instruction manual

Mx Onda

Mx Onda MX-HC2183 instruction manual

Daewoo F6EV19SM2 Service manual

Daewoo

Daewoo F6EV19SM2 Service manual

Blodgett MT3870 Specifications

Blodgett

Blodgett MT3870 Specifications

GE ZET2F owner's manual

GE

GE ZET2F owner's manual

GE JK3000DF3WW owner's manual

GE

GE JK3000DF3WW owner's manual

eka EKF 523 NT Operating and instruction manual

eka

eka EKF 523 NT Operating and instruction manual

AEG Electrolux E3191-5 user manual

AEG Electrolux

AEG Electrolux E3191-5 user manual

Pratica Rocket Express quick start guide

Pratica

Pratica Rocket Express quick start guide

Viking Professional VGSO260T user guide

Viking

Viking Professional VGSO260T user guide

FM RX203 instruction manual

FM

FM RX203 instruction manual

Bosch HBN331 9B Series instruction manual

Bosch

Bosch HBN331 9B Series instruction manual

NEFF B95M42N0MK Instructions for use

NEFF

NEFF B95M42N0MK Instructions for use

manuals.online logo
manuals.online logoBrands
  • About & Mission
  • Contact us
  • Privacy Policy
  • Terms and Conditions

Copyright 2025 Manuals.Online. All Rights Reserved.

EN
Quick guide
1. SELECTION KNOB
For switching the oven on by selecting a
function. Turn to the position to switch
the oven o.
2. +/- BUTTON
To decrease or increase the value shown
on the display.
3. TIME BUTTON
For selecting the various settings:
duration, cooking end time, timer.
4. DISPLAY
5. THERMOSTAT KNOB
Turn to select the temperature you
require.
6. LED THERMOSTAT / PREHEATING
Switches on during the heating
process. Switches o once the desired
temperature is reached.
CONTROL PANEL DESCRIPTION
60
80
100
120
140
160
180
200
220
250
1 32 4 5 6
FIRST TIME USE
1. SETTING THE TIME
You will need to set the time when you switch on the appliance
for the rst time: “AUTO” and “0.00” ash on the display.
A
U
T
O
To set the time of day, press buttons and at the same time:
Set the time of day using the and buttons.
Please note: To change the time of the day afterwards for example
following lengthy power outages, you will need to reset the
time.
2. SETTING THE TONE
Having selected the desired time value, press the time button:
The display shows “ton 1”.
A
U
T
O
To select the desired tone, press button , then press the time
button to conrm.
3. HEAT THE OVEN
A new oven may release odors that have been left behind
during manufacturing: this is completely normal. Before starting
to cook food, we therefore recommend heating the oven with it
empty in order to remove any possible odors.
Remove any protective cardboard or transparent lm from the
oven and remove any accessories from inside it.
Heat the oven to 250 °C for about one hour. The oven must be
empty during this time.
Please note: It is advisable to air the room after using the appliance
for the first time.
FUNCTIONS
OFF
For switching o the oven.
LIGHT
For switching on the light in the compartment.
CONVENTIONAL
For cooking any kind of dish on one shelf only.
CONVECTION BAKE
For cooking dierent foods on several shelves (maximum
two) at the same time. It is reccomended to switch the positions
of racks halfway thorugh cooking.
GRILL
For grilling steaks, kebabs and sausages,cooking vegetables
au gratin or toasting bread. When grilling meat, we recommend
using a Baking tray to collect the cooking juices: position the
pan on any of the levels below the wire shelf and add 200 ml of
drinking water.
GRATIN
For roasting large joints of meat (legs, roast beef, chicken).
We recommend using a Baking tray to collect the cooking juices:
position the pan on any of the levels below the wire shelf and
add 200 ml of drinking water.
DEFROSTING
For defrosting food more quickly.
THANK YOU FOR BUYING A WHIRLPOOL PRODUCT
In order to receive a more complete assistance, please
register your product on www.whirlpool.eu/register Before using the appliance carefully read the Safety
Instruction.
1. SELECT A FUNCTION
To select a function, turn the selection knob to the symbol for
the function you require.
2. ACTIVATE A FUNCTION
To start the function you have selected, turn the thermostat
knob to set the temperature you require.
To interrupt the function at any time, switch o the oven, turn
the selection knob and the thermostat knob to and .
3. PREHEATING
Once the function has been activated, the LED thermostat will
switch on signalling that the preheating process has begun.
At the end of this process, the LED thermostat switches o
indicating that the oven has reached the set temperature: at this
point, place the food inside and proceed with cooking.
Please note: Placing the food in the oven before preheating has
nished may have an adverse eect on the nal cooking result.
4. PROGRAMMING COOKING
After selecting and activating the function, it is possible to set
the duration values.
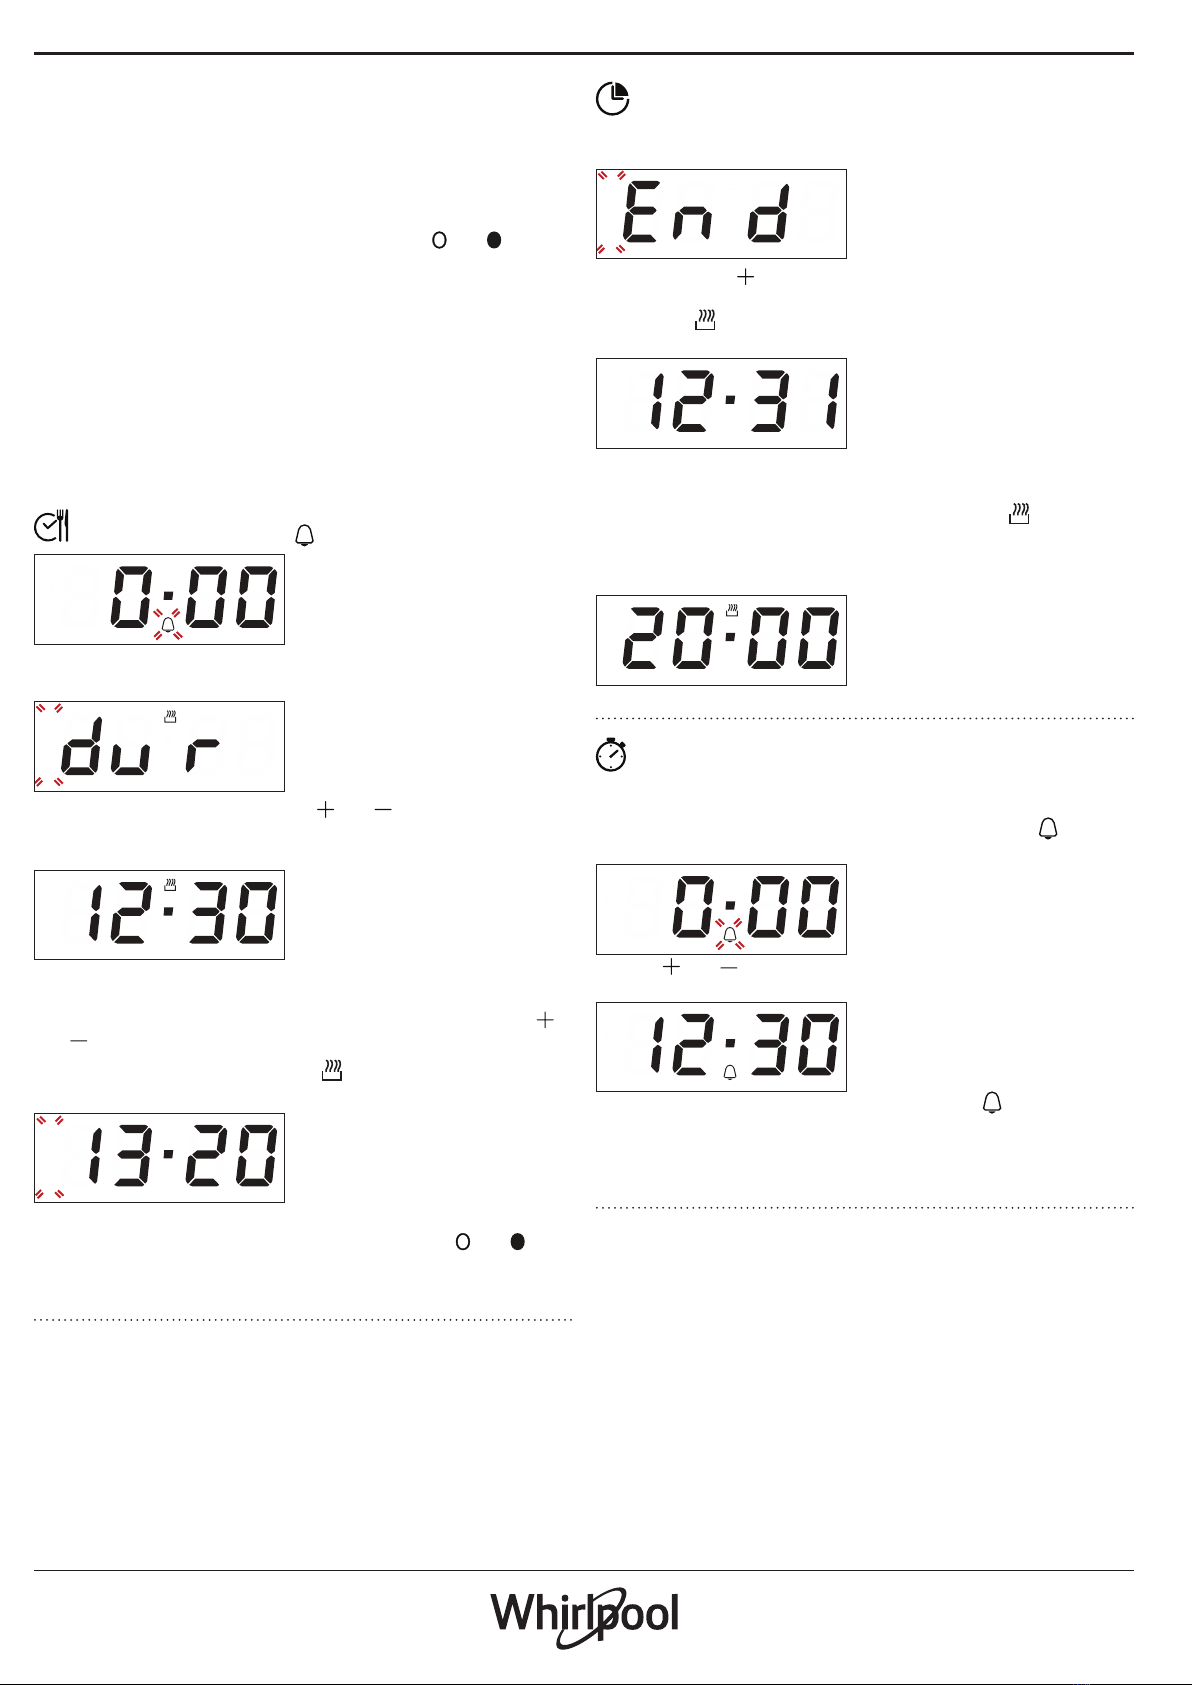
DURATION
Press the time button: the symbol ashes.
A
U
T
O
Press the time button again: the display shows DUR and AUTO
ashes.
A
U
T
O
Set the duration using the button and . After a few seconds,
the display shows the time of the day while AUTO remains lit,
conrming the setting.
A
U
T
O
To view the remaining cooking time press the time button for at
least 2 seconds.
To change it, if necessary, press it again a second time, using
and buttons to modify the duration.
At the end of cooking, the symbol switches o, an alarm
sounds and AUTO ashes on the display.
A
U
T
O
Press any button to deactivate the alarm.
Return the function knob and thermostat knob to and ,
then press the time button for at least 2 seconds to switch o
the oven.
PROGRAMMING THE END COOKING TIME/DELAYED START
After selecting cooking time, press the time button: the
display shows END, cooking end time and AUTO ashing in
sequence.
A
U
T
O
Press the button to select the desired cooking end time.
After a few seconds the display shows the time of the day, while
the symbol switches o and AUTO remains lit, conrming the
setting.
A
U
T
O
Please note: To view cooking end time and change it if necessary,
press the time button 2 seconds, then press it again twice.
The function will remain paused until the symbol lights up
and the oven proceeds automatically with the selecetd cooking
mode after the period of time that has been calculated in order
for cooking to nish at the time you have set.
A
U
T
O
SETTING THE TIMER
This option does not interrupt or activate cooking but
allows you to use the display as a timer, both while a function is
active and when the oven is o.
To activate the timer, long press the time button: the symbol
ashes on the display.
A
U
T
O
Use the and buttons to set the desired duration: the
countdown begins after a few seconds.
A
U
T
O
The display shows the time of the day and the remains lit,
conrmating the timer has been set.
Please note: To view the countdown and change it if necessary,
press the time button 2 seconds again.
COOKING TABLE
RECIPE FUNCTION PREHEAT TEMPERATURE
(°C)
DURATION
(MIN)
LEVEL AND
ACCESSORIES
Leavened cakes
Yes 150 - 170 30 - 90 2
Yes 150 - 170 30 - 90 *** 4 1
Biscuits / tartlets
Yes 160 - 180 15 - 35 2 / 3
Yes 150 - 170 20 - 40 *** 4 2
Pizza / Focaccia
Yes 220 - 250 10 - 25 1 / 2
Yes 200 - 240 15 - 30 *** 4 2
Lasagne / baked pasta / cannelloni / ans Yes 190 - 200 45 - 65 2
Lamb / veal / beef /pork 1 kg Yes 190 - 200 80 - 110 2
Chicken/rabbit/duck 1 kg Yes 200 - 230 50 - 100 2
Baked sh/en papillote 0,5 kg (fillets,
whole) Yes 170 - 190 30 - 45 2
Toasted bread 5’ 250 2 - 6 5
Sausages / kebabs / spare ribs /
hamburgers 5’ 250 15 - 30 * 5 4
Roast potatoes -200 - 220 35 - 55 ** 3
ACCESSORIES Wire shelf Baking dish on the wire
shelf
Baking tray/Drip tray or
baking dish on the wire shelf Drip tray / Baking tray Drip tray / Baking tray with
200 ml of water
* Turn food halfway through cooking
** Turn food two thirds of the way through cooking (if necessary).
*** Switch levels halfway through cooking.
The time indicated does not include the preheating phase: we
recommend placing the food in the oven and setting the cooking
time only after the required temperature has been reached.
The level is indicated on the wall of the cooking compartment.
Download the complete Use and Care Guide from
docs.whirlpool.eu for the table of tested recipes, compiled for
the certication authorities in accordance with the standard IEC
60350-1.
CLEANING AND MAINTENANCE
Make sure that the oven has cooled
down before carrying out any
maintenance or cleaning.
Do not use steam cleaners.
Do not use wire wool, abrasive
scourers or abrasive/corrosive
cleaning agents, as these could
damage the surfaces of the appliance.
Wear protective gloves.
The oven must be disconnected from
the mains before carrying out any kind
of maintenance work.
REMOVING AND REFITTING THE DOOR
To remove the door, open it fully and lower the catches until
they are in the unlock position (1). Close the door as much as you
can (2). Take a rm hold of the door with both hands - do not
hold it by the handle. Simply remove the door (3) by continuing
to close it while pulling it upwards (a) at the same time until it is
released from its seating (b).
12
~60°
3
a
b
~15°
Put the door to one side, resting it on a soft surface. Ret the door
by moving it towards the oven, aligning the hooks of the hinges
with their seating and securing the upper part onto its seating.
Lower the door and then open it fully. Lower the catches into
their original position: make sure that you lower them down
completely. Try closing the door and check to make sure that it
lines up with the control panel. If it does not, repeat the steps
above.
CLICK & CLEAN - CLEANING THE GLASS
After removing the door and resting it on a soft surface with the
handle downwards, simultaneously press the two retaining clips
(1) and remove the upper edge of the door by pulling it towards
you (2).
1 2
Lift and rmly hold the inner glass with both hands, remove it
and place it on a soft surface before cleaning it (3).
3
To correctly reposition the inner glass, make sure that the “R” is
visible in the left-hand corner and the clear surface (not printed)
is facing up. First insert the long side of the glass indicated by “R”
into the support seats, then lower it into position (4). Ret the
upper edge (5): a click will indicate correct positioning.
Make sure the seal is secure before retting the door.
4 5
TROUBLESHOOTING
Problem Possible cause Solution
The oven does not work Power cut
Disconnection from the
mains
Check for the presence of mains electrical
power and whether the oven is connected to
the electricity supply.
Turn off the oven and restart it to see if the
fault persists
Policies, standard documentation and additional product information can be found by:
• Visiting our website docs.whirlpool.eu
• Using QR Code
• Alternatively, contact our After-sales Service (See phone number in the warranty
booklet). When contacting our After-sales Service, please state the codes provided on your
product's identication plate.
XXXXXXXXXXXXXX
Model: xxxXXXXxx
Download the complete Use and Care Guide from docs.whirlpool.eu for more informations about your product
400011538239