manuals.online logo
Brands
  1. Home
  2. •
  3. Brands
  4. •
  5. Whirlpool
  6. •
  7. Refrigerator
  8. •
  9. Whirlpool NWT0002D User manual

Whirlpool NWT0002D User manual

Use and Care
Guide ]
This use and care guide applies for the following models:
NWTOS02D, NWT2002Q, NWT2002D
Nominal Technical Specification IMade by industries Acres Whirlpoo| S.A. de C.V.
Antigua Carretera a Rome km 9
Nominal Current __ 6,0 A J CoL El Milagro
Frequency _ 60 Hz Apedacs N.L.
Voltage _ 110-127V- M_xico, 66600
Phone.(01 81) 8329 2180
4. Before starting the refrigeration process allow the refrigerator to rest
from 2 to 3 hours in order to let the gas and oil be settled.
Connecting your refrigerator
A 110-127 V-, 60 Hz AC only 15 or 20 A fused and properly grounded
electrical supply is required.
Levellin
g screw
Te reduce the risk of fire, electrical shock, or injury when using
your refrigerator, follow these basic precautions:
• Read all instructions before using the refrigerator.
- Child entrapment and suffocation are not problems of the past. Junked or abandoned refrigerators are still
dangerous ... even if they will "just sit in the garage a few days".
•if you are getting rid of your old refrigerator, do it safely.
• Never allow children to operate, play with, or crawl inside the refrigerator.
- Never clean refrigerator parts with gsmrnable fluids. The fumes can create a fire hazard or explosion.
• We suggest to remove the door or thigh it with a resistant cord.
•if supply cord is damaged must be replaced by our service department or a qualified person to avoid hazard.
•FOR YOUR SAFETY,
• Do not store or use gasoline or ether flammable vapors and liquids in the vicinity of this or any ether appliance.
The fumes can create a fire hazard or explosion.
•If damage in power supply cord occurs, it should be replaced by our service department or by an qualified
electrician in order to avoid a risk. -SAVE THESE iNSTRUCTiONS-
Electrical shock hazard
The refrigerator must be properly grounded.
_¢ De not modify the electrical cord
Do net use an extension cord with this appliance, consult with aqualify technician
any doubts about the proper grounding of this appliance,
if your wail outlet is not proper one have aqualify technician install it.
if supply cord is damaged must be replaced by our service department or a
qualified person to avoid hazard.
Failure to follow these precautions may result in high risk of injury and even
death
• Do not use the refrigerator in an area where the room temperature will fall
below 13°C (55 ° F).
•Keep the refrigerator out of the weather.
•Connect the refrigerator only to the proper kind of outlet, with the correct
electrical supply and grounding.
•Do not load the refrigerator with food before it has time to get properly cold.
,Use the refrigerator only for the uses described in this manual.
• Properly maintain the refrigerator.
•Be sure the refrigerator is not used by anyone unable to operate it properly.
• The refrigerator is intended for domestic use.
Grounding Method
Your refrigerator has an electrical cord provided with 3 prong
grounding plug. To minimize the possibility of electrical shock,
the cord must be plugged into a mating 3 prong grounding type
wall outlet according to national electrical code and all local
codes, if plug will not fit the outlet, is your responsibility to have
a proper outlet installed by a qualified electrician.
Wall outlet for 3 prong plug cord,
grounded properly.
3 prong plug cord
Power supply Grounding
cord Terminal
Adjusting temperature control
Your refrigerator has 2 control knobs that let you independently set
the temperature in both, refrigerator and freezer compartments.
When you plug the refrigerator for the first time:
. Set the temperature control knob of refrigerator and freezer in f_.,_,,_
"MED" position, it means mid cool. Temperature ranges goes
from "MIN" or "-" (less cool) to "MAX" or "+" (coolest).
-If you set the temperature control knob to "APAGADO" (OFF) in
refrigerator compartment, the system turn off in both compartments.
but it still remains connected to power supply.
• Give the refrigerator time to cool down completely before adding .............
food. This could take several hours. Adjust the temperature control
to have food as cold as you like. The settings indicated above
should be correct for normal, household refrigerator usage.
Before connecting the new refrigerator follow these
steps:
1. Remove all packing material and the wood bases.
2. install your refrigerator under the following conditions:
*Allow 7,5 cm (3 inches) between overhead cabinets and
refrigerator top.
, Allow at least 5 cm (2 inches) between the refrigerator
condenser on the back and the wall.
,Allow 1,25 crn (1/2") on each side of the refrigerator for
ease of installation.
"If the hinge side of the refrigerator is to be against the
wall, you might want to leave extra space so the door can be opened wider.
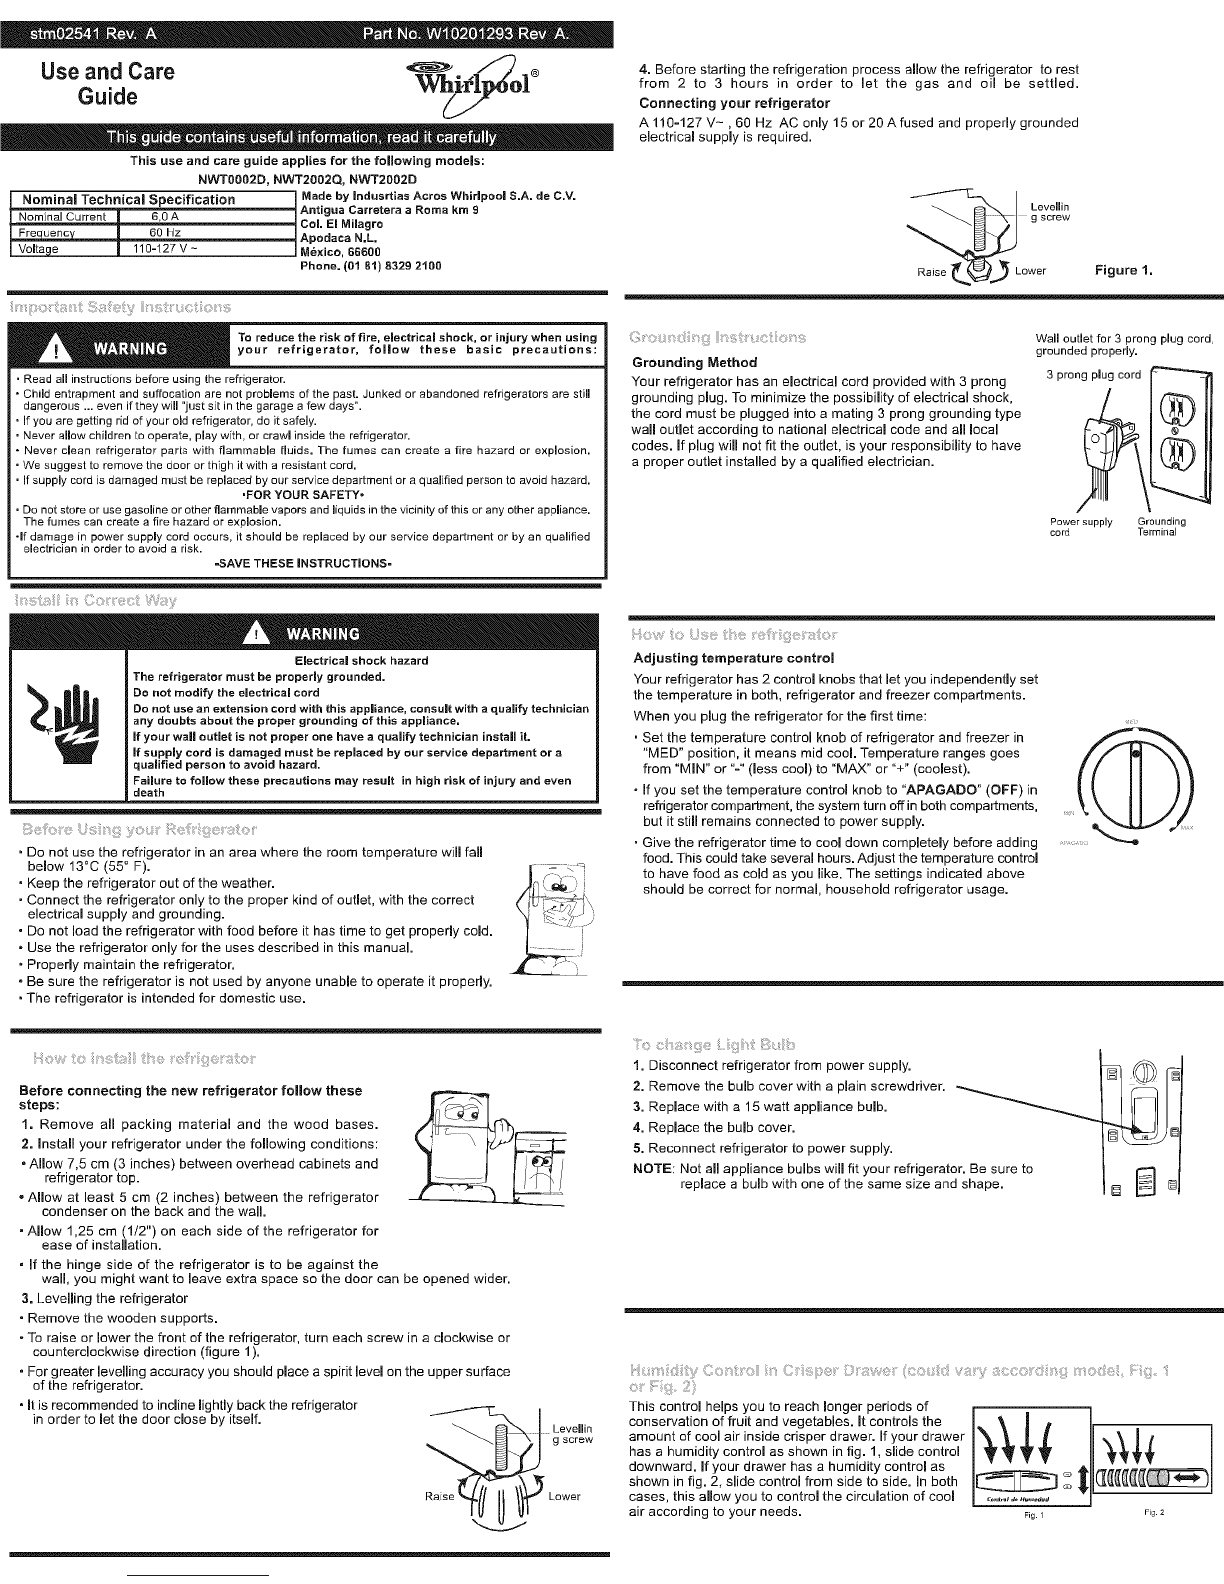
3. Levelling the refrigerator
•Remove the wooden supports.
-To raise or lower the front of the refrigerator, turn each screw in a clockwise or
counterclockwise direction (figure 1).
•For greater levelling accuracy you should place a spirit level on the upper surface
of the refrigerator.
• it is recommended to incline lightly back the refrigerator
in order to let the door close by itself. ___ _-_'_"\ ii Levellin
g screw
Raise Lower
:::t
1. Disconnect refrigerator from power supply. _- (_r_J
--t
2. Remove the bulb cover with a plain screwdriver. _
3. Replace with a 15 watt appliance bulb.
4. Replace the bulb cover.
5. Reconnect refrigerator to power supply.
NOTE: Not all appliance bulbs will fit your refrigerator. Be sure to _ Ijreplace a bulb with one of the same size and shape.
; ;t C:: , ; v : C© ;
_t 2
This control helps you to reach longer periods of
conservation of fruit and vegetables, it controls the
amount of cool air inside crisper drawer. If your drawer
has a humidity control as shown in fig. 1, slide control
downward. If your drawer has a humidity control as
shown in fig. 2, she control from side to side. In beth
cases, this allow you to control the circulation of cool
air according to your needs. Fig. 1 Fg. 2
Reversing the door swing should be performed by
a qualified person.
important Information
- Before you begin, turn refrigerator OFF, unplug
it, and remove any food from door shelves.
- When removing hinges, keep doors closed until
ready to lift free from cabinet.
- To remove doors, start at the top hinge and work
your way down.
- To replace doors, start at the bottom hinge and
work your way up.
- Line up doors so they are centered between the
sides of the cabinet and parallel with each
other.
- Seal all unused openings with screws or plastic
plugs. Moisture will enter any openings.
NOTE: After the doors are reversed, reinstall the
handles, If the doors are not shutting on their
own, see the "How to install the refrigerator"
section,
TOP HINGE
hinge
Hinge
Screws 4
Hinge 45
IMPORTANT
BEFORE CALLING THE TECHNICIAN IT IS VERY IMPORTANT TO VERIFY THE FOLLOWING
INFORMATION:
IF AFTER READING THE USE AND REFERENCE GUIDE YOU HAVE QUESTIONS,THIS
GUIDE MAY OFFER YOU SOME SOLUTIONS TO PROBLEMS YOU CAN DETECT AND
CORRECT YOURSELF IN YOUR HOME
IF THE REFRIGERATOR IS NOT WORKING
• Plug firmly into a live circuit. Do not use extension cord.
• Check the power supply. It could be damaged. Connect another appliance and see if it works
normally.
• Do not connect various appliances at the same time, the electrical installation will overload.
,Verify that the temperature control is in the ON (ENCENDIDO) position.
• Avoid placing the appliance close to a hot source.
• Close the doors completely. Check to see if the gaskets are dirty or sticky.
• Level the refrigerator. Remove wood supports and adjust the roller levels (FIGURE 1).
• Do not overload the refrigerator. The air circulation will be deficient.
• Set the temperature control in number 3 or in the middle position and wait at least 24 hours
before making another change of temperature.
THE REFRIGERATOR SEEMS TO RUN TOO MUCH
•Verify if the condenser has lint or is dirty (FIGURE 1)
• Avoid opening the doors constantly or for long periods.
• Do not introduce hot food.
IS THE REFRIGERATOR MAKING UNFAMILIAR SOUNDS
, Verify there is nothing on top or behind.
• The compressor does not work properly; check if you are using the right voltage.
,Verify the light intensity. If it is low, consult with a qualified technician (FIGURE 1).
WARRANTY WhJol
@®
WHIRLPOOL MI_XICO, S.A. DE C.V.
Antigua carretera a Roma km 9, Col. El Milagro, Apodaca, N.L. Mexico C.P. 66600, phone
(01-81) 83-29-21-00, in the terms of this policy, we guarantee to the buyer and the consumer
the WHIRLPOOL refrigerator identified in this following policy:
PROTECT THE FOLLOWING MODELS:
NWT0002D, NWT2002Q, NWT2002D
COVERED CONCEPTS:
Manufacturing defects that prevent the partial or total product functioning according to the
terms of this policy. In this case the repair will be made at no charge for the buyer or consumer,
in case that part, components or product replacement is required will at manufacturer
expenses, so are the shipping and handling costs with in the service and labor guarantee
network.
WHIRLPOOL MEX|CO, S.A. DE C.V. WILL NOT PAY:
• When the refrigerator is used in other than normal, single family household use.
•When the refrigerator was not used according with the use and care guide attached.
• When the refrigerator would have been repaired by any unauthorized service.
PROCEDURE TO MAKE EFFECTIVE THE WARRANTY:
When the final customer considers one of the events protected by this contract has happened,
he/she will have to make contact with Whirlpool Service through our Call Center, in Monterrey,
N.L and its surrounding area to (81) 83-29-2100; or from the interior of the Mexican Republic
to 01-800-8-300-400:where a specialized service agent will take care of the matter. Our
facilities are located in Miguel Alem_n Highway km 16 Col. El Milagro C.P 66600. Apodaca,
N.L. where Whirlpool original parts and accessories can also be found. For additional
information of our services, visit www.whidpool-service.com.mx.
TERMS:
This is a 12 MONTHS warranty in all refrigerator parts, beginning the purchase day.
NOTE: The refrigerator sealed system contains: COMPRESSOR, EVAPORATOR, DRYER
FILTER, CONDENSER, JOINT AND SUCTION TUBES.
IMPORTANT NOTE
This document should be presented for any
procedure related with the warranty.
THE PURCHASER SHOULD MAINTAIN THIS
DOCUMENT WITH HIMAND KEEP IN A SAFE
PLACE,
The consumer will be able to request this warranty
policy to be effective,with the distributor where he
acquired the product. In case of the policy loss,
the distributor will expedite a new warranty policy,
by presenting the purchase tickets or the invoice,
Identification Format
NAME OF THE PURCHASER:
ADDRESS:
PHONE NUMBER:
NAME OF THE DISTRIBUTOR:
ADDRESS:
PHONE NUMBER: PRODUCT: MODEL:
SERIAL NUM. DATE OF DELIVERY:
SIGNATURE OF THE DISTRIBUTOR AND STAMP
(Please show with accuracy the street, outside and inside number,
section, city, state and Z.C.)
FIGURE 1 MAGNETIC
SEAL
COMPRESSOR LEVELING
ROLLERS
IF AFTER FOLLOWING INSTRUCTION
THE REFRIGERATOR STILL WITH
PROBLEMS, CALL AN AUTHORIZED
SERVICE CENTER
01 800 8 300 400
When unpacking the product take offthe tape from the shelves and place them in the correct
position.

This manual suits for next models

2

Other Whirlpool Refrigerator manuals

Whirlpool ED2GVEXVD - Side By Refrigerator Assembly instructions

Whirlpool

Whirlpool ED2GVEXVD - Side By Refrigerator Assembly instructions

Whirlpool W10620504A User manual

Whirlpool

Whirlpool W10620504A User manual

Whirlpool WQ9 E1L User manual

Whirlpool

Whirlpool WQ9 E1L User manual

Whirlpool ER8AHKXRB01 User manual

Whirlpool

Whirlpool ER8AHKXRB01 User manual

Whirlpool WBE31132 A++W Dimensions

Whirlpool

Whirlpool WBE31132 A++W Dimensions

Whirlpool WRS975SIDM Quick start guide

Whirlpool

Whirlpool WRS975SIDM Quick start guide

Whirlpool ARC 6980 User manual

Whirlpool

Whirlpool ARC 6980 User manual

Whirlpool ARC 3945 IS User manual

Whirlpool

Whirlpool ARC 3945 IS User manual

Whirlpool WRT313CZLZ User manual

Whirlpool

Whirlpool WRT313CZLZ User manual

Whirlpool 3XARG458GD00 Operating instructions

Whirlpool

Whirlpool 3XARG458GD00 Operating instructions

Whirlpool ET22MK User manual

Whirlpool

Whirlpool ET22MK User manual

Whirlpool ET1MHKXMB00 User manual

Whirlpool

Whirlpool ET1MHKXMB00 User manual

Whirlpool No Frost 390/ User manual

Whirlpool

Whirlpool No Frost 390/ User manual

Whirlpool ART 836/G/GREY User manual

Whirlpool

Whirlpool ART 836/G/GREY User manual

Whirlpool ER8MHKXRB02 User manual

Whirlpool

Whirlpool ER8MHKXRB02 User manual

Whirlpool 3VET16GK User manual

Whirlpool

Whirlpool 3VET16GK User manual

Whirlpool AT18DK User manual

Whirlpool

Whirlpool AT18DK User manual

Whirlpool GI7FVCXW - DIMENSION GUIDE 8-12-09 User manual

Whirlpool

Whirlpool GI7FVCXW - DIMENSION GUIDE 8-12-09 User manual

Whirlpool WRX988SIBM User manual

Whirlpool

Whirlpool WRX988SIBM User manual

Whirlpool G32026PELB12 User manual

Whirlpool

Whirlpool G32026PELB12 User manual

Whirlpool WSC5553 A+N User manual

Whirlpool

Whirlpool WSC5553 A+N User manual

Whirlpool W10297791 User manual

Whirlpool

Whirlpool W10297791 User manual

Whirlpool ARC 5200 User manual

Whirlpool

Whirlpool ARC 5200 User manual

Whirlpool CT14NKXJN00 User manual

Whirlpool

Whirlpool CT14NKXJN00 User manual

Popular Refrigerator manuals by other brands

Hisense RC33 User's operation manual

Hisense

Hisense RC33 User's operation manual

Hisense RR55D4AW1 User's operation manual

Hisense

Hisense RR55D4AW1 User's operation manual

Hisense HRTF205S User's operation manual

Hisense

Hisense HRTF205S User's operation manual

KitchenAid KBFS22EWMS user guide

KitchenAid

KitchenAid KBFS22EWMS user guide

LG LFXC22526 series owner's manual

LG

LG LFXC22526 series owner's manual

Ariston BTS 1614 I Installation and use

Ariston

Ariston BTS 1614 I Installation and use

Saivod CT186NFW Instructions for use

Saivod

Saivod CT186NFW Instructions for use

Sunbeam 20060328 Service manual

Sunbeam

Sunbeam 20060328 Service manual

Husky HUS-RETRO110 Series user manual

Husky

Husky HUS-RETRO110 Series user manual

Ariston BO 2320 AI UK Instructions for installation and use

Ariston

Ariston BO 2320 AI UK Instructions for installation and use

Kenwood KSBS4DX17 Installation instructions manual

Kenwood

Kenwood KSBS4DX17 Installation instructions manual

GE Profile Arctica CustomStyle PSI23SGRSV Dimension Guide

GE

GE Profile Arctica CustomStyle PSI23SGRSV Dimension Guide

Frigidaire FRT21P6CS Factory parts catalog

Frigidaire

Frigidaire FRT21P6CS Factory parts catalog

Hotpoint CTF14 Use and care

Hotpoint

Hotpoint CTF14 Use and care

Zanussi 730182 Specifications

Zanussi

Zanussi 730182 Specifications

JUNO JKG3464 operating instructions

JUNO

JUNO JKG3464 operating instructions

GE PSDF5RGXBB - 24.6 cu. Ft. Refrirator owner's manual

GE

GE PSDF5RGXBB - 24.6 cu. Ft. Refrirator owner's manual

Hotpoint Ariston EBQ xxxxx F operating instructions

Hotpoint Ariston

Hotpoint Ariston EBQ xxxxx F operating instructions

manuals.online logo
manuals.online logoBrands
  • About & Mission
  • Contact us
  • Privacy Policy
  • Terms and Conditions

Copyright 2025 Manuals.Online. All Rights Reserved.