/HVpWDSHVHWV·DSSOLTXHQW
VHXOHPHQWjFHUWDLQVPRGqOHV
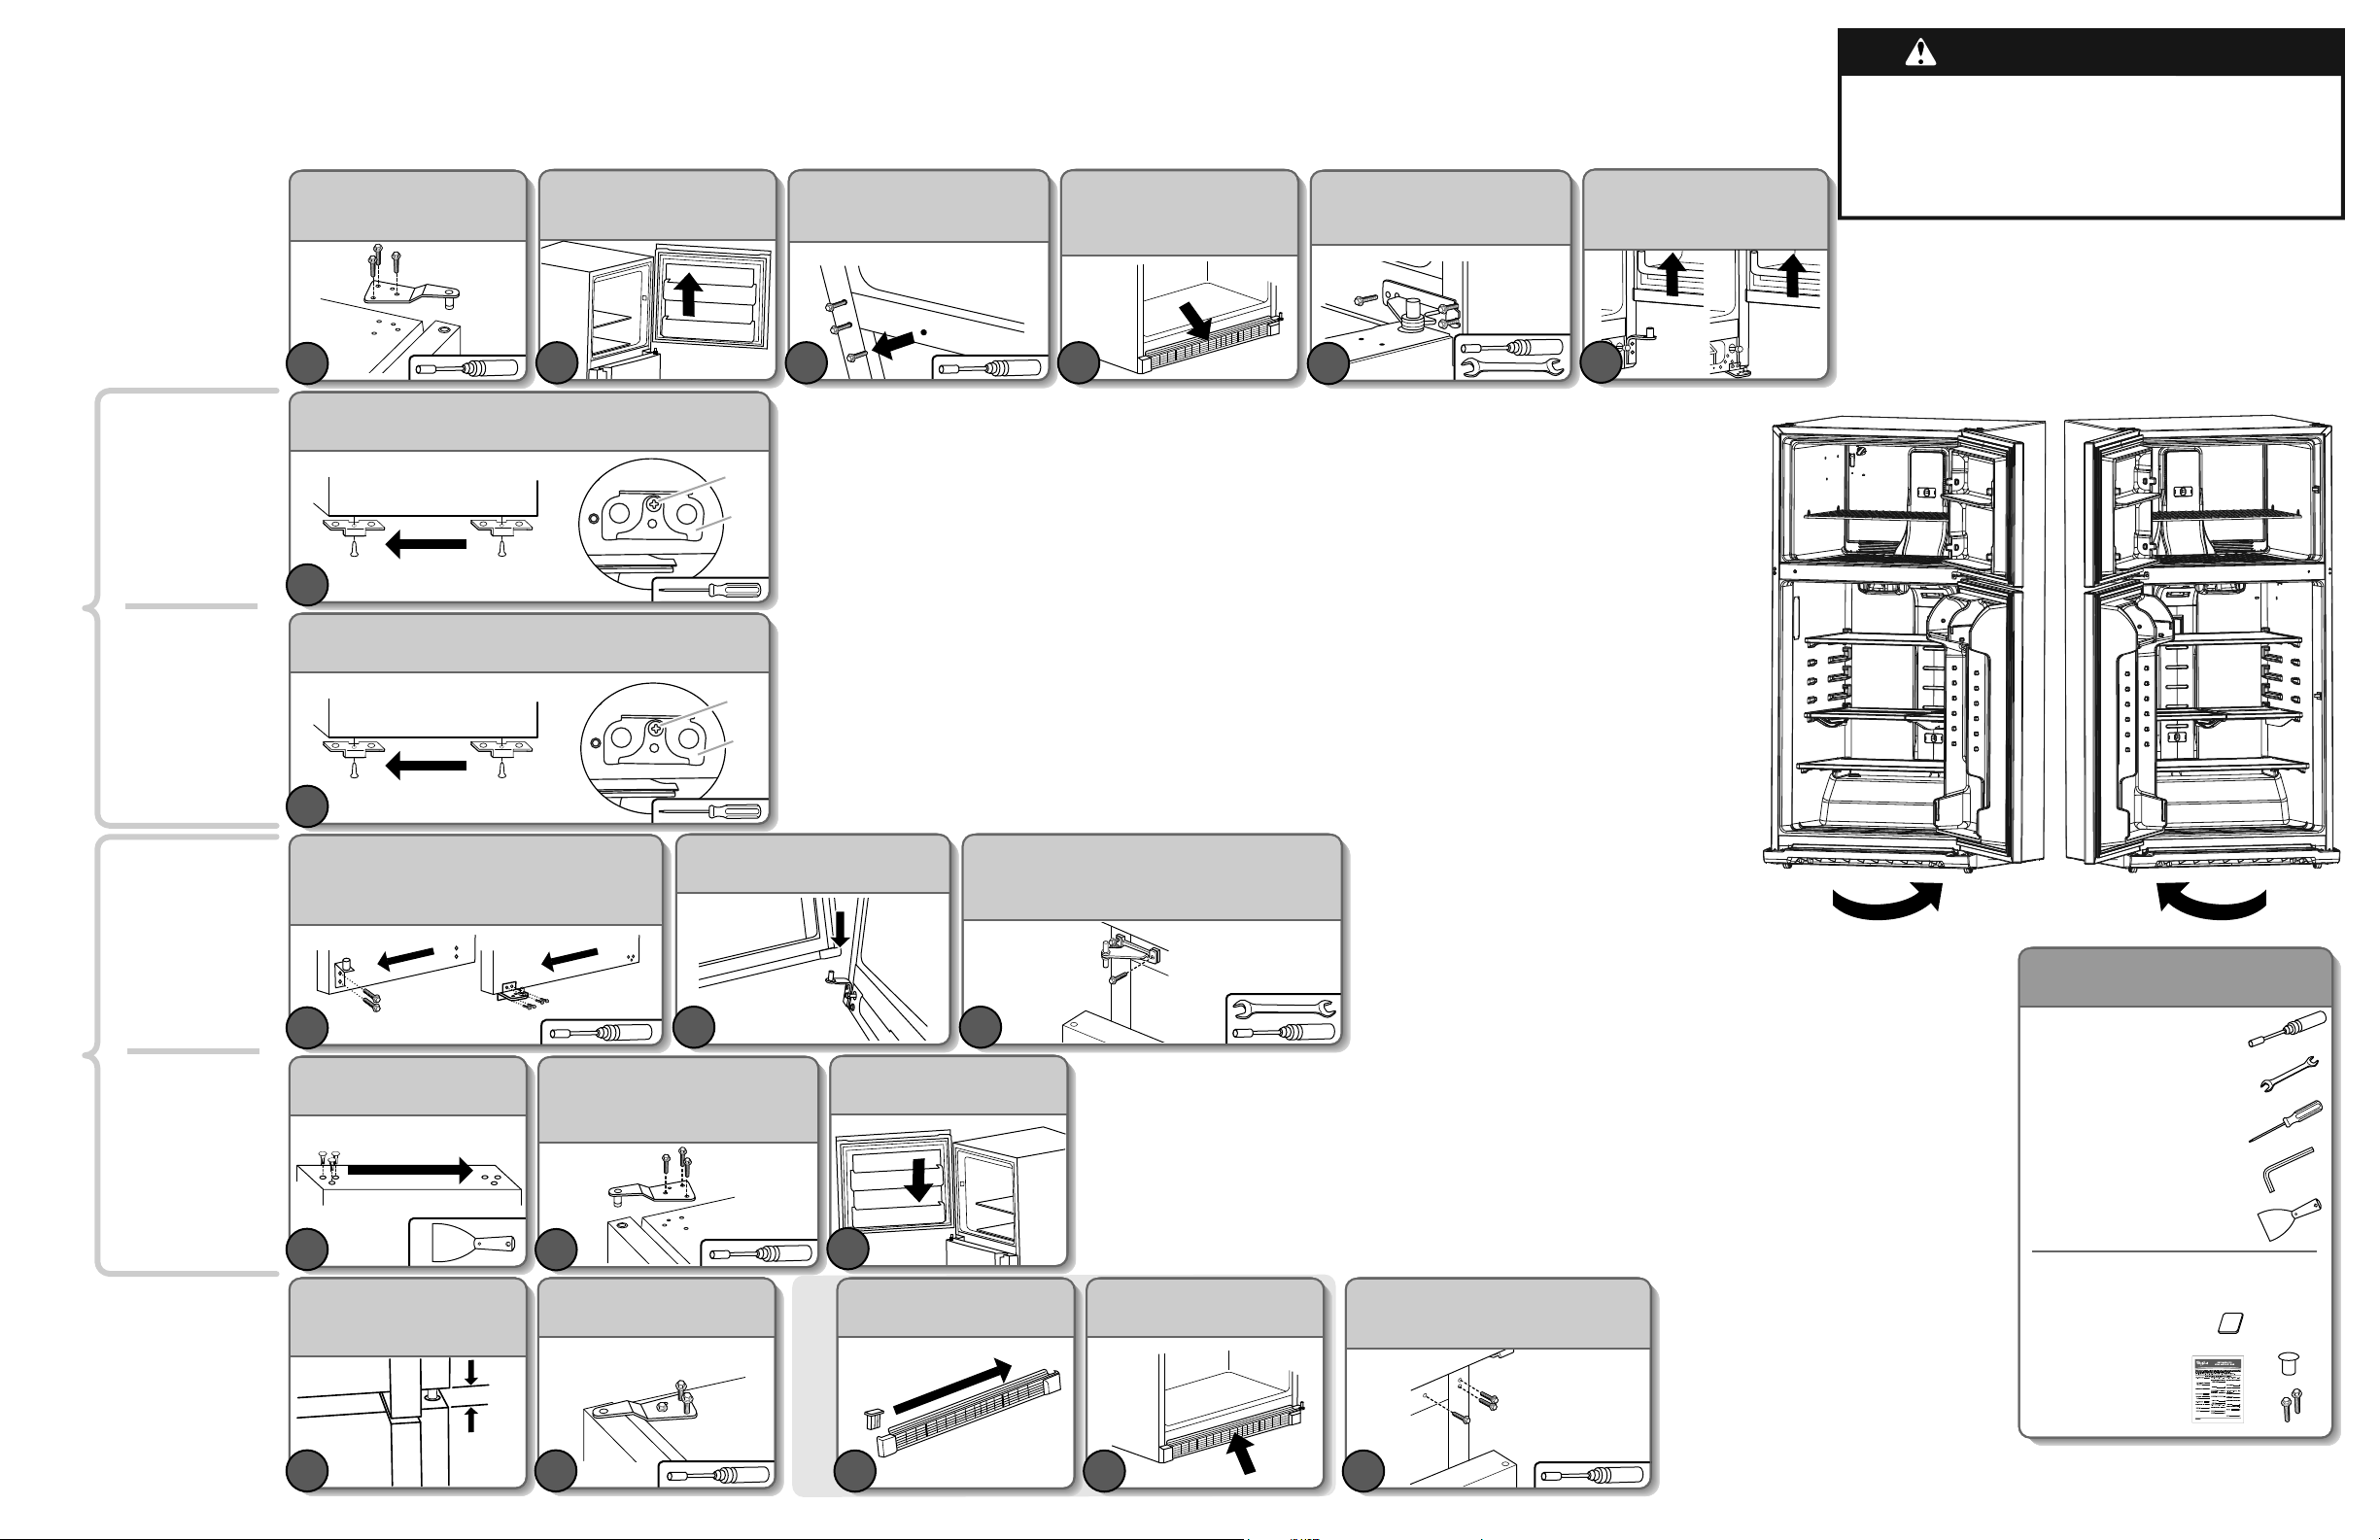
7RXWHQUHWHQDQWODSRUWH{WHU
OHVYLVjWrWHKH[DJRQDOH
HWO·D[HGHODFKDUQLqUH
6RXOHYHUODSRUWHGXFRQJpODWHXU
SRXUODGpJDJHUGHO·D[H
GHODFKDUQLqUHFHQWUDOH
2
&KDUQLqUHFHQWUDOH'HVVHUUHU
OHVYLVWRXUVjJDXFKH
HW{WHUODYLVGXF{WpGURLW
3 4
&KDUQLqUHFHQWUDOH7RXWHQUHWHQDQW
ODSRUWHGHVVHUUHUOHVYLVjGURLWH
HW{WHUODYLVGXF{WpJDXFKH
5
Démontage des
portes du
réfrigérateur et du
congélateur
REMARQUE :8QHIRLVOHVSRUWHV
GpPRQWpHVOHVSODFHUVXUXQH
VXUIDFHVRXSOHSRXUpYLWHU
G·HQGRPPDJHUODILQLWLRQ
5HWLUHUODEXWpHHQEDVGHODSRUWH
HWODSODFHUGHO·DXWUHF{Wp
$9LVGHEXWpHGHSRUWH
%%XWpHGHSRUWH
5HWLUHUODEXWpHHQEDVGHODSRUWH
HWODSODFHUGHO·DXWUHF{Wp
$9LVGHEXWpHGHSRUWH
%%XWpHGHSRUWH
'pSODFHUOHVFDFKHRULILFH
GHODFDLVVHVXUO·DXWUHF{Wp
1
Inversion des butées de porte
3RUWHGX
FRQJpODWHXU
3RUWHGX
UpIULJpUDWHXU
Installation des portes
3RUWHGX
FRQJpODWHXU
3RUWHGX
UpIULJpUDWHXU
Alignement
des portes
1
6HUUHUjIRQGOHVYLVGH
ODFKDUQLqUHVXSpULHXUH
2
3ODFHUOHERXFKRQGHOD
JULOOHGHEDVHGXF{WpRSSRVp
3
5pLQVWDOOHUODJULOOHGHODEDVH
4
6HUUHUOHVGHX[YLVGHVVHUUpHVSOXVKDXW
SXLVSRVHUODYLVGHODFKDUQLqUH
FHQWUDOHHWODVHUUHU
5
1
,QWURGXLUHOHVYLVGHODFKDUQLqUH
VXSpULHXUHjODPRLWLpGHOHXU
ORQJXHXUGDQVODFKDUQLqUH
VXSpULHXUHHWOHKDXWGHODFDLVVH
2
3ODFHUODSRUWHGXFRQJpODWHXU
VXUODFKDUQLqUHFHQWUDOH
3
A
B
A
B
1
1
6RXOHYHUODSRUWHGXUpIULJpUDWHXUSRXU
ODGpJDJHUGHODFKDUQLqUHLQIpULHXUH
REMARQUE :/HVW\OHGHFKDUQLqUH
SHXWYDULHUHQIRQFWLRQGXPRGqOH
RX
3RXUOHVPRGqOHVpTXLSpVG·XQH
JULOOHGHEDVHGpSRVHUFHWWH
GHUQLqUHHQODWLUDQWIHUPHPHQW
YHUVVRL
3ODFHUODFKDUQLqUHLQIpULHXUHGHO·DXWUHF{WpGHOD
FDLVVH9HLOOHUjFHTXHODURQGHOOHUHVWHVXU
O·D[HGHODFKDUQLqUHREMARQUE :/HVW\OHGH
FKDUQLqUHSHXWYDULHUHQIRQFWLRQGXPRGqOH
1
RX
2 3
6HUUHUOHVYLVGHVVHUUpHVSOXVKDXWSXLVSRVHUODYLVGHOD
FKDUQLqUHFHQWUDOHHWODVHUUHUREMARQUE :6·DVVXUHU
TXHOHVURQGHOOHVVRQWELHQLQVWDOOpHVVXUOHVD[HV
VXSpULHXUHWLQIpULHXUGHODFKDUQLqUHFHQWUDOH
,16758&7,2163285/·,19(56,21'86(16'·289(5785('(/$3257(
W10661460B (FACULTATIF)
(QOHYHUOHVDOLPHQWVHWWRXVOHVEDOFRQQHWVUpJODEOHVGHVSRUWHV
IMPORTANT :'pEUDQFKHUOHUpIULJpUDWHXURXGpFRQQHFWHUODVRXUFHGHFRXUDQWpOHFWULTXH3UpYRLUXQVXSSRUWDGGLWLRQQHOGHVSRUWHVSHQGDQWOHFKDQJHPHQWGHF{WpGHVFKDUQLqUHV/DIRUFHG·DWWUDFWLRQGHVDLPDQWVGHVSRUWHVQHVXIILWSDVjOHVPDLQWHQLUHQSODFH
/RUVGXGpPRQWDJHGHODSRUWHFRQVHUYHUOHVYLVHWOHVFKDUQLqUHV(OOHVVRQWQpFHVVDLUHVSRXUUpLQVWDOOHUODSRUWH3RXUGHVLQVWUXFWLRQVSOXVGpWDLOOpHVVXUO·LQYHUVLRQGXVHQVG·RXYHUWXUHGHODSRUWHFRQVXOWHUOHVLQVWUXFWLRQVG·XWLOLVDWLRQ
AVERTISSEMENT
Risque du poids excessif
Utiliser deux ou plus de personnes pour déplacer et
installer le réfrigérateur.
Le non-respect de cette instruction peut causer
une blessure au dos ou d'autre blessure.
W10661460B
©2014
7RXV GURLts UéVHUYpV
UtLOLVp sRXV OLFeQFH aXCaQDGa
/14
IPpULPé DX Me[LTXe
2XYHUWXUHGHVSRUWHV
GHJDXFKHjGURLWH
2XYHUWXUHGHVSRUWHV
GHGURLWHjJDXFKH
Outillage nécessaire
&OpjGRXLOOHjWrWH
KH[DJRQDOHGH
&OpSODWHGH
7RXUQHYLV3KLOOLSV
&OpKH[DJRQDOHGH¼
&RXWHDXjPDVWLFSODWGH
(QVHPEOHG·LQYHUVLRQ
GXVHQVG·RXYHUWXUH
D2XWLOGHGpPRQWDJH
E,QVLJQHGHODPDUTXH
F,QVWUXFWLRQV
G&DFKHRULILFH
H'HX[YLV
5
/
D E
F
G
H
Insigne de
la marque
5
/
18
/
¾
PP
3ODFHUODSRUWHGXUpIULJpUDWHXUVXU
OD[HGHFKDUQLqUHLQIpULHXUH
$OLJQHUOHVSRUWHVGXUpIULJpUDWHXU
HWGXFRQJpODWHXUREMARQUE :
6DVVXUHUTXLO\DELHQXQHVSDFH
GHöPPHQWUHOHVSRUWHV


