Whiteway WW-Jet 3000 User manual

3 0 0 0
IRYGATOR DENTYSTYCZNY ZUBNÍ SPRCHA
Diagnosis S.A.
Gen. W. Andersa 38A,
15-113 Białystok, POLAND
www.diagnosis.pl
Rev. 2018.10.24
DENTAL ORAL IRRIGATOR ZAHN-IRRIGATOR
4001
3 0 0 0

3 0 0 0
| 1
USER MANUAL
Dental Oral Irrigator
WW-Jet 3000
Thank you for buying WhiteWay product.
The WW-Jet 3000 Irrigator effectively and quickly removes food debris and bacteria from
hard to reach areas in the interdental spaces and under gum line –where a traditional
toothbrush or dental floss cannot reach. Our irrigator is a non-invasive way to remove
surface stains and plaque, stimatenously offering gum care. It is an irreplaceable device for
complete dental care. Highly recommended for people with tight spaces between teeth,
and those having braces, bridges, crowns and implants.
Please read these instructions before using.
DANGERS
lDo not immerse totally in water or in any liquids.
lDo not use the product while bathing.
lDo not place or store the product where it can fall into tub or sink.
lDo not reach for the product that has fallen into water. Unplug immediately.
lDo not disassemble, repair or remodel the main unit. Warranty is void under unauthorized
attempt to open the main unit.
WARNINGS
lThis appliance can be used by children aged from 8 years. Toddlers or people who are not
able to operate should be supervised by adults.
lUse this product only for its intended use as described in this manual.
lDo not use attachments not recommended by the manufacturer.
lDo not operate any appliance with a damaged cord or plug. Contact authorized service
facility for examination.
lDo not plug or unplug the power cord into the electrical outlet that has a voltage different
than that specified by the producer (110-240V).
lDo not use near heated surfaces or outdoors.
lDo not fill the tank with water warmer than 40ºC.
lPlease do not use without the nozzle
lKeep away from small children. It contains the small parts enough to be swallowed and
can be become lodged in the throat.
lDo not press the nozzle against your teeth or gums.
Keep this user manual!
3 0 0 0
English

3 0 0 0
| 2
HOW TO USE
Charging the device (Fig. 1)
1. Take the charger base cover down and insert the appliance plug
securely into the appliance socket (make sure no liquid
remaining inside the socket before insert the appliance plug).
2. Insert the charging adaptor securely into power outlet.
3. The “CH” indicator blinks when the device is charging and it will
turn off after it's fully charged.
4. Recover the cover onto charger base again after charging
finished.
NOTE! If the “CH” indicator is blinking during or after an
irrigating, that means the battery need to be recharged. An full
recharging will take about 8 hours.
a Nozzle release button
b ON/OFF button
c Mode button
d Mode indicator
e Charging base
f Charging base cover
g Nozzle
h Identification ring
i Nozzle suction tube
j Filter
k Water tank
l Water tank cap
CONFIGURATION
NOTE! There may be some liquid remaining inside the main appliance, this is the
remaining distilled water that was used for the performance test.
USE THE ORAL IRRIGATOR
Use only filtered water. Do not use any mouthwashes or dilute
them with water.
1. Attach nozzle (irrigator tip onto the unit). (Fig. 2)
2. Open the water tank cap to fill the tank with water which
temperature does not exceed 40ºC, then close the cap. (Fig. 3)
3. Or, Slide the water tank down off the unit, fill the tank with water
which temperature does not exceed 40ºC, then attach the tank
onto the unit. (Fig. 4)
4. Press “Mode” button to select the mode you desired. During
irrigating, you can change the working mode. (Fig. 5)
lNormal: for normal cleaning.
lSoft: for gentle cleaning of sensitive gums.
źPulse: for cleaning and massaging the gums.
Hold the unit in an upright position with nozzle tip point toward your
teeth.
6. Keep your mouth opened slightly so that the water can flow out.
Fig.2
Fig.1
Fig.3
Fig.4
insert
slide
down
CHARGING
INDICATOR
English

3 0 0 0
| 3
Fig.5
Fig.6
Fig.8
7. Press “ON/OFF” button to start irrigating. (Fig. 6)
lDirecting the water jet flow at a 90-degree angle to the teeth and
gums.
lDirecting the water jet slowly along the teeth, providing a gentle
massage. From time to time stop the irrigator at interdental
spaces to remove food debris.
lKeep Cleaning your upper and lower teeth from both sides
between the teeth.
lIn the same way clean around any braces, crowns, or
bridgework.
l8. Press “ON/OFF” button and then press the nozzle release
button to replace other nozzle when you need. (Fig.7)
l9. Once irrigating complete, press “ON/OFF” button again to
turn off the device.
AFTER USING THE APPLIANCE (FIG.8)
1. Open the water tank cap and dispose of the water in the tank.
2. Press “ON/OFF” button to turn on the unit, and drain the water
inside the appliance.
3. Press “ON/OFF” button again to turn off the unit, and close the
water tank cap.
4. Wipe the device with dry cloth
Note!
To prevent bacteria propagating, make sure there is no
remaining water inside the unit. If you're not going to use this
appliance for long time, be sure wipe and dry the appliance.
MAINTENANCE
Use only water to clean the device. Never use caustic or abrasive
agents. Do not wash using hot water of over 40°C. Keep the device
away from high temperature area; avoid direct sunlight and sudden
shocks.
Fig.7
press
button
unplug
the
nozzle
IRRIGATOR
lRemove the dirt by wiping using a cloth with liquid and wipe off using a dry cloth.
lDo not submerge the main unit in water to clean.
WATER TANK CAP
l Wipe off any grime and dirt with a cloth.
NOZZLE
lWash with water and wipe with soft cloth.
lReplace the nozzle every 6 months.
WATER SUCTION TUBE
lWash with water and wipe with soft cloth.
lDo not bend, pull or twist the water suction tube.
TANK
lWash with water and wipe with soft cloth.
lDry the tank when not using for a long period.
English

3 0 0 0
| 4
TROUBLESHOOTING
Problem
It does not work
It only works for a few
minutes even after
charging
Water pressure
is very low
Water does not
come out
Possible Cause
Battery is out of power
The battery has reached
the end of its life cycle.
There is dirt stuck in the nozzle
The nozzle is deformed
There is dirt stuck in the filter
Water tank is is incorrectly
positioned
Solution
Charge the unit for
at least 8 hours
Charge the unit for
at least 8 hours
Contact service center for support.
Replace the nozzle
Replace the nozzle
Clean the filter
Use the irrigator
in a vertical state
WASTE DISPOSAL
Used up product shall be supplied to a waste collection point. Contains ingredients
hazardous to the environment. Correct disposal of the device helps secure precious
resources and avoid negative impact on health and the environment, which can be
endangered by incorrect waste handling. If you have any doubts where to dispose
of your device, contact Diagnosis S.A. or your local distributor.
SPECIFICATION
Reservoir capacity 150ml
Total emptying of reservoir in 40~60 sec. Normal mode
Dimensions 56(L) x 74(W) x 273(H) mm
Weight 450 g
Water pressure 40~90 PSI
Waterproof Irrigator IPX7, adapter - IPX4
Power (irrigator) Battery Li-ion 1500 mAh battery provided,
charges full in 8 hours
Input voltage (adaptor) 110-240 V, AC 50/60 Hz
Operating Environment 18 - 25°C; 10-95% RH
Storage Environment -20 - 60°C; 10-95% RH
Warranty 2 years
Included Inside irrigator, 2 nozzles, adaptor, user manual
USED SYMBOLS:
Manufacturer
Read the operating instructions before use
Catalogue Number
Date of the last revision
IP Code
Rev.
IPX
English

3 0 0 0
| 5
BEDIENUNGSANLEITUNG
Zahn-Irrigator
WW-Jet 3000
Danke, dass Sie sich für ein Gerät der Marke WhiteWay entschieden haben.
Fa. Diagnosis S.A.
Der Irrigator WW-Jet 3000 entfernt erfolgreich und schnell Essensreste und Bakterien von
schwer zugänglichen Stellen zwischen den Zähnen und unter der Zahnfleischlinie, wo
Zahnbürsten und Zahnfaden nicht hinkommen. Er entfernt auf eine nichtinvasive Weise
Plaque und massiert das Zahnfleisch zugleich, um seine Durchblutung zu stärken. Es ist ein
bei der komplexen Mundhygiene notwendiges Gerät. Ideal für Personen, die eng aneinander
liegende Zähne haben, einen Zahnapparat, Brücken oder Implantate tragen.
Vor dem Erstgebrauch ist die Bedienungsanleitung zu lesen.
GEFAHR
lNicht in Wasser sowie andere Flüssigkeiten eintauchen.
lBeim Baden nicht gebrauchen.
lDas Gerät nicht an solchen Orten abstellen, von wo es in die Badewanne oder das
Waschbecken fallen könnte.
lWenn das Gerät ins Wasser gefallen ist, darf man es nicht anfassen. In so einem Fall muss
es unverzüglich vom Stromnetz getrennt werden.
lDas Gerät darf nicht auseinandergebaut oder selbst repariert werden. Alle unberechtigten
Öffnungsversuche führen zum Garantieverlust.
WARNUNGEN
lDas Gerät kann von Kindern ab 8 Jahren verwendet werden. Wenn das Gerät von Kindern
oder Behinderten benutzt wird, ist die Aufsicht eines Erwachsenen erforderlich.
lDas Gerät darf ausschließlich gem. dem in der vorliegenden Anleitung angegeben Zweck
verwendet werden.
lDas Gerät darf ausschließlich mit vom Hersteller empfohlenen Aufsätzen und Zubehörteilen
verwendet werden.
lWenn Kabel oder Stecker beschädigt sind, darf das Gerät nicht verwendet werden. Treten
Sie mit dem Verkäufer in Kontakt.
lDen Stecker darf man nicht in einer Steckdose mit anderer als der angegebenen Spannung
(110-240 V) stecken.
lDas Netzkabel des Gerätes fern von heißen Oberflächen halten.
lDen Behälter nicht mit Wasser, das über 40 Grad heiß ist, füllen.
lDas Gerät darf nicht ohne Düsen verwendet werden.
lDas Produkt ist außer der Reichweite von Kindern aufzubewahren. Das Gerät enthält kleine
Teile, die eine Erstickungsgefahr beim Verschlucken darstellen.
lZähne sowie Zahnfleisch dürfen nicht mit der Irrigatordüse berührt werden.
Die Bedienungsanleitung ist aufzubewahren!
Deutsch
3 0 0 0

3 0 0 0
| 6
a Freigabetaste zum einfachen Düsentausch
b Taste EIN/AUS (ON/OFF)
c Wahltaste des Betriebsmodus
d Anzeige des Betriebsmodus
e Ladestation
f Deckel der Ladestation
g Düse (Irrigationsteil)
h Düsendrehring
i Pumprohr
j Filter
k Wasserbehälter
l Wasserbehälterdeckel
KONSTRUKTION
DES IRRIGATORS
VORSICHT!
Das sich im Wasserbehälter oder Pumprohr befindliche Wasser befindet sich dort
aufgrund einer vor dem Verkauf vorgenommenen Qualitätskontrolle mithilfe von
destilliertem Wasser.
VERWENDUNG DES IRRIGATORS
Aufladen des Gerätes (Abb. 1)
1. Öffnen Sie die Ladeöffnung auf der Vorderseite des Gerätes. Das
Kabelende in die Irrigatoröffnung stecken (vergewissern Sie sich
zuvor, dass keine Flüssigkeit in der Öffnung ist).
2. Das Ladegerät an die Steckdose anschließen.
3. Wenn die „CH“-Anzeige blinkt, läuft der Ladevorgang. Wenn diese
Anzeige nicht blinkt, bedeutet das, dass das Gerät aufgeladen ist.
4. Nach dem Aufladen das Kabel aus der Steckdose ziehen und das
Ende aus dem Gerät.
VORSICHT!
Wenn die „CH“-Anzeige während oder nach der Irrigation blinkt, bedeutet das, dass man
den Akku aufladen muss. Eine volle Ladung dauert ca. 8 Stunden.
BEGINN DER ARBEIT
Ausschließlich gefiltertes Wasser verwenden. Keine Mundwässer
oder mit Wasser verdünnte Mundspülungen verwenden.
1. Düse befestigen (Irrigationsteil). (Abb. 2)
2. Behälter mit Wasser (Temperatur bis zu 40°C) füllen und ihn
genau mit Deckel abschließen (Abb. 3).
3. Oder Behälter aus dem Irrigator nehmen (nach unten schieben),
Behälter mit Wasser füllen (Temp. Bis zu 40°C) und danach den
Behälter wieder am Gerät befestigen. (Abb. 4)
4. Taste „Wahl des Betriebsmodus" drücken, um den
entsprechenden Modus zu wählen. Während der Irrigation kann
man den Betriebsmodus des Gerätes ändern. (Abb. 5)
lNormal: normale Reinigung
lSoft: sanfte Reinigung von empfindlichen Zahnfleisch
lPulse: Reinigung und Massage des Zahnfleisches
5. Den Irrigator senkrecht mit in Richtung der Zähne platzierter Düse
halten.
6. Während der Irrigation das Gerät senkrecht halten. Der Mund
sollte leicht geöffnet sein, damit das Wasser frei in das
Waschbecken fließen kann.
Abb.2
Abb.1
Abb.3
Abb.4
reinstecken
nach
unten
herausfahren
AKKULADEANZEIGE
Deutsch

3 0 0 0
| 7
7. Taste EIN/AUS (ON/OFF) drücken, um die Irrigation zu starten.
(Abb. 6)
lDen Wasserstrahl im Winkel von 90 Grad auf Zähne und Zahnfleisch
richten.
lDen Wasserstrahl langsam entlang der Zahnfleischlinie bewegen,
um so das Zahnfleisch sanft zu massieren. Ab und zu den Irrigator
auf der Höhe des Zahnzwischenraums stoppen, um Essensreste
genau auszuspülen.
lDie Irrigation bis zur vollen Reinigung der oberen und unteren Zähne
innen und außen fortsetzen.
lAuf die gleiche Weise die Reinigung des Zahnzwischenraums um
Zahnapparate, Kronen und Brücken herum vornehmen.
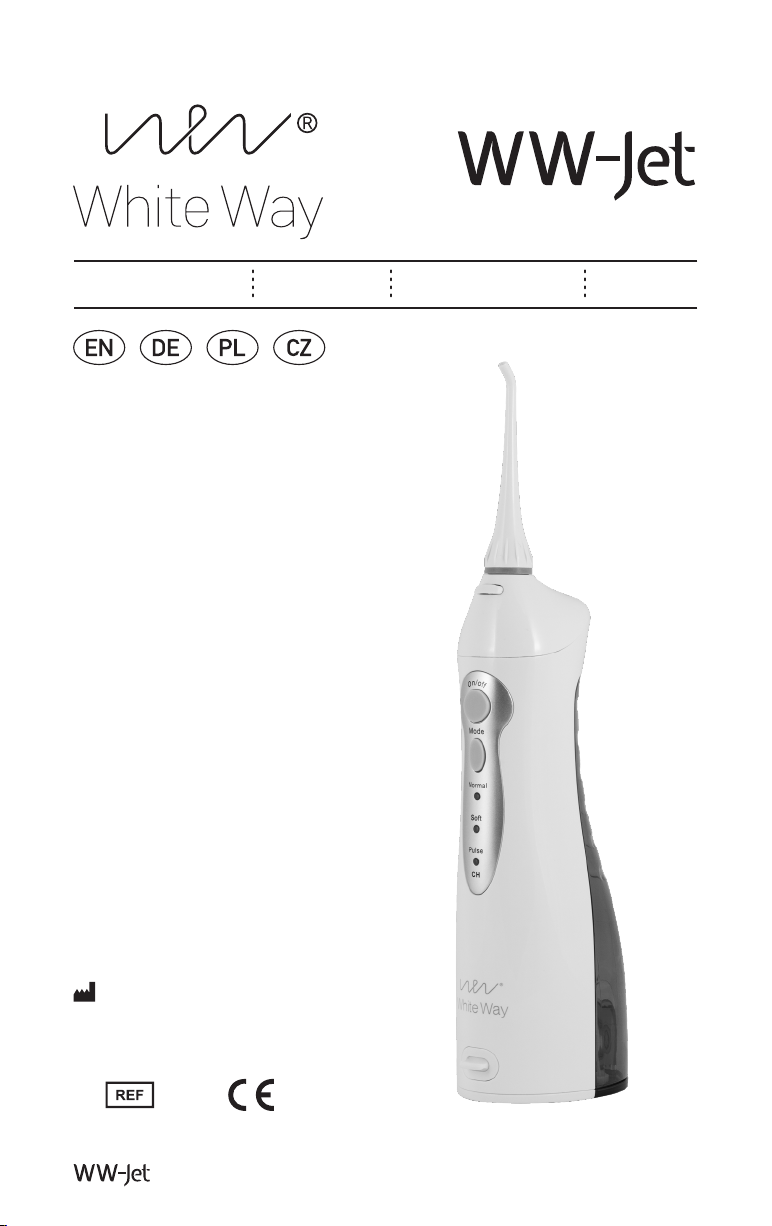
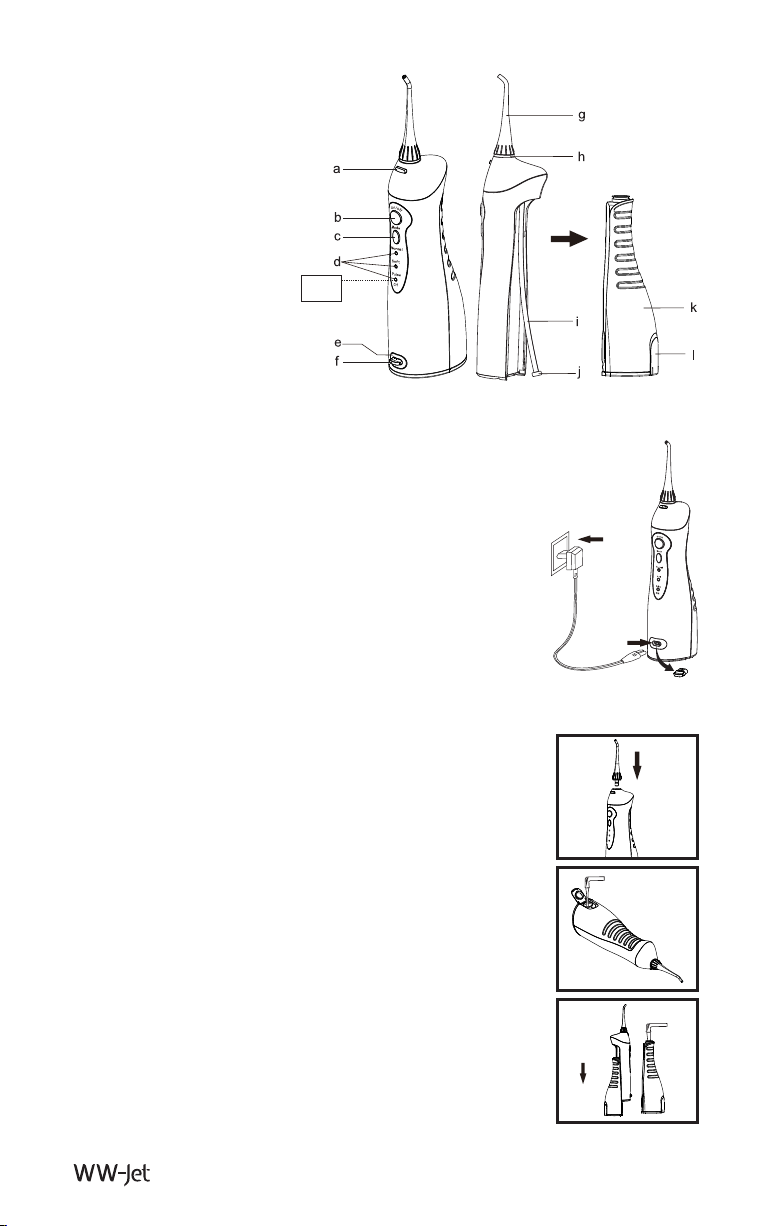
8. Vor dem Düsentausch das Gerät abschalten (Taste ON/OFF) und
danach die Freigabetaste, die ermöglicht, die Düse
herauszunehmen, drücken. (Abb. 7)
9. Nach dem Abschluss der Mundreinigung die Taste ON/OFF
drücken, um das Gerät abzuschalten.
NACH DER BENUTZUNG
DES IRRIGATORS (ABB.8)
1. Den Wasserbehälter öffnen und das übrige Wasser ausgießen.
2. Taste ON/OFF drücken, um den Irrigator einzuschalten und die
Wasserüberreste abtrocknen lassen.
3. Taste ON/OFF drücken, um den Irrigator auszuschalten, Behälter
mittels Deckel schließen.
4. Den Irrigator mit trockenem Lappen abwischen.
VORSICHT! Um der Entwicklung von Bakterien vorzubeugen, den
Wasserbehälter nach jedem Gebrauch genau entleeren. Wenn Sie
planen, das Gerät läger nicht zu benutzen, dann sollte es mit
einem trockenen Lappen abgewischt werden.
Abb.5
Abb.6
Abb.8
Abb.7
Taste
drücken
Düse
herausnehmen
IRRIGATOR
lDas Irrigatorgehäuse mit einem feuchten und danach mit einem trockenen Lappen
abwischen.
lDas Gerät nicht in Wasser eintauchen.
WASSERBEHÄLTERDECKEL
lDen Wasserbehälterdeckel mit einem feuchten Lappen abwischen.
IRRIGATORDÜSEN
lDie Düsen mit Wasser sauber machen und mit einem weichen Lappen trocknen.
lDer Wechsel der Düsen wird nach 6 Monaten empfohlen.
PUMPROHR
lDas Pumprohr mit Wasser sauber machen und mit einem weichen Lappen trocknen.
lDas Pumprohr darf nicht verbogen werden.
WASSERBEHÄLTER
lDen Wasserbehälter mit Wasser sauber machen und abtrocknen.
lWenn der Wasserbehälter längere Zeit nicht verwendet werden soll, sollte man ihn trocknen
lassen.
Deutsch
REINIGUNG DES IRRIGATORS
Zum Reinigen des Gerätes verwenden Sie nur Wasser. Niemals stark ätzende
Reinigungsstoffe verwenden. Beim Abwischen kein Wasser über 40°C verwenden. Das
Produkt nicht hohen Temperaturschwankungen, direkter UV-Strahlenwirkung, starken Stößen
aussetzen.

3 0 0 0
| 8
LÖSUNG VON PROBLEMEN
Problem
Das Gerät funktioniert nicht
Das Gerät funktioniert nur
paar Minuten, sogar nach
dem Aufladen.
Wasserdruck niedrig.
Durch die Düse kommt kein
Wasser.
Mögliche Ursache
Das Akku ist leer.
Die Akkus sind komplett leer.
Düse verunreinigt.
Düse verformt.
Verunreinigungen im Filter.
Behälter in falscher Stellung.
Lösung
Gerät aufladen. Ladezeit 8 Stunden.
Den Service kontaktieren.
Düse tauschen.
Düse tauschen.
Filter reinigen.
Den Irrigator senkrecht halten.
ENTSORGUNG DES PRODUKTS
Wenn das Produkt verschlissen ist, ist es bei einer Abfallsammelstelle abzugeben.
Enthält umweltschädliche Stoffe. Eine ordnungsgemäße Entsorgung ermöglicht,
wertvolle Ressourcen zu erhalten und schützt Gesundheit und Umwelt vor negativen
Einflüssen, zu denen es bei unsachgemäßem Umgang mit Abfällen kommen könnte.
Wenn Sie Zweifel haben, wo das abgenutzte Produkt abgegeben werden sollte,
kontaktieren Sie Diagnosis S.A. oder den örtlichen Vertriebspartner der Firma.
Der Hersteller behält sich das Recht vor, die technische Spezifikation ohne vorherige
Benachrichtigung zu ändern.
TECHNISCHE SPEZIFIKATION
Wasserbehältervolumen 150 ml
Komplette Entleerung des Wasserbehälters 45-60 Sekunden bei normalem Betriebsmodus
Maße 56 x 74 x 273 mm
Gewicht 450 g
Wasserdruck 40 - 90 PSI
Schutzart Irrigator - IPX7, Adapter - IPX4
Stromversorgung Quelle (irrigator) Akku 1500mAh Li-ion , 8 Stunden die volle
Ladung
Eingangsspannung (Netzteil) 110-240 V, AC 50/60 Hz
Arbeitstemperatur 18-25°C; 10-95% RH (feuchtigkeit)
Lagertemperatur -20-60°C; 10-95% RH (feuchtigkeit)
Garantie 2 Jahre
Im Set enthalten Irrigator, 2 Düsen, Netzteil, Bedienungsanleitung
ERKLÄRUNG DER SYMBOLE
Hersteller
Bitte vor der Anwendung die Gebrauchsanweisung lesen
Katalog – Nummer
Datum der letzten Aktualisierung
Schutzart
Rev.
IPX
Deutsch

3 0 0 0
| 9
INSTRUKCJA UŻYCIA
Irygator dentystyczny
WW-Jet 3000
Firma Diagnosis S.A. dziękuje za zakup urządzenia marki WhiteWay.
Irygator WW-Jet 3000 skutecznie i szybko usuwa resztki jedzenia i bakterie z trudno
dostępnych miejsc w przestrzeniach międzyzębowych oraz poniżej linii dziąseł, do których
nie dotrze szczoteczka ani nić dentystyczna. Bezinwazyjnie usuwa płytkę nazębną a
jednocześnie masuje dziąsła poprawiając ich ukrwienie. To niezbędne urządzenie do
kompleksowej higieny jamy ustnej. Znakomicie sprawdza się w przypadku osób mających
ciasno przylegające zęby, noszących aparaty ortodontyczne, mosty lub implanty.
Przed pierwszym użyciem należy zapoznać się z instrukcją obsługi.
ZASADY BEZPIECZEŃSTWA
lNie zanurzać w wodzie ani innych płynach
lNie używać podczas kąpieli.
lNie stawiać urządzenia w miejscu, z którego może spaść do wanny lub umywalki.
lNie sięgaj po urządzenie, które wpadło do wody. W takim przypadku należy urządzenie
natychmiast wyłączyć z sieci.
lNie należy rozmontowywać ani naprawiać samodzielnie urządzenia. Wszystkie
nieupoważnione próby otwarcia urządzenia spowodują unieważnienie gwarancji.
ŚRODKI OSTROŻNOŚCI
lUrządzenie może być używane przez dzieci od 8 lat. W przypadku używania urządzenia
przez dzieci, osoby niepełnosprawne konieczny jest nadzór osoby dorosłej.
lUżywaj urządzenia wyłącznie zgodnie z jego przeznaczeniem opisanym w niniejszej
instrukcji.
lUżywaj wyłącznie z końcówkami i akcesoriami zalecanymi przez producenta.
lNie używaj urządzenia w przypadku uszkodzonego przewodu lub wtyczki. Należy
skontaktować się ze sprzedawcą.
lNie należy wkładać wtyczki do gniazdka o innym napięciu niż przypisane do tego
urządzenia (110-240V).
lTrzymaj przewód sieciowy urządzenia z dala od gorących powierzchni.
lNie napełniaj pojemnika wodą o temperaturze powyżej 40°C.
lNie używaj urządzenia bez dysz.
lTrzymaj urządzenie w miejscu niedostępnym dla dzieci. Urządzenie zawiera małe części,
które stanowią niebezpieczeństwo uduszenia w przypadku ich połknięcia.
lNie dotykaj zębów ani dziąseł dyszą irygatora.
Zachowaj instrukcję użycia!
Polski
3 0 0 0

3 0 0 0
| 10
a Przycisk zwalniający umożliwiający
łatwą wymianę dyszy
b Przycisk ON/OFF
c Przycisk wyboru trybu pracy
d Wskaźnik trybu pracy
e Baza ładowania
f Pokrywka bazy ładowania
g Dysza (końcówka irygacyjna)
h Pierścień obrotu dyszy
i Rurka pompująca
j Filtr
k Pojemnik na wodę
I Pokrywka pojemnika na wodę
BUDOWA IRYGATORA
UWAGA!
Woda znajdująca się wewnątrz pojemnika na wodę lub w rurce pompującej jest
wynikiem przeprowadzonej kontroli jakości z użyciem destylowanej wody przed
sprzedażą urządzenia.
UŻYCIE IRYGATORA
Ładowanie urządzenia (Rys.1)
1. Otwórz otwór do ładowania z przodu urządzenia. Włóż końcówkę
kabla do otworu irygatora (upewnij się, że nie ma żadnych
pozostałości płynów w otworze przed włożeniem końcówki).
2. Podłącz ładowarkę do gniazda.
3. Wskaźnik CH miga podczas ładowania urządzenia. Urządzenie
wyłączy się automatycznie po pełnym naładowaniu.
4. Odłącz kabel z gniazdka i końcówkę z urządzenia po zakończeniu
ładowania.
UWAGA!
Jeżeli wskaźnik „CH” miga w czasie lub po irygacji oznacza to, że bateria wymaga
naładowania. Pełne ładowanie urządzenia zajmuje około 8 godzin.
ROZPOCZĘCIE PRACY URZĄDZENIA
Używaj tylko i wyłącznie wodę przefiltrowaną. Nie wolno używać
ani rozcieńczać z wodą żadnych płynów do płukania jamy ustnej.
1. Przymocuj dyszę (końcówkę irygacyjną). (Rys.2)
2. Napełnij pojemnik wodą o temperaturze do 40°C i dokładnie
zamknij pojemnik przy pomocy pokrywki (Rys.3)
3. Lub wyjmij pojemnik z irygatora wysuwając go w dół, napełnij
pojemnik wodą o temperaturze do 40°C a następnie przymocuj
pojemnik z powrotem do urządzenia. (Rys. 4)
4. Wciśnij przycisk „Wyboru Trybu Pracy” w celu wybrania
odpowiedniego trybu. Podczas irygacji możesz zmieniać tryb
pracy urządzenia. (Rys.5)
lNormal: normalne czyszczenie
lSoft: delikatne czyszczenie wrażliwych dziąseł
lPulse: czyszczenie i masaż dziąseł
5. Ustaw irygator w pozycji pionowej z dyszą skierowana w stronę
zębów.
6. Podczas irygacji trzymaj irygator w pozycji pionowej. Usta
powinny być lekko otwarte aby woda mogła swobodnie
wypływać do umywalki.
Rys.2
Rys.1
Rys.3
Rys.4
wciśnij
wysuń
w dół
WSKAŹNIK
ŁADOWANIA
Polski

3 0 0 0
| 11
Rys.5
Rys.6
Rys.7
Rys.8
7. Wciśnij przycisk ON/OFF w celu rozpoczęcia irygacji. (Rys. 6).
lKieruj strumień wody pod kątem 90 stopni w stronę zębów i dziąseł.
lPrzesuwaj strumień wody powoli wzdłuż linii dziąseł zapewniając w
ten sposób delikatny masaż dziąseł. Co pewien czas zatrzymuj
irygator na wysokości przestrzeni międzyzębowych w celu
dokładnego wypłukania resztek pokarmu.
lKontynuuj proces irygacji do momentu oczyszczenia wewnątrz i na
zewnątrz górnych i dolnych zębów.
lW ten sam sposób wykonuj czyszczenie przestrzeni między-
zębowych, dookoła aparatów ortodontycznych, koron i mostów.
8. Przed wymianą dyszy wyłącz urządzenie (przycisk ON/OFF ) a
następnie wciśnij przycisk zwalniający umożliwiający wyjęcie
dyszy. (Rys.7)
9. Po zakończeniu czyszczenia jamy ustnej wciśnij przycisk ON/OFF
w celu wyłączenia urządzenia.
PO UŻYCIU IRYGATORA (RYS.8)
1. Otwórz pojemnik na wodę i wylej resztę wody z pojemnika.
2. Wciśnij przycisk ON/OFF aby włączyć irygator i wysuszyć
pozostałości wody.
3. Wciśnij przycisk ON/OFF aby wyłączyć irygator, zamknij pojemnik
za pomocą pokrywki.
4. Przetrzyj irygator suchą ściereczką.
UWAGA! Aby zapobiec rozwojowi bakterii po każdym użyciu
dokładnie opróżnij pojemnik na wodę. Jeżeli nie zamierzasz używać
urządzenia przez dłuższy czas wytrzyj go suchą ściereczką.
UTRZYMANIE CZYSTOŚCI IRYGATORA
Do czyszczenia urządzenia używaj wyłącznie wody. Nigdy nie używaj
silnie żrących substancji czyszczących. Nie myj irygatora w wodzie
powyżej 40°C. Nie narażaj produktu na wysokie wahania temperatury,
bezpośrednie działanie promieni słonecznych, silne wstrząsy.
wciśnij
przycisk
wyjmij
dyszę
IRYGATOR
lObudowę irygatora przetrzyj wilgotną a następnie suchą ściereczką.
lNie zanurzaj urządzenia w wodzie.
POKRYWKA POJEMNIKA NA WODĘ
l Umyj pokrywkę pojemnika przy pomocy wilgotnej ściereczki.
DYSZE DO IRYGATORA
lUmyj dyszę przy użyciu wody oraz osusz je miękką ściereczką.
lZaleca się wymianę dyszy co 6 miesięcy
RURKA POMPUJĄCA
lUmyj rurkę pompującą przy użyciu wody oraz osusz ją miękką ściereczką.
lNie zginaj rurki pompującej.
POJEMNIK NA WODĘ
lUmyj pojemnik przy użyciu wody oraz osusz go.
lWysusz pojemnik w przypadku nieużywania go przez dłuższy czas.
Polski

3 0 0 0
| 12
ROZWIĄZYWANIE PROBLEMÓW
Problem
Urządzenie nie działa
Urządzenie działa przez
kilka minut nawet po
naładowaniu
Niskie ciśnienie wody
Woda nie przedostaje się
przez dyszę
Możliwa Przyczyna
Bateria jest rozładowana
Baterie są całkowicie wyczerpane
Dysza jest zanieczyszczona
Dysza uległa deformacji
Zanieczyszczenia w filtrze
Pojemnik jest w niewłaściwej
pozycji
Rozwiązanie
Naładuj urządzenie.
Czas ładowania 8 godzin
Naładuj urządzenie.
Czas ładowania 8 godzin
Skontaktuj się z serwisem
Wymień dyszę
Wymień dyszę
Wyczyść filtr
Trzymaj irygator w pozycji pionowej
UTYLIZOWANIE PRODUKTU
Zużyty wyrób oddać do punktu zbiórki odpadów. Zawiera składniki niebezpieczne
dla środowiska. Prawidłowa utylizacja urządzenia umożliwia zachowanie cennych
zasobów i uniknięcie negatywnego wpływu na zdrowie i środowisko, które może
być zagrożone przez nieodpowiednie postępowanie z odpadami. Jeśli masz
wątpliwości, gdzie oddać zużyty aparat skontaktuj się z firmą Diagnosis S.A. lub jej
lokalnym dystrybutorem. Producent zastrzega sobie prawo do zmiany specyfikacji
technicznej bez wcześniejszego powiadomienia.
SPECYFIKACJA TECHNICZNA
Pojemność pojemnika na wodę 150 ml
Całkowite opróżnianie zbiornika na wodę 45-60 sekund na normalnym trybie pracy
Wymiary produktu 56 x 74 x 273 mm
Waga 450 g
Ciśnienie wody 40 - 90 PSI
Stopień ochrony irygator - IPX7, adapter - IPX4
Zasilanie (irygator) bateria Li-ion 1500 mAh, czas ładowania 8 godzin
Napięcie wejściowe zasilacza 110-240V, 50/60 Hz
Warunki pracy 18 - 25°C; 10-95% RH
Transport i przechowywanie -20 - 60°C; 10-95% RH
Gwarancja 2 lata
W zestawie irygator, 2 dysze, zasilacz, instrukcja użycia
WYJAŚNIENIE SYMBOLI:
Wytwórca
Przed użyciem zapoznaj się z instrukcją użycia
Numer katalogowy
Data ostatniej aktualizacji
Stopień ochrony
Rev.
IPX
Polski

3 0 0 0
| 13
NÁVOD K POUŽITÍ
Bezdrátová zubní sprcha (irigátor)
WW-Jet 3000
Diagnosis S.A. děkuje, že jste si koupili zařízení značky WhiteWay.
Zubní sprcha WW-Jet 3000 efektivně a rychle odstraňuje zbytky jídla a bakterie z těžko
dostupných míst v mezizubním prostoru a pod linií dásní, kam se nedostane kartáček ani
zubní nit. Neinvazivně odstraňuje zubní plak a současně masíruje dásně a zlepšuje tak jejich
prokrvení. Je to nepostradatelné zařízení pro komplexní zubní hygienu ústní dutiny. Je ideální
pro osoby s těsně přiléhajícími zuby, rovnátky, můstky nebo implantáty.
Před použitím se seznamte s návodem k použití.
NEBEZPEČÍ
lNeponořujte do vody ani jiných tekutin.
lNepoužívejte během koupání.
lNepokládejte zařízení na místo, kde by mohlo spadnout do vany nebo umyvadla.
lNesahejte pro zařízení, které spadlo do vody. V takovém případě je nutné nejdříve zařízení
odpojit ze sítě.
lNerozebírejte ani neopravujte sami zařízení. Všechny neoprávněné zásahy do zařízení
způsobí ztrátu garance.
UPOZORNĚNÍ
lZařízení může být používáno dětmi od 8 let. V případě, že zařízení používají děti nebo
postižené osoby, je u zařízení nutný neustálý dozor dospělé osoby.
lPoužívejte zařízení výhradně v souladu s určením popsaným v tomto návodu.
lPoužívejte výhradně s hlavicemi a doplňky doporučenými výrobcem.
lNepoužívejte zařízení v případě, že je poškozený kabel nebo zástrčka. Doporučujeme
kontaktovat prodejce.
lNevkládejte zástrčku do zásuvky s jiným napětím, než je určeno pro toto zařízení (110 –
240V).
lUchovávejte síťový kabel mimo horké plochy.
lNenaplňujte nádobku vodou teplejší než 40°C.
lNepoužívejte zařízení bez trysek.
lUchovávejte zařízení v místě nedostupném pro malé děti. Zařízení obsahuje malé části,
hrozí nebezpečí - v případě spolknutí mohou způsobit udušení.
lNedotýkejte se tryskou zubní sprchy zubů ani dásní.
Ponechte si návod k použití!
Český
3 0 0 0

3 0 0 0
| 14
a Tlačítko pro snadnou výměnu trysky
b Tlačítko ON/OFF
c Tlačítko pro výběr provozního režimu
d Indikátor provozního režimu
e Nabíjecí jednotka
f Krytka nabíjecí jednotky
g Tryska (irigační tryska)
h Kroužek otáčení trysky
i Hadička
j Filtr
k Nádobka na vodu
I Krytka nádobky na vodu
POPIS ZUBNÍ SPRCHY
(IRIGÁTORU)
POZOR! Voda, která je v nádobce na vodu nebo v hadičce, je výsledkem provedené
kontroly kvality s použitím destilované vody před prodejem zařízení.
POUŽITÍ ÚSTNÍ SPRCHY
Nabíjení zařízení (Obr.1)
1. Otevřete otvor pro nabíjení na přední straně zařízení. Vložte
koncovku kabelu do otvoru ústní sprchy (před vložením koncovky
se ujistěte, že v otvoru nejsou žádné zbytky vody).
2. Připojte nabíječku do zásuvky.
3. Blikající indikátor „CH“ znamená nabíjení zařízení. Pokud tento
indikátor nebliká, znamená to, že zařízení je zcela nabité.
4. Po ukončeném nabíjení odpojte kabel ze zásuvky a koncovku ze
zařízení.
POZOR! Pokud indikátor „CH” bliká během používání ústní sprchy, znamená to, že
baterii je potřeba nabít. Celkové nabití zařízení trvá cca 8 hodin.
POUŽITÍ ZAŘÍZENÍ
Používejte pouze a výhradně filtrovanou vodu. Nepoužívejte ani
neřeďte vodou žádné tekutiny pro vyplachování ústní dutiny.
1. Připevněte trysku (irigační hlavici) (Obr.2)
2. Naplňte nádobku vodou s teplotou do 40 °C a krytkou zcela
zavřete nádobku (Obr.3)
3. Nebo vyndejte nádobku z ústní sprchy tak, že ji posunete směrem
dolů, naplňte nádobku vodou s teplotou do 40°C a poté nádobku
připevněte zpátky do zařízení (Obr. 4)
4. Stiskněte tlačítko „Výběr provozního režimu” za účelem výběru
vhodného provozního režimu. Během užívání ústní sprchy můžete
měnit režim zařízení (Obr.5)
lNormal: normální čištění
lSoft: jemné čištění citlivých dásní
lPulse: čištění a masáž dásní
5. Nastavte ústní sprchu do svislé polohy, trysku směřujte ve směru
zubů
6. Během používání ústní sprchy držte ústní sprchu ve svislé poloze.
Ústa by měla být lehce pootevřená, aby voda mohla stékat do
umyvadla.
Obr.2
Fig.1
Obr.3
Obr.4
vložte
vysuňte
směrem
dolů
INDIKÁTOR
NA BÍJENÍ
Český

3 0 0 0
| 15
Obr.5
Obr.6
Obr.7
Obr.8
7. Stiskněte tlačítko ON/OFF za účelem spuštění ústní sprchy (Obr.6)
lPramen vody pod úhlem 90 stupňů směřujte ve směru zubů a dásní
lPramen vody přesouvejte pomalu podél linie dásní, tímto způsobem
budete jemně masírovat dásně. Čas od času přidržte ústní sprchu ve
výšce mezizubních prostor za účelem důkladného odstranění zbytků
jídla
lPokračujte v tomto procesu do momentu vyčištění vnitřní a vnější
strany horních a dolních zubů
lStejným způsobem proveďte čištění mezizubních prostor, kolem
rovnátek, korunek a můstků
8. Před výměnou trysek vypněte zařízení (tlačítko ON/OFF) a poté
stiskněte tlačítko pro snadnou výměnu trysky (Obr. 7)
9. Po skončení čištění ústní dutiny, stiskněte tlačítko ON/OFF, vypnete
tak zařízení.
PO POUŽITÍ ÚSTNÍ SPRCHY(OBR.8)
1. Otevřete nádobku na vodu a vylejte z ní zbytky vody.
2. Stiskněte tlačítko ON/OFF pro zapnutí ústní sprchy a osušení zbytků
vody.
3. Stiskněte tlačítko ON/OFF pro vypnutí ústní sprchy, krytkou zavřete
nádobku.
4. Otřete ústní sprchu suchým hadříkem.
POZOR! Předcházejte rozvíjení bakterií, po každém použití
důkladně vyprázdněte nádobku na vodu. Pokud nebudete zařízení
používat delší čas, otřete jej suchým hadříkem.
UDRŽOVÁNÍ ČISTOTY ÚSTNÍ SPRCHY
K čištění zařízení používejte výhradně vodu. Nikdy nepoužívejte silně
žíravé substance. Nemyjte ústní sprchu ve vodě teplejší než 40°C.
Nevystavujte zařízení vysokým teplotním výkyvům, přímému
slunečnímu záření a silným vibracím.
stiskněte
tlačítko
vyndejte
trysku
ÚSTNÍ SPRCHA
lKryt ústní sprchy otřete vlhkým a poté suchým hadříkem.
lNeponořujte zařízení do vody.
KRYTKA NÁDOBKY NA VODU
l Umyjte krytku nádobky na vodu vlhkým hadříkem.
TRYSKY ÚSTNÍ SPRCHY
l Umyjte trysku vodou a osušte měkkým hadříkem.
l Doporučuje se výměna trysek každých 6 měsíců.
HADIČKA
l Umyjte hadičku vodou a osušte měkkým hadříkem.
l Hadičku neohýbejte.
NÁDOBKA NA VODU
l Umyjte nádobku vodou a osušte jí.
l Vysušte nádobku v případě, že ji nebudete používat delší čas.
Český

3 0 0 0
| 16
ŘEŠENÍ PROBLÉMŮ
Problém
Zařízení nefunguje
Zařízení funguje několik
minut i po nabití.
Nízký tlak vody
Voda neprotéká tryskou
Možná příčina
Baterie jsou zcela vybité
Tryska je znečištěná
Tryska je deformovaná
Filtr je znečištěný
Nádobka je v nesprávné pozici
Řešení
Nabijte zařízení. Čas nabíjení je 8
hodin.
Nabijte zařízení. Čas nabíjení je 8
hodin.
Kontaktujte servis
Vyměňte trysku
Vyměňte trysku
Vyměňte filtr
Držte ústní sprchu ve svislé poloze
LIKVIDACE PRODUKTU
Použitý produkt odevzdejte na sběrném místě. Obsahuje látky nebezpečné životnímu
prostředí. Řádný způsob likvidace umožňuje zachování vzácných surovin a zamezí
negativním vlivům na zdraví a životní prostředí, které může být ohroženo v důsledku
nevhodného zacházení s odpady. Pokud máte pochybnosti, kam vrátit opotřebovaný
výrobek, spojte se s firmou Diagnosis S.A.nebo se s distributorem.
Výrobce si vyhrazuje právo na změnu technické specifikace bez dřívějšího upozornění.
TECHNICKÁ SPECIFIKACE
Objem nádobky na vodu 150 ml
Celkové vyprázdnění nádobky na vodu 45-60 sekund při normálním provozním režimu
Rozměry produktu 56x74x 273 mm
Hmotnost 450g
Tlak vody 40 - 90 PSI
Stupeň krytí ústní sprcha - IPX7, adaptér - IPX4
Napájení (sprcha) Li-ion 1500 mAh, Celkové nabití baterie trvá 8 hodin
Vstupní napětí (nabíječka) 110-240V, 50/60 Hz
Provozní teplota 18 - 25°C; 10-95% RH
Skladovací teplota -20 - 60°C; 10-95% RH
Garance 2 roky
V balení ústní sprcha, 2 trysky, nabíječka, návod k použití
VYSVĚTLENÍ SYMBOLŮ
Výrobce
Přečtěte si návod k obsluze
Katalogové číslo
Datum poslední aktualizace
Stupeň krytí
Rev.
IPX
Český

3 0 0 0
| 17

3 0 0 0
| 18
DEVICE NAME
MODEL
SERIAL NUMBER
DATE OF SALE
1. Diagnosis S.A. grants a warranty: 24 months for irrigator
WW-Jet 3000 (excluding irrigator nozzles).
lHardware defects revealed during the warranty period
will be rectified free of charge within 21 days.
lThe term runs from the date of delivery of the
equipment to the service center.
2. The purchaser shall be entitled to replace the equipment
for a new one, free of defects, when:
lThe repair has not been made within the time limit set
in item 1
lAn authorized service center found an irreparable
manufacturing defect
lDuring the warranty period, 4 repairs were effected, and
the equipment still shows defects that prevent its use in
accordance with its intended purpose.
lThe concept of repair shall not include operations related
to equipment check and cleaning.
3. The warranty shall not cover: batteries, products with
illegible or damaged serial number, damage due to the
operation and storage inconsistent with the user manual,
ingress of liquids or foreign bodies, overvoltage of mains,
repairs by unauthorized persons and random events.
4. Faulty equipment should be delivered by the buyer to the
address of the main service center.
5. The warranty for the sold consumer goods shall not
exclude, restrict or suspend the powers of the buyer
resulting from non-conformity of the goods with the
contract.
6. The only basis for the warranty rights shall be the
warranty card with the date of sale, stamp and signature
of the salesperson. If the card is not completed, filled in
wrongly, with traces of corrections and entries made by
unauthorized persons, illegible as a result of damage - it
shall be invalid.
1. DIAGNOSIS S.A erteilt Garantie: 24 Monaten für
WW-Jet 3000 (ausgenommen Zubehör- Düsen)
lDie innerhalb der Garantiezeit entdeckten Gerätemängel
werden im Laufe von 21 Tagen kostenlos beseitigt.
lDieser Termin gilt ab dem Tag, an dem das Gerät zur
Servicestelle abgegeben wurde.
2. Der Käufer hat das Recht auf Austausch des Gerätes
gegen ein mangelfreies, wenn:
lDie Reparatur innerhalb der im Punkt 1 angegebenen
Zeit nicht erfolgt ist;
lEine berechtigte Servicestelle einen Herstellungsmangel
festgestellt hat, der nicht behoben werden konnte;
lInnerhalb der Garantiezeit 4 Reparaturen erfolgt sind und
das Gerät trotzdem weiterhin Mängel; aufweist, die eine
zweckgemäße Benutzung unmöglich machen.
lDer Begriff Reparatur umfasst keinerlei Tätigkeiten, die
sich auf Überprüfung oder Reinigung des Gerätes
beziehen.
3. Die Garantie gilt nicht für: Batterien, Produkte mit
unleserlichen oder zerstörten Herstellungsnummern,
Beschädigungen, die durch eine nicht mit der
Gebrauchsanweisung übereinstimmende Anwendung oder
Lagerung entstanden sind, das Eindringen einer Flüssigkeit
oder eines Fremdkörpers in das Innere des Gerätes,
Überspannungen im Stromversorgungsnetz, Reparaturen
durch unberechtigte Personen sowie zufällige Ereignisse.
4. Der Benutzer sollte das mangelhafte Gerät an die Adresse
des Zentralen Reparaturpunktes.
5. Die Garantie auf die verkaufte Konsumware bedeutet
keinen Ausschluss, keine Beschränkung und keine
Abtretung von Rechten des Käufers, die mit der
Nichtübereinstimmung der Ware mit dem Vertrag
verbunden sind.
6. Die einzige Grundlage für die Garantierechte bildet der
Garantieschein mit dem eingetragenen. Verkaufsdatum
sowie dem Stempel, der Unterschrift des Verkäufers und
der beleg. Ein Garantieschein, der nicht bzw. falsch
ausgefüllt ist, Spuren von Korrekturen oder Eintragungen.
WARRANTY CARD
GARANTIEKARTE
STORE STAMP AND SIGNATURE OF SALESPERSON
BRIEFMARKE UND UNTERSCHRIFT DES VERKÄUFERS SPEICHERN
. . . . . . . . . . . . . . . . . . . . . . . . . . . . . . . . . . . . . . . . . . . . . . . . .
. . . . . . . . . . . . . . . . . . . . . . . . . . . . . . . . . . . . . . . . . . . . . . . . .
. . . . . . . . . . . . . . . . . . . . . . . . . . . . . . . . . . . . . . . . . . . . . . . . .
. . . . . . . . . . . . . . . . . . . . . . . . . . . . . . . . . . . . . . . . . . . . . . . . .
WARRANTY TERMS GARANTIEBEDINGUNGEN
Diagnosis S.A.
Gen. W. Andersa 38A,
15-113 Białystok, Poland
www.diagnosis.pl
GERÄTENAME
MODELL
ORDNUNGSNUMMER
VERKAUFSDATUM
Das Gerät muss durch den Kunden in einer Verpackung zugesendet werden, die
ordnungsgemäß gegen Beschädigungen gesichert ist. Schäden, die infolge einer
unsachgemäßen Sicherung des Gerätes entstehen, werden nicht im Rahmen der
Garantieleistungen behoben. Andere Beschädigungen, die infolge von Umständen
entstehen, für die die Firma Diagnosis S.A. keine Verantwortung übernimmt,
insbesondere Schäden, die durch Poczta Polska (Polnische Post) bzw. Paketdienst-
Firmen zu vertreten sind, werden ebenfalls nicht im Rahmen der
Garantieleistungen behoben.
The buyer should provide the equipment in a properly protected package. Damages
caused by insufficiency or unsuitability of packing are excluded from the warranty.
Diagnosis S.A. is also not liable for defects that resulted from the damaging
caused by post or courier companies.

3 0 0 0
| 19
1. Diagnosis S.A. poskytuje garanci 24 měsíců na zubní
sprchu WW-Jet 3000 (bez koncovek)
lZávady na zařízení, které se vyskytnou během užívání,
budou odstraněny bezplatně v termínu do 30 dní.
lTermín se počítá ode dne doručení zařízení do servisu.
2. Kupující má právo na výměnu zařízení v případě, že:
lOprava nebyla provedená v termínu určeném v bodě 1;
lAutorizovaný servis potvrdil výrobní vadu, kterou není
možné odstranit;
lBěhem garanční doby byly provedeny 4 opravy a zařízení
stále vykazuje závady, které znemožňují jeho užívání dle
určení.
lPojem oprava nezahrnuje činnosti spojené s kontrolou a
čištěním zařízení.
3. Garance nezahrnuje: baterie, výrobky s nečitelným nebo
poškozeným výrobním číslem, poškození vzniklá při
užívání a skladování v rozporu s návodem k použití,
vniknutím tekutin nebo cizích těles do vnitřku, přepětí v
napájecí síti, opravy provedené neoprávněnými osobami a
také náhodné události.
4. Závadné zařízení je nutné dodat na adresu hlavního
servisu.
5. Garance nevylučuje, neomezuje ani nezbavuje kupujícího
jakýchkoliv dalších práv vyplývajících z nesouladu mezi
produktem a dohodou.
6. Jediným základem garančních práv je záruční list s
vepsaným datem prodeje, razítkem a podpisem
prodávajícího, doklad o koupi. Záruční list nevyplněný,
špatně vyplněný, s viditelnými opravami neoprávněných
osob, nečitelný pod vlivem poškození – je neplatný.
PIECZĘĆ SKLEPU I PODPIS SPRZEDAWCY
OBCHODNÍ ZNÁMKA A PODPIS PRODEJCE
. . . . . . . . . . . . . . . . . . . . . . . . . . . . . . . . . . . . . . . . . . . . . . . . .
. . . . . . . . . . . . . . . . . . . . . . . . . . . . . . . . . . . . . . . . . . . . . . . . .
. . . . . . . . . . . . . . . . . . . . . . . . . . . . . . . . . . . . . . . . . . . . . . . . .
. . . . . . . . . . . . . . . . . . . . . . . . . . . . . . . . . . . . . . . . . . . . . . . . .
ZÁRUČNÍ PODMÍNKY
DEVICE NAME
MODEL
ČÍSLO OBJEDNÁVKY
PRODEJ DATE
1. Diagnosis S.A. udziela gwarancji: 24 miesiące na Irygator
WW-Jet 3000 (z wyłączeniem dysz)
lWady sprzętu ujawnione w okresie gwarancji będą
usuwane bezpłatnie w terminie 21 dni.
lTermin liczy się od dnia dostarczenia sprzętu do serwisu.
2. Nabywcy przysługuje prawo wymiany sprzętu na wolny
od wad w przypadku gdy:
lnaprawa nie została wykonana w terminie określonym
w punkcie 1
luprawniony punkt serwisowy stwierdził wadę fabryczną
nie możliwą do usunięcia
lw okresie gwarancji wykonane zostały 4 naprawy, a
sprzęt nadal wykazuje wady uniemożliwiające używanie
go zgodnie z przeznaczeniem.
lPojęcie naprawa nie obejmuje czynności związanych ze
sprawdzeniem i czyszczeniem sprzętu.
3. Gwarancją nie są objęte: baterie, wyroby z nieczytelnym
lub zniszczonym numerem fabrycznym, uszkodzenia
powstałe w skutek niezgodnego z instrukcją obsługi
użytkownika i przechowywania, dostanie się do wewnątrz
płynów lub ciał obcych, przepięć w sieci zasilającej,
naprawy przez osoby niepowołane oraz zdarzeń losowych.
4. Wadliwy sprzęt nabywca powinien dostarczyć na adres
serwisu głównego: ul. Przemysłowa 8, 16-010 Wasilków.
5. Gwarancja na sprzedany towar konsumpcyjny nie
wyłącza, nie ogranicza, ani nie zawiesza uprawnień
kupującego wynikających z niezgodności towaru z
umową.
6. Jedyną podstawą uprawnień gwarancyjnych jest karta
gwarancyjna z wpisaną datą sprzedaży, pieczątką i
podpisem sprzedawcy. Karta nie wypełniona, źle
wypełniona, ze śladami poprawek i wpisów przez osoby
nieupoważnione, nieczytelna w skutek zniszczenia - jest
nieważna.
KARTA GWARANCYJNA
ZÁRUČNÍ LIST
NAZWA URZĄDZENIA
MODEL
NUMER FABRYCZNY
DATA SPRZEDAŻY
WARUNKI GWARANCJI
Kupující je povinen dodat zařízení v obalu vhodně zabezpečeném proti poškození.
Poškození způsobená nedostatečným zabezpečením zařízení nepodléhají
garančním opravám. Garančním opravám nepodléhají také jiná poškození vzniklá
díky okolnostem, za které Diagnosis S.A. nenese odpovědnost, zejména způsobené
Českou poštou nebo kurýrními společnostmi.
Kupujący powinien dostarczyć sprzęt w opakowaniu należycie zabezpieczonym
przed uszkodzeniem. Uszkodzenia spowodowane niedostatecznym
zabezpieczeniem sprzętu nie podlegają naprawom gwarancyjnym. Naprawom
gwarancyjnym nie podlegają także inne uszkodzenia powstałe w następstwie
okoliczności, za które Diagnosis S.A. nie ponosi odpowiedzialności, w
szczególności zawinione przez Pocztę Polską lub firmy kurierskie.
Diagnosis S.A.
Gen. W. Andersa 38A,
15-113 Białystok, Poland
www.diagnosis.pl
Table of contents
Languages:
Popular Dental Equipment manuals by other brands

Patterson Medical
Patterson Medical EC quick start guide

Carestream DENTAL
Carestream DENTAL CS 8100 Series user guide

3D Systems
3D Systems NextDent Cure Instructions for use

Woodpecker
Woodpecker PT MASTER 3 instruction manual

hatch
hatch X-RAY operating manual

StarDental
StarDental DentalEZ 263739 instruction manual

Guilin Woodpecker Medical Instrument
Guilin Woodpecker Medical Instrument HL11-M4 instruction manual

DentalEZ
DentalEZ aXcs Series Installation, Operation and Care Manual

Aseptico
Aseptico AEU-350 Operation and maintanance manual

Wassermann
Wassermann HSS-88 Replacement manual

ENBIO
ENBIO Enbio S user manual

Vatech
Vatech EzRay Air VEX-P300 user manual