INSTALLATION MANUAL
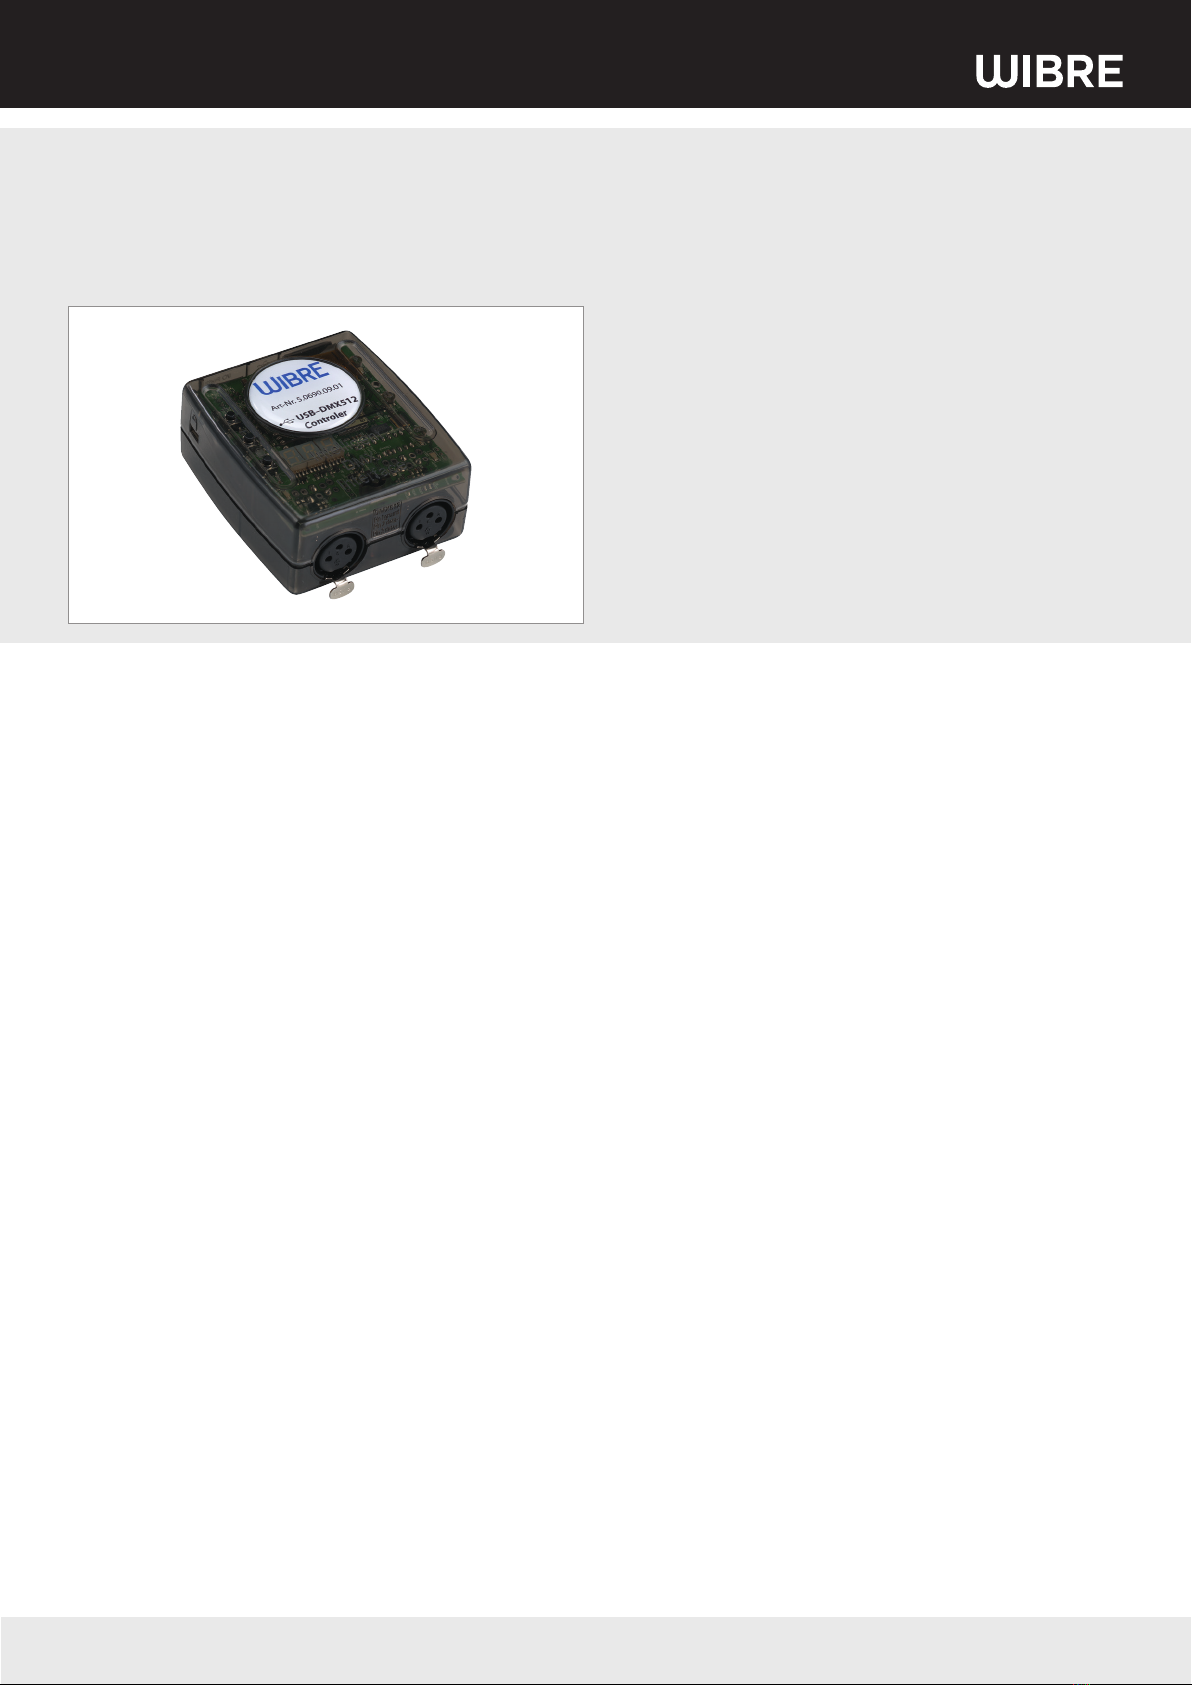
5.0690.09.01
USB-DMX-Controler
USB-DMX-Controler
USB-DMX-Controleur
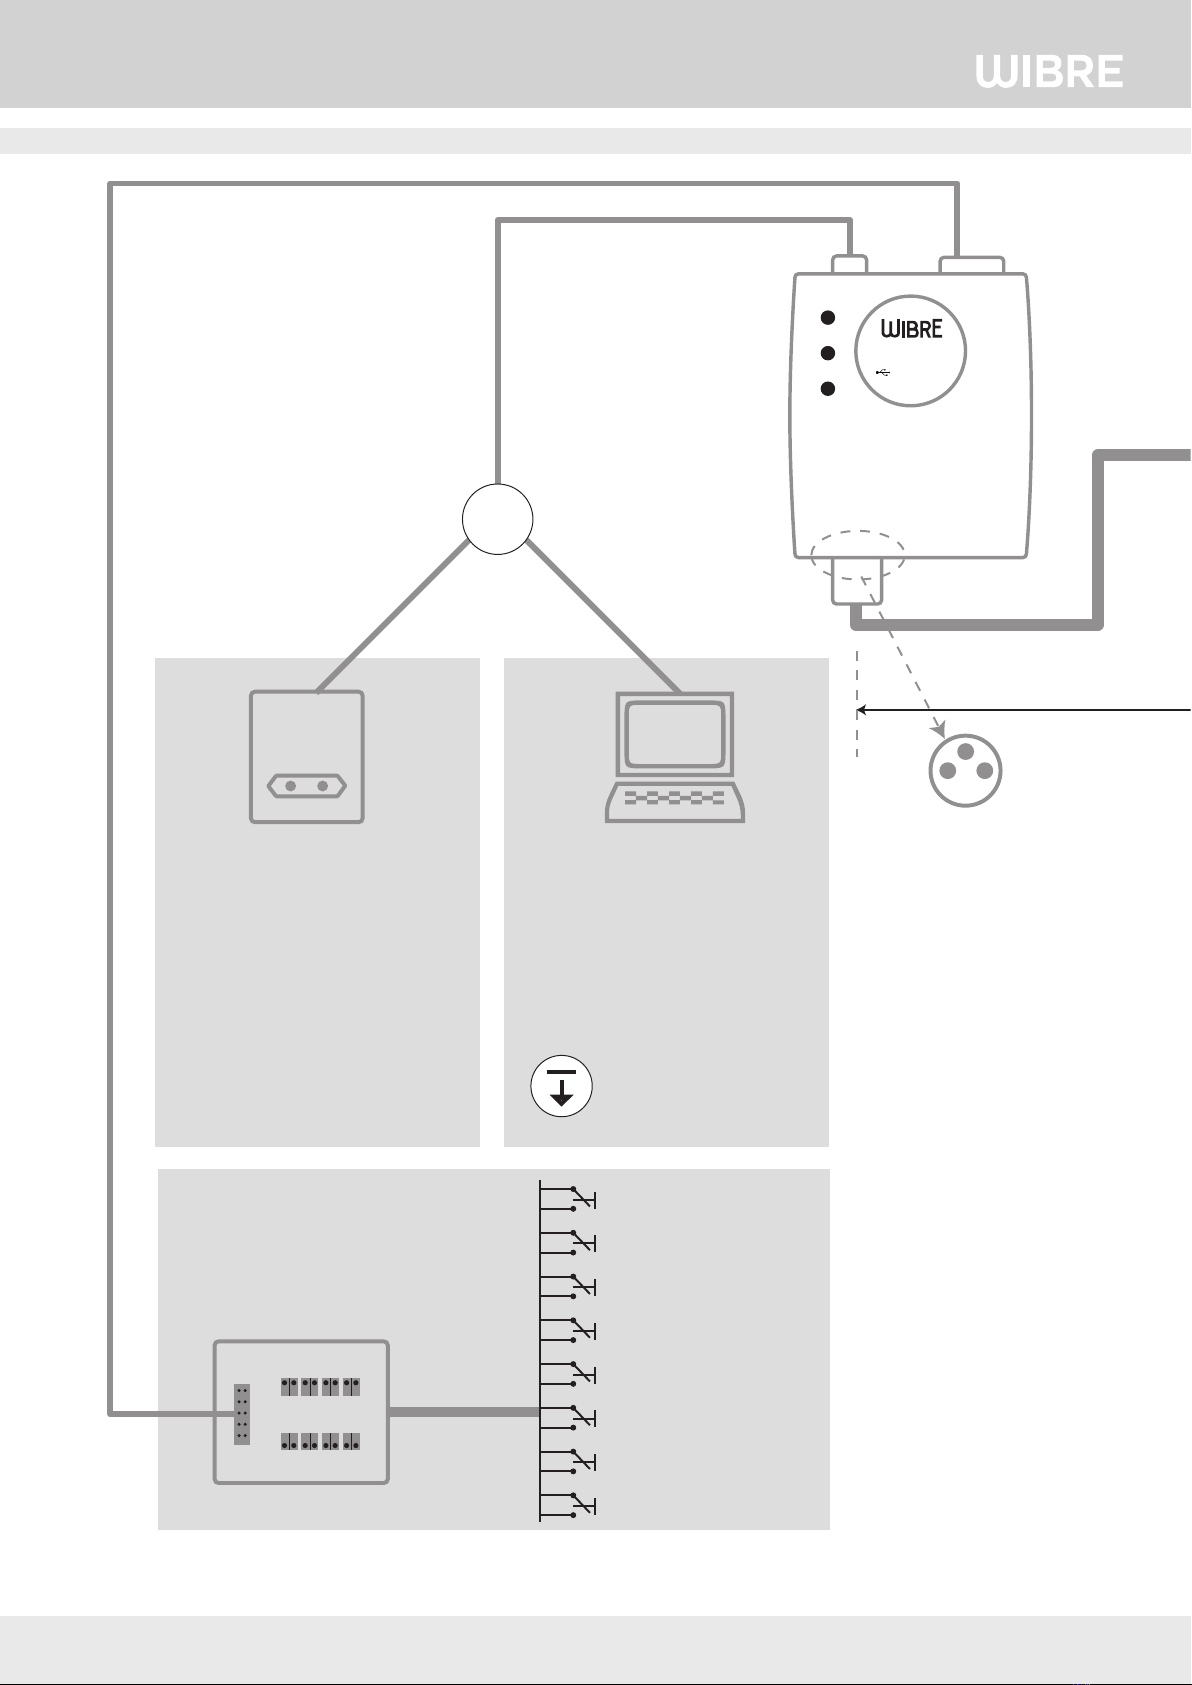
1. Beschreibung
USB-DMX-Controler zur einfachen Programmierung und Speicherung
von Lichtszenen und -programmen mittels PC und Laptop auf miniSD
Speicherkarte. Betrieb auch ohne PC-Anschluss mit beiliegendem
Netzteil als Stand-Alone-Lösung möglich. Über integrierte Up/Down-
Buttons mit Display oder Anschluß potentialfreierTaster an I/O-Ports
wird die Auswahl von gespeicherten Lichtszenen ermöglicht.
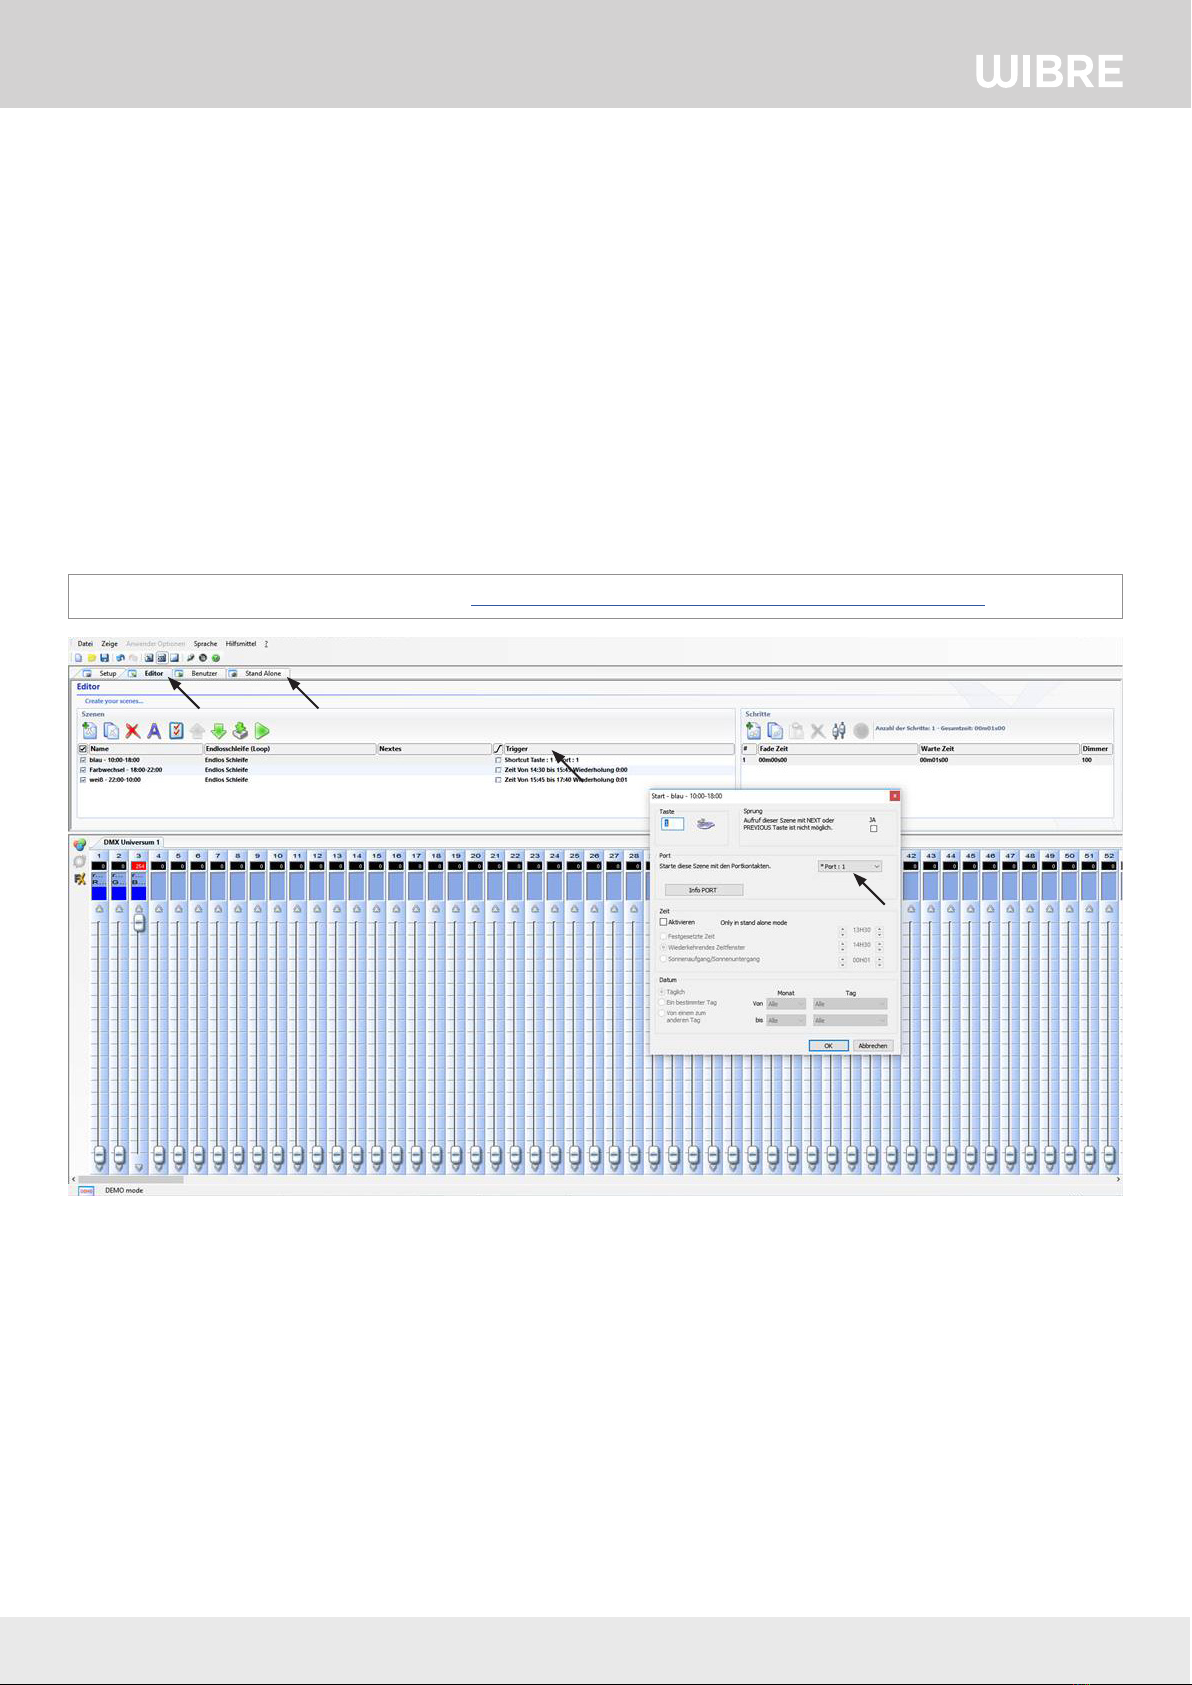
2. Anwendung
Zur einfachen Programmierung und Speicherung von Lichtszenen für
die Architekturbeleuchtung über Easy Stand Alone Software.
Mehr Informationen unter www.nicolaudie.com, Model SLESA-U7
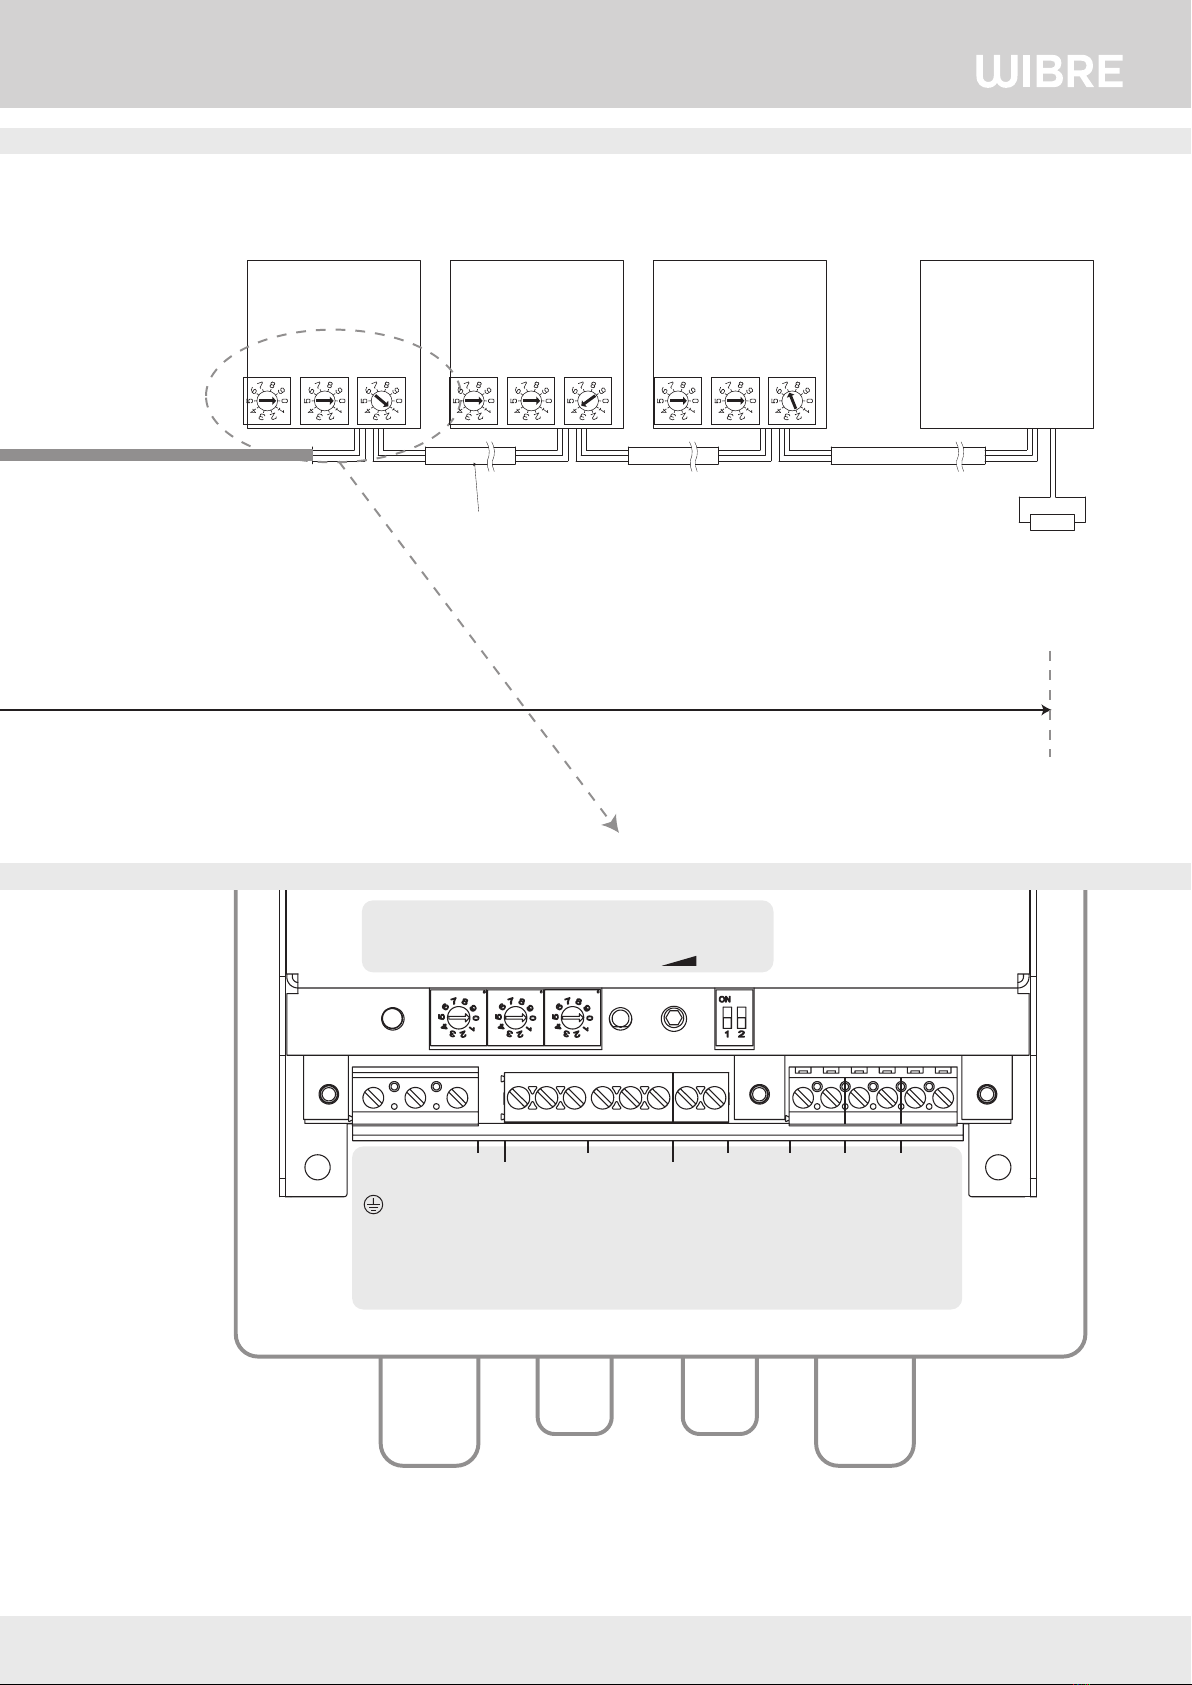
3. Technik
Steuerausgang: 2 x DMX512
Anschluss DMX: XLR-Stecker 3-polig
Anschluss Computer: USB 2.0
Externe Ports: 8 I/O Ports
Interne Uhr: Realtime Clock
Amessung: 80 x 90 x 40 mm
Gewicht: 0,1 kg
Lieferumfang: USB-DMX-Controler, USB-Kabel,
Netzteil, SD-Karte, Stand-Alone
Software und Gerätetreibern
(Windows)
Betriebstemperatur: 0 – 45°C
4. Zubehör
5.0690.09.02 - Tasteranschlussbox, Kunststoff,IP65,zumAnschluss
von 8 potentialfreienTastern an USB-DMX Controler und Abruf von 8
programmierten Lichtszenen im Port-Modus
5. Garantiebestimmungen
Folgende Garantiezeiten und Bestimmungen gelten vom
Tage der Lieferung an:
· 24 Monate aufWIBRE-Produkte
· Unter die Garantie fallen nachweisbare Material-,Konstruktions-
undVerarbeitungsfehler von Seiten des Herstellers.
· Für Schäden, welche durch Nichtbeachtung dieser Betriebs-
anleitung, oder durch unsachgemäße Reparatur entstehen,
können wir keine Garantie übernehmen.
· Schäden durch falsche Handhabung sind von der Garantie
ausgeschlossen.
· Keine Garantie besteht wenn die Installation nicht korrekt nach den
Bestimmungen vorgenommen wurde, oder beiVerwendung nicht
geeigneter Leuchtmittel.
· Änderungen,die demtechnischenFortschritt dienen,behaltenwiruns vor.
1. Description
USB DMX Controler for easy programming and saving of light scenes and
programs via PC and Laptop on mini SD memory card. A use, as a Stand-
Alone solution, without PC connection is possible with a power supply
included in the delivery.
Via integral up/down buttons with a display or a potential-free switch key
on I/O ports a selection of memorized light scenes is possible.
2. Application
For easy programming and saving of light scenes for architectural illumina-
tion with Easy Stand Alone Software.
More informations on www.nicolaudie.com, Model SLESA-U7
3. Technics
Control output: 2 x DMX512
DMX-Connection: XLR-Stecker 3-polig
PC-Connection: USB 2.0
External Ports: 8 I/O Ports
Internal Clock: Realtime Clock
Dimensions: 80 x 90 x 40 mm
Weight: 0,1 kg
Content: USB-DMX-Controler, USB-Cable, Power
supply, SD-Card, Stand-Alone Software
and Driver (Windows)
Operating temperature: 0 – 45°C
4. Accessories
5.0690.09.02 - Switch key connection box
Plastic material, IP 65, for the connection of 8 potential-free switch keys,
USB DMX controller and recall of 8 programmed light scenes in port mode.
5. Warranty conditions
The following warranty times and conditions are valid
from the day of delivery:
· 24 months onWIBRE-Products
· Proven faults appertaining to material, construction or processing fall
under the warranty of the manufacturer.
·We accept no liability for damages arising through negligence of the
operating instructions or improper repair work.
· No liability is accepted for installation carried out contrary to the
instructions or for the use of inappropriate light bulbs.
·We reserve the right to instigate any technical improvements without
prior notice.
1. Description
Contrôleur USB DMX pour la programmation facile et mémorisation des
scènes et programmes d’éclairage parmi ordinateur et lap top sur mini SD
carte. Utilisation sans ordinateur, par solution Stand Alone possible, avec
alimentation livré avec.
Parmi des buttons Up/Down avec écran, ou une connexion des contacts secs
sur I/O ports la sélection des scènes d’éclairage et possible.
2. Application
Pour la programmation facile et mémorisation des scènes pour l’éclairage
architectural avec Easy Stand Alone Software.
Plus d‘informations sur www.nicolaudie.com, Model SLESA-U7
3. Technique
Control output: 2 x DMX512
DMX-Connection: XLR-Stecker 3-polig
PC-Connection: USB 2.0
External Ports: 8 I/O Ports
Internal Clock: Realtime Clock
Dimensions: 80x90x40mm
Poids: 0,1kg
Content: USB-DMX-Controler, Câble USB, alimen-
tation, carte SD, Stand-Alone Software et
logiciel pilote (Windows)
Operating temperature: 0 - 45°C
4. Accessoires
5.0690.09.02 - Boîtier connexion contact sec
Plastic, IP65, pour la connexion des 8 contacts secs, USB DMX contrôleur et
rappel des 8 scènes d’éclairage dans le port mode.
5. Dispositions de garantie
Des périodes de garantie et dispositions suivantes sont
en vigueur au jour de la livraison:
· 24 mois pour les produits WIBRE
· la garantie couvre des erreurs de construction démontrables, de matériel et
de traitement de la part du fabricant
· pour des dommages qui résultent de non-respect de ce manuel ou de
réparation inadéquate, nous ne pouvons pas assurer la garantie
· des dommages par une fausse manipulation sont exclus de la garantie
· aucune garantie n‘existe si l‘installation n‘a pas été entreprise correctement
après les dispositions, ou lors d’une utilisation de sources non appropriés.
· nous nous réservons le droit de faire des modifications qui résultent de
l‘évolution technique de nos produits
WIBRE Elektrogeräte Edmund Breuninger GmbH & Co. KG · Liebigstrasse 9 · 74211 Leingarten/Germany
T
elefon:
+49
(0)
7131
9053-0
·
T
elefax:
+49
(0)
7131
9053-19
·
E-Mail:
[email protected] 1/4