Milano
Wood Fired Oven
Installation Instructions
Version 4.0
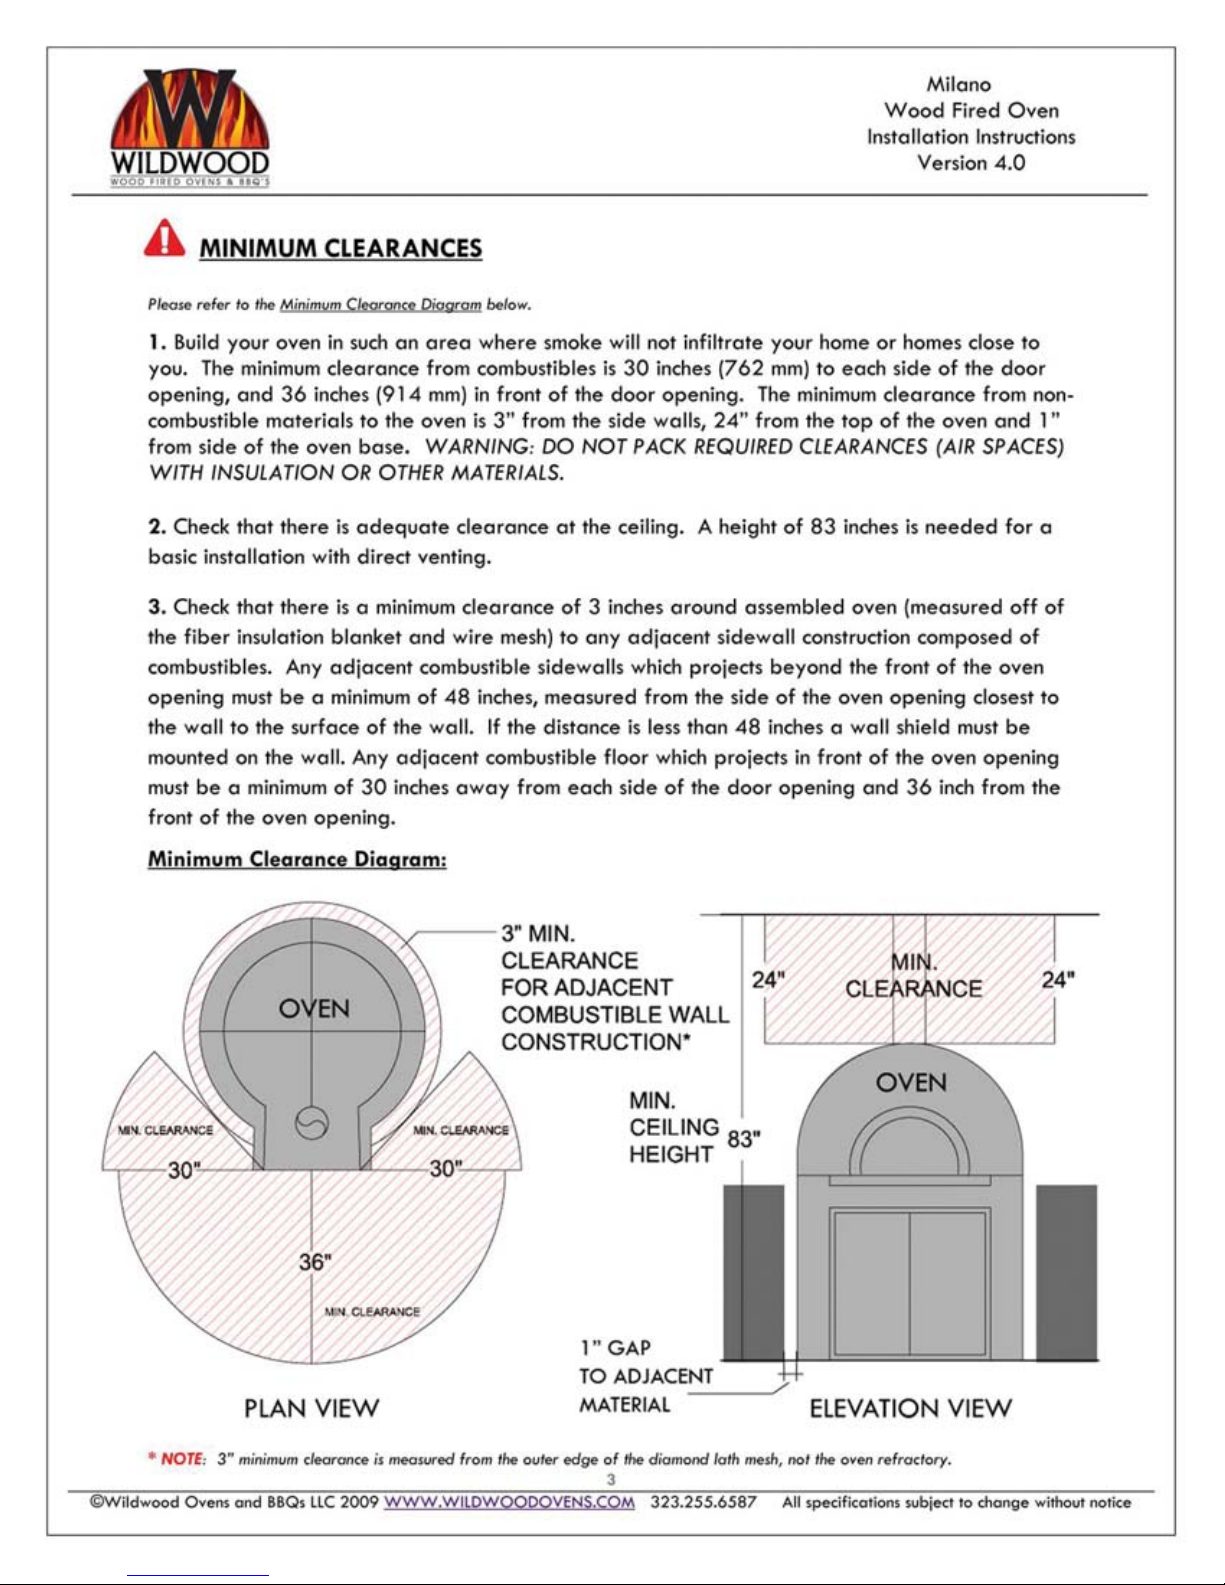
6
©Wildwood Ovens and BBQs LLC 2009 WWW.WIL WOO OVENS.COM 323.255.6587 All specifications subject to change without notice
STARTING THE IRE: PLACE TWO SHORT PIECES OF FIREWOO (3-4 IN IAMETER)
ABOUT SIX INCHES APART IN THE CENTER OF HEARTH. NEXT, PLACE A SAFE LITE FIRE
STARTER SQUARES (AVAILABLE AT WILDWOOD!) BETWEEN THE PIECES OF WOO .
LAY SMALL PIECES OF KIN LING ACROSS THE FIRST LAYER OF WOO IN A CROSS
HATCH PATTERN, CREATING SEVERAL LAYERS SO THAT THEY ARE IRECTLY ABOVE THE
SAFE LITE FIRE STARTER SQUARES. LIGHT THE SAFE LITE FIRE STARTER SQUARES USING A
MATCH OR BBQ LIGHTER. AS THE KIN LING BURNS, A A ITIONAL PIECES,
GRA UALLY INCREASING THE SIZE OF THE FIRE. ONCE A GOO SIZE FIRE IS
BURNING (ONE THAT WON’T GO OUT IF MOVE ), GENTLY PUSH THE FIRE TO THE
BACK, LEFT, OR RIGHT OF THE OVEN USING THE OVEN BRUSH. CONTINUE TO FEE
WOO PERIO ICALLY. LEAVE OOR SLIGHTLY AJAR.
•USE ONLY SEASONE OR RIE , UNTREATE WOO IN THE OVEN. O NOT BURN
CHARCOALS, COALS, TRASH/GARBAGE OR MANUFACTURE LOGS (PROCESSE SOLI
FUEL).
•STORE WOO IN A RY PLACE, PROTECTE FROM THE ELEMENTS.
IRECT CONTACT WITH FOO IS LIMITE TO BREA PRO UCTS ONLY. FOR OTHER
FOO S, USE PROPER COOKWARE. INQUIRE ABOUT OUR SOAPSTONE COOKWARE AT
WILDWOOD!
USE ONLY NON-COMBUSTIBLE COOKING TOOLS INSI E THE OVEN. INQUIRE ABOUT
OUR OVEN ACCESSORIES!
•REMOVE ASHES USING OUR ASH-VAC OR FIREPLACE SHOVEL. NEVER VACUUM OUT
OR THROW AWAY COALS THAT ARE STILL BURNING.
•KEEP YOUR OVEN CLEAN. YOU CAN BURN OFF CHEESE AN OTHER FOO S THAT ARE
STUCK TO THE HEARTH BY SPREA ING HOT COALS OVER THE AFFECTE AREA AN
ALLOWING SUFFICIENT TIME (APPROXIMATELY 5-7 MINS) TO BURN OFF INGRE IENTS.
USE THE OVEN BRUSH TO PUSH THE COALS BACK INTO PLACE AN LIGHTLEY SCRUB
THE AFFECTE AREA. USE OUR HEARTH MOP LIGHTLY MOISTENE TO REMOVE FINE
ASH.
•BEFORE LAUNCHING PIZZA, REMOVE FINE ASH WITH A AMP HEARTH MOP.
•FOR A CRISPIER PIZZA CRUST, HEAT YOUR HEARTH FOR 4-5 MIN. BRUSH THE COALS
BACK INTO PLACE AN CLEAN THE HEARTH QUICKLY WITH A AMP HEARTH MOP.