DO NOT ATTEMPT TO RECHARGE ZINC CARBON (“HEAVY DUTY
LITHIUM BATTERIES! DO NOT ATTEMPT TO RECHARGE DISPOSABLE BATTERIES!
These batteries may heat up and explode, causing possible injury and damage to the equipment. Avoid shorting
the plus and minus battery terminals together with metal
dispose of batteries in fire. Do not open batteries
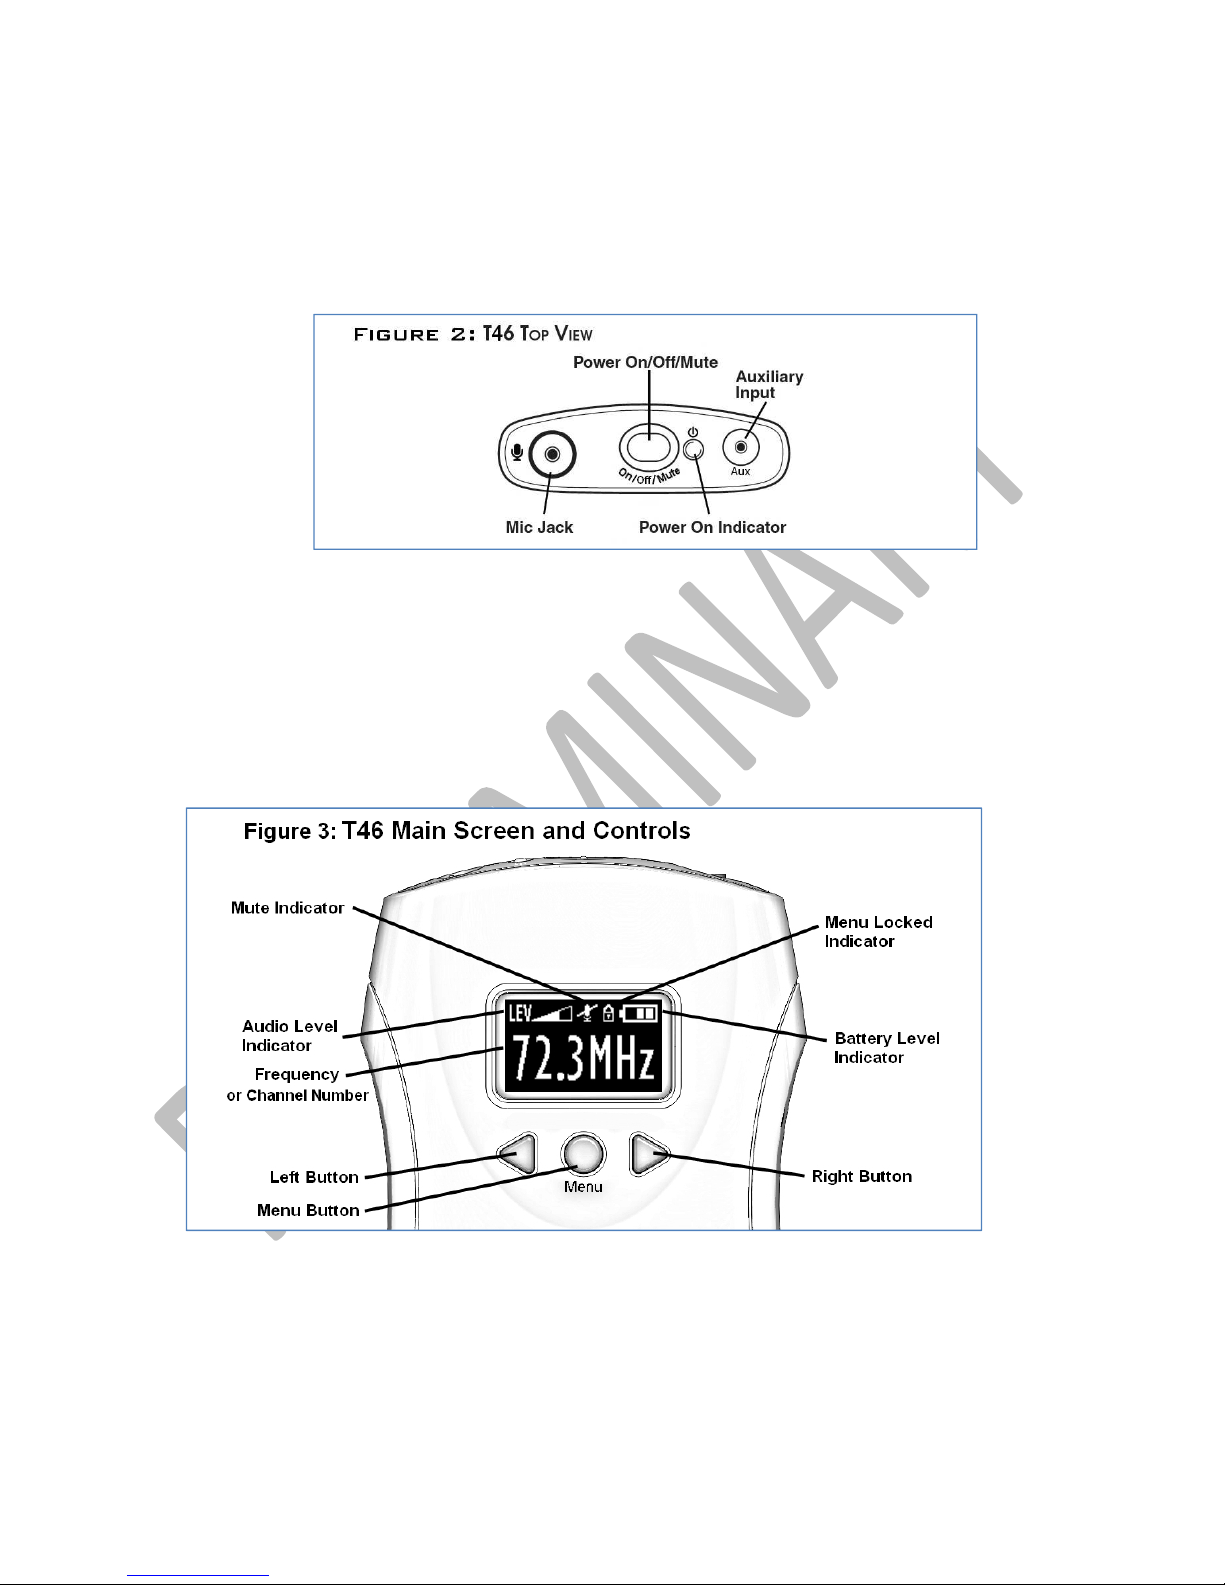
Tips for Using the System
The maximum operating distance between the transmitter and receiver is about 46 meters (150 feet).
will vary in different buildings and surroundings. In some locations, the signal may momentarily disappear. This is called
out” and is due to reflection and cancellation of the radio signal. Moving a few feet should restore the
Keep the transmitter and receiver units at least 1 meter (3 feet) apart. If the transmitter gets too close to a receiver, it
overload the receiver, causing noisy reception or blocking of the signal.
Do not use more than one transmitter on th
separated by more than 60 meters (200 feet). Operating more than one transmitter on the same channel at the same time in
the same place will result in interference.
FM transmitters on the same frequency interfere with each other. For multiple tour groups within the same facility, either
maintain physical separation of more than 60 meters (200 feet) between groups
See “Setting the Basic Features” step 1 on page 5 for instructions on how to change the transmitter
frequency.
Troubleshooting
The system is noisy or has poor range.
Check the “Battery Level Indicat r” n the display, making sure it displays at least ne bar. If n t, replace r
recharge the batteries.
•
Make sure the micr ph ne is plugged in, and that a c mpat
“C mpatible Access ries” n page
Make sure the transmitter and receivers are at least 3 feet (1 meter), but less than 150 feet (45 meters) apart.
M ve a few feet. When using the system ind rs, it’s n rmal f r th
l cati ns. This is called “dr p ut”. M ving a few feet may rest re the signal.
Make sure an ther transmitter n the same frequency is n t nearby. Transmitters n the same frequency
interfere with each ther.
Keep transmitters n the same frequency at least 200 feet (60 meters) apart.
My rechargeable batteries only work for a short period of time.
be replaced every 1-2 years.
Page 9
DO NOT ATTEMPT TO RECHARGE ZINC CARBON (“HEAVY DUTY
LITHIUM BATTERIES! DO NOT ATTEMPT TO RECHARGE DISPOSABLE BATTERIES!
These batteries may heat up and explode, causing possible injury and damage to the equipment. Avoid shorting
the plus and minus battery terminals together with metal
objects. Battery damage and burns can result! Do not
dispose of batteries in fire. Do not open batteries
- toxic chemicals inside.
The maximum operating distance between the transmitter and receiver is about 46 meters (150 feet).
will vary in different buildings and surroundings. In some locations, the signal may momentarily disappear. This is called
out” and is due to reflection and cancellation of the radio signal. Moving a few feet should restore the
Keep the transmitter and receiver units at least 1 meter (3 feet) apart. If the transmitter gets too close to a receiver, it
overload the receiver, causing noisy reception or blocking of the signal.
Do not use more than one transmitter on th
e same channel (frequency) at the same time unless they are physically
separated by more than 60 meters (200 feet). Operating more than one transmitter on the same channel at the same time in
the same place will result in interference.
FM transmitters on the same frequency interfere with each other. For multiple tour groups within the same facility, either
maintain physical separation of more than 60 meters (200 feet) between groups
, or set up the tours on differe
See “Setting the Basic Features” step 1 on page 5 for instructions on how to change the transmitter
Battery Discharged Bel w 10%
Check the “Battery Level Indicat r” n the display, making sure it displays at least ne bar. If n t, replace r
Make sure the micr ph ne is plugged in, and that a c mpat
ible micr ph ne has been selected. See
“C mpatible Access ries” n page
Make sure the transmitter and receivers are at least 3 feet (1 meter), but less than 150 feet (45 meters) apart.
M ve a few feet. When using the system ind rs, it’s n rmal f r th
e signal t m mentarily disappear in certain
l cati ns. This is called “dr p ut”. M ving a few feet may rest re the signal.
Make sure an ther transmitter n the same frequency is n t nearby. Transmitters n the same frequency
Keep transmitters n the same frequency at least 200 feet (60 meters) apart.
My rechargeable batteries only work for a short period of time.
Rechargeable batteries gradually l se capacity ver time, and need t
DO NOT ATTEMPT TO RECHARGE ZINC CARBON (“HEAVY DUTY
LITHIUM BATTERIES! DO NOT ATTEMPT TO RECHARGE DISPOSABLE BATTERIES!
These batteries may heat up and explode, causing possible injury and damage to the equipment. Avoid shorting
objects. Battery damage and burns can result! Do not
The maximum operating distance between the transmitter and receiver is about 46 meters (150 feet).
will vary in different buildings and surroundings. In some locations, the signal may momentarily disappear. This is called
out” and is due to reflection and cancellation of the radio signal. Moving a few feet should restore the
Keep the transmitter and receiver units at least 1 meter (3 feet) apart. If the transmitter gets too close to a receiver, it
e same channel (frequency) at the same time unless they are physically
separated by more than 60 meters (200 feet). Operating more than one transmitter on the same channel at the same time in
FM transmitters on the same frequency interfere with each other. For multiple tour groups within the same facility, either
, or set up the tours on differe
See “Setting the Basic Features” step 1 on page 5 for instructions on how to change the transmitter
Check the “Battery Level Indicat r” n the display, making sure it displays at least ne bar. If n t, replace r
ible micr ph ne has been selected. See
Make sure the transmitter and receivers are at least 3 feet (1 meter), but less than 150 feet (45 meters) apart.
e signal t m mentarily disappear in certain
Make sure an ther transmitter n the same frequency is n t nearby. Transmitters n the same frequency
Keep transmitters n the same frequency at least 200 feet (60 meters) apart.
Rechargeable batteries gradually l se capacity ver time, and need t