Willow WS90DFBL User manual

Instruction manual
90cm Dual Fuel
Range Cooker
WS90DFBL
WS90DFSS

Contents
Safety Warnings............................................................................................................................ 4
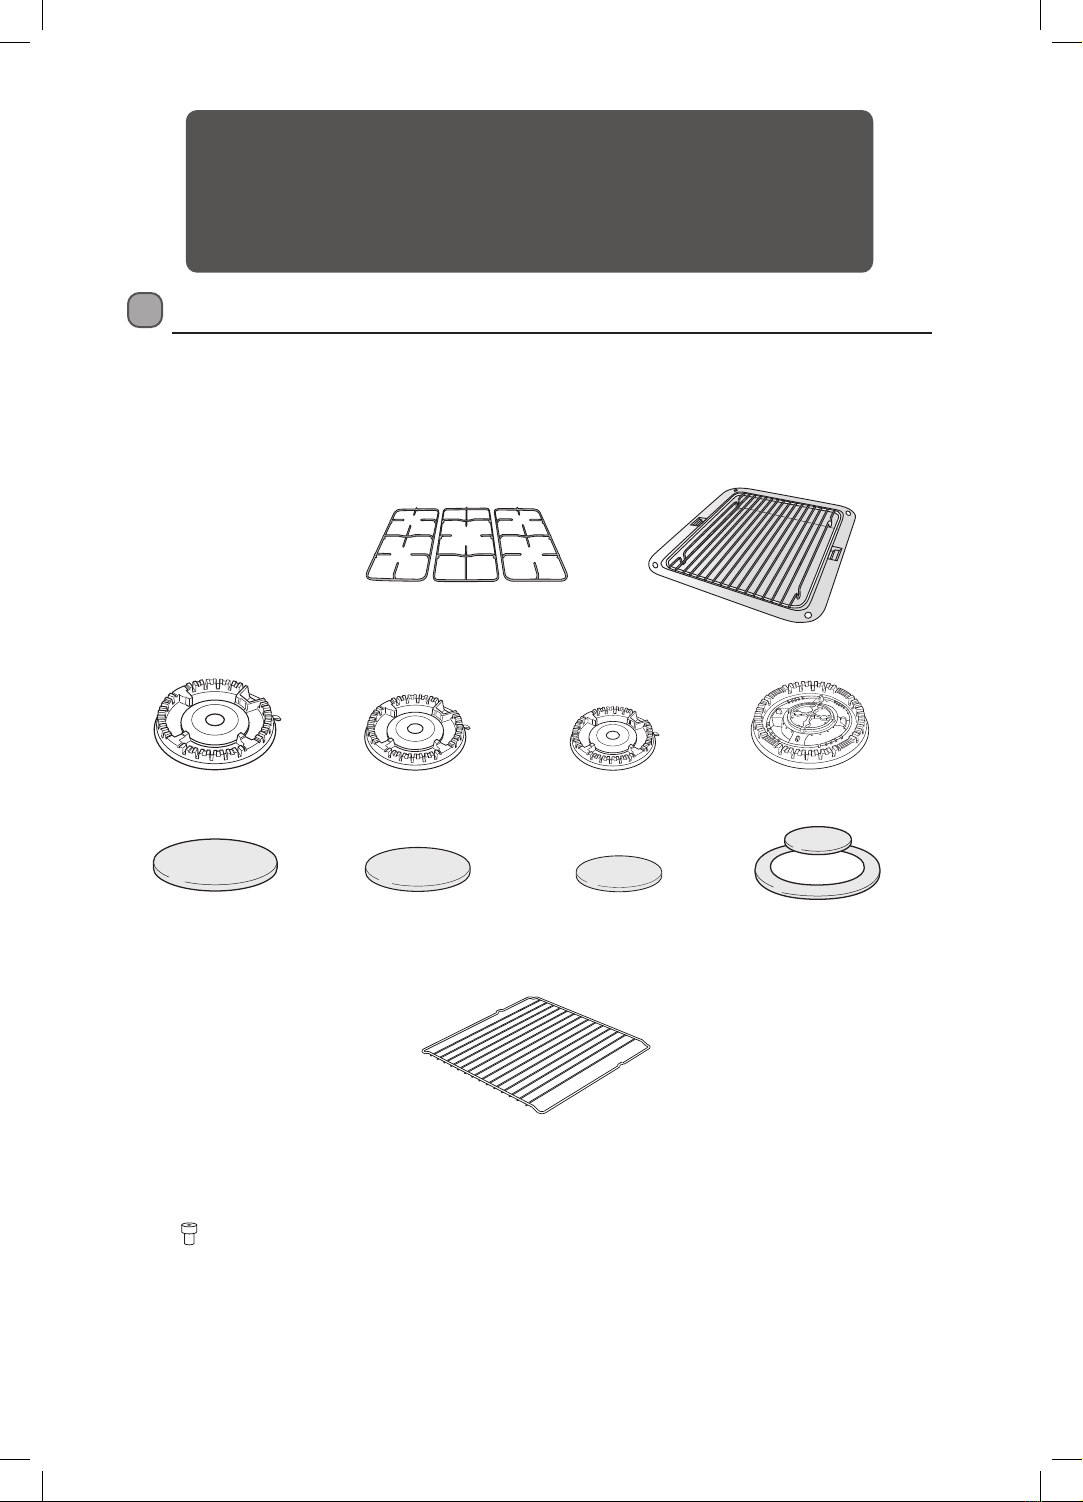
Unpacking..................................................................................................................................... 7
Product Overview......................................................................................................................... 8
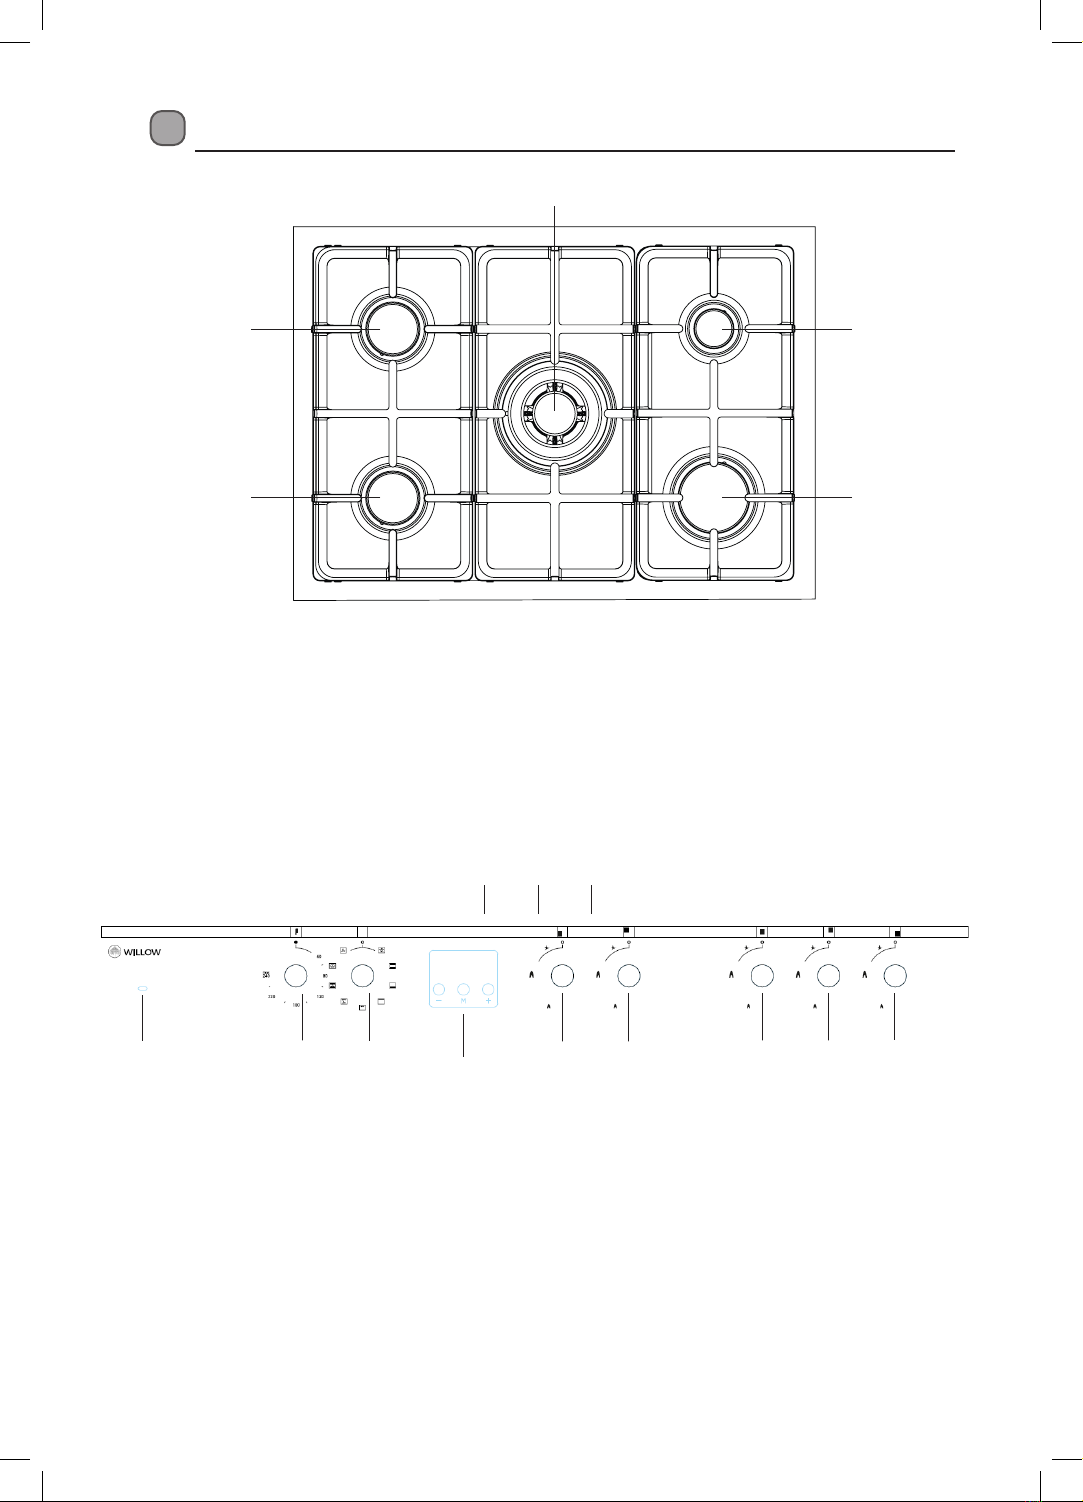
The Hob........................................................................................................................................................................8
Control Panel..............................................................................................................................................................8
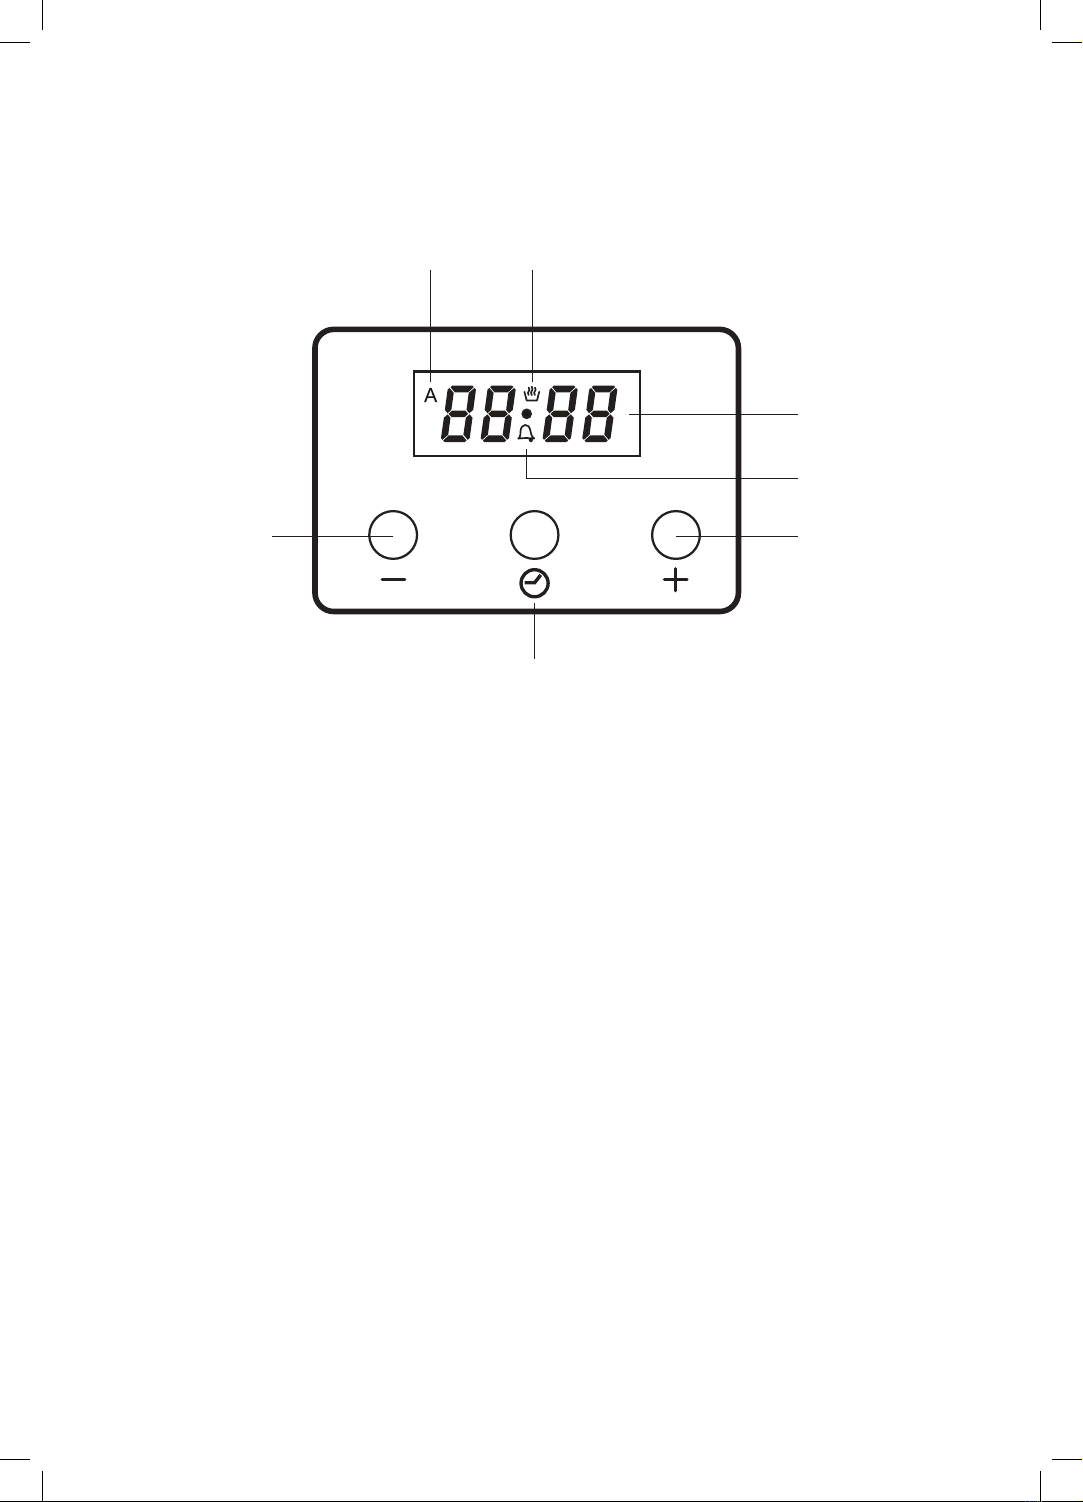
Timer/Programmer Display...................................................................................................................................9
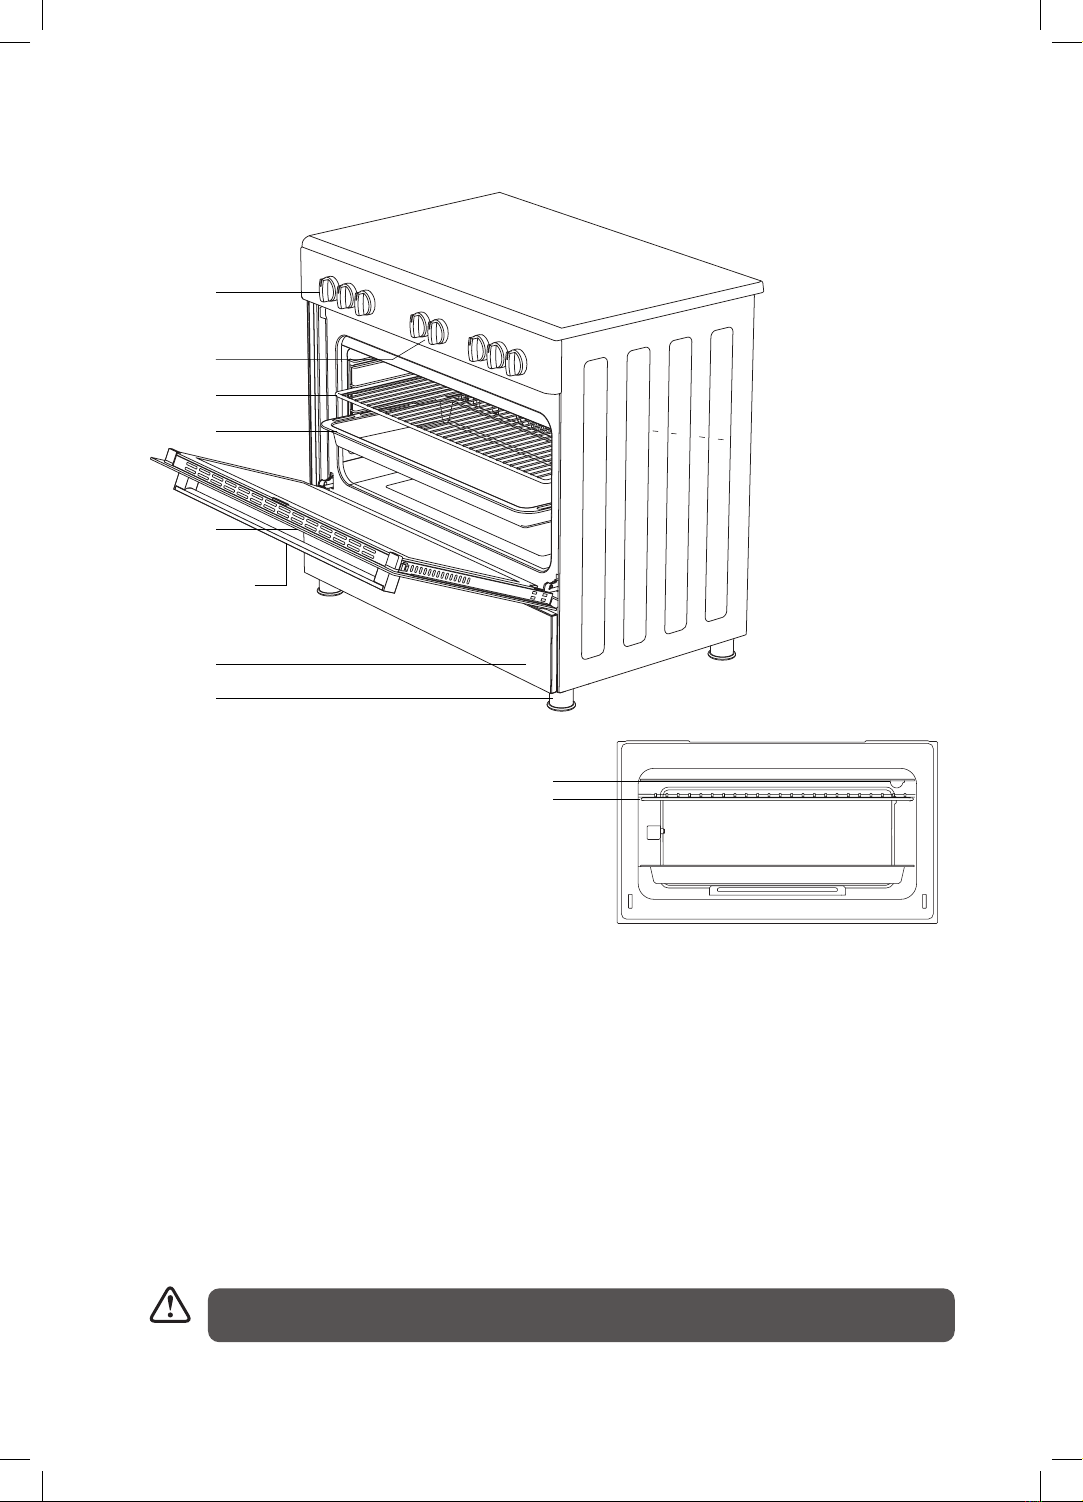
Oven...........................................................................................................................................................................10
Setting the Clock ........................................................................................................................ 11
Before Using the Hob ................................................................................................................. 12
Lighting the Hob......................................................................................................................... 12
Flame Failure Safety Feature ..................................................................................................... 13
If the Burner Does Not Light...................................................................................................... 13
If the Flame is Irregular .............................................................................................................. 13
Electricity Failure........................................................................................................................ 13
Cookware Guidelines ................................................................................................................. 14
Using the Oven ........................................................................................................................... 15
First Time Use of the Oven .................................................................................................................................15
Oven Controls ............................................................................................................................. 15
Right Oven Shelf Positions.................................................................................................................................16
Left Bottom Oven Shelf Positions....................................................................................................................16
Replacing the Anti-tilting Oven Shelf ............................................................................................................16
Preheating................................................................................................................................................................17
Cooking.....................................................................................................................................................................17
Baking Tips...............................................................................................................................................................17
Cooking with the Grill ................................................................................................................ 18
Grill Shelf Positions ...............................................................................................................................................19
Setting a Timer............................................................................................................................ 20
Cancelling the Buzzer sound.............................................................................................................................20
Setting a Cooking Timer............................................................................................................. 21
Setting a Cooking Timer with a Finish Time ............................................................................. 22
Using the Storage Compartment .............................................................................................. 24
Cleaning and Maintenance........................................................................................................ 25
Cleaning the Gas Hob................................................................................................................. 25
Burner Parts and Pan Supports ................................................................................................. 26
Replacing the Burners................................................................................................................ 26
Hob Controls ............................................................................................................................... 26
Cleaning Instructions ................................................................................................................. 27
Cleaning the Outside of the Cooker...............................................................................................................27
Cleaning the Oven Door Glass..........................................................................................................................27
Cleaning the Inside of Your Cooker.................................................................................................................28
Removing the Grill Door ............................................................................................................ 28

Hints and Tips ............................................................................................................................. 29
Removing the Door Glass .......................................................................................................... 30
Replacing the Oven Lamps ........................................................................................................ 30
Installation .................................................................................................................................. 31
Adjusting the Feet ...................................................................................................................... 32
Moving the Cooker ..................................................................................................................... 32
Stability Chain ............................................................................................................................ 32
Ventilation Requirements.......................................................................................................... 33
Gas Installation........................................................................................................................... 33
Installation and Service Regulations ........................................................................................ 33
Gas Connection........................................................................................................................... 34
Installation Relevant to Natural Gas ............................................................................................................... 34
Installation Relevant to Liquid Petroleum Gas (LPG)................................................................................ 34
To Connect the Gas Supply................................................................................................................................ 34
Replacement of Burner Injectors .............................................................................................. 35
To Replace the Hob Injectors ............................................................................................................................ 35
Adjusting the Reduced Flame Position ......................................................................................................... 35
Injector Size Table....................................................................................................................... 36
Electrical Connection ................................................................................................................. 37
Energy Saving Tips ..................................................................................................................... 38
Product Fiche and Specications .............................................................................................. 39
Product Support Information .................................................................................................... 41

4
Safety Warnings
IMPORTANT SAFETY INSTRUCTIONS
READ CAREFULLY AND KEEP FOR FUTURE REFERENCE
• This appliance must be installed by a qualied Gas Safe registered
engineer. The manufacturer is not responsible for any damage caused
by incorrect installation.
• Check whether there is any damage to the appliance after you have
unpacked it. If any damage is found, do not use the appliance and
contact the store where you purchased it.
• This appliance is for indoor domestic use only.
• This appliance is for cooking purposes only. It must not be used for other
purposes, for example room heating.
• For disconnection from the mains supply you must have a switch with
a contact separation of at least 3.0 mm in all poles and rated 32 Amp that
provides full disconnection, this must be incorporated in the xed wiring
in accordance with the local wiring rules.
• If the mains cable gets damaged, it should be replaced by an authorized
service agent or qualied electrician in order to avoid a hazard.
• The cooker must be used in a well ventilated location and installed on
at / level surface.
• Only operate your appliance in a dry atmosphere.
• Keep the electrical cables of your other appliances away from hot areas;
do not let them touch the appliance.
• Ensure that the appliance is switched o at the mains supply switch
and allowed to completely cool down before cleaning, replacing the
oven lamp or performing any maintenance to avoid the possibility of an
electric shock or burns.
• The use of a gas cooking appliance results in the production of heat,
moisture and products of combustion in the room in which it is installed.
Ensure that the kitchen is well ventilated especially when the appliance
is in use. Keep natural ventilation holes open or install a mechanical
ventilation device (mechanical extractor hood).

5
• Prolonged intensive use of the appliance may call for additional ventilation,
for example opening of a window, or more eective ventilation, for
example increasing the level of mechanical ventilation where present.
• This appliance can be used by children aged from 8 years and above
and persons with reduced physical, sensory or mental capabilities or
lack of experience and knowledge if they have been given supervision
or instruction concerning use of the appliance in a safe way and
understand the hazards involved.
• Cleaning and user maintenance shall not be made by children without
supervision.
• Children should be supervised to ensure that they do not play with
the appliance.
• During use the appliance becomes hot. Care should be taken to avoid
touching the parts inside the oven or the hob burners/pan stands.
• The appliance and its accessible parts may become hot during use.
Young children should be kept away.
• Unattended cooking on a hob with fat or oil can be dangerous and may
result in re. NEVER try to extinguish a re with water, but switch o the
appliance and then cover the ame e.g. with a lid or a re blanket.
• Danger of re: Do not store items on the cooking surfaces.
• When the hob is hot never touch any parts that get hot. Allow the hob to
cool before touching these parts.
• When the oven is hot never touch the oven glass or any other parts that
get hot. Allow the oven to cool before touching these parts.
• Do not use harsh abrasives cleaners or sharp metal scrapers to clean the
oven door glass since they can scratch the surface, which may result in
the glass shattering.
• Before starting to use your appliance, keep curtains, tulle, paper or
ammable materials away from your appliance.
• Do not keep combustible or ammable things in, on or near the appliance.
• Do not use steam cleaners for cleaning the appliance.
• Do not rest any items on the open door and do not let children climb on
or stand on it.

6
• Take care when handling parts with glass, knocks, chips, heavy handling
and dropping could cause the glass to shatter.
• The glass doors use toughened glass and are designed to break into
many‘nugget’ size pieces if it breaks. These pieces will still have sharp
edges, please handle broken glass with care.
• The appliance is not intended to be operated by means of an external
timer or separate remote-control system.
• This appliance is not designed to be used with hob guards. Use of
inappropriate hob guards can cause accidents.
• The inside surface of storage compartment may be hot during use. Care
should be taken to avoid touching inside surfaces.
• To prevent the appliance tipping, the stabilizing
bracket must be installed.

7
Unpacking
Remove all packaging from the unit. Retain the packaging. If you dispose of it please do so according to local
regulations.
The following items are included:
Oven Shelf × 2
Thank you on the purchase of your new Dual Fuel Range Cooker.
You must read this manual in order to fully understand how to operate it correctly.
This unit MUST be installed by a competent and registered engineer (Gas Safe in the UK).
Please allow the installer to view the installation section of this manual.
Read all the safety warnings carefully before use and keep this manual for future reference.
* All images are for indication only; please refer to your individual unit for actual item.
LPG Conversion Kit:
LPG Nozzle × 5
Pan Support (Left/Middle/Right) × 3 Grill Pan set x 1
100 mm Burner Ring × 1
100 mm Burner Cap × 1
75 mm Burner Ring × 2
75 mm Burner Cap × 2
55 mm Burner Ring × 1 Multi Ring Burner Ring × 1
55 mm Burner Cap × 1 67 mm & 135 mm Multi
Ring Burner Cap × 1

8
Control Panel
1. Oven Thermostat indicator
2. Oven Temperature Control
3. Oven Programme Control
4. 3 button Digital Timer
5. Front left Hob Control
6. Back Left Hob Control
7. Middle Multi Ring Hob Control
8. Back Right Hob Control
9. Front Right Hob Control
123456789
* All images are for indication only; please refer to your individual unit for actual item.
Product Overview
6 8 10
The Hob
1. Standard Burner (75 mm)
2. Multi Ring Burner (middle 60mm, outer 130mm)
3. Small Burner (55 mm)
4. Large Burner (100 mm)
1 3
41
2

9
Timer/Programmer Display
1 2
3
4
57
6
1. Auto Cook Symbol
2. Manual Cook Symbol
3. Time Display
4. Timer Symbol
5. + Button
6. Option Button
7. - Button

10
Oven
1. Control Panel
2. Hob Controls
3. Wire grill tray
4. Deep Grill Tray **
5. Oven Door
6. Oven Handle
7. Lower Cabinet Door
8. Plastic Legs
9. Oven Lamp
10. Grill
The inside surface of storage compartment may be hot during use. Care should be taken to avoid
touching inside surfaces.
NOTE: your model may have a different number of shelves to illistration.
6
1
2
3
4
7
8
5
9
10
** Not included with this model

11
Setting the Clock
Your cooker has a 24 hour digital clock that must be set before you can use the left bottom oven.
1. When you switch your cooker on for
the first time the number in the display
will be flashing. Press the Option
button. The Manual cook icon will be
displayed and the dot will now be
flashing.
2. Press the +and -buttons to adjust the
time.
3. Once you have set the time wait a few
seconds, the dot will stop flashing and
the time is now set.

12
Lighting the Hob
1. Choose the control for the burner you want to use.
2. Press and hold the Burner control in. The spark ignition will
operate whilst you hold in the control. While pressing the
burner control down, turn it anti-clockwise to the large flame
symbol . Continue to hold the control in for approximately
5-10 seconds after the burner has lit. Releasing the control too
soon can extinguish the flame due to the flame failure safety
feature.
Manual Ignition (in case of electricity failure)
To ignite one of the burners, press and turn the control counter-clockwise so that the control is at the
position. Hold an ignition source (e.g. candle lighter) close to the upper edge of the burner. Move the
ignition source away as soon as you see a stable flame. Continue holding the control in for approximately
5-10 seconds after the burner has lit. Releasing the control too soon will extinguish the flame due to the
flame failure safety feature.
3. Adjust the flame anywhere between the and positions. Do not adjust the flame between the and Off
position.
4. After ignition, check the flames visually. If you see yellow tipped, lifted or unstable flames; turn the control
off. Allow the burners to cool before touching, then check the assembly of the burner rings and caps. Also,
make sure that no liquid has entered into the burner cups. If the burner flames go out accidentally, turn the
burners off, and do not try to light them again for at least 60 seconds (to allow the gas to disperse).
5. When turning the hob off, turn the control in a clockwise direction to the off mark, ‘O’.
Before Using the Hob
Before using your new hob, please:
•Read this manual fully taking special note of the ‘Safety Warnings’ section.
•Make sure the cooker is connected to the mains supply so that the ignition circuit will work.
O
High
Low
•If the burner does not light within 15 seconds, turn the control off and wait for at least 60 seconds
before trying again.
•To switch the burner off, turn the control clockwise to the off ‘O’ position.
•After use, always turn the controls to the off position.
This appliance is for cooking purposes only. It must not be used for other purposes, e.g. room
heating.
•This appliance is for cooking purposes only. It must not be used for other purposes, for example
room heating.
•The use of a gas cooking appliance results in the production of heat, moisture and products of
combustion in the room in which it is installed. Ensure that the kitchen is well ventilated especially
when the appliance is in use: keep natural ventilation holes open or install a mechanical ventilation
device (mechanical extractor hood). Prolonged intensive use of the appliance may call for
additional ventilation, e.g. opening of a window, or more effective ventilation, e.g. increasing the
level of mechanical ventilation where present.
* All images are for indication only; please refer to your individual unit for actual item.

13
Electricity Failure
If there is an electricity failure, you can still use your hob. Light the burners by holding an ignition source (e.g.
candle lighter) close to the side of the burner and turning the control to the High position to light the gas. The
controls must still be held down for 5 – 10 seconds after the burner has lit. Releasing the controls too soon will
extinguish the flame. Adjust the controls as required.
Flame Failure Safety Feature
The flame supervision device (FSD) probe cuts off the gas supply to the burner within one minute if the flame is
extinguished. Gas will flow out of the burner until the FSD cools down and activates, so you may notice the smell
of gas, this is normal.
If the flames are accidentally extinguished, turn off the burner and do not try to light it again for at least one
minute (to allow the gas to disperse).
When lighting the burner, hold down the control for approximately 5 – 10 seconds after the burner has lit.
Releasing the control too soon will extinguish the flame.
If the Burner Does Not Light
If the burner does not light, check that:
•The hob is connected to the electrical supply and the supply is switched on.
•The gas is turned on.
•You have held down the control for at least 5 – 10 seconds after the flame has been lit.
•The ignitors are sparking. If the ignitors are not sparking, they may be dirty or wet. Clean them gently with a
small nylon brush such as a toothbrush as shown below. Ensure the electrical supply has been disconnected
before cleaning.
If the Flame is Irregular
If the flame is yellow or irregular, check that the burner parts, including the burner cap (allow to cool before
touching), are:
•Clean and dry.
•Positioned correctly. See ‘Replacing the Burners’.
•Also see ‘Hints and Tips’.
Ignitor
Flame failure
probe
Burner Cap
Electrode Burner Ring
To avoid damage to
the ignition circuit
NEVER light the hob
when the burners are
not in place.
* All images are for indication only; please refer to your individual unit for actual item.

14
•Do not use large saucepans or frying pans that overlap the edges of your hob as this can deflect heat onto
your worktop and damage the surface, and may also cause a hazard.
•Always make sure saucepans are stable. Using very heavy saucepans may bend the trivet/pan support or
deflect the flame.
•Always lift the cookware when removing from the hob, do not drag.
•When you need to boil, simmer or fry food, first set the temperature to the High position.
Once the liquid is boiling, reduce the temperature to maintain a steady heat to cook your food thoroughly.
Doing this will reduce the cooking time and save energy.
•Pan sizes should be as per the table shown below.
Burners Minimum Diameter Maximum Diameter
Large (100mm) 22 cm 26 cm
Standard (75mm) 18 cm 22 cm
Small (55 mm) 12 cm 18 cm
Multi Ring
(middle 67mm, outer 135mm) 28 cm N/A
Cookware Guidelines
To get the best out of your hob, follow these simple suggestions:
•Use saucepans with thick flat bottoms. Food in a saucepan with an uneven bottom will take longer to cook.
•Using a lid will reduce cooking times and save energy.
•When liquid comes to a boil, reduce the temperature setting to maintain the desired level of boiling.
•Choose cookware of the proper size, material and construction.
•Minimise the amount of liquid or fat to reduce cooking times.
•Select the proper temperature setting for the cooking task.
Do not use cooking vessels on the hob that overlap its edges.
* All images are for indication only; please refer to your individual unit for actual item.

15
Using the Oven
First Time Use of the Oven
Ensure that nothing has been left in the oven and that the room is well ventilated. Remove any insert cards or
plastic bags. Before connecting the power, use a damp cloth to carefully wipe the inner cavity wall and housing.
Clean all the detachable parts in hot, soapy water before using.
Heat the appliance on maximum, making sure the room is well ventilated as there may be a little smoke and
odour. This is normal, and is due to the protective substance on the appliance which protects it during shipping
from the factory. Switch the appliance off once the smoke and odour has stopped. This can take
up to 30 minutes.
•Under no circumstances should the oven be lined with aluminium foil as overheating may occur.
•Do not place dishes or baking trays directly onto the base of the oven as it becomes very hot and
damage may occur.
•Bread may catch fire if the toasting time is too long. Close supervision is necessary during toasting.
•During use, this appliance becomes hot. Care should be taken to avoid touching hot surfaces,
e.g., oven door, heating elements.
•Accessible parts may become hot when in use. Children should be kept away.
•Do not leave the handle in position when grilling. If the handle is left in position when grilling,
it will get very hot.
Function Description
Top and Bottom Elements
The oven’s light will turn on and the top and bottom elements will switch on. The temperature can
be set using the control knob. This function is ideal for cooking joints of meat.
Top Element
The oven’s light will turn on and the top element will switch on. This function has no temperature
settings, the element will be full on.
Bottom Element
The oven’s light will turn on and the bottom element will switch on. This function has no
temperature settings, the element will be full on.
Fan Function
The oven’s light will turn on and the fan element will switch on.
This function is ideal for baking and cooking food on multiple shelves at the same temperature.
Oven Controls
To use the oven simply turn the oven control to your desire. The oven light will switch on and the oven fan will
start. The thermostat light will illuminate while the oven is heating up to temperature and go out once it meets
the desired temperature.
Oven
The clock must
be set to use the
oven.

16
Oven Shelf Positions
1. On the wall of the inner cavity there are 4
different shelf guide slots in the oven. You
can place the shelf at different heights to
achieve the best cooking performance
depending on the heat of the heating
elements and the size of food. If only the
top heating element is on, we suggest
that you place the shelf on guide 3 (make
sure that there is a minimum distance of
30 mm between the food and the top
heating element).
2. Always monitor the food during
operation to ensure that you are not
overcooking it.
3. For heavy food, use a baking pan rather
than the oven shelf.
Guide 4
Guide 3
Guide 2
Guide 1
Replacing the Anti-tilting Oven Shelf
•Insert the shelf between the two side rails.
•To remove, slide the shelf out and when it hits the shelf
stop, angle the shelf up slightly and remove.
NOTE: your model may have a different number of shelves to
illistration
Function Description
Grill
The oven's light will turn on.
This function is great for browning and fast finishing of meals.
Grill with Fan
The oven’s light will turn on and the top grill will switch on. This function will turn element grill
full on whilst the fan circulates the heat.
Lower and Upper Heating Element with Fan
The oven’s light will turn on and the bottom and top element will switch on. This function will
have the full fan and heating elements to give you an even bake, roast or cook.
Fan
This is a function that just activates the fan to circulate air around. This acts as a mechanism to
help defrost food.
Lamp
This will turn on when any function is selected.

17
Preheating
When you need to preheat the oven, we recommend you do so for 10 minutes. For recipes needing high
temperatures, e.g. bread, pastries, scones, soufflés etc., best results are achieved if the oven is preheated first.
For best results when cooking frozen or cooked chilled ready meals always preheat the oven first, unless the
cooking instructions advise you otherwise.
Cooking
•Ensure that food is placed centrally on the shelf and that there is sufficient room around the baking tray/dish
to allow for maximum heat circulation.
•Stand dishes on a suitably sized baking tray on the shelf to prevent spillage onto the oven base and to help
reduce cleaning.
•The material and finish of the baking tray and dishes used affect browning of the bottom of the food.
Enamel-ware, dark, heavy or non-stick utensils increase browning of the bottom of the food. Shiny aluminium
or polished steel trays reflect the heat away and give less browning of the bottom of the food.
•When cooking more than one dish in the oven, place dishes centrally on different shelves rather than cluster
several dishes on one shelf, this will allow the heat to circulate freely for the best cooking results.
•If you are cooking more than one tray of similar items, for example cakes or biscuits, swap the trays during
cooking or you can remove the top tray when the food is cooked and move the lower tray to the higher shelf
to finish cooking.
•Do not place baking trays directly on the oven base as it interferes with the oven air circulation and can lead to
burning of the food. Use the lower shelf position.
•During cooking, do not open the door unnecessarily as you will lose heat and your cooking results may
changed. Cooking times will be longer and energy use will be higher.
•At the end of cooking time, as in all other cooking processes; turn the control to the “0” position (off). Take the
cooking tray out and put it onto a safe place (NOT on the oven door) as it will be hot. Keep children away from
the hot oven during and after cooking, until it has completely cooled down.
Baking Tips
1. Always place baking tins in the centre of the wire shelf.
2. Make sure you use bakeware that is oven proof and suitable for your recipe.
3. Do not place bakeware too close to the rear of the oven wall.
4. You can influence the degree of browning by changing the temperature setting.
5. If a cake collapses after removing it from the oven:
•Use less liquid on your next attempt.
•Consider using a longer baking time or use a slightly lower temperature setting.
•During use, the outer and inner surfaces of the oven get hot. While opening the oven door,
step back to avoid the hot steam coming out of the oven. There may be a risk of burns.
•Always use oven gloves to remove and replace food in the oven.

18
Cooking with the Grill
Before using the grill for the first time, switch the grill on for 15 ~ 20 minutes. Ensure that the room is well
ventilated as there may be a little smoke and odour upon initial start up (for about 10 mins). This is normal.
It is due to the protective substance on the heating elements which protects the cooker from the effects
of corrosion during shipping from the factory.
• The door must be kept closed when using the grill.
1. To use the grill simply turn the grill control to your desired temperature. The grill light will switch on. The
thermostat light will illuminate while the grill is heating up to temperature and go out once it meets the
desired temperature. Insert an oven shelf at your desired level, the closer to the elements the more intense
the heat with be. There must be at least 30 mm between the top of the food and the element.
2. Using heatproof oven gloves insert the grill pan and rack onto the shelf. Make sure you leave at least 30mm
of space between the top of the food and the grill element. The food to be cooked must be placed on the
grill rack in the grill pan. Close the oven door. Check the food regularly to ensure you do not overcook it.
3. At the end of grilling, as in all other cooking processes; turn the grill function control to the “ 0 ” position
(off). Carefully take the grill pan out by using heatproof oven gloves and put the pan onto a safe place.
Function Description
Grill Function
The grills light and grill heating element will turn on.
The grill function is used for grilling and toasting foods, use any shelf position, just make sure the
top of the food you are grilling is 30mm from the grill element. Its recommended to pre-heat the
grill for about 10 minutes.
•When using the grill the grill door must be closed.
•Never cover the grill pan or grill rack with foil as this can lead to grill fires.
•Bread may catch fire if the toasting time is too long. Close supervision is necessary during toasting.
•During use this appliance becomes hot. Care should be taken to avoid touching hot surfaces,
e.g. grill door.
•Accessible parts may become hot when in use. Children should be kept away.

19
Grill Shelf Positions
1. On the wall of the inner cavity there are 2
different shelf guide slots in the grill. You
can place the shelf at different heights to
achieve the best cooking performance
depending on the heat of the heating
elements and the size of food (make sure
that there is a minimum distance of 30
mm between the top of the food and
heating element).
2. Always monitor the food during
operation to ensure that you are not
overcooking it.
3. For heavy food, use a baking pan rather
than the oven shelf.
Guide 2
Guide 1
NOTE: your model may have a different number of shelves to
illistration

20
Setting a Timer
You can use the Timer/Programmer to set a timer. This will count down from your desired time then sound a
buzzer when the time has elapsed.
1. Press the OPTION button once. The timer
icon ( ) will start to flash in the display.
2. Now you need to set the time for the timer.
While the timer icon ( ) is flashing press the
+ and - buttons to select the timer time.
3. Now wait a few seconds. The timer icon (
) will stop flashing and the timer will be set
and start to count down. The display will now
revert back to the current time.
Cancelling the Buzzer sound
The buzzer will sound to indicate your timer has finished. Press any button to cancel the buzzing sound. The
timer icon ( ) will disappear from the display.
This manual suits for next models
1
Table of contents
Other Willow Cooker manuals
Popular Cooker manuals by other brands

Sharp
Sharp K-71F28BM2-EU user manual

Bosch
Bosch HSG736355M instruction manual

AEG
AEG COMPETENCE 5210V operating instructions

Tricity Bendix
Tricity Bendix CSIE508 Operating and installation instructions

Beko
Beko D533 Installation & operating instructions and cooking guidance

Indesit
Indesit KN3G11S/NL operating instructions

Creda
Creda HB49119 Instruction and recipe book

Indesit
Indesit K3G11/AUS operating instructions

Pitco
Pitco PG14D Installation and operation manual

point
point POIC50 user manual

Hotpoint
Hotpoint EW72 Instructions for installation and use

Tricity Bendix
Tricity Bendix SG552D Operating & installation instructions