manuals.online logo
Brands
  1. Home
  2. •
  3. Brands
  4. •
  5. WilTec
  6. •
  7. Swimming Pool Vacuum
  8. •
  9. WilTec Naia HJ1009 User manual

WilTec Naia HJ1009 User manual

This manual suits for next models

1

Popular Swimming Pool Vacuum manuals by other brands

POOLGOODS PoolGobbler Pro user guide

POOLGOODS

POOLGOODS PoolGobbler Pro user guide

Maytronics Dolphin POOL UP operating instructions

Maytronics

Maytronics Dolphin POOL UP operating instructions

iRobot Verro 600 owner's manual

iRobot

iRobot Verro 600 owner's manual

Kokido SKOOBA K535CBX/18/EU user manual

Kokido

Kokido SKOOBA K535CBX/18/EU user manual

SmartPool Robo-Kleen PLUS user manual

SmartPool

SmartPool Robo-Kleen PLUS user manual

Brilix BARACUDA Installation and user guide

Brilix

Brilix BARACUDA Installation and user guide

Aiper Orca 1200 Pro user manual

Aiper

Aiper Orca 1200 Pro user manual

Hayward Navigator Pro manual

Hayward

Hayward Navigator Pro manual

Polaris Vac-Sweep 380 owner's manual

Polaris

Polaris Vac-Sweep 380 owner's manual

Pentair Prowler 710 Installation and user guide

Pentair

Pentair Prowler 710 Installation and user guide

BWT D500 quick start guide

BWT

BWT D500 quick start guide

Kokido xtrovac 70 instructions

Kokido

Kokido xtrovac 70 instructions

Pentair RACER Installation and user guide

Pentair

Pentair RACER Installation and user guide

Pentair REBEL 2 owner's manual

Pentair

Pentair REBEL 2 owner's manual

Zodiac VX55 4WD owner's manual

Zodiac

Zodiac VX55 4WD owner's manual

SmartPool Robo Kleen Plus user guide

SmartPool

SmartPool Robo Kleen Plus user guide

Steinbach Twin ORIGINAL OWNER'S MANUAL

Steinbach

Steinbach Twin ORIGINAL OWNER'S MANUAL

STA-RITE PoolShark Vacuum owner's manual

STA-RITE

STA-RITE PoolShark Vacuum owner's manual

manuals.online logo
manuals.online logoBrands
  • About & Mission
  • Contact us
  • Privacy Policy
  • Terms and Conditions

Copyright 2025 Manuals.Online. All Rights Reserved.

Instruction Manual
Pool Cleaning Robot
Naia HJ1009
63229
Illustration similar, may vary depending on model
Please read and follow the operating instructions and safety information prior to initial operation.
Technical changes reserved!
Illustrations, functional steps and technical data may deviate insignificantly due to continuous further
developments.
© by WilTec Wildanger Technik GmbH Item 63229 Page 2
http://www.WilTec.de
http://www.aoyue.eu 09 2021-1
http://www.teichtip.de
The information contained in this document may alter at any time without prior notice. No part of this
document may be copied or otherwise duplicated without prior written consent. All rights reserved.
WilTec Wildanger Technik GmbH cannot be held liable for any possible mistakes in this operating man-
ual, nor in the diagrams and illustrations shown.
Although WilTec Wildanger Technik GmbH has made every possible effort to ensure that this operating
manual is complete, accurate and up-to-date, errors cannot be ruled out entirely.
If you have found an error or wish to suggest an improvement, we look forward to hearing from you.
Send us an e-mail to:
[email protected]
or use our contact form:
https://www.wiltec.de/contacts/
The most recent version of this manual in several languages can be found in our online shop:
https://www.wiltec.de/docsearch
Our postal address is:
WilTec Wildanger Technik GmbH
Königsbenden 12
52249 Eschweiler Germany
Do you wish to collect your goods? Our address for collection is:
WilTec Wildanger Technik GmbH
Königsbenden 28
52249 Eschweiler Germany
In order to shorten the waiting time and to allow for an easy on-site processing, we kindly ask you to
contact us briefly beforehand or to place your order via the webshop.
E-mail: service@wiltec.info
Phone: +49 2403 55592-0
Fax: +49 2403 55592-15
To return your goods for exchange, repair or other purposes, please use the following address. Atten-
tion! To allow for a trouble-free complaint or return, it is important to contact our customer service team
before returning your goods.
Retourenabteilung
WilTec Wildanger Technik GmbH
Königsbenden 28
52249 Eschweiler Germany
E-mail: [email protected]o
Phone: +49 2403 55592-0
Fax: (+49 2403 55592-15)
© by WilTec Wildanger Technik GmbH Item 63229 Page 3
http://www.WilTec.de
http://www.aoyue.eu 09 2021-1
http://www.teichtip.de
Introduction
Thank you for choosing to purchase this quality product. To minimise the risk of injury, we ask you to
always take some basic safety precautions when using this product. Please read this operating manual
carefully and make sure that you understand it.
Keep these operation instructions in a safe place.
Safety instructions
•This model is especially suitable for pools with flat floor; follow the corresponding instructions in
this manual if your pool has a sloped floor.
•To avoid serious damage to your robot, never switch the device on when it is not in the pool.
•The power cable must be connected to an appropriate earthed socket. Only operate the device
with a residual current protective device with a triggering amperage of max. 30 mA.
•Do not operate the robot while persons are in the pool.
•Do not try to move the floating bodies alongside the power cable. Always leave them at their
initial positions.
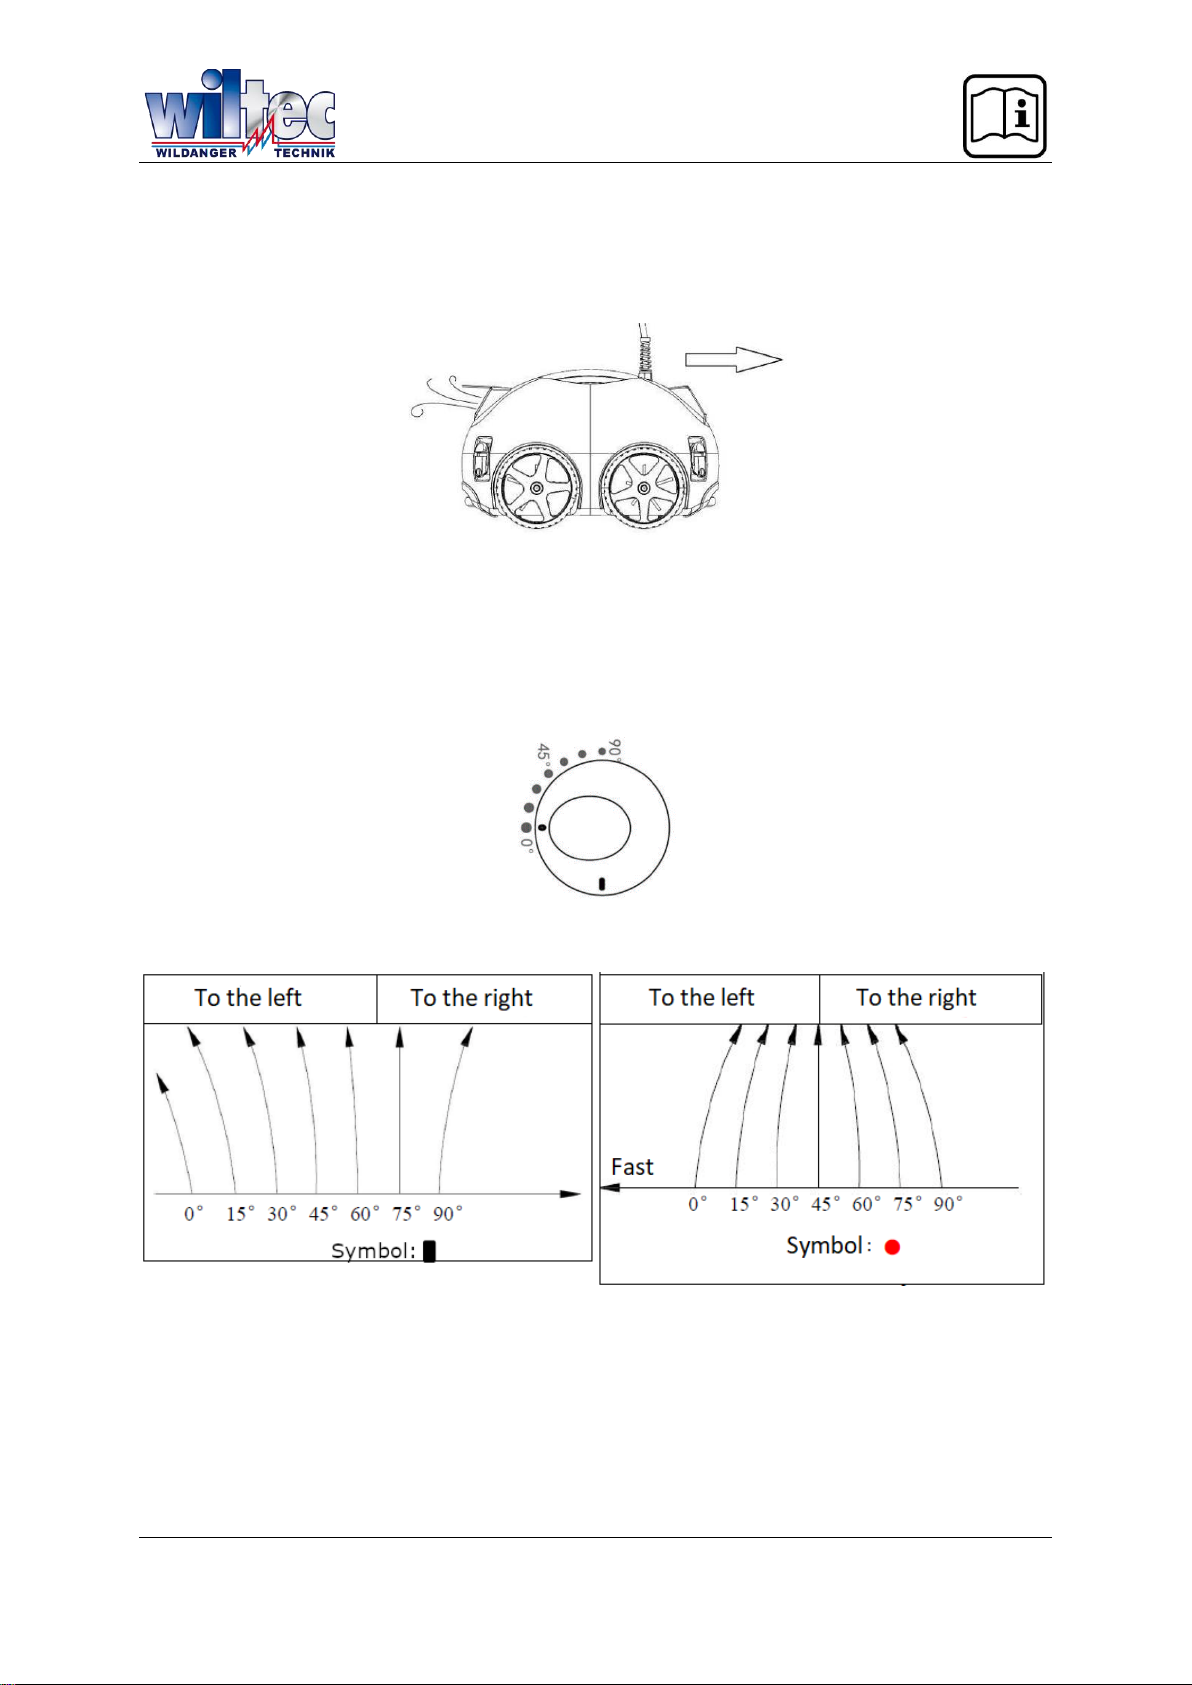
•Before switching the device on, make sure that the cable is completely unrolled to avoid any
rolling-up of the cable which would impair the efficiency of the robot or damage it.
•The filter bag must be cleaned before or after each use. This avoids that contaminations of the
filter bag impairs the normal operation if the robot.
•When not in use, the robot must be stored in a cool and well-ventilated place and not in direct
sunlight.
•The power-supply unit must be place in a shadowy place. To avoid any overheating and possi-
ble consequential damage of components, never cover the power-supply unit.
•The robot and motor unit should only be opened and/or repaired by qualified persons.
•To avoid any accidents or damages, the power-supply unit should be placed at a min. distance
of 3.5 m from the edge of the pool.
•Do not use the device in other working conditions than those stated in this manual. Only use
the device according to the intended use defined in this manual.
•Do not remove the protective film of the control panel.
•Close the pool filter system when you use the robot.
Other instructions
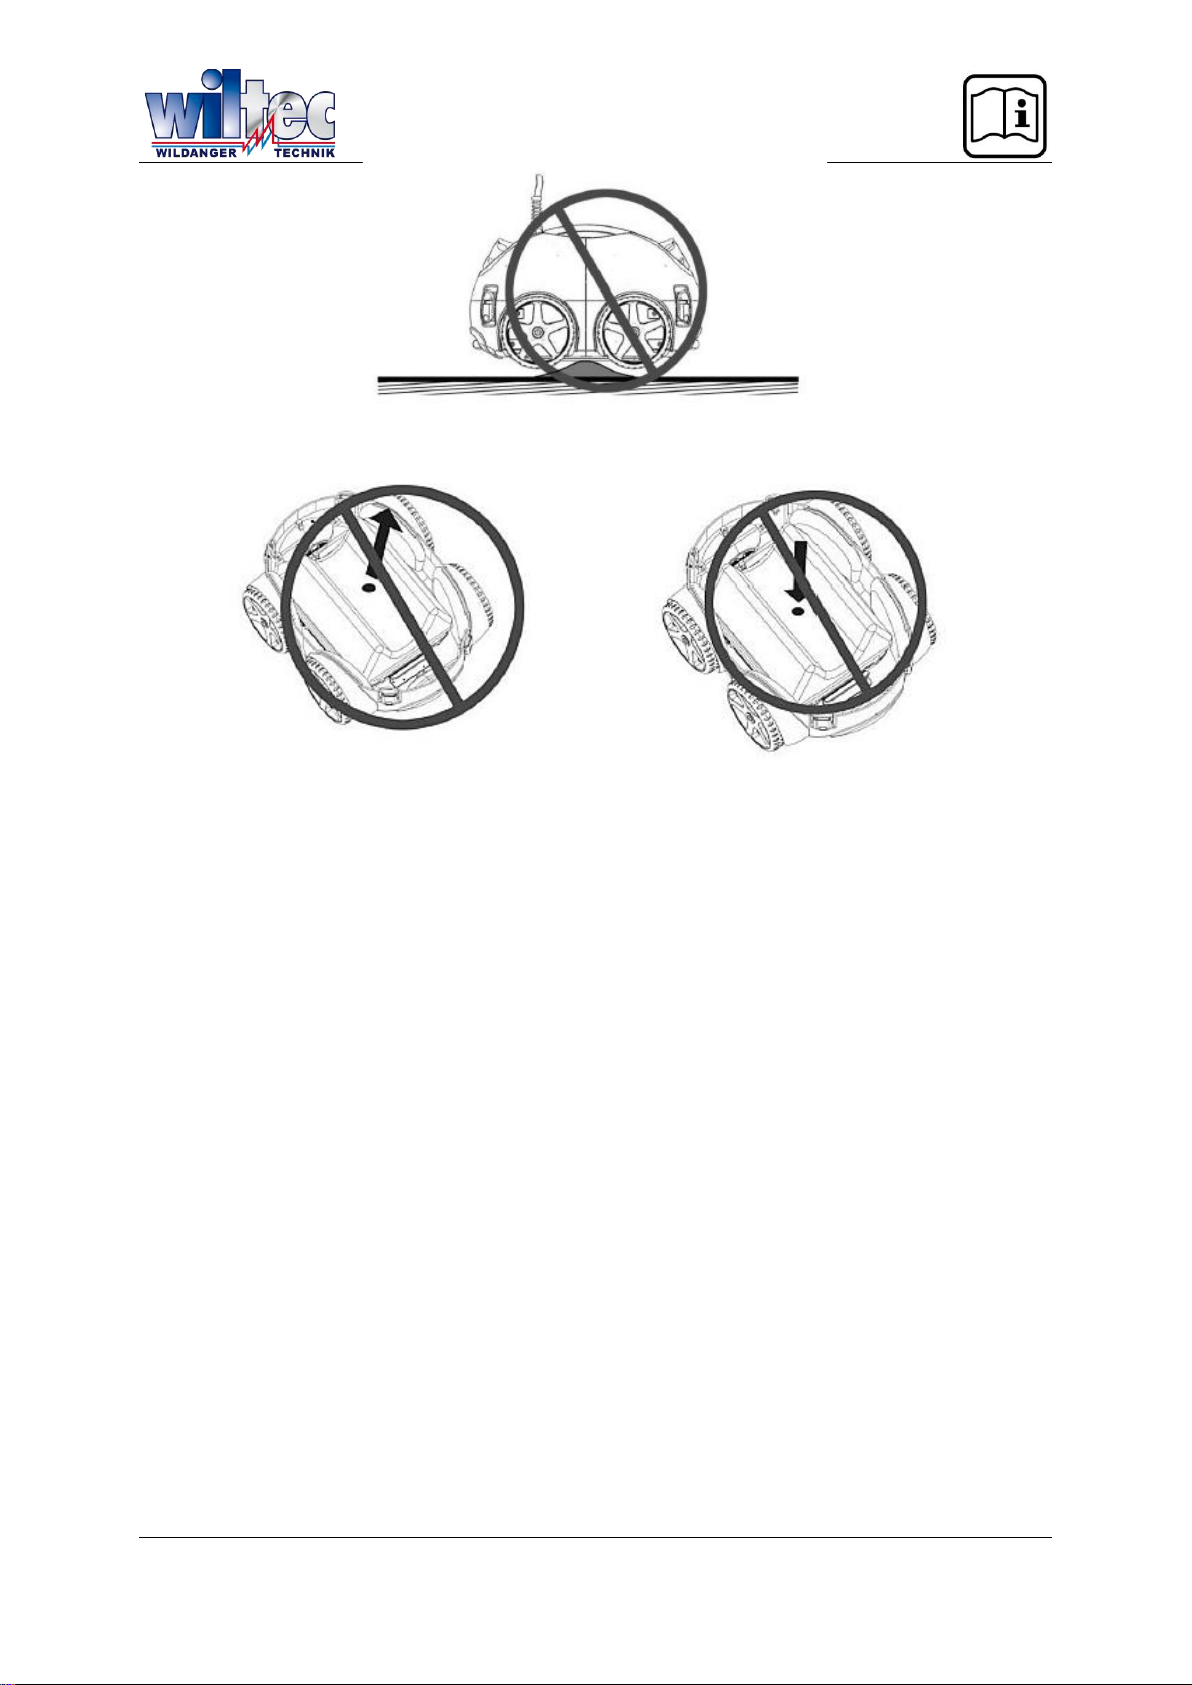
•Placing the robot in the pool and removing it from the pool should be so that the wheels of the
robot point towards the walls to avoid that the surface of the pool be scratched.
•Store the cleaning robot on a flat surface. No hard objects must touch the casing of the robot to
avoid damage.
© by WilTec Wildanger Technik GmbH Item 63229 Page 4
http://www.WilTec.de
http://www.aoyue.eu 09 2021-1
http://www.teichtip.de
•Do not apply excessive force on the filter unit by squeezing or seizing it when you mount or
unmount it to avoid that the casing be damaged.
•Do not lift both sides of the filter unit at the same time.
© by WilTec Wildanger Technik GmbH Item 63229 Page 5
http://www.WilTec.de
http://www.aoyue.eu 09 2021-1
http://www.teichtip.de
Assembly and installation
© by WilTec Wildanger Technik GmbH Item 63229 Page 6
http://www.WilTec.de
http://www.aoyue.eu 09 2021-1
http://www.teichtip.de
Technical specifications
Nominal intake voltage (V)
220
Nominal intake frequency (㎐)
50
Output voltage (V)
24 (DC)
Operational cycle (h)
1 / 1.5 / 2 / 2.5
Length of cable (m)
12
Max. cleaning surface (㎡)
150
Filter capacity (㎥⁄h)
15
Filter ability (µm)
150
Operational water temperature (℃)
10–35
Speed (m⁄min)
15–18
Protection class
Cleaning robot
IP68
Power-supply unit
IPX4
Working temperature (℃)
10–40
Pool depth (m)
2.5
Max. inclination/slope (°)
25
Operation
Cable connection
Plug the cable into the socket of the power-supply unit (Attention! Make sure that the plug is correctly
oriented!) and screw both nuts on either side of the plug to tighten them.
Then plug in the plug to the mains.
© by WilTec Wildanger Technik GmbH Item 63229 Page 7
http://www.WilTec.de
http://www.aoyue.eu 09 2021-1
http://www.teichtip.de
Control panel
№
Name
Explanation
Function
1
POOL DISTANCE
Wall distance button
Setting the pool width
2
RUN TIME
Automatic service time button
3
STOP
Stop button
4
FWD/REW
(forward/rewind)
Manual forward/backward move-
ment
Moving the robot to a precise
spot
5
AUTO RUN
(automatic operation)
Automatic operation button
Cleaning robot is working au-
tomatically.
6
Operational time display for auto-
matic operation
7
Pool width display
© by WilTec Wildanger Technik GmbH Item 63229 Page 8
http://www.WilTec.de
http://www.aoyue.eu 09 2021-1
http://www.teichtip.de
Function and adjustment of nozzles
The robot has two nozzles, one of which opens when the other closes. Water flows through the opening
nozzle to move the cleaning robot forward. The user can change the orientation of the nozzle by turning
it to control the track that the robot takes.
Adjustment of nozzle, speed, and track
•In general, cleaning is more efficient when the robot runs more slowly.
•The larger the curve described by the track, the less the cable is twisted.
Overlapping tracks and different settings of the nozzles
Low speed
Adjust with symbol (see fig.)
High speed
Adjust with symbol (see fig.)
The user can select the appropriate nozzle orientation for different pool types, e.g., a low speed with a
large radius of movement, by setting the circle symbol 〇to the 45° position (movement to the left) or
75° position (movement to the right).
© by WilTec Wildanger Technik GmbH Item 63229 Page 9
http://www.WilTec.de
http://www.aoyue.eu 09 2021-1
http://www.teichtip.de
Nozzle adjustments
•In most cases, the same orientation of both nozzles is suitable for every pool shape.
•A curved and direct track alternate if one of the nozzles is set to 30° and the other to 60°; this
will permit that a very large portion of the floor be covered, and it will help to release any cable
twists.
Distance adjustment
•On the control panel, select a suitable pool distance according to the pool width.
•It is recommended to select a larger distance if the nozzle is set to a low speed or if your pool
is sloped. With a pool of 6 m of width, it is recommended to select an 8 m or 10 m distance if
the robot is to run slowly.
Sloped pool adjustments
Set the nozzle to a high speed, so that the robot can cope with the slope, by reinforcing the water flow
rate of the robot (see fig. concerning high speed).
Note! With some pool shapes, it cannot be guaranteed that the cleaning robot can cover the entire
surface of the floor. You can adapt the nozzle orientation to reduce the moving curve ; however, that
means that the cable will be twist more often.
Recommended nozzle orientation
Direction of higher speed
Pool distance
Figures
© by WilTec Wildanger Technik GmbH Item 63229 Page 10
http://www.WilTec.de
http://www.aoyue.eu 09 2021-1
http://www.teichtip.de
Direction of lower speed
Pool distance
Figures