Winegard TRAVELNET TN-2033 User manual

Ver. 1.5
4/1/2009 - 1 -
TravelNet Internet Only Cellular Router Installation Guide
ATTENTION INSTALLER
Parts List:
•TravelNet Cellular Router (TN-2033, TN-2055)
•110 volt adapter with green connector
•Edimax BR-6204WG WiFi Preconfigured Router
•110 volt adapter with plug connector
•3 foot Ethernet Cable
•(2)External Antenna (white)
•(2)External Antenna mount with 14’ cable
•(2)Stainless Antenna Mounts
•Cable Entry Cover
•Aluminum Ground Plane (7 x 7 )
•Customer Package (clear envelope)
o 7 foot Red Ethernet Cable
o (2)Black SMA Antenna
o TravelNet Quick Start,
o TravelNet User CD
•User Manual
•Troubleshooting Guide
Other items not included:
•Sealant (Consult your vehicle manufacturer for the best sealant for your roof
material.)

Ver. 1.5
4/1/2009 - 2 -
TravelNet’s Cellular Router System is Preconfigured
And Ready to Install with these Easy Steps
Installation Instructions:
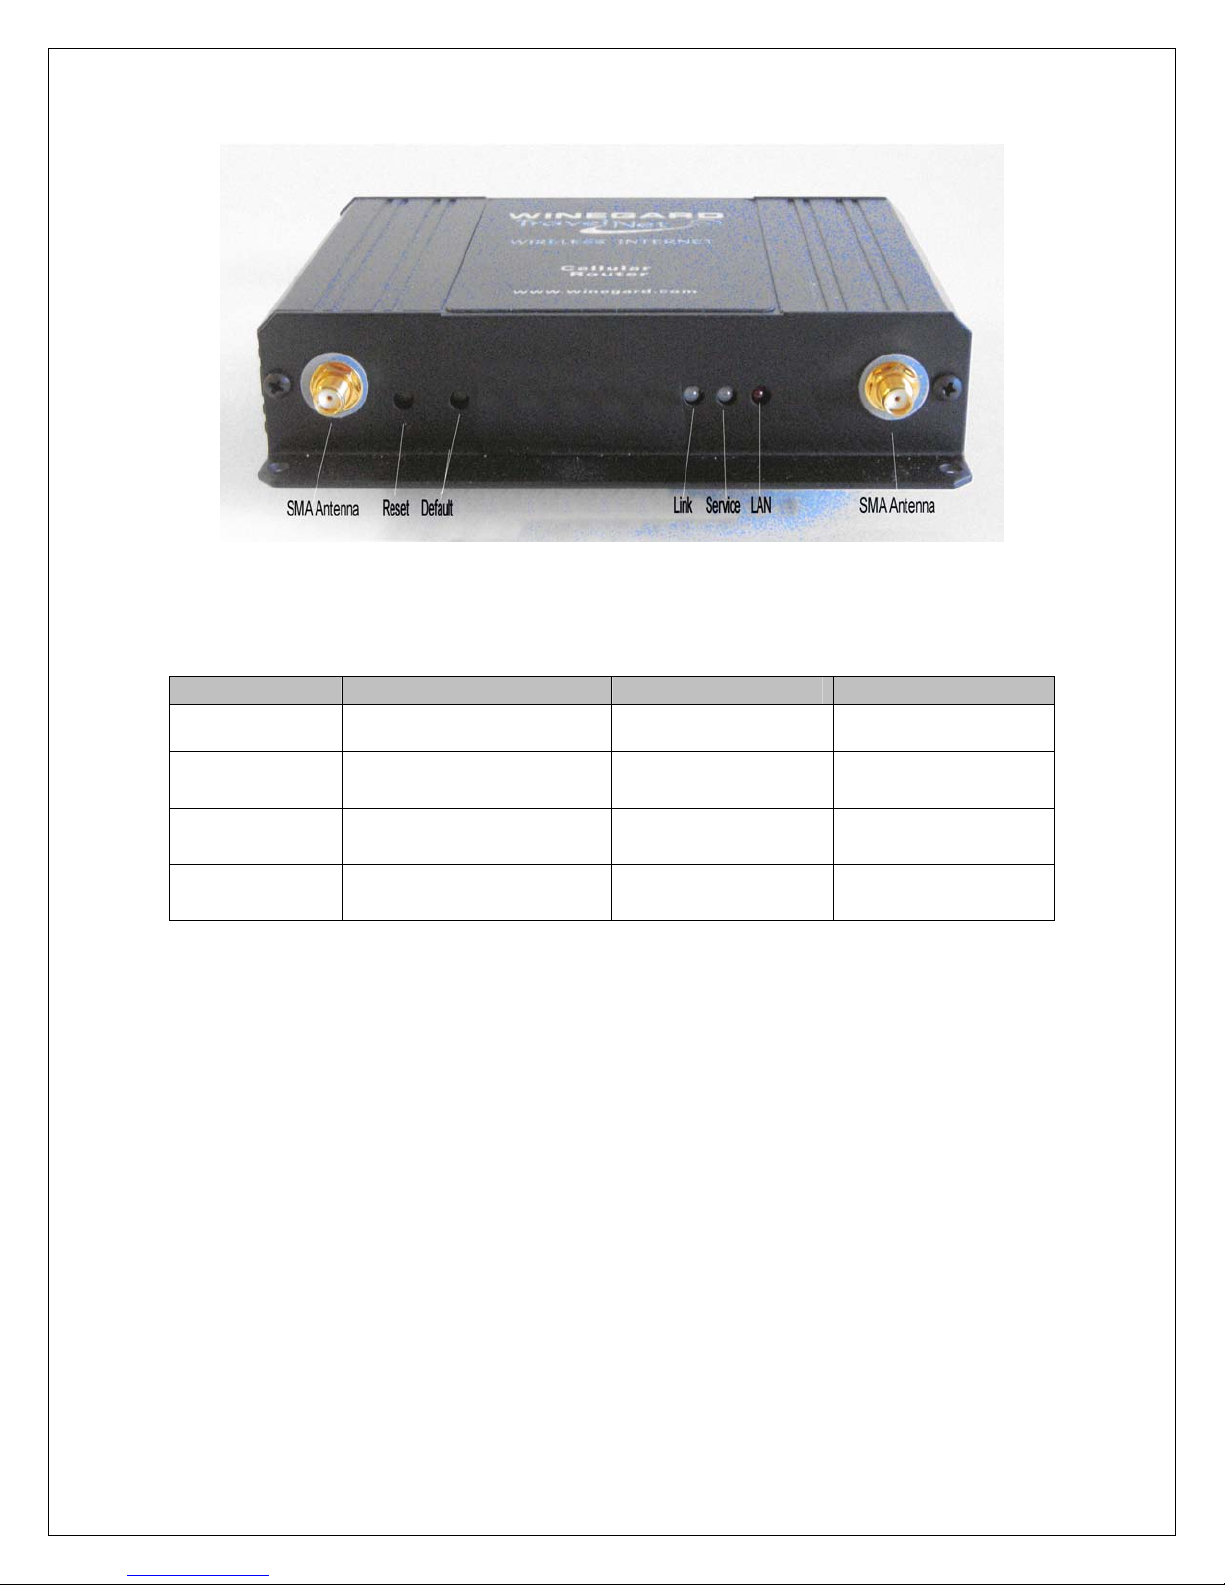
1. Install the TravelNet Router and Edimax Router equipment in a convenient place such
as upper cabinet (Velcro works well on the base of the each unit). Mount
the unit so that the diagnostic lights can be viewed without moving the TravelNet Router
and the Edimax Wireless Router.
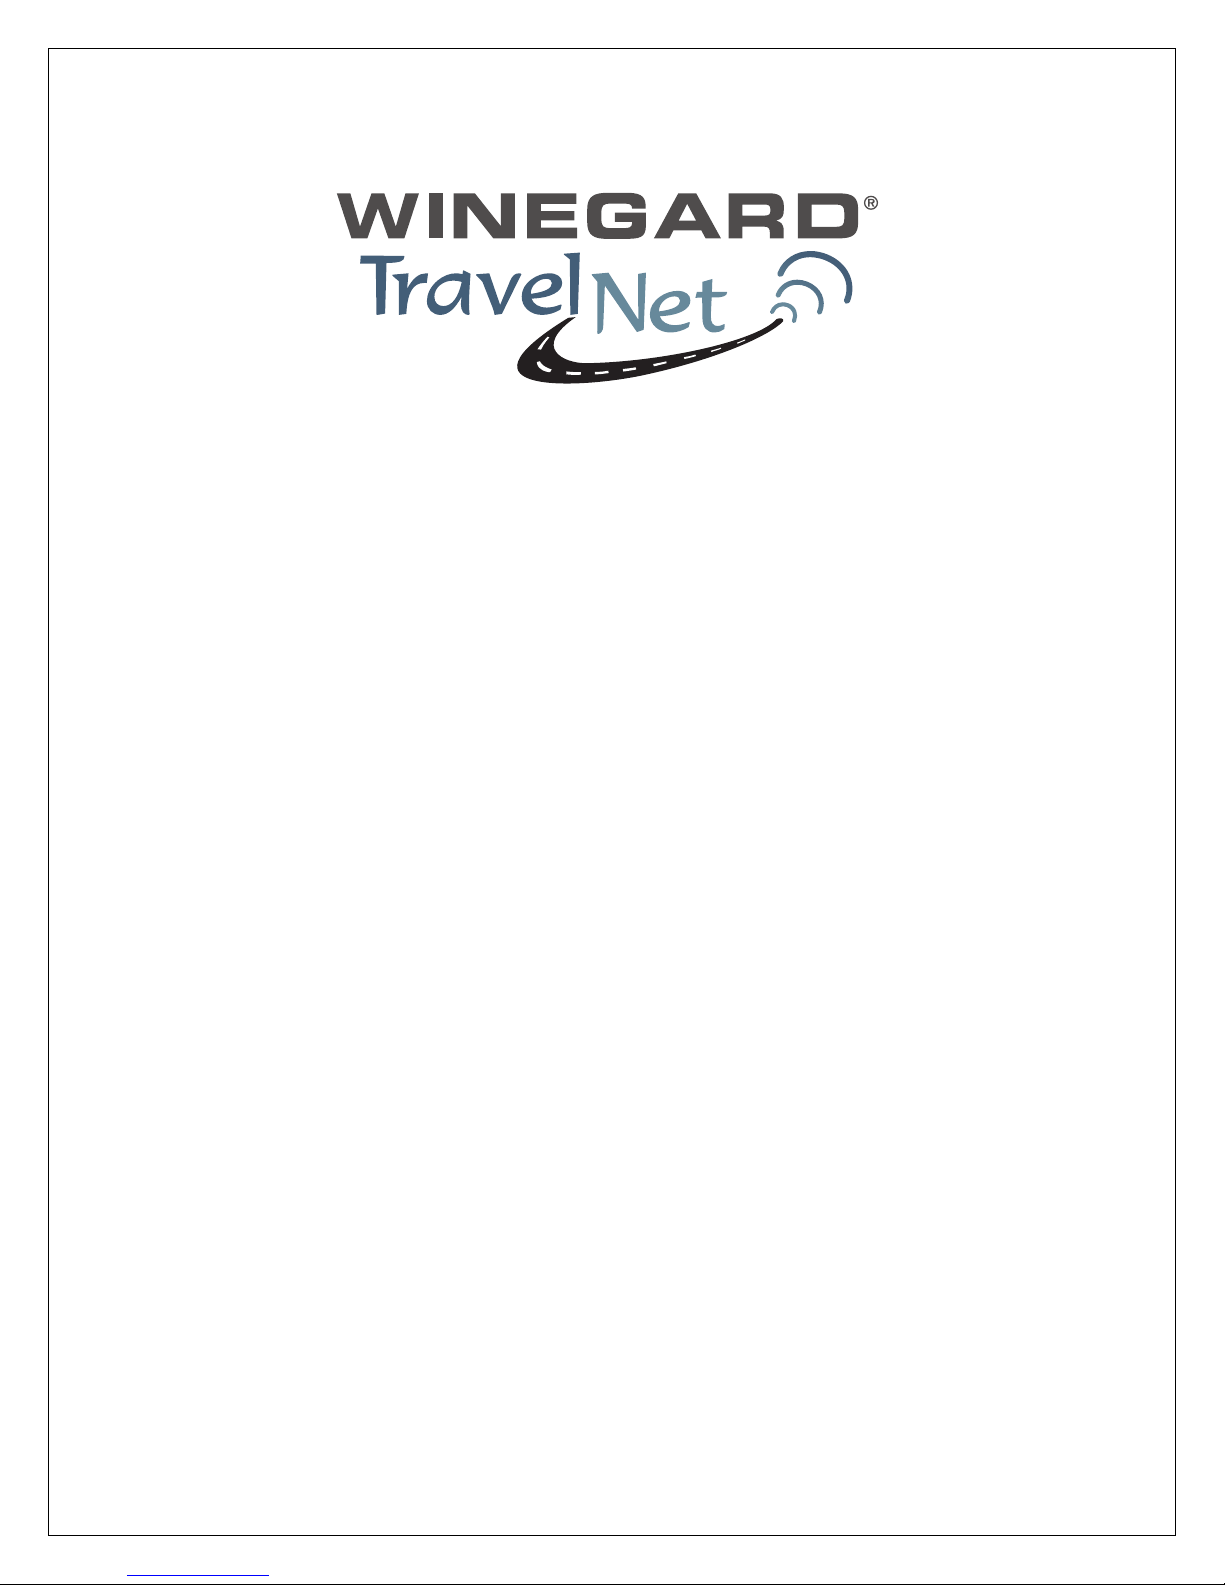
2. Locate the 2 antennas on the roof away from other obstructions
Also, you will need sealant as recommended by your coach manufacturer, stainless
screws (4) to anchor the aluminum ground plane to roof, cable clips to anchor cable,
cable entry cover plate.
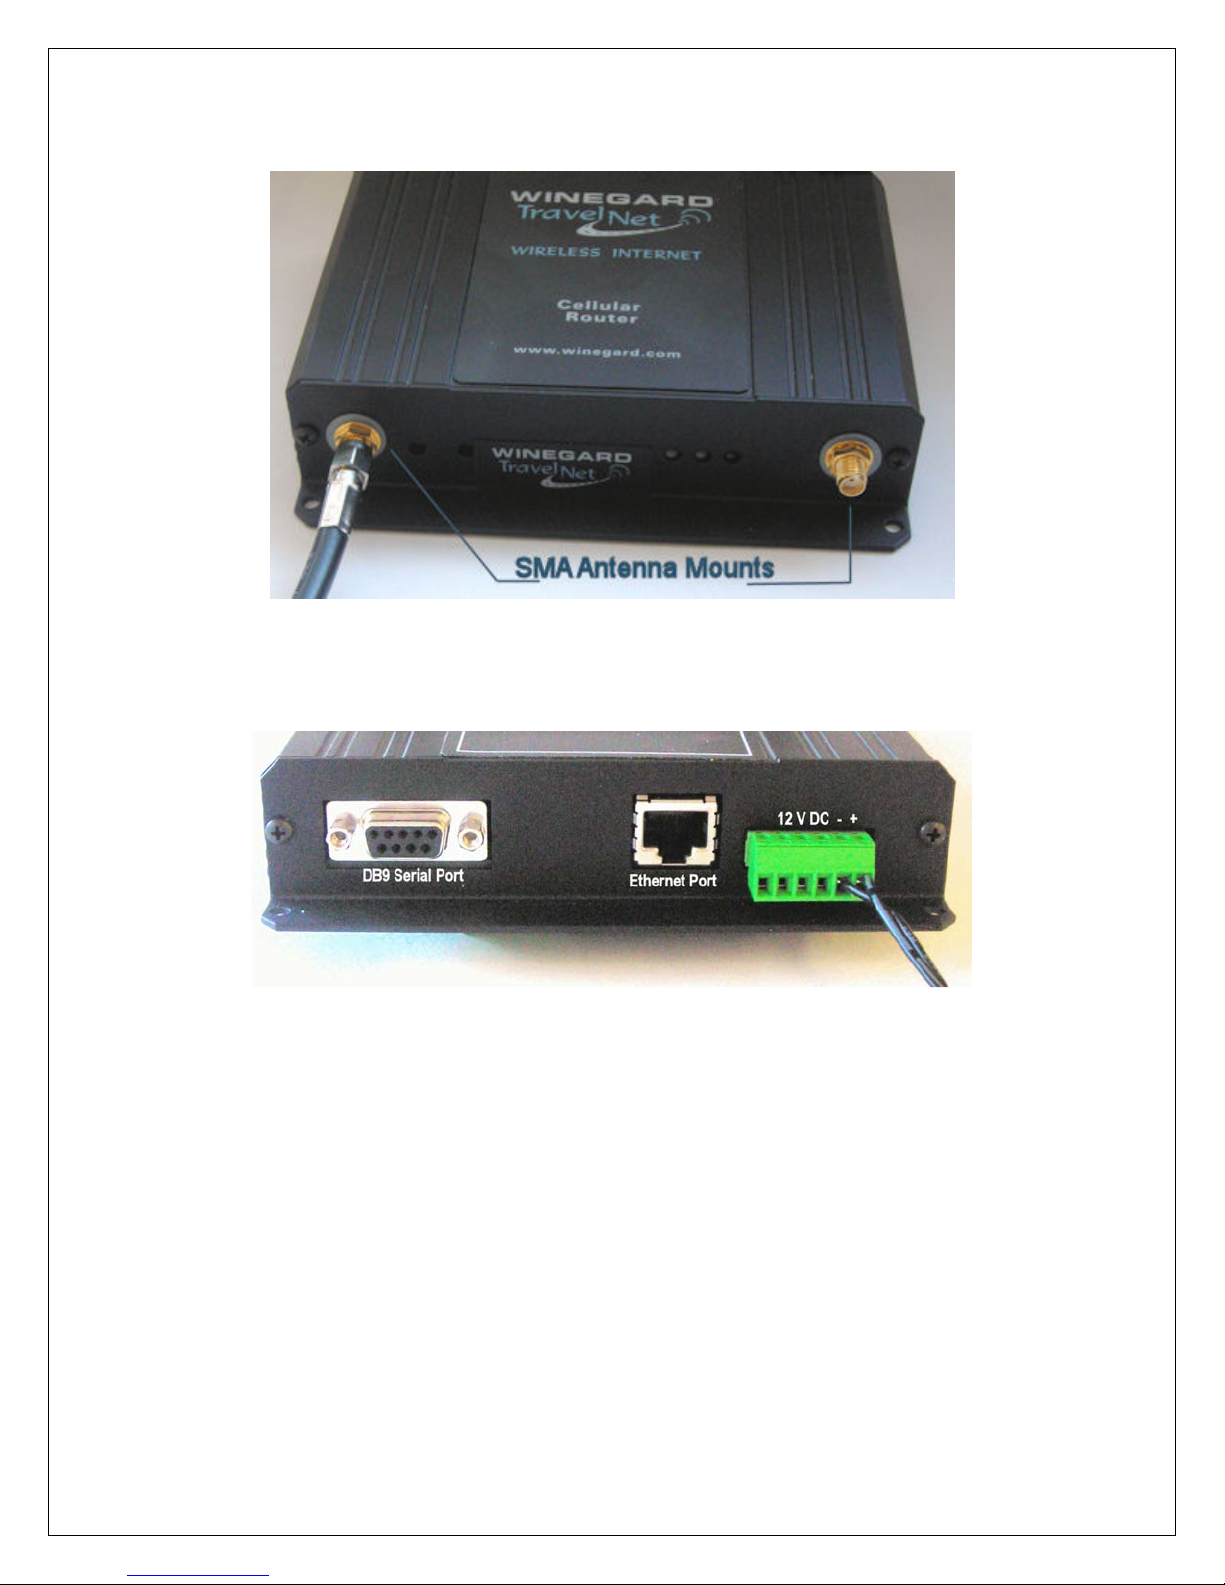
Warning – You must connect antennas to the SMA style antenna connectors on the
TravelNet Cell Router before turning it on. Failure to do this could result in erratic start up
behavior and could possibly damage the unit.
Figure 1
Position the antennas near the cable entry point. Here the TravelNet unit was located in
the front overhead (Figure 1) with the antennas mounted close by on the roof.

Ver. 1.5
4/1/2009 - 3 -
Figure 2
Note that the antenna mounts are anchored to the 7” x 7” aluminum ground plane and that
everything is well sealed.
Figure 3
3. Insert the small end of the cable through the ¾” diameter hole in the stainless antenna
mount and feed the cable through. Next screw the brass antenna mount nut to the
antenna mount as shown above, with the O-ring down, and attach the Antennas. Locate
the antenna mounts as shown, and attach the stainless Antenna mounts securely to the
ground plane and coach roof as shown. Secure the antenna cable to the roof as shown.

Ver. 1.5
4/1/2009 - 4 -
Figure 4
4. Route the 2 antenna cables to the cable entry hole in the coach roof. Securely attach
the cable entry cover over the cable entry point on the coach roof using screws and caulk
(Figure 6) Antenna cables should be directed to the TravelNet Router.
Figure 5
5. Attach the 3 foot Ethernet cable to the TravelNet router’s Ethernet port and the Edimax
wireless router. Note: there are 5 ports on the Edimax Wireless router, use the
WAN port (Figure 19), not the 4 LAN ports.

Ver. 1.5
4/1/2009 - 5 -
Figure 6
6. Carefully attach the antenna cables to the SMA Antenna Mounts on the TravelNet
router. Caution should be taken to not over tighten the SMA cable connectors.
Figure 7
7. Connect power supplies for both devices to AC source or 12VDC source. When
a 12 VDC source, order the appropriate pigtail accessories and please save the 12 volt
power supply for the coach owner. Note that if using RV’s DC power, the power inputs
are polarity sensitive. NOTE: The lead with the white stripe is +12 VDC.

Ver. 1.5
4/1/2009 - 6 -
Figure 8
8. Check table below for LED status.
Light Status LINK SVC LAN
Off No Connection
(IP address) No Power No Connection
On Green--
1XRTT Connection
Yellow Blinking--
No Signal (RSSI)
Red--
Connected to LAN
On Red—
EV-DO Connection
Yellow Solid—
RSSI < -88
On Green Solid --
RSSI > -88
9. If you are activating the TravelNet Cellular Router, precede to the activation
instructions for the correct TravelNet model. See below: Sprint or Verizon
10. If the unit has been previously activated, now start your computer, connect to the
wireless network, launch a browser window and open a website to test your internet
connection. If this test is successful then your setup and the installation is complete.
If a problem arises check our troubleshooting guide in the User Manual CD or call our
support line.
11. Attention Installer: Place consumer information package in cabinet or drawer for your
customer.

Ver. 1.5
4/1/2009 - 7 -
Activation Instructions for model TN-2055 and TN-2033:
(Sprint TN-2033 users skip to page 9)
Verizon TN-2055 Activation:
1. Connect an Ethernet Cable directly to the TravelNet Cellular Router and the
Laptop.
2. Enable the Local Area Network, when connected, go to the next step.
3. Open a web browser (Internet Explorer, Firefox, Mozilla, Safari)
4. Enter the IP address: 192.168.1.10
Figure 9
Figure 10
5. Enter the user name ‘ctek’ and password ‘ctek’
6. Click on the Login button.
7. Click on the Activation button.

Ver. 1.5
4/1/2009 - 8 -
Figure 11
8. Click on the Over The Air Activation button.
9. If Network Stability is OK For Activation (if Not Ok for Activation, wait 3
minutes.) If Not OK for Activation for 15 additional minutes, contact Support.
10. Click the Activate button.
11. Wait 3 minutes, then check status. If still in progress, wait an additional 3
minutes. If still in progress or ‘failed’, contact support.
12. When ‘Activated’ click Back button
13. Click the Home button.
14. Go to Interfaces-Wireless and Wireless Connection: and Select ‘Enable’ (refer to
figure 11)
Figure 12
15. At the bottom of the page, click the Update button.
16. Click on the Home button.
17. Click on the Restart button and confirm by clicking the Restart button again, and
wait 30 seconds.
18. Click on the Home button.

Ver. 1.5
4/1/2009 - 9 -
19. Click on the Status-Wireless button, and verify that there is a Current IP address.
This may take several minutes depending on the carrier network.
Figure 13
20. Click on the Home button.
21. Click on the Restart button and confirm by clicking the Restart button again, and
wait 30 seconds.
22. Do a restart of all network devices in order, first the TravelNet Router, 2nd the
Edimax Router, and finally laptop.
Sprint TN-2033 Activation:
1. Connect an Ethernet Cable directly to the TravelNet Cellular Router and the
Laptop.
2. Enable the Local Area Network, when connected, go to the next step.
3. Open a web browser (Internet Explorer, Firefox, Chrome, Mozilla)
4. Enter the IP address: 192.168.1.10
Figure 14
Figure 15

Ver. 1.5
4/1/2009 - 10 -
5. Enter the user name ‘ctek’ and password ‘ctek’
6. Click the Log In button.
7. Click on the Activation button.
8. Click on the Over the Air Activation button
Figure 16
9. If Network Stability is Ok for Activation then go to step 9, if Not Ok, then wait 3
minutes. If still Not Ok, call support.
Figure 17
10. Click on the Activate button.
11. Wait 3 minutes, then click the Status button. If still in progress, then wait an
additional 3 minutes. If still in progress or ‘failed’, contact support.
12. When status changes to ‘Activated’ click the Back button.
13. Click on the Home button.
14. Click on the Interfaces-Wireless button and change the Wireless connection type
to ‘Enable’ (refer to fig. 17)
This manual suits for next models
1
Table of contents
Other Winegard Network Router manuals
Popular Network Router manuals by other brands

TRENDnet
TRENDnet TEW-435BRM - 54MBPS 802.11G Adsl Firewall M Quick installation guide

Siemens
Siemens SIMOTICS CONNECT 400 manual

Alfa Network
Alfa Network ADS-R02 Specifications

Barracuda Networks
Barracuda Networks Link Balancer quick start guide

ZyXEL Communications
ZyXEL Communications ES-2024PWR Support notes

HPE
HPE FlexNetwork 5510 HI Series Openflow configuration guide


