WinFast CarePhone User manual

WinFast CarePhone
Quick Installation Guide
Before installing WinFast CarePhone, please make sure the outgoing
network is correctly configured as instructed by your ISP.
We recommend you to use Windows XP SP2 operating system with
Internet Explorer 6.0 or newer version of browser.
This installation guide is only intended for connecting WinFast
CarePhone. For other advanced functions or information related to the
product, please read the complete user manual on the CD. Or you can
visit our website for the detailed product
information.
Thank you for buying WinFast CarePhone. Please read this guide
carefully as the following chapters will take you through the installation
and network configuration of WinFast CarePhone. Please contact our
technical staff if you encounter other problems concerning the
installation.
http://www.leadtek.com.tw
WinFast CarePhone Hardware Installation

Type I
Directly connect WinFast CarePhone and the
computer with a Cross-Over cable. (Fig. 1-1)
Type II (Recmmended)
Connect the Ethernet cables from both the
computer and WinFast CarePhone to the
same subnet.
1. Connect the Ethernet cable from the
computer to the switch or hub.
2. Connect the Ethernet cable from WinFast
CarePhone to the same network device. (Fig.
1-2)
Procedure
Step 1
Connect the included DC 5V power adapter to
the power connector of WinFast CarePhone.
Plug the other end of the power cord into the
wall outlet. (110V-240V) (Fig. 1-3)
Step 2
When the WinFast CarePhone is connected
for power, the yellow indicator on the white
button will light up. 10-20 seconds later, a
blue indicator on WinFast CarePhone will
light, which means the network connection is
working. (Fig. 1-4)
Hardware Connection
Fig. 1-1
Fig. 1-2
Fig. 1-3
Fig. 1-4

Step 3
Right-click the "My Neighborhood" icon on
desktop and choose "Properties". Right-click on
"Local Area Connection" icon, and choose
"Properties". (Fig. 1-5)
Choose "Internet Protocol (TCP/IP)" and click
"Properties". (Fig. 1-6)
192.168.0.139 as the IP address. The Subnet
mask is 255.255.255.0. Click "OK". (Fig 1-7)
If the DNS server addresses are filled, please
clear them.
Return to the previous screen and click "OK" to
complete the TCP/IP configuration.
Step 4
Click "Start" "Run" and type "cmd". Click
"OK" to make sure if the computer has the
correct IP address. (Fig. 1-8)
In the MS-DOS window, type "ipconfig" and press
"ENTER". The command will display the IP
address, Subnet mask and gateway.
Choose "Use the following IP address", and type
Fig. 1-5
Fig. 1-6
FIg. 1-7
Fig. 1-8

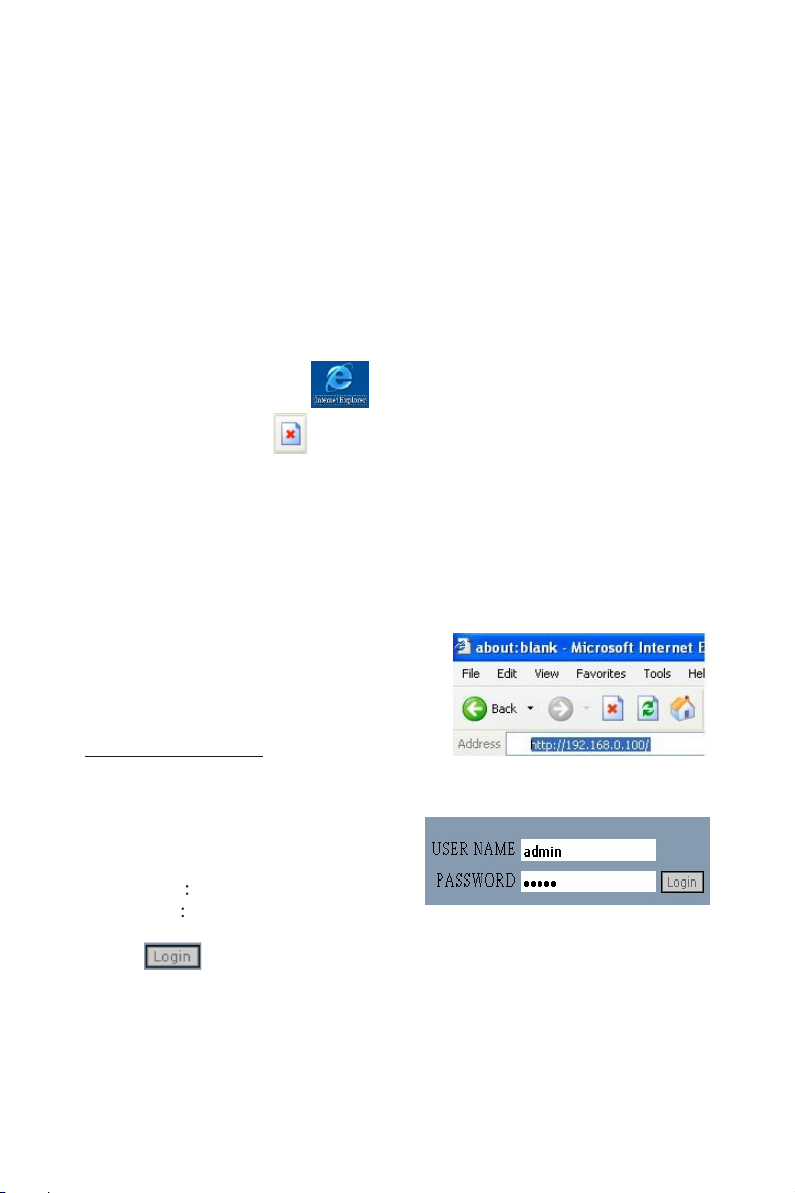
The default IP address of WinFast CarePhone is 192.168.0.100, so
you have to type "Ping 192.168.0.100" and press "ENTER". The
"PING" command is used to make sure if the computer and WinFast
CarePhone are correctly connected.
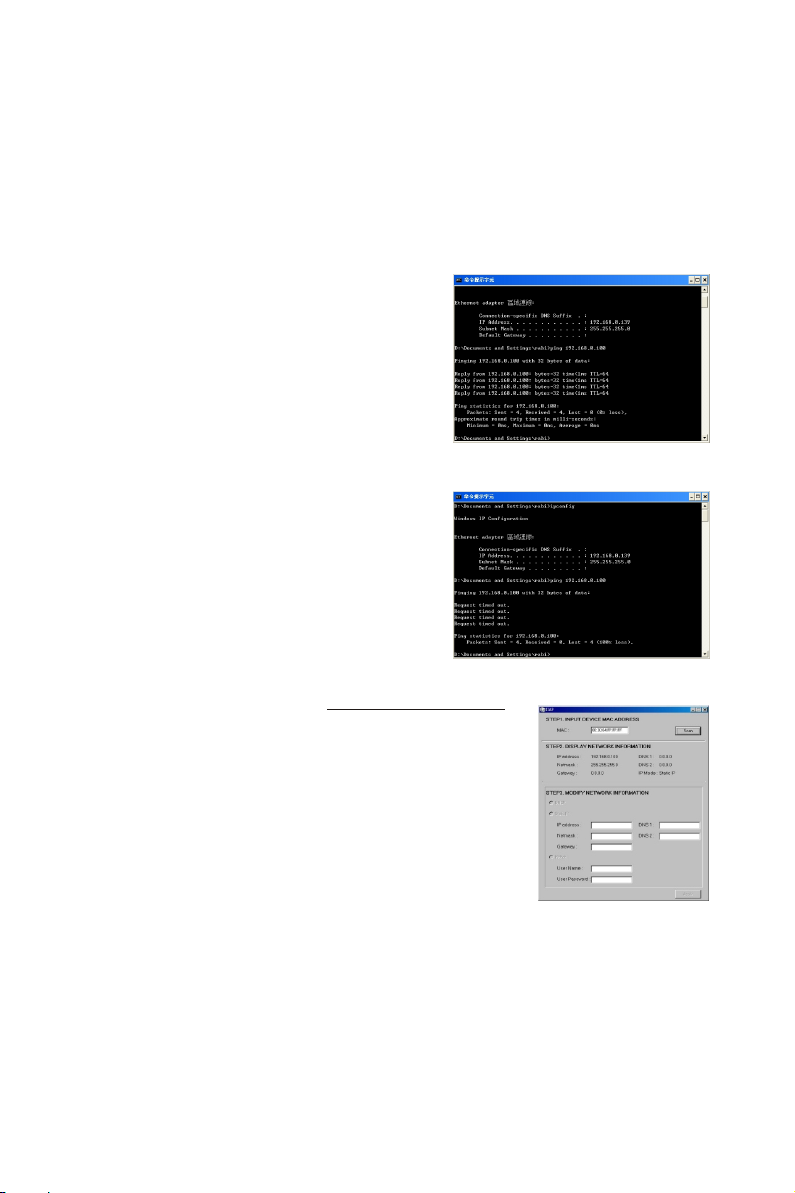
If the computer and WinFast
CarePhone are correctly connected, the
MS-DOS window will look like Fig. 1-8.
If the connection between the computer
and WinFast CarePhone fails, the MS-
DOS window will look like Fig. 1-9.
Step 5 (This program can also be used
if you install the product in a DHCP
environment)
In the same local area network, using
the IIAP program can locate the default
IP address of WinFast CarePhone,
which is a fixed IP address http://192.168.0.100.
The rest of the network information will be
displayed in the IIAP window.
Note: IIAP can only be used to locate WinFast
products. Follow the steps below if you want to
modify the network information of the device.
(Fig. 1-10)
1. Input the MAC address of the device and click "Scan".
2. Modify the network information if necessary.
3. Click "Apply" when done.
Fig. 1-8
Fig. 1-9
Fig. 1-10

Note: To prevent IP conflicts between the product and other devices in
the local area network, we recommend you to use an independent
network connection to connect the computer and WinFast CarePhone
through Switch/Hub.
Step 6
Click "Internet Explorer".
Click the "stop" icon , click "tools", and choose "Internet
Properties".
Click the "Connection" tab, and click "LAN settings".
Make sure no items are checked in the "LAN settings" window. Click
"OK" and click "OK again.
Login to WinFast CarePhone
configuration screen and start setting
up network connection.
Launch Internet Explorer, type
http://192.168.0.100 in the address bar
and press "ENTER". (Fig. 1-11)
Input Username and Password as
follows.
Username admin
Password admin (Fig. 1-12)
Click to enter the configuration window.
Fig. 1-11
Fig. 1-12

IE will ask you to download ActiveX control. Please notice the status
bar (Fig. 1-13) and the message below the address bar. Click the
message below the address bar and choose "Install ActiveX Control".
(Fig. 1-14)
Fig. 1-13
Fig. 1-14
Note: If the firewall in your computer is
enabled, you will see a security alert.
Please choose "Unblock". (Fig. 1-15)
Click "Install" to begin downloading.
(Fig. 1-16)
Fig. 1-15
Fig. 1-16

Downloading ActiveX will take 30 seconds to 1 minute. Do not close
the window when downloading.
(Fig. 1-17)
Step 7
We recommend you to choose "User Management" to modify the
Username and Password after you login for the first time and after you
download ActiveX Control.
Step 8
A. Main Menu
System
Network
Camera
User Management
System Info
System Log
B. Submenu
Choose the related functions
of the items in the main
menu.
C. Settings
Modify the configurations of the functions.
When the installation is completed,
the image will be displayed in the browser.
A
B
C
Fig. 1-17

Other references
To set up the information of the persons to call to, please refer to:
Leadtek_WinFast_CarePhone_PC_UserManual_B5
For the detailed descriptions of all the parameters and functions of the
product, please refer to:
Leadtek_WinFast_CarePhone_PC_UserManual_B5
For troubleshooting (including the problems during installation), please
refer to:
Leadtek_WinFast_CarePhone_PC_UserManual_B5

The following will tell you how to install WinFast CarePhone to your
networl. (Please see the complete document on the CD for the
detailed instructions on how to configure the network settings.)
Please make sure your computer has connected to the Intranet or
Internet through the Router or ADSL/Cable Modem.
WinFast CarePhone Network Connection
Choose the network type for your WinFast CarePhone
Follow the steps below to
directly connect WinFast
CarePhone to the computer.
Network type 1
Direct connection to computer
(Fig. 2-1)
WinFast CarePhone can be
directly connected to the
computer with a Cross-Over
cable. This connection can be
used for testing or initializing
purposes.
Procedure
1. Connect the cross-over cable to WinFast CarePhone.
2. Connect the free end of the cross-over cable to the computer.
3. Connect the power cord to WinFast CarePhone.
4. Plug the power cord into the wall plug (110V-240V).
5. If the network is correctly connected, the LED will light blue.
Fig. 2-1

The router is usually
used in a wired/wireless
network environment in
the house to connect
the private network and
the Internet, and usually works in conjunction with the Hub or the
Switch. Follow the steps below to connect WinFast CarePhone to the
network environment with a router.
Procedure
1. Connect the Ethernet cable to WinFast CarePhone.
2. Connect the free end of the Ethernet cable to the router.
3. Connect the power cord to WinFast CarePhone.
4. Plug the power cord into the wall plug.
5. If the network is correctly connected, the LED will light blue.
Network type 3
Connecting to the ADSL/Cable Modem
(Fig. 2-3)
Follow the steps below to connect
WinFast CarePhone to the xDSL
Modem.
Procedure
1. Connect the Ethernet cable to WinFast CarePhone.
2. Connect the free end of the Ethernet cable to Cable Modem or
xDSL (ADSL Modem).
3. Connect the power cord to WinFast CarePhone.
4. For PPPoE users, please go to the WinFast CarePhone
management page and set up PPPoE username and password.
5. If the network is correctly connected, the LED will light blue.
Network type 2
Connecting to the router (Fig. 2-2)
Fig. 2-3
Fig. 2-2

WinFast CarePhone Automatic Provision Server
and Server Management
WinFast CarePhone has a built-in web server, which allows the user
to enable automatically assigning a unique phone number for WinFast
CarePhone and optimizing the proxy server. The downloading process
is encrypted and is updated through the Internet.
Enabling APS will manage the phone number of WinFast CarePhone
and the network configuration of the server more effectively. Just
choose the appropriate IP address type in the built-in web page of
WinFast CarePhone, and APS will save you a lot of troubles for
setting up the system information.

Setting Up WinFast CarePhone Automatic
Provision Service
Procedure
Step 1
Launch IE browser and login to WinFast CarePhone homepage.
Step 2
Choose "System" in the main menu, and
choose "APS" in the submenu. Choose
"ON" in the setting, and click "Save".
WinFast CarePhone will reboot and start
downloading from the automatic provision server.
Step 3
When downloading APS files, the
system indicator (yellow) will blink.
Please do not disconnect the power
to avoid download failures.
Downloading APS will take 20-30
seconds, depending on the network speed.
After APS is successfully downloaded, the system indicator (yellow)
will stop blinking. Go to the WinFast CarePhone homepage to reboot
the unit or use the "RESET" button on the back to manually restart the
unit. After reboot, APS will start working.
You can choose "System Info" in the main menu of the homepage and
find the account and phone number of APS.
Note: If your IP address configuration is incorrect, the connection will
not work. Please contact your ISP or network administrator for the
information of the correct IP address.

Using Leadtek SoftPhone
1 SoftPhone Interface
The functions are illustrated in the following figure.
Show all
Call history
Show
Missed calls
Show
Answered calls
Show
Detail calls
Call Display Minimize and
Close Keys
Phonebook
Setting Button
Hang -up Button
My Account
Dial Button
Answer Button
Registration
status
Numeric Keypad
Webcam
Button
Mute
Button
Volume
Button
REC
Button
Snapshot
Button
Viewer
Button
Adjust View
Button
Details
Button
Add contact
menu
Minimize screen
Maximize screen
Close screen

There are two ways to start SoftPhone:
1. From the Windows task bar: Start Programs Leadtek
Research Inc SoftPhone SoftPhone.
2. Click the SoftPhone shortcut on the desktop.
Windows Security Alert:
Windows firewall may block SoftPhone and displays an alert
message. Choose "Unblock".
You need to enter Username and Password to
login to SoftPhone, as shown in Fig. 1.
1. Input the Username/Password as printed on
the label.
2. You can find 2 free accounts on the CD sleeve.
For example, 88650100000 is the password.
The Password is printed after P/W, as shown in
Fig. 2.
Login Errors:
You may encounter some common errors:
1. Unable to start SoftPhone: Please check the network connection of
the computer.
2. SoftPhone registration failed: Make sure you input the SoftPhone
username/password correctly. Please contact Leadtek FAE if you
encounter other problems.
2 Starting SoftPhone
Fig. 1
Fig. 2

Note: Before making a call, please notice the following items:
1. Please check the speaker and microphone on your computer
before using Leadtek SoftPhone.
2. Please run SoftPhone first to make sure no errors will occur.
3. Please make sure the network connection is working before you
can make a call.
4. The login procedure will be authenticated by the Username /
Password you entered. After registration, you will be able to make
calls.
5. You have to enter all the required information, and the SoftPhone
will attempt to login to the server. After authentication succeeds,
SoftPhone registration status will be indicated by a green circle, which
means the unit is in ready status.

The SoftPhone allows you make calls by using different
methods to enter a number.
Leadtek SoftPhone can dial to a phone number or an IP address.
Dialing to a phone number (Proxy Mode)
1. In Proxy Mode, You need to register to the SIP Server with a VOIP
account. Only after registration can you talk to other VOIP users in the
SIP Server. The VOIP account can be
found on the CD sleeve.
2. Before making a call, please make sure
Leadtek SoftPhone registration indicator is
green.
3. Input the phone number of the VoIP
account with the keyboard or you can use
mouse to click the number keypad on the
screen. (Fig. 3)
4. Click to start dialing, and you will
hear ring tones.
5. Click to end the call.
Dialing to an IP address (Peer-to-Peer)
1. When entering an IP address, you have
to use "." on the keyboard. (Fig. 4)
2. Use keyboard to enter the IP address of the user you want to call.
Click to start dialing, and you will hear ring tones.
3 Making a Call
Fig. 3
Fig. 4

Other methods
You can also use the following methods to make calls:
Select a number from the phonebook (Fig. 5)
Select a number from the calls log (Fig. 6)
Modifying the number
When you enter the wrong number, you can use the "Backspace" key
on the keyboard to erase a number, or you can click to clear the
entire number.
Fig. 5 Fig. 6

4 Displaying Incoming and Outgoing Calls
The system screen will display both incoming and outgoing calls.
1. When there is an incoming call, the screen will look like Fig. 7.
2. When there is an outgoing call, the screen will look like Fig. 8.
3. During a call, the screen will look like Fig. 9.
4. Click to answer the call.
5. Click to end the call.
When SoftPhone stays resident in the system tray and there is an
incoming call, SoftPhone will pop up and displays the call.
Fig. 7 Fig. 8 Fig. 9

5 Calls Log
Calls Log can display all
missing, incoming and
outgoing calls. Click
button to view the list.
Show All Call Logs
To view all calls, select the
tab and select the "Show All"
option to view all calls that
have been received through
SoftPhone.
Show Received Calls
To view all received calls,
select the tab, and select the "Show Inbox"
option to view all calls that have been received.
Show Outgoing Calls
To view all outgoing calls, select the tab, and
select the "Show Outbox" option to view all calls that have been
received.
Show Missed Calls
To view all missed calls, select the tab, and select the "Show
MissCalls" option to view all calls that have been missed.
Delete All
To delete all call logs, select the tab, and select the "Delete All"
options to delete all calls logs.
Details Button
To view the detail of recent calls, click button to observe the
information.

This function allows users
to store contacts which
can be divided by groups,
added, or deleted.
Phonebook
To display the Phonebook,
click button on the
main panel.
Display by Contact
To view all name by
contact, click the tab,
select the "Display by Contact" option to sort the
information.
Display by Group
To view all name by group, click the tab,
select the "Display by Group" option to sort the
information.
New Contact
To add new contact, click the tab, select the "New Contact" option
to create a new entry item, and enter the following information for the
contact: Name, Phone Number, Group, Icon.
New Group
To add new Group for each contact, click the tab, select the "New
Group" option to create a new group.
Delete Item
To delete a contact, with a contact highlighted, click the tab, select
the Delete Item to remove the contact from the phone book.
6 Phonebook
Table of contents