Wintec G-Trender II WSG-2000 User manual

G-Trender II
English
Professional GPS Cycle Computer WSG-2000
User Manual


Table of Contents
WSG-2000 Professional GPS Cycle Computer
Product Overview
Standard Package
Illustration on how to install Micro SD card
Install the battery on Wheel Speed, Cadence Sensors
Charge the Battery by USB cable
Function Description
Status Bar Description
Pair the Wheel Speed, Cadence and Heart Rate Sensors
Install Mount Holders on the Bike
Accessories Installation
GPS Setting
Compass Calibration
1
2
3
4
4
5
8
9
10
12
14
15
Attitude Calibration
Altimeter Calibration
Navigation Setting
Trip Computer Setting
My Training
Information
Setup
Running WSG-Tool on PC
USB Com Port Driver Installation
Firmware Update
Specification
16
17
18
19
20
21
22
27
32
36
38

SAFETY NOTES
When you first turn on your WSG-2000 or when you shut it down more than one month, it is recommended to face
it oriented toward the open sky about 10 ~ 15 minutes. This position provides the best receiving status to allow the
GPS antenna to acquire and position GPS satellites information quickly. (ex. The window side, or any outdoor open
area.)
The Global Positioning System (GPS) is a U.S. space-based global navigation satellite system. It provides reliable•
positioning, navigation, and timing services to worldwide users on a continuous basis in all weather, day and night,
anywhere on or near the Earth. The United States have the right, without prior notice or announcement of the situation,
to reduce the overall system functionality or positioning accuracy (such as in times of war or deliberately blocked, when
a given region), the U.S. government made some change and that may affect the GPS device accuracy and performance.
If you use WSG-2000 when in a building (such as in the basement or garage), the tunnel blocked or surrounded by tall•
building and terrain. It may temporarily lose the GPS satellite signals. As soon as the block is passed, WSG-2000 will re-
position and recording the GPS data back to normal
Please don't make improper changes to replace or modify on the mechanical structure and components. Those•
improper changes will cause the defective on the WSG-2000 and lose the warranty rights.
Please keep of using it from dangerous environment.•
Avoid placing it in the high temperature and high humidity environment for a long time.•
If there is strange smell or smoking from the WSG-2000, please shut it down immediately and ask for repairing to•
the store.
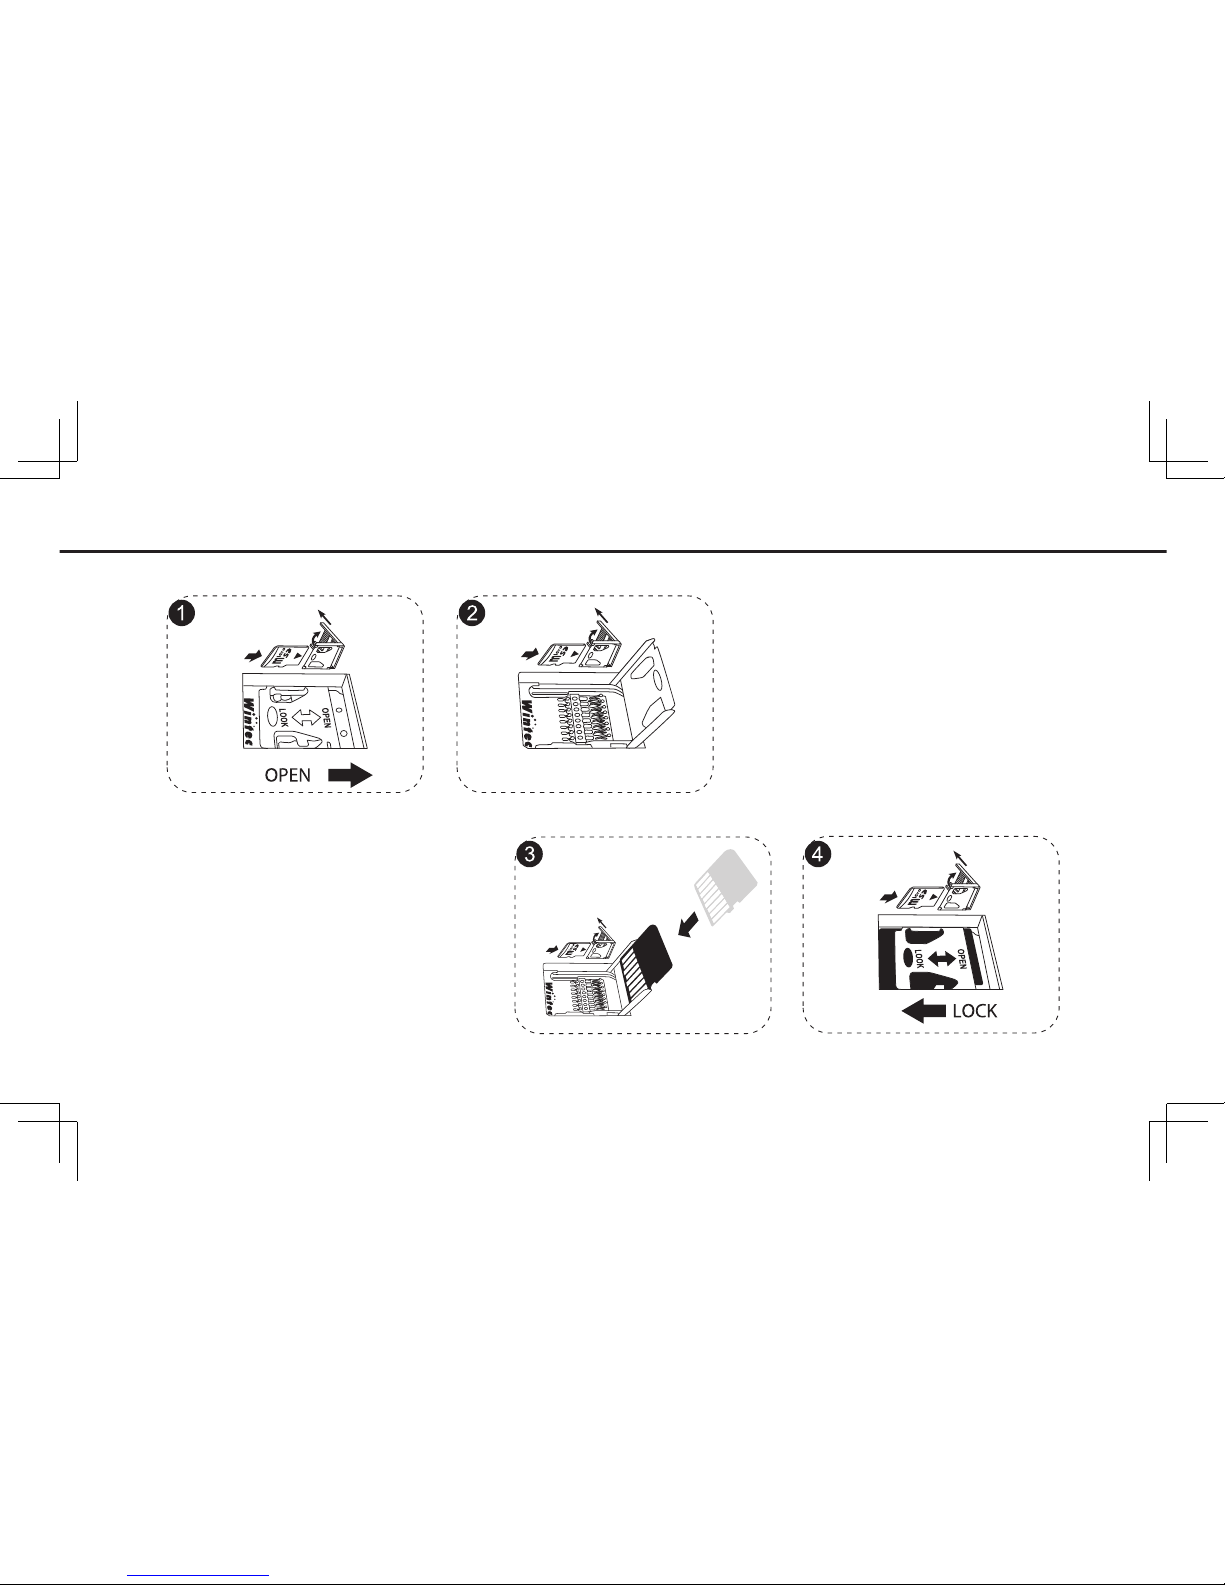
WSG-2000 doesn’t support SDHC Micro-SD card•
PC software requires Microsoft windows XP/VISTA/7•

1
Product Overview
1ESC / MENU
Short Press:E x i t
Long Press:Return to the Main Page
2Central Button:Select the up, down, left
and right function icons.
Short Press: Enter the function pages
3Set / Lock Button
Short Press:Confirm and Enter
Long Press:Enable / Disable Key Lock
function
4Log On / Off Button
Short Press:E n a b l e/ Disable Log
function
Long Press:E n a b l e / D i s a b l e L o g
function
5Push to log / Start New Log
Short Press
:Push to log Button
Long Press
:Start New Log
7Hot Key to Add Mark Point
8Hot Key for fast switch to favorite pages
9Journey accumulated function Button
Short Press: Start or Pause Journey
accumulated
Long Press: Reset the Journey
accumulated
6Backlight / Power Button
Short Press
:Backlight On / Off
Long Press
:Power On / Off
10 Led indicator
Left Light:
GPS Indicator (Green): When Green light
is flashing means positioned
Right Light:
Power Charge Indicator (Orange): When
orange light is flashing means battery
charging.
ESC
MENU
SET
LOCK
1 2 3
4
5
6
7
8
9
10
FIX Full
Log
ON
3D
08:11 06-Jan-36
E.Trip Computer

2
Standard Package
1 x WSG-2000 Professional GPS Cycle Computer (built-in Micro-SD card interface )•
1 x Micro-SD card•
1 x Rechargeable Li-ion battery•
1 x Mini USB cable•
1 x User Manual•
1 x Cadence Sensor•
1 x Speed Sensor•
1 x Heart Rate Sensor•
3 x CR2032 Batteries•
1 x Mount Holder Package•
Optional Accessories
AC adapter with USB Port•
Car Charger with USB Port•
Belt Clip Holder•
Before you open the package of G-Trender II, please make sure that your package contains all the
items listed above, if there is any shortage, please contact the agent you brought from.

3
Illustration on how to install the Micro SD card

4
Charge the Battery by USB cable
Place the battery into the battery slot on WSG-2000.•
Connect USB Cable to USB port on PC or the AC Adapter•
(Optional Accessories).
Plug the mini-USB end of cable to WSG-2000 mini-USB•
Port.
Install the battery on Wheel Speed,
Cadence Sensors
Remove the battery cover on the back sensor using a coin, or the
1.
equivalent tool.
Insert new lithium batteries (CR2032) with the (+) sign upward and
2.
(-) negative downward,
Close the battery cover firmly.
3.
Tight the battery cover to the sensor using a coin, or the equivalent
4.
tool.
Note
Please take out the bat tery when it is not on
1.
operation over 30 days.
Please be sure to turn off the WSG-2000 before
2.
battery replacement. If you take it out when
operation, it may cause the error in memory to lost
the recorded data.
It is suggested to charge the battery when the low
3.
power level is indicated on the screen to make sure
the complete efficiency of the recording data and
GPS acquisition
Please make sure the type of battery is correctly .
4.
The wrong battery placement may be explosive
during the usage.
Pl e a se d i s c a r d t h e b at te r y t o th e r ec yc l ed
5.
institution

5
Function Description
Provide GPS-related information and settings.
GPS Information
GPS Information 1 Reset GPS
Coordinates
Display Format
GPS Information 2
GPS Information 3
Electronic compass, Attitude information
Electronic compass / G-Sensor Function
Compass / G-Sensor Attitude
calibration
Compass
calibration
Compass
Note Please note that the Pitch Angle and Roll Angle will change rapidly
during the movement. To acquire the best measurement, we suggest
looking up the most accurate attitude information when stationary.
FIX Full
Log
ON
3D
08:11 06-Jan-36
A.GPS

6
Function Description
Provide altitude, pressure, temperature,
ultraviolet radiation information and
related settings.
Barometer/UV Function
Barometer/UV
Altitude
Calibration
Altitude Chart
Pressure Chart
Temperature Chart
UV Chart
Provide information of biking and
settings.
Trip computer Function
Provide track-back information in
Navigation, Mark and Settings.
Track Navigation Function
Track Navigation
My Favorite Track
Back To Start
Navigator Mode
Delete All Track
Mark Navigation
Mark List
Add Mark
Delete All Mark
Trip Computer (Rotation)
Trip Computer
Setting
Trip Computer 1
Trip Computer 2
Trip Computer 3
Trip Computer 4
Speed
1. Max. Speed
2. Average Speed
3.
Distance
4. Moving time
5. Stop Time
6.
Total Time
7. Altitude
8. Max. Altitude
9.
Total Ascent
10. Total Descent
11. Pressure
12.
Temperature
13. UV
14. Course
15.
Time
16. Heart Rate
17. Average Heart Rate
18.
Cadence
19. Average Cadence
20. Calories
21.
Grade
22.
WSG-2000 contains up to 22 kinds of important
information and set up easily for a pleasant ride.

7
Provide track, time, distance, altitude
setting for training program
My Training Function
My Training My Training Setting (By Distance、
Time、Altitude)
My Training My Favorite Track
Delete All Track
Provide odometer, history, version
information, etc
Odometer Information
Odometer odometer setting
History Info
System Info
Provide system and operation information
and settings.
Setup Function
System
User Info Setting
Bike Info Setting
Contrast、Backlight、
Buzzer、Zone Time、
Language、Unit、
Hot Key、Factory Reset、
Firmware Upgrade
Device
Wheel Speed pairing
Cadence pairing
Heart Rate Monitor pairing
Power Saving Mode
Set Alert
Over Speed
UV Excess
Heartbeat Load
Log Mode
Provide other information
Other Information
Sunrise and Sunset

8
Status Bar Description
Logger Status. Enable or Disable Logger USB Status.
Journey accumulated Status: This function is designed to record
all related biking information along the ride when enabled. Key Lock.
Wheel Speed Signal Reception Status. GPS Status
Cadence Signal Reception Status. The Power Status about Battery.
Heart Rate Signal Reception Status.
Note 1. Logger and Journey accumulated are different and separate functions.
2. Logger Logger will record your tracks during the trip. The recorded files can
be converted to Google Earth、Google Map formats and Geo-Tagging the photos
or creating the report by WSG-Tool.
3. Journey accumulated : Journey accumulated is designed to record all related
biking information along the ride. And the recorded data will be stored to“My
Favorite Track”. You can select the tracks stored inside for track-back navigation
and workouts on WSG-2000.

9
Heart Rate Sensor
Remove the battery from Heart Rate Sensor. (Sensor Side)
1.
Go to search device page for pairing sensors. (WSG-2000
2.
Side) (Main Page->Setup->Device-> Heart Rate)
Put the battery in the sensor again and use a coin to twist
3.
the battery cover and lock it back into the place. (Sensor
Side)
Activating the search function on page of Heart Rate.
4.
(WSG-2000 Side)
Repeat the step 1~4 until it is successfully paired.
5.
Pair the Wheel Speed, Cadence, and Heart Rate Sensors
Wheel Speed/Cadence
Remove battery from Wheel Speed or Cadence.(Sensor Side)
1.
Put the battery in the sensor again and use a coin to twist the battery
2.
cover and lock it back into the place. (Sensor Side)
Go to search device page for pairing sensors. (WSG-2000 Side)
3.
(Main Page->Setup->Device->Wheel speed or Cadence)
Activating the search function on page of Wheel Speed or Cadence.
(WSG-2000)
Repeat the step 1~4 until it is successfully paired.
4.
WheelSpeed
Search
WheelSpeedDevice
HeartRate
Search
HeartRateDevice
PS. The sensors of WSG-2000 have been paired in advance for usage, if the signals are not being received by the unit. Please pair
the unit with sensors again. The data of device will be stored in the memory after pairing, you don't need to pair the unit again
next time unless you need to change to another one.

10
Install Mount holders on the Bike
Horizontal Mount Holder
1 2 3 4
5 6
Horizontal Mount holder
•on the handle bar
Back side view
1.
Stick double-faced sticker on the concave
2.
surface of holder
Slip provided straps trough their holes
3.
Tighten both straps on the handle bar
4.
Slide WSG-2000 downwards aligning with
5.
the holder’s grooves till a “click” is heard.
To take out, press the spring bar downwards
6.
and slide upwards WSG-2000.

11
Vertical Mount Holder
1 2 3 4
5 6
Vertical Mount Holder on the Stem
•
Back side view
1.
Stick double-faced sticker on the
2.
concave surface of holder.
Slip provided straps trough their
3.
holes
Tighten both straps on the Stem
4.
S l i d e WS G -2 0 0 0 d o w n w a r d s
5.
aligning with the holder’s grooves
till a “click” is heard.
To take out, press the spring bar
6.
downwards and slide upwards
WSG-2000.

12
Accessories Installation
Wear the Hear Rate Sensor
•
Install the battery (CR2032) on the heart rate sensor.
1.
Use a coin to twist the battery cover and lock it back into the place.
2.
Insert the HR strap hook into the two sides of holes, and press it until it
3.
fixed on the rubber.
Adjust the Heart Rate straps to the most appropriate length and fit to
4.
the chest size
Place the heart rate sensor near the area of the heart on the skin, and
5.
keep the “Wintec” logo side as the front side when wearing on the
chest
Attention To avoid measurement errors, it is recommended to
1.
moisten the electrode pads with water.
If there is any discomfort or allergy occurred, please
2.
remove it immediately .
If the sensor cannot be detected, please repairing
3.
the unit again.
For the cleanness of the heart rate monitor, you can
4.
clean it with towel in wet.

13
Mount the speed, cadence
•
sensor, and magnet on the bike
Please pair the sensor before
1.
mounting it on the bike
Secure the magnet and sensors
2.
correctly on the cadence and
wheel as picture indication.
Place the magnet and faced the
3.
cadence or wheel sensor to the
magnet by the “Wintec” logo
side
Slide the straps into the sensors
4.
and fix it on the bike
wheel speed sensor
cadence sensor
the magent on
the cadence
the magnet on the
frame of rear wheel
wheel speed sensor cadence sensor
If WSG-2000 cannot connect to sensors successfully, there may be possible improper
1.
installation as the following situation:
a. The battery is not properly installed
b. The distance is too far between wheel sensor and magnet to be connected
c. The distance is too far between cadence sensor and magnet to be connected
d. The sensors have not been paired with the WSG-2000 in advance.
Generally the wheel sensor is located on the rear frame near the magnet, please
2.
note that it might be difficult to install and be connected if you install it on the front
because the different structures of types of bikes.
Attention

14
GPS Setting
WSG-2000 provide information about how to reset GPS, set coordination and display format etc.
(Main Page->GPS->Press the “SET” key)
GPS Restart: Hot start / Warm start / Cold start
1.
WSG-2000 with high-sensitive chipset can well receive and acquire the GPS signals generally
when in normal and frequent use. You can execute the Hot/Warm/Cold Start depends on the
strength of the GPS signals after WSG-2000 cannot be positioned for a long time, to perform this
action can help to speed up GPS positioning.
The conditions to perform the Hot/Warm/Cold Start:
Cold Start : WSG-2000 has not been powered on for more than 3 months.
When you start the WSG-2000 again, the position is away more than 800km from the final
position when you shut down the WSG-2000 last time.
Warm Start : If you start the WSG-2000 for more than 15mins but it cannot acquire and fix the
position, please execute Warm Start function.
Hot Start : If you are a frequent user or the satellite signals are in a very good condition but it
cannot acquire and fix the position, please execute Hot Start function.
Coordinate:Default (WGS84)
2.
Note:
Unless you need some special application, we strongly recommend using default format (WGS84)
Format: dd.ddd(degree)
3.
dd mm.mmm’(Degree/minute)
dd mm’ ss.s’’(Degree/minute/second)
GPS Restart
Coordinate
Format
Note : If you start WSG-2000 in the first time or execute the cold start function, there will be
discrepancy about the time on the system. Please take and position it to outdoor. It will modify
the time automatically.

15
Implement Calibration on page of “Compass Calibration”. (Main Page->Compass->Press the “SET” key).
1.
P.S WSG-2000 can auto-calibrate itselves or you can manually calibrate the Compass if it goes wrong. Normally,
the accuracy of compass will be affected by magnetic things. You can try more times or move to different places
and try again if manually calibration is not successful.
Compass Calibration
Compass/G-Sensor Compass/G-Sensor
Compass/G-Sensor
Attitude Clibration
Compass Clibration
Compass/G-Sensor

16
Attitude Calibration
First, please position the mount properly on the handle bar or Stem on your
1.
bike and fix it.
Slip WSG-2000 on the mount.
2.
Please locate your bike on horizontal plane (0°) .
3.
Start the attitude calibration (Main page->Compass->Press the “SET” key).
4.
ground
Compass/G-Sensor
Attitude Clibration
Compass Calibration
Table of contents
Other Wintec GPS manuals

Wintec
Wintec WGT-168 User manual

Wintec
Wintec WBT-100 User manual

Wintec
Wintec G-RAYS 2 WBT-201 User manual

Wintec
Wintec WBT-100 User manual

Wintec
Wintec G-Trender User manual

Wintec
Wintec WGM-302 User manual

Wintec
Wintec WBT-202 User manual

Wintec
Wintec WBT-200 User manual

Wintec
Wintec WBT-202 User manual

Wintec
Wintec WPL-2000 User manual