Wirata HC-908 User manual

MODEL NO.
HC-908
CURRENT
0.2A
VOLTAGE
DC 5V
FREQUENCY
50/60Hz
BATTERIES
1x Li-ion 3.7V DC 2000mAh
INPUT
100-240V, 50/60Hz, 0.2A
OUTPUT
5V DC/1000mA
INSTRUCTION MANUAL
Model No.:
HC-908
Please read Instruction Manual before use
& follow ALL the instructions carefully.

WHAT’S IN THE BOX
PARTS DESCRIPTION
1: Hair Clipper 5: Cleaning brush
2: Comb (3,6,9,12mm) 6: Oil
3: Charging cable 7: Scissors
4: Hair comb
1. Hair Clipper –1set
2. Oil, Cleaning brush, hair comb & scissors–1 set
3. Charging cable –1pc
4. Attachment Comb –4pcs (3, 6, 9, 12mm)
MAIN COMPONENT:
(Product may vary slightly from what is illustrated)
1
1
1
1
2
3
4
5
6
7
1
1
1

The hair clipper with four easily replaceable comb
attachments provides possibility of obtaining different lengths
of cutting and clipping hairline.
Please read these instructions carefully. Pay your special
attention to important safety instructions. Keep this
“Instructions for use” for future reference.
Herewith information concerns your health and safety. It is
obligatory to learn about all instructions for use and safety
information before first usage of the clipper.
1. Before using the appliance for the first time, you must
read and understand the operation manual completely.
2. Consider the operation manual as part of the product and
store it in a safe and accessible place.
3. Include this operation manual if passing the appliance on
to a third party.
4. In the case of conflicts with national safety specifications
or instructions, the national
5. requirements must be followed.
1. Do not use during bath.
2. Never immerse the device and cord in water or other
liquids.
3. Do not place the hair clipper on wet surface or cloth
during operation.
4. Do not place or store the device in the area where it can
fall into water.
5. Do not use the device with damaged comb attachment. It
can cause injuries hazard.
GENERAL INSTRUCTION
SAFETY INSTRUCTIONS
WARNING:

6. Never try to remove the foreign bodies out of the clipper
using sharp objects (i.e. comb).
7. Always clean after using.
8. This appliance is not intended for use by persons
(including children) with reduced physical, sensory or
mental capabilities, or lack of experience and knowledge.
9. Children should be supervised to ensure that they do not
play with the appliance.
10. Do not apply not recommended attachments.
11. The hair clipper can be used both as a mains and
cordless device.
12. The cut hair should be clean, dry and combed.
13. Put the towel around the neck to avoid getting the cut
hair under the collar.
14. Use the hair clipper only as intended according to the
herewith instructions.
WARNING: Do not use the device near water, over the bath tub,
pool or other water basin.
*Observe the above-mentioned rules in order to avoid burning,
electric shock or fire hazard. Make sure you understand the
instructions.

1. BLADE ALIGNMENT
a) Your clippers were carefully examined to unsure that
the blades were oiled and
aligned before leaving our
factory.
b) Blades must be realigned
if they have been
removed for cleaning or replacement.
c) To realign the blades, simply match
the upper and bottom blades teeth
up, point for point. (End of top blade
teeth should be approximately
1.2mm back from bottom blade.
Compare your clipper blades with the
sketch.)
2. OIL
a) To maintain your clipper in peak
condition, the blades should be oiled
every few haircuts.
b) Do not use hair oil, grease, oil mixed
with kerosene or any solvent.
c) As the solvent will evaporate and
leave the thick oil which may slow
down the blades motion.
3. BLADE LEVER
a) The lever is conveniently located near your thumb (if
you’re right-handed) so it can easily be adjusted
while the clipper is in your hand.
b) The Lever adds versatility to the Clipper by allowing a
gradual change to the closeness of a cut without an
attachment comb.
c) When the Lever is in the uppermost position, the
Blades will give the closest cut leaving the hair very
FUNCTION INSTRUCTION

short. Pushing the Lever gradually downward
increases the cutting length.
d) In its lowest position, the Lever will leave the hair
approximately the same length as a #1 comb.
e) The Lever will also extend the use of the blades since
a different cutting edge is used in each setting.
f) In addition, if extremely heavy hair cutting has
jammed the blades, it will help to remove hair that
has become wedged between the two blades without
removing the blades.
g) While the Clipper is running,
move the Lever from "close
cut" to "longer cut" a couple
of times. Doing this each
time after use will help to
keep the blades clear of cut
hair. If the Clipper stops cutting and this does not
help, the Cutting Blades are blunt. Replace them with
new blades.
CLEANING: Never clean the appliance under running water! Use the
included brush to remove hair.
Wipe the enclosure with a dry, soft cloth. Do not use abrasive cleaning
agents.

1. OPERATION WITH POWER SUPPLY ADAPTOR
At first insert the adaptor plug into the device and then
insert the adapter plug into the mains supply outlet (100-
240 V). In mains supplied mode the device is ready for
use.
2. LOADING ACCUMULATORS AND CORDLESS OPERATION:
a) In order to load the device, move the ON/OFF switch
to “OFF” position.
b) Connect the unit to the adapter cord.
c) Insert the plug of the adapter into appropriate mains
supply outlet (100-240 V).
The LED indicator will change from red to green
when full charged. When fully loaded the hair clipper
can operate approximately 3.5 hours.
d) The hair clipper accumulator obtains optimum power
after three cycles of loading and unloading. 2.5-3
hours is enough for next loading. In order to provide
long life of accumulators, they should be completely
unloaded before loading.
1. BEFORE STARTING THE HAIR CUT:
a) Inspect the clipper, making sure that it is free of oil
between the cutting blade teeth and turn the unit on
to distribute the oil and to make sure it is running
smoothly. Wipe off any excess oil. This should be done
after each use. While using the unit, untwist the cord
from time to time to avoid tangling.
b) Seat the person so their head is approximately at your
HOW TO OPERATE
OPERATION OF HAIR CLIPPER
The hair clipper can be used both as a main supplied or cordless device.
INSTRUCTION FOR HAIR CUTTING

eye level. This allows ease of visibility while cutting
and a relaxed control of the unit.
c) Before cutting always first comb the hair so it is tangle
free and as it is naturally worn.
d) Place a towel around the neck and shoulders of the
person having the haircut.
REMINDERS:
Make sure that the appliance is fully charged when you
start to cut. Only use appliance on clean, dry hair. Do not
use it on freshly washed hair.
a) Cut the hair in a relaxed and slow manner. Use short
strokes only to work gradually over the entire head.
b) Always take off a little hair at a time; you can always
trim off additional hair later.
c) As you work, comb the hair frequently back into the
style to which you are cutting.
d) When cutting with this Clipper it is better to leave the
hair dry, not wet. With the hair dry, it is much easier
to control the amount of hair being cut.
2. BEGINNING THE HAIRCUT:
a) Cutting hair requires practice so It is always better to
leave the hair longer for the first few haircuts until
you become used to the length to which each comb
attachment cuts the hair.
3. ATTACHMENT COMB:
Attachment Comb #1 leaves 3mm (1/8 inch) hair length.
Attachment Comb #2 leaves 6mm (1/4 inch) hair length.
Attachment Comb #3 leaves 9mm (3/8 inch) hair length.
Attachment Comb #4 leaves 12mm (1/2 inch) hair length.

Each comb attachment is marked accordingly on its
outside middle surface.
To attach a comb, hold it with its teeth upward and
slide it onto and along the clipper blade until the front
of the comb firmly seats against the clipper blade.
To remove the comb, simply pull the comb upward and
away from the clipper blade.
For even cutting, allow the comb attachment/cutter
through quickly. Also remember to comb the hair
frequently to remove trimmed hair and to check for
uneven strands.
4. STEP 1 –NAPE OF THE NECK:
a) Attach comb attachment 3mm or 6mm.
b) Hold the Clipper cutting edge pointed up and begin
the haircut, starting at the center of the head at the
base of the neck (see diagram 1).
c) Hold the clipper comfortably in your hand and hold
lightly against the head with the comb teeth pointing
upward. Gradually and slowly lift the clipper working
upwards and outwards, through
the hair, trimming just a little at
a time.
d) As you cut, gradually lift the
Clipper head towards you.
Continue to cut the back area
from the bottom of the neck
upwards to the top of the ears.
5. STEP 2 –BACK OF THE HEAD:
a) Change to the next longest comb
attachment 9mm or 12mrn and
cut the back of the head (see
diagram 2).

6. STEP 3 –SIDE OF THE HEAD:
Change to one of the shorter combs
3mm or 6mm, trim sideburns, i.e. the
hair directly in front of the ears.
Change to one of the longer combs,
9mm or 12mm, and continue to cut to
the top of the head (see diagram 3).
7. STEP 4 –TOP OF THE HEAD:
a) Using the comb attachment 9mm
or 12mrn, cut top of head from
back to front against the direction
in which the hair normally grows
(see diagram 4). In some cases,
this may require the reverse, or
cutting from front to back.
b) Comb attachments 3mm or 6mm
are used to achieve a close crew
cut or short cut.
c) For longer hair on top, use the
comb provided and lifts hair on
the top of the head. Cut over the
comb, with the hair lifted or hold
the hair between the fingers to lift
it and cut it to desired length
(see diagrams 5 and 6).
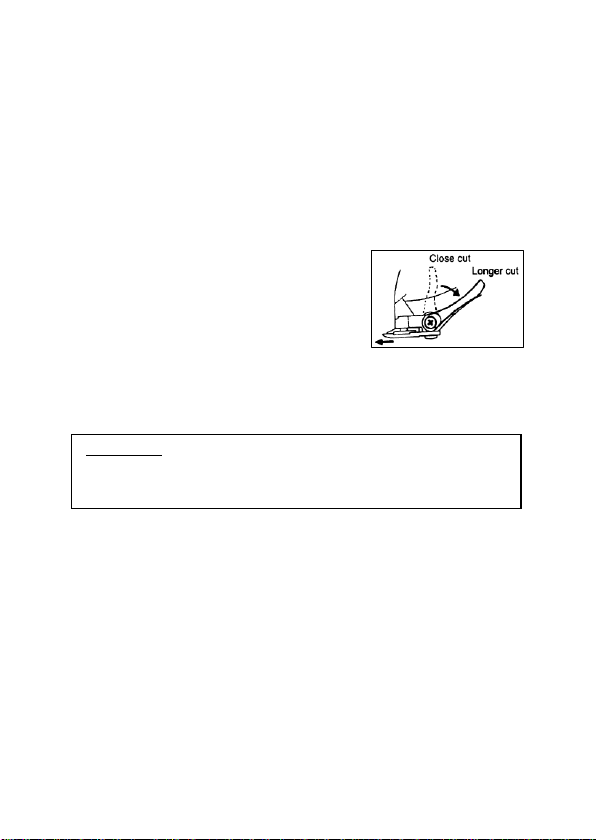
d) Always work from the back of the
head.
Hair can be cut shorter gradually
by reducing the space between
the comb/fingers, and the head.
Comb
out trimmed hair and check for
uneven strands.

8. STEP 5 –THE FINISHING TOUCH:
a) Finally, use the Taper Lever
without an attachment comb for
close trimming around the base
of the neck, the sides of the
neck and the ears.
b) To produce a clean straight line
at the sideburns, reverse the
Clipper by turning the reverse side uppermost (see
diagram 7).
c) Press the Clipper at right angles to the head, tips of
the blades lightly touching the skin and work
downwards. This way will obtain, as a clean cut as
would be given by a razor.
9. SHORT TAPERED STYLES, ‘FLAT TOPS’ & SHORT CUTS:
a) Starting with the longest attachment comb (12mm),
cut from the back of the neck to the crown. Hold the
attachment comb flat against the head and slowly
move the clipper through the hair, as shown (see
diagram 8).
b) Use the same procedure from the lower side to the
upper side of the head, as illustrated. Cut the hair
against the direction in which it grows from the front
to the crown and then level the cut with the sides.
c) To give a 'flat top' look, the hair on top of the head
must be cut over the top of a flat
comb instead of using the
attachment comb.
d) Use closer cutting attachment
combs to taper the hair down to
the neckline as desired. Comb
hair and check for uneven areas
and outlining sideboards and
neckline as described previously.

Each user can contribute to protect the environment. It is neither
difficult nor expensive. In order to do so:
a) Return cardboard packages to recycling points.
b) Throw polyethylene (PE) bags into appropriate containers.
c) Batteries contain substances harmful to the natural
environment. Do not throw them away with other household
waste.
d) Return used batteries to recycling points. Before disposing of
or returning the appliance to a recycling point make sure to
remove the batteries from the battery compartment.
e) Return a worn-out appliance to an appropriate collecting
point as the components of the appliance may pose a threat
to the environment.
ENVIRONMENT PROTECTION
The manufacturer/ importer does not accept any liability for
any damages resulting from unintended use or improper
handling.
Unit: HC-908
Built-in rechargeable: 1x Li-ion 3.7V DC 2000mAh
batteries
Input: 00-00V, 50/60Hz, 0.2A
Output: 5V DC/0000mA
The product technical parameters are included at the name
plate. The device is built in II class isolation, it does not require
grounding. This hair clippers meet the requirements of
effective standards. The device meets the requirements of the
following directives:
Low Voltage Device (LVD) –2006/95/EC.
Electro- Magnetic Compatibility (EMC) –2004/108/EC.
The product is marked with CE symbol on the name plate.
ECOLOGY –ENVIRONMENT PROTECTION
SPECIFICATIONS
Table of contents
Other Wirata Hair Clipper manuals