C9000
Benutzerhandbuch
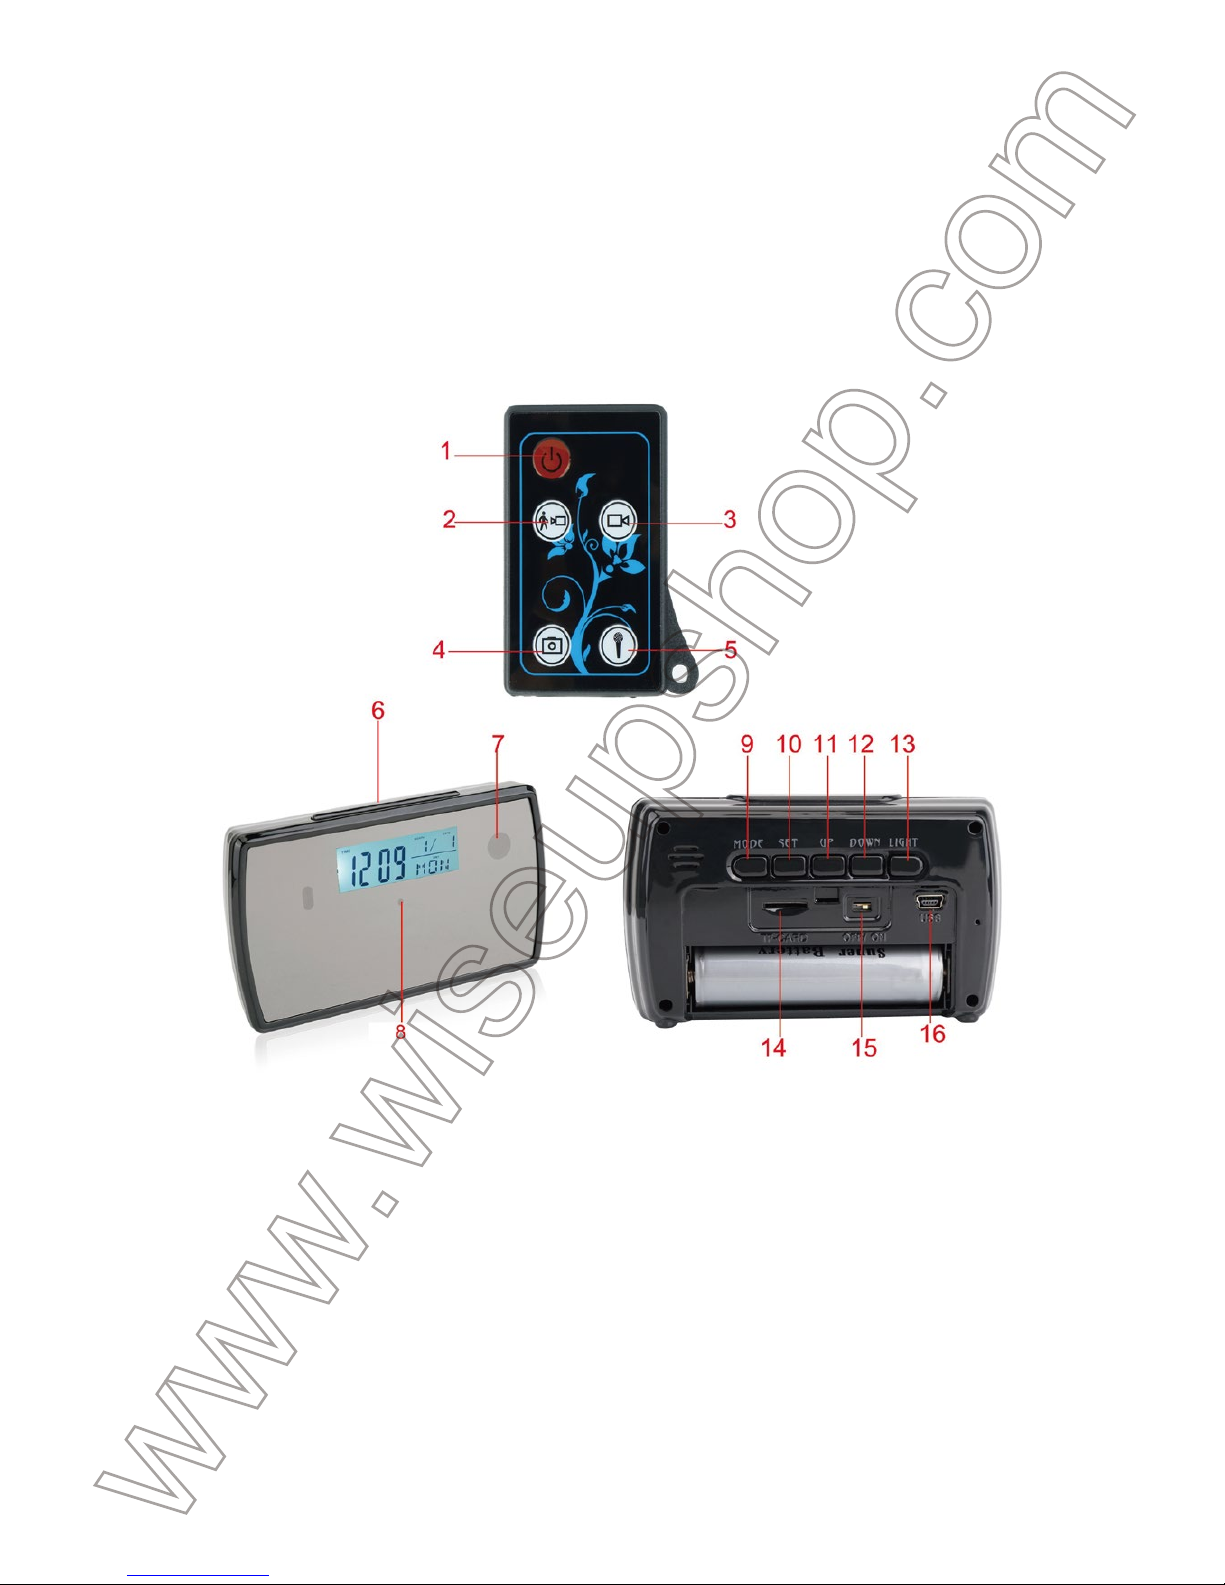
I. Produktübersicht
1. Netzschalter
2. Bewegungs-Abfragungs-Aufnahmetaste
3. Video-Aufnahmetaste
4. Kamera-Taste
5. Audio-Aufnahmetaste
6. Timer-Taste
7. Kameraobjektiv
8. Kontrollleuchte
II. Was ist in der Box
-1 × Wecker-Kamera
-1 × Fernsteuerpult
-1 × USB-Kabel
-1 × AC110-240V zum DC5V Aufladeeinheits-Adapter
-1 × 8GB Micro SD-Karte (in den Micro SD-Kartensteckplatz bereits eingebaut)
III. Betrieb
>> Vergewissern Sie sich vor der Verwendung, dass die Uhrzeitkamera
vollständig aufgeladen ist.
>> Bitte stellen Sie sicher, dass die Micro SD-Karte (4GB-32GB) bereits
formatiert wurde und sicher in den SD-Kartensteckplatz der Kamera eingesteckt
ist, oder es funktioniert nicht. Eine SDHC Klasse 10 Micro SD-Karte wird
empfohlen.
>> Entfernen Sie die Isolierfolie vom Ende der Batterie und der Fernbedienung.
>> Wenn Sie die Kamera 24/7 Tage arbeiten möchten, schließen Sie die
Uhrkamera an eine Steckdosen-Stromversorgung an, indem Sie den
Ladegerätadapter verwenden.
[Hinweis]:
1). Wenn keine Micro SD-Karte in die Uhrkamera eingebaut ist, blinkt die Kontrolllampe
für 15 Sekunden blau und schaltet sich dann aus. Die Kamera wird automatisch
heruntergefahren.
2). Sobald der Isolierfilm von der Batterie entfernt ist, leuchtet die LCD-Anzeige der
Taktkamera mit einem Musikstück auf, danach hört die Musik automatisch auf; Wenn die
LCD-Anzeige nicht leuchtet, drücken Sie bitte einmal die Lichttaste.
3.1. EINSCHALTEN / AUSSCHALTEN
3.1.1. Schieben Sie den Netzschalter auf ON. Schalten Sie die Kamera ein,
indem Sie einmal die Power-Taste auf der Fernbedienung drücken. Die
Kontrolllampe leuchtet blau und zeigt an, dass die Kamera automatisch in den
Standby-Modus versetzt wurde.
3.1.2. Schalten Sie die Kamera aus, indem Sie erneut die Ein- / Austaste auf der
Fernbedienung drücken und schalten Sie den Netzschalter auf OFF. Die
Anzeigelampe erlischt.
[Hinweis]: Die Kamera schaltet sich automatisch ab, wenn sie sich im Standby-Modus
befindet, ohne dass der Betrieb länger als 3 Minuten ist.
3.2. VIDEOAUFNAHME
3.2.1. Schieben Sie den Netzschalter auf ON. Schalten Sie die Kamera ein,
indem Sie einmal die Power-Taste auf der Fernbedienung drücken. Die
Kontrolllampe leuchtet blau und zeigt an, dass die Kamera automatisch in den
Standby-Modus versetzt wurde.
3.2.2. Drücken Sie die Videoaufnahme-Taste einmal, um Video aufzuzeichnen.
Die Anzeigelampe blinkt dreimal langsam blau und schaltet sich dann aus, was
bedeutet, dass die Kamera das Video aufnimmt.
3.2.3. Drücken Sie erneut die Video-Aufnahmetaste, um die Aufnahme zu
beenden. Die Kontrolllampe leuchtet blau und zeigt an, dass die Kamera wieder
in den Standby-Modus zurückkehrt.
[Hinweis]:
1). Eine Videodatei wird alle 10 Minuten automatisch generiert und gespeichert.
2). Videoentschließung: 1280 × 720P Video Format: AVI
3). Die Kamera kann Video mit Backup-Batterie für 4,5 Stunden kontinuierlich auf eine
volle Aufladung aufzeichnen.
3.3. KAMERA / STILL FOTOGRAFIE
3.3.1. Schieben Sie den Netzschalter auf ON. Schalten Sie die Kamera ein,
indem Sie einmal die Power-Taste auf der Fernbedienung drücken. Die
Kontrolllampe leuchtet blau und zeigt an, dass die Kamera automatisch in den
Standby-Modus versetzt wurde.
3.3.2. Drücken Sie die Kamera-Taste einmal, um ein Foto aufzunehmen. Die
Kontrollleuchte blinkt einmal blau und leuchtet dann leuchtend blau, was
bedeutet, dass die Kamera wieder in den Standby-Modus zurückkehrt.
3.4. AUDIO AUFNAHME
3.4.1. Schieben Sie den Netzschalter auf ON. Schalten Sie die Kamera ein,
indem Sie einmal die Power-Taste auf der Fernbedienung drücken. Die
Kontrolllampe leuchtet blau und zeigt an, dass die Kamera automatisch in den
Standby-Modus versetzt wurde.
3.4.2. Drücken Sie einmal die Audio-Aufnahme-Taste, um Audio aufzuzeichnen.
Die Kontrollleuchte blinkt zweimal langsam blau und schaltet sich dann aus.
3.4.3. Drücken Sie erneut die Audio Recording-Taste, um die Aufnahme zu
stoppen. Die Kontrolllampe leuchtet blau und zeigt an, dass die Kamera wieder
in den Standby-Modus zurückkehrt.
[Hinweis]:
1). Eine Audiodatei wird automatisch alle 20 Minuten erstellt und gespeichert.
2). Audio-Format: WAV
3.5. BEWEGUNGSERKENNUNG
3.5.1. Schieben Sie den Netzschalter auf ON. Schalten Sie die Kamera ein,
indem Sie einmal die Power-Taste auf der Fernbedienung drücken. Die
Kontrolllampe leuchtet blau und zeigt an, dass die Kamera automatisch in den
Standby-Modus versetzt wurde.
3.5.2. Drücken Sie die Motion Detection Recording-Taste einmal, um in den
Bewegungserkennungs-Aufnahmemodus zu gelangen. Die Kontrollleuchte
blinkt dreimal langsam blau und schaltet sich dann aus. Die Kamera nimmt das
Video automatisch auf, wenn eine Bewegung erkannt wird.
3.5.3.Drücken Sie erneut die Bewegungserkennungstaste, um den
Bewegungserkennungs-Aufnahmemodus zu verlassen. Die Kontrolllampe leuchtet
blau und zeigt an, dass die Kamera wieder in den Standby-Modus zurückkehrt.
[Hinweis]: Eine Videodatei wird alle 3 Minuten automatisch generiert und gespeichert.
IV. Video / Bilddateien Uploads
4.1. Schalten Sie die Uhrkamera aus, entfernen Sie die Micro SD-Karte und
stecken Sie sie in einen Kartenleser ein.
4.2. Stecken Sie den Kartenleser in einen PC-Computer.
4.3. Die Micro SD-Karte wird als Wechseldatenträger erkannt.
4.4. Auf alle Dateien kann im Ordner "DCIM" zugegriffen werden.
V. Einstellzeit / Datumsstempel
5.1. Schalten Sie die Uhrkamera aus, entfernen Sie die Micro SD-Karte und
stecken Sie sie in einen Kartenleser ein.
5.2.Wechseldatenträgerordner wird angezeigt.
5.3.Klicken Sie auf das Laufwerk im Stammverzeichnis und im Stammverzeichnis,
erstellen Sie eine Datei mit dem Namen "time.txt".
5.4. Schreiben Sie das aktuelle Datum und die Uhrzeit in der Datei "time.txt" mit
dem richtigen Format:
YYYY.MM.DD HH: MM: SS (Beispiel: 2016.04.12 14:24:32). Speichern Sie
diese Datei.
5.5. Starten Sie die Kamera neu und das System aktualisiert das Programm
automatisch.
VI. Aufladen
6.1. Entfernen Sie den Isolierfilm vom Ende der Batterie.
6.2. Schließen Sie die Uhrkamera an eine Netzsteckdose an, indem Sie den
mitgelieferten Ladegerätadapter verwenden.
6.3. Die Kontrolllampe leuchtet während des Ladevorgangs rot.
6.4. Die Kontrolllampe erlischt, wenn die Kamera vollständig aufgeladen ist.
6.5. Es dauert 4,5 Stunden, um eine volle Ladung zu erhalten.
VII. Wecker Grundeinstellung
7.1. ZEITEINSTELLUNG
7.1.1. Wenn das LCD-Display der Taktkamera den Standardmodus anzeigt,
drücken Sie einmal die Set-Taste und die Stunde beginnt zu blinken. Verwenden
Sie die Auf- oder Ab-Taste, um die aktuelle Stunde einzustellen.
7.1.2. Drücken Sie erneut die Set-Taste, um die Stundeneinstellung zu
speichern, und die Minute beginnt zu blinken. Verwenden Sie die UP- oder
DOWN-Taste, um die aktuelle Minute einzustellen.
7.1.3. Drücken Sie erneut die Set-Taste, um die Minuteneinstellung zu
speichern, und das Jahr beginnt zu blinken. Verwenden Sie die Auf- oder
Ab-Taste, um das aktuelle Jahr anzupassen.
7.1.4. Drücken Sie erneut die Set-Taste, um die Jahreseinstellung zu speichern,
und der Monat beginnt zu blinken. Verwenden Sie die Auf- oder Ab-Taste, um
den aktuellen Monat einzustellen.
7.1.5. Drücken Sie erneut die Set-Taste, um die Monatseinstellung zu speichern,
und das Datum beginnt zu blinken. Verwenden Sie die Auf- oder Ab-Taste, um
das aktuelle Datum einzustellen.
7.1.6.Drücken Sie erneut die Set-Taste, um die Datumseinstellung zu speichern,
und der Tag beginnt zu blinken. Verwenden Sie die Nach-oben-oder
Nach-unten-Taste, um die gewünschte Tagessprache aus Italienisch, Portugiesisch,
Spanisch, Englisch, Französisch, Deutsch und Niederländisch auszuwählen.
7.1.7. Drücken Sie erneut die Set-Taste, um die Einstellung der Tagessprache
zu speichern.
7.2. 12/24-STUNDEN-MODUS-SCHALTER
Wenn das LCD-Display der Taktkamera den Standardmodus anzeigt, drücken
Sie die Auf-Taste, um zwischen dem 12-Stunden-Modus und dem
24-Stunden-Modus umzuschalten.
7.3. ALARMEINSTELLUNG
7.3.1. Wenn das LCD-Display der Taktkamera den Standardmodus anzeigt,
drücken Sie einmal die Mode-Taste, um in den Alarmmodus zu gelangen.
7.3.2. Wenn die LCD-Anzeige der Taktkamera den Alarmmodus anzeigt,
drücken Sie einmal die Set-Taste und die Stunde beginnt zu blinken. Verwenden
Sie die Auf- oder Ab-Taste, um die Stunde einzustellen.
7.3.3. Drücken Sie erneut die Set-Taste, um die Stundeneinstellung zu
speichern, und die Minute beginnt zu blinken. Verwenden Sie die Auf- oder
9. Modus-Taste
10. Schaltfläche
11. Auf-Taste
12. Abwärtstaste
13. Leuchttaste
14. Mikro-Sd-Einbauschlitz
15. Netzschalter
16. USB-Anschluss
Ab-Taste, um die Minuten einzustellen.
7.3.4.Drücken Sie erneut die Set-Taste, um die Minuteneinstellung zu speichern,
und die arabische Ziffer beginnt zu blinken. Verwenden Sie die UP- oder
DOWN-Taste zur Auswahl von 1 bis 8, die 8 verschiedene Arten von Musik
anzeigt.
7.3.5.Drücken Sie erneut die Set-Taste, um die Musik-Einstellung zu speichern.
7.3.6.Drücken Sie einmal die Aufwärts- oder Abwärtstaste, die Alarmmarkierung
erscheint auf dem LCD-Display und zeigt an, dass die Alarmfunktion aktiviert
wurde;
7.3.7.Drücken Sie die UP- oder DOWN-Taste erneut, die SNOOZE-Markierung
erscheint auf dem LCD-Display und zeigt an, dass die SNOOZE-Funktion
aktiviert ist;
7.3.8.Drücken Sie erneut die Aufwärts- oder Abwärtstaste, die Alarm- und die
SNOOZE-Markierung werden auf der LCD-Anzeige ausgeblendet, wodurch
angezeigt wird, dass die Alarm- und SNOOZE-Funktion aktiviert wurde.
7.4. WELTZEIT-BROWSE
Wenn das LCD-Display der Taktkamera den Standardmodus anzeigt, drücken
Sie die Auf-Taste, um die Weltzeit von 16 Städten zu durchsuchen.
7,5. TIMER EINST
7.5.1.Wenn das LCD-Display der Uhrenkamera den Standardmodus anzeigt,
drücken Sie die Timer-Taste einmal, um in den Timer-Modus zu gelangen.
7.5.2.Wenn das LCD-Display der Taktkamera den Timer-Modus anzeigt,
drücken Sie einmal die Set-Taste und die Stunde beginnt zu blinken. Drücken
Sie die Auf- oder Ab-Taste, um die Stunde einzustellen.
7.5.3.Drücken Sie erneut die Set-Taste, um die Stundeneinstellung zu
speichern, und die Minute beginnt zu blinken. Drücken Sie die Auf- oder
Ab-Taste, um die Minuten einzustellen.
7.5.4.Drücken Sie erneut die Set-Taste, um die Minuteneinstellung zu speichern,
und die zweite beginnt zu blinken. Drücken Sie die Taste Auf oder Ab, um die
Sekunde einzustellen.
7.5.5.Drücken Sie erneut die Set-Taste, um die zweite Einstellung zu speichern.
Die Timer-Einstellung ist abgeschlossen.
7.5.6.Drücken Sie die Taste Timer einmal, um den Countdown zu starten.