Wolf ICBEC24 User manual

COFFEE SYSTEMS
USE & CARE GUIDE
GUÍA DE USO Y MANTENIMIENTO
GUIDE D’UTILISATION ET D’ENTRETIEN
GUIDA ALL’USO E ALLA MANUTENZIONE
BEDIENUNGS-UND PFLEGEANLEITUNG

2
|
English
Contents
3Safety Precautions
7Coffee Systems
7Coffee System Operation
11 Care Recommendations
12 Troubleshooting
13 Wolf Warranty
COFFEE SYSTEMS
Customer Care
The model and serial number are printed on the enclosed
product registration card. Both numbers are also listed on
the product rating plate. Refer to page 7 for rating plate
location. For warranty purposes, you will also need the date
of installation and name of your authorized Wolf dealer.
Record this information below for future reference.
If your product ever needs attention, be sure to use a Wolf
factory certied service provider.
SERVICE INFORMATION
Model Number
Serial Number
Date of Installation
Certied Service Name
Certied Service Number
Authorized Dealer
Dealer Number
Important Note
To ensure this product is installed and operated as safely
and efciently as possible, take note of the following types
of highlighted information throughout this guide:
IMPORTANT NOTE highlights information that is especially
important.
CAUTION indicates a situation where minor injury or product
damage may occur if instructions are not followed.
WARNING states a hazard that may cause serious injury or
death if precautions are not followed.

wolfappliance.com
|
3
SAFETY PRECAUTIONS
IMPORTANT SAFEGUARDS
When using electrical appliances, basic safety precautions
should always be followed including the following:
READ ALL INSTRUCTIONS
•Make sure the voltage of your electrical system corresponds to
the voltage shown on the machine.
•Do not touch hot surfaces. Use handles or knobs.
•Never immerse the appliance in water.
WARNING
The appliance is not intended for use by persons (including
children) with reduced physical, sensory or mental capabili-
ties, or lack of experience and knowledge, unless they have
been given supervision or instruction concerning use of the
appliance by a person responsible for their safety. Children
should be supervised to ensure that they do not play with the
appliance. Cleaning and user maintenance shall not be made
by children without supervision.
WARNING
This appliance can be used by children aged from 8 years
and above if they have been given supervision or instruction
concerning use of the appliance in a safe way and if they
understand the hazard involved. Cleaning and user mainte-
nance shall not be made by children unless they are older
than 8 and supervised. Keep the appliance and its cord out
of the reach of children aged less than 8 years. Appliances
can be used by persons with reduced physical, sensory, or
mental capabilities or lack of experience and knowledge if
they have been given supervision or instruction concerning
use of the appliance in a safe way and understand the haz-
ards involved. Children shall not play with the appliance.
•When not in use and before cleaning, always unplug the
appliance.
•Surfaces marked with this symbol become hot during use
(the symbol is present in certain models only).

4
|
English
SAFETY PRECAUTIONS
•Extreme caution must be used when moving an appliance con-
taining hot oil or other hot liquids.
•Do not use appliance for other than intended use.
•The appliance must be properly installed before operation to
ensure that no electrical components are accessible. Ensure
that power is not supplied to the appliance while installation
work, repairs or maintenance is performed.
•Be certain your appliance is properly installed and grounded
by a qualied technician. To guarantee the electrical safety of
this appliance, continuity must exist between the appliance
and effective grounding system. It is imperative that this basic
safety requirement be met. If there is any doubt, have the elec-
trical system of the house checked by a qualied electrician.
The manufacturer can not be held responsible for damages
caused by the lack, or inadequacy, of an effective grounding
system.
IMPORTANT SAFEGUARDS
•If the plug or power cable is damaged, it must be replaced by
customer services only to avoid all risk.
•The use of accessory attachments not recommended by the
appliance manufacturer may cause injuries.
•Do not let cord hang over edge of table or counter, or touch hot
surfaces.
•Do not place on or near a hot gas or electric burner, or in a
heated oven.
•Keep all packaging (plastic bags, polystyrene foam) away from
children.
•Make sure the socket used is accessible at all times, enabling
the appliance to be unplugged when necessary. To disconnect,
turn main power switch to “OFF” and unplug only from the
wall. Never pull on the power cord as you could damage it.

wolfappliance.com
|
5
SAFETY PRECAUTIONS
IMPORTANT SAFEGUARDS
•Do not use an extension cord to connect the appliance to elec-
tricity. Extension cord doesn’t guarantee the required safety of
the appliance (danger of overheating).
•Installation work and repairs must be only performed by a
trained technician in accordance with national and local safety
regulations. Repairs and other work by unauthorized persons
could be dangerous and may void the warranty.
•Only use original spare parts. Only then can the manufacturer
guarantee the safety of this machine.
•Never open the outer casing of the appliance. Tampering with
electrical connections or components and mechanical parts is
dangerous and may cause machine damage.
•If the machine is installed in combination with other appliances,
a protective base should be installed between the appliance
and the unit.
•Do not install or use outdoors even if installed in the display
cabinet.
•Only ll the water tank with cold, fresh tap water. Warm or hot
water, or any other liquids may damage the machine.
•The water should be changed daily to prevent bacteria or mold
growth.
•Do not use mineral water. Mineral water leads to heavy calcium
buildup in the machine that can damage the unit.
•Do not ll anything but coffee beans into the beans container.
Do not ll ground coffee in the beans container, it will damage
the grinding unit.
•Sugar can damage the appliance! Caramelized or otherwise
pre-treated coffee beans or other sugar containing beverages
must not be put in the machine.

6
|
English
SAFETY PRECAUTIONS
•The appliances must be descaled regularly. In areas with very
hard water the machine may need to be descaled more often.
The manufacturer cannot be held responsible for damages
resulting from insufcient descaling.
•Do not grasp the coffee maker when it is extracted. Do not rest
cups containing liquids or inammable/corrosive materials on
top of the appliance. Place all accessories required to make
the coffee in their designated holder when done using them.
Do not rest large objects which could obstruct movement or
unstable objects on the appliance.
•THIS APPLIANCE IS FOR HOUSEHOLD USE ONLY. It is not
intended to be used in: staff kitchen areas in shops; ofces and
other working environments; farm houses; by clients in hotels,
motels, and other residential type environments; bed and
breakfast type environments.
SAVE THESE INSTRUCTIONS
IMPORTANT SAFEGUARDS
•Never place a cup with an alcohol-coffee mixture underneath
the coffee dispenser. Plastic parts of the unit could catch re!
•The hot water and steam dispensed could cause scalding.
These functions must be used carefully. Never hold any parts
of the body under the steam nozzle or the hot water dispenser.
The machine must never be used to clean objects.
•Never use a steam cleaner to clean the appliance. Pressurized
steam could damage electrical components and cause a short
circuit.
•Never make coffee, hot water or steam when the appliance is
extracted. Always make sure the appliance is inactive before
extracting it. Failure to observe this precaution could lead to
damage to the appliance! The only exception is adjusting the
coffee mill which must be done with the machine out (see the
section “GRIND ADJUSTMENT”).

wolfappliance.com
|
7
COFFEE SYSTEMS
Coffee System Features
FEATURE
1Product Rating Plate
2Control Panel and Display
3Coffee Spout
4Water Tank
5Service Door
6LED Lighting
7Drip Tray
8Main Power Switch (behind control panel)
9Handle (to slide unit forward)
10 Milk Container
11 Water Spout
Coffee system (ICBEC24/S shown).
5
2
3
4
6
1
7
10 11
9
8
9
Control Panel
BUTTON USES
On/Stand by.
Access to extended options.
Delivers hot water.
Selects taste.
Selects volume.
Initiates cycle.
Initiates cycle and doubles the volume.
Makes cappuccino.
Makes latte macchiato, caffelatte or frothed milk.
Exit extended options.
Select next option, move ahead.
Select previous option, move back.
Enter.
Control panel.
COFFEE SYSTEM OPERATION
Using the Appliance for the First Time
1Fill the water tank. Refer to the illustration below.
2Slide unit forward and press the main power switch
located behind the front (right) control panel.
3Select desired language. To select, scroll through lan-
guages until desired language is displayed, then press
and hold .
4Press . Hot water will be dispensed from the hot
water spout.
5The unit will turn off automatically after initial power up is
complete.
WATER TANK
Water tank.

8
|
English
COFFEE SYSTEM OPERATION
Cup Placement
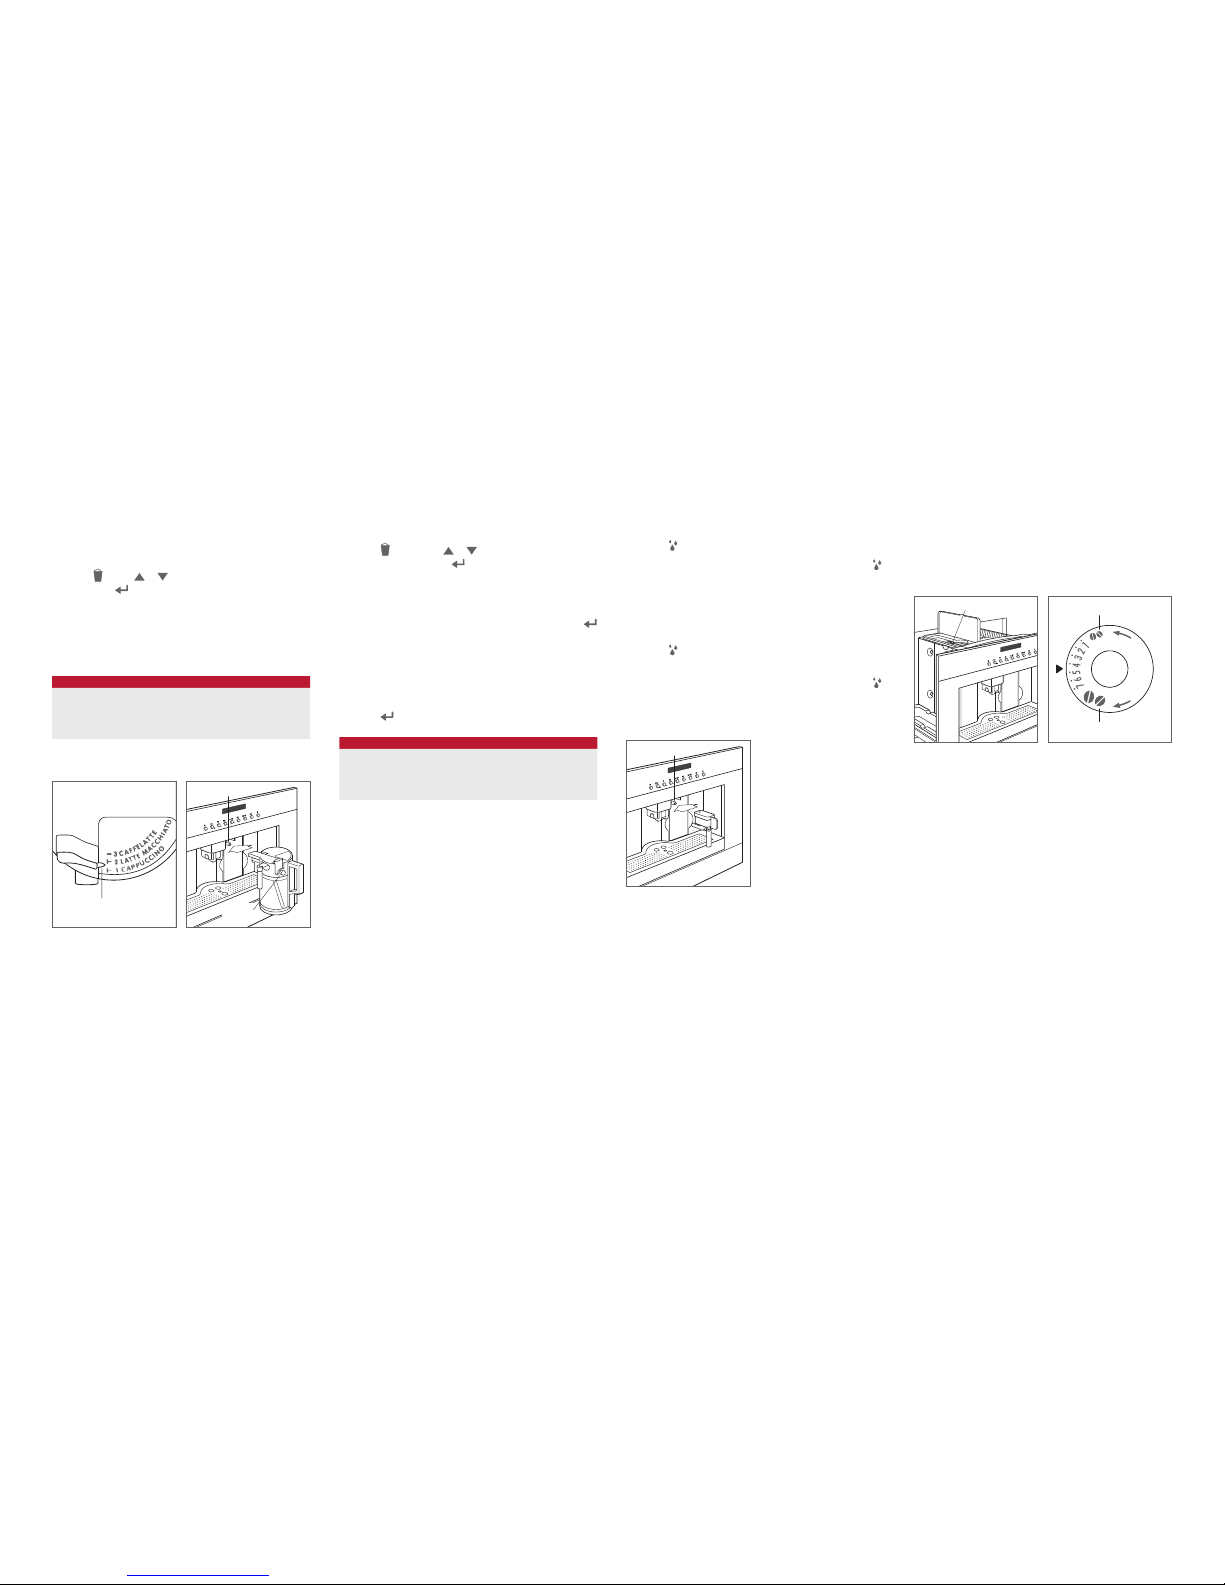
The adjustable height coffee spout has two outlets. One or
two cups can be placed under the spout. Adjust the height
of the spout as close to the cup(s) as possible. Refer to the
illustrations below.
Prior to Use
To ensure all residual oil from the manufacturing process
has been removed, clean the coffee system thoroughly
with hot water and a mild detergent prior to use. Rinse and
dry with a soft cloth. Refer to care recommendations on
page 11.
1Remove, ll and reinstall water tank. Refer to the illustra-
tion below.
2Using the handle, slide unit forward and open the whole
bean compartment lid. Refer to the illustration below. Fill
the compartment, then slide unit back into position.
3Install water spout or milk container.
4The unit will go through an automatic rinse cycle upon
initial start up and before turning off. A small amount of
liquid will dispense from the coffee spout during the rinse
cycle.
WATER TANK
WHOLE BEAN COMPARTMENT
Water tank.
Whole bean compartment.
COFFEE
SPOUT
Cup placement.
Coffee spout.
Extended Options
The extended options feature allow the user to select
preferences for the options listed in the chart below.
SETTING FUNCTION
Rinsing Initiates rinse cycle.
Beep Enable Enables or disables audible tone.
Descale Initiates descale cycle. Refer to page 11.
Default Returns all settings to factory default settings.
Statistics Displays number of beverages produced.
Contrast Adjusts display brightness.
Hardness Adjusts water hardness (•••• hardest).
Set Temperature Adjusts coffee temperature (•••• hottest).
Auto-Off Turns unit off after 15 min, 30 min, 1 hr, 2 hr
or 3 hr.
Auto-Start Turns unit on, rinses and heats at preset time.
Adjust Time Adjusts time of day. Required for auto-start.
Energy Saving Enables or disables energy saving mode.
Set Language Adjusts language.
Setting extended options:
1To enter extended options mode, when the appliance is
on, press to access options.
2Press or to scroll through options, then press to
select option.
3Press or to select preferences, then press to
enter preference.
4Press to exit extended options mode.
Coffee
WHOLE BEANS
Do not use caramelized or avored beans.
1Press multiple times to select the desired taste.
Choices include extra-mild, mild, standard, strong, extra-
strong or pre-ground.
2Press multiple times to select the desired volume.
Refer to the chart below.
3Press to initiate the cycle. Press to initiate the
cycle and double the volume.
4Adjust the height of the coffee spout as close to the cup
as possible.
For all beverages 360 ml or larger, ‘FILL WATER AND
BEANS, EMPTY TRAY AND GROUNDS’ will appear on the
display. Once levels have been veried, press to initiate
cycle.
VOLUME
BEVERAGE VOLUME
Espresso 30 ml
Short Coffee 90 ml
Coffee 270 ml
Long Coffee 360 ml

wolfappliance.com
|
9
COFFEE SYSTEM OPERATION
Coffee
MY COFFEE
The My Coffee setting allows the user to select any volume
between 30 ml and 207 ml.
1Press multiple times until ‘MY COFFEE’ is
displayed.
2Press and hold until ‘MY COFFEE—PROGRAM
QUANTITY’ is displayed, then release.
3Once the desired amount is reached, press .
NOTE: You can program a single coffee only.
PRE-GROUND COFFEE
1Press multiple times and select pre-ground.
2Using the handle, slide unit forward and open the pre-
ground coffee lid. Refer to the illustration below.
3Use the scoop provided to place one scoop of pre-
ground coffee into the funnel, then slide unit back into
position. NOTE: Using more than one scoop will cause
unit to clog.
4Press multiple times to select the desired volume.
5Press to initiate the cycle. Press to initiate the
cycle and double the volume.
6Adjust the height of the coffee spout as close to the cup
as possible.
PRE-GROUND COMPARTMENT
Pre-ground compartment.
Cappuccino
1Remove water spout (if installed).
2Adjust the froth regulator on the milk container to the
desired amount. Refer to the chart and illustration below.
3Fill with milk and insert the milk container. Refer to the
illustration below.
4Place a cup under the coffee spout, then verify the milk
spout is positioned over the cup.
5Press to initiate the cycle.
6Once the cycle is complete, place a cup under the milk
spout, then press and hold CLEAN on the milk container
until the bar is complete.
7Remove milk container and place in refrigerator.
FROTH
BEVERAGE AMOUNT
Caffelatte No Froth
Latte Macchiato Some Froth
Cappuccino Most Froth
ADJUSTING VOLUME
Refer to the chart below for the programmed volume of milk
and coffee for cappuccino. The maximum volume of milk is
limited to the volume in the container.
1Insert the milk container.
2Press until ‘MILK FOR CAPPUCCINO PROGRAM
QUANTITY’ is displayed, then release.
3Once the desired volume of milk is dispensed, press .
4After a few seconds unit will begin to dispense coffee
and ‘COFFEE FOR CAPPUCCINO PROGRAM QUAN-
TITY’ appears on the display.
5Once the desired volume of coffee is dispensed,
press . The new volume will be maintained until repro-
grammed or default settings are selected.
VOLUME
BEVERAGE MILK COFFEE
Cappuccino 70 ml 80 ml
FROTH
REGULATOR
RECEPTACLE
Froth regulator.
Milk container.
CLEAN
BUTTON

10
|
English
COFFEE SYSTEM OPERATION
Latte Macchiato, Caffelatte or Frothed Milk
1Remove water spout (if installed).
2Adjust the froth regulator on the milk container to the
desired amount. Refer to the chart and illustration below.
3Fill with milk and insert the milk container. Refer to the
illustration below.
4Place a cup under the coffee spout, then verify the milk
spout is positioned over the cup.
5Press , press or to scroll to desired beverage,
then press to initiate the cycle.
6Once the cycle is complete, place a cup under the milk
spout, then press and hold CLEAN on the milk container
until the bar is complete.
7Remove milk container and place in refrigerator.
FROTH
BEVERAGE AMOUNT
Caffelatte No Froth
Latte Macchiato Some Froth
Cappuccino Most Froth
ADJUSTING VOLUME
Refer to the chart below for the programmed volume of milk
and coffee for each beverage. The maximum volume of milk
is limited to the volume in the container.
1Insert the milk container.
2Press , then press or to scroll to desired bev-
erage. Press and hold until ‘MILK FOR MACCHIATO
PROGRAM QUANTITY’, ‘MILK FOR CAFFELATTE
PROGRAM QUANTITY’ or ‘FROTHED MILK PROGRAM
QUANTITY’ is displayed, then release.
3Once the desired volume of milk is dispensed, press .
4For a Latte Macchiato or Caffelatte, the unit will begin
to dispense coffee and ‘COFFEE FOR MACCHIATO
PROGRAM QUANTITY’ or ‘COFFEE FOR CAFFELATTE
PROGRAM QUANTITY’ appears on the display.
5Once the desired volume of coffee is dispensed,
press . The new volume will be maintained until reset.
VOLUME
BEVERAGE MILK COFFEE
Latte Macchiato 90 ml 60 ml
Caffelatte 240 ml 60 ml
Frothed Milk 240 ml NA
FROTH
REGULATOR
RECEPTACLE
Froth regulator.
Milk container.
CLEAN
BUTTON
Coffee Mill
GRIND ADJUSTMENT
If coffee delivery is too fast or too slow, the grind can be
adjusted by turning the grind adjustment dial. Refer to the
illustrations below.
Adjustment must be made while the mill is in operation. Turn
the dial clockwise for faster coffee delivery (coarser grind)
and counterclockwise for slower coffee delivery (ner grind).
ADJUSTMENT DIAL
COARSER GRIND
FINER GRIND
Adjustment dial location.
Grind adjustment.
Hot Water
Hot water can be dispensed to make tea or for preheating
cups. Preheating cups will allow beverages to stay hot
longer.
1Verify the water spout is installed, then place a cup
under the spout. Refer to the illustration below.
2Press . ‘HOT WATER’ will appear on the display.
3Once the desired volume has been dispensed, press .
ADJUSTING VOLUME
1Verify the water spout is installed, then place a cup
under the spout.
2Press until ‘HOT WATER PROGRAM QUANTITY’ is
displayed, then release.
3Once the desired volume has been dispensed, press .
The new volume will be maintained until reset.
RECEPTACLE
Water spout.

wolfappliance.com
|
11
COFFEE SYSTEM OPERATION
Descale
Use only EcoDecalk descaling solution.
1Remove the water tank and empty completely.
2Pour diluted descaler (as indicated on the package) into
the water tank, then reinstall.
3Install the water spout, then place a large container,
more than 2 L, under the spout.
4When the appliance is on, press to access options.
5Press or until ‘DESCALE’ is displayed, then
press . ‘DESCALING UNDERWAY’ will appear on the
display.
6After 30 minutes, ‘RINSING FILL TANK’ is displayed.
Fill the water tank with water and empty the large con-
tainer, then reinstall.
7Press . ‘RINSING PLEASE WAIT’ will appear on the
display.
8Once the cycle is complete, ‘RINSING COMPLETE’ will
appear on the display, then ll container and press .
Press and then press .
CARE RECOMMENDATIONS
Care Recommendations
CLEANING
Coffee system Before cleaning, turn unit off at main switch and disconnect from electrical supply. Never submerge unit
in water. Do not wash any components in the dishwasher.
Stainless steel Use a nonabrasive stainless steel cleaner and apply with a soft lint-free cloth. To bring out the natural
luster, lightly wipe surface with a water-dampened microber cloth followed by a dry polishing chamois.
Always follow the grain of stainless steel.
Control panel Use spray degreaser to remove ngerprints and food soil. Spray on a cloth before wiping panel.
IMPORTANT NOTE: Do not spray cleaners directly on the control panel.
Coffee spout Clean periodically using a sponge. Remove any coffee deposits in holes with a toothpick.
Water tank Clean periodically (about once a month) with a damp cloth and mild dish soap. Rinse and towel dry.
Drip tray
Grounds container
Empty and clean drip tray before water level indicator protrudes from cup tray. Empty and clean grounds
container when ‘EMPTY GROUNDS CONTAINER’ is displayed. Open service door. Remove and empty
drip tray and grounds container. Wash with warm water and mild dish soap. Rinse and towel dry. Refer to
the illustration below.
Pre-ground compartment Check periodically to verify pre-ground coffee funnel is not blocked.
Interior Access by opening service door. Remove coffee deposits with a sponge and vacuum residue.
Infuser Clean infuser at least once a month. Turn unit off, then open service door and remove drip tray and
grounds container. Press two red buttons inward and remove infuser. Soak in water approximately 5
minutes, then rinse and towel dry. Do not use detergent. Replace by sliding infuser onto internal support
and bottom pin, then press “PUSH” until it clicks into place. Verify red buttons have snapped out.
IMPORTANT NOTE: Do not use detergent to clean infuser. It will remove lubricant on interior parts.
Milk container Unscrew lid, remove milk spout and intake tube. Remove froth regulator by pulling outward. Refer to the
illustration below. Wash all components thoroughly with hot water and mild dish soap. Rinse and dry
before reassembling. Components are dishwasher safe; use top rack of dishwasher.
Milk container lid Clean circuits in lid after making cappuccino. ‘PRESS CLEAN’ ashes on the display. Place a cup
under milk spout. Press and hold ‘CLEAN’ on the lid for 5 seconds to initiate cleaning. ‘CLEANING
UNDERWAY’ appears on the display. Hold ‘CLEAN’ until progress bar is complete. After cleaning,
remove milk container and store in refrigerator.
DRIP TRAY
GROUNDS
CONTAINER
INFUSER
MILK
SPOUT
INTAKE
TUBE
FROTH
REGULATOR
CLEAN
MILK
SPOUT
INTAKE
TUBE
FROTH
REGULATOR
CLEAN
Service door open.
Milk container lid.

12
|
English
TROUBLESHOOTING
Troubleshooting
OPERATION
Coffee system does not operate.
•Verify power is on.
•Verify electrical power to unit and home circuit breaker
is on.
Infuser is difficult to reinstall.
•Before inserting, compress top and bottom ends of the
infuser together to adapt to the proper dimension for
installation.
•Once inserted, verify two red buttons have snapped out.
‘LESS COFFEE’ message displayed.
•Too much coffee has been used. Select a milder tasting
coffee or reduce the quantity of pre-ground coffee.
‘EMPTY CIRCUIT FILL CIRCUIT’ message displayed.
•The water circuit is empty. Connect the hot water nozzle
and press to deliver water from it, until it ows out
normally.
‘GENERAL ALARM’ message displayed.
•Interior needs thorough cleaning. Refer to page 11.
If message displays after cleaning, contact your Wolf
service provider.
COFFEE QUALITY
Coffee not hot enough.
•Preheat cups with hot water.
•Change temperature in extended options.
Coffee does not have enough crema.
•Coffee ground too coarsely. Refer to grind adjustment on
page 10.
•Verify type of coffee used is for espresso machines.
Extraction time too slow.
•Shorten extraction time by adjusting grind to coarser
pre-ground coffee. Refer to page 10.
Extraction time too fast.
•Increase extraction time by adjusting grind to ner pre-
ground coffee. Refer to page 10.
Coffee does not come out of spouts.
•Clean blocked spouts.
Coffee comes out from around service door.
•Clean blocked spouts and thoroughly clean the coffee
guide.
Water comes out of spouts instead of coffee.
•Clean pre-ground coffee funnel to unblock.
Milk does not come out of milk spout.
•Verify intake tube is inserted in the rubber washer in the
intake tube.
Milk is not well frothed.
•Clean milk container lid.
•Adjust frothing regulator. Refer to pages 9–10.
Service
•Maintain the quality built into your product by contacting
Wolf factory certied service.
•When contacting service, you will need the model and
serial number of your product. Both numbers are listed
on the product rating plate. Refer to page 7 for rating
plate location.
•For warranty purposes, you will also need the date of
installation and name of your authorized Wolf dealer. This
information should be recorded on page 2 of this guide.

wolfappliance.com
|
13
Wolf Products Limited Warranty
INTERNATIONAL PRODUCTS
FOR RESIDENTIAL USE ONLY
FULL TWO YEAR WARRANTY
For two years from the date of original installation, your Wolf Appliance product warranty covers
all parts and labor to repair or replace, under normal residential use, any part of the product that
proves to be defective in materials or workmanship. All service provided by Wolf Appliance under
the above warranty must be performed by Wolf factory certied service, unless otherwise speci-
ed by Wolf Appliance, Inc. Service will be provided during normal business hours.
LIMITED THIRD THROUGH FIFTH YEAR WARRANTY
For ve years from the date of original installation, Wolf Appliance will repair or replace the follow-
ing parts that prove to be defective in materials or workmanship: gas burners (excluding appear-
ance), electric heating elements, blower motors (ventilation hoods), electronic control boards,
magnetron tubes and induction generators. The part(s) will be repaired or replaced, free of charge,
with the owner paying for all other costs including labor. All service provided by Wolf Appliance
under the above warranty must be performed by Wolf factory certied service, unless otherwise
specied by Wolf Appliance, Inc. Service will be provided during normal business hours.
Wolf, Wolf & Design, Wolf Gourmet, W & Design and the color red as applied to knobs are registered trademarks and service marks of Wolf Appliance, Inc. Sub-Zero, Sub-Zero
& Design, Dual Refrigeration, The Living Kitchen, Great American Kitchens The Fine Art of Kitchen Design, and Ingredients are registered trademarks and service marks of
Sub-Zero, Inc. (collectively, the “Company Marks.”) All other trademarks or registered trademarks are property of their respective owners in the United States and other countries.

2
|
Español
Índice
3Precauciones de seguridad
7Sistemas de café
7Funcionamiento del sistema de café
11 Recomendaciones de mantenimiento
12 Localización y solución de problemas
13 Garantía Wolf
SISTEMAS DE CAFÉ
Atención al cliente
El modelo y el número de serie están impresos en la tarjeta
de registro del producto que se adjunta. Esta información
también se muestra en la placa de datos del producto.
Consulte la página 7 para observar la ubicación de la placa
de datos. Para cuestiones relacionadas con la garantía,
también necesita saber la fecha de instalación y el nombre
de su distribuidor autorizado de Wolf. Guarde la siguiente
información para tenerla como referencia en el futuro.
Si alguna vez su producto necesita asistencia, asegúrese de
acudir a un servicio técnico autorizado de Wolf.
INFORMACIÓN SOBRE EL MANTENIMIENTO
Referencia del modelo
Número de serie
Fecha de instalación
Nombre del servicio certicado
Número de servicio certicado
Distribuidor autorizado
Número del distribuidor
Nota importante:
Para garantizar que este producto se instala y funciona de
la forma más ecaz y segura posible, tenga en cuenta la
información que se destaca en esta guía:
Cuando aparece NOTA IMPORTANTE, se resalta información
que resulta especialmente importante.
PRECAUCIÓN indica una situación en la que se pueden
sufrir heridas leves o provocar daños al producto si no se
siguen las instrucciones.
AVISO indica el peligro de que se produzcan heridas graves
o incluso la muerte si no se respetan las precauciones.

wolfappliance.com
|
3
PRECAUCIONES DE SEGURIDAD
INSTRUCCIONES DE SEGURIDAD IMPORTANTES
Cuando utilice aparatos eléctricos, siempre debe seguir ciertas
precauciones de seguridad básicas, entre las que se incluyen
las siguientes:
LEA TODAS LAS INSTRUCCIONES
•Asegúrese de que el voltaje de su sistema eléctrico se corres-
ponde con el voltaje indicado en la máquina.
•No toque las supercies calientes. Utilice manillares o pomos.
•Nunca sumerja el aparato dentro de agua.
AVISO
Este aparato no está diseñado para su uso por parte de per-
sonas (incluyendo niños) con discapacidades físicas, senso-
riales o mentales, o con falta de experiencia y conocimientos,
a menos que una persona responsable de su seguridad les
controle o enseñe cómo utilizarlo. Es preciso supervisar a los
niños para asegurarse de que no jueguen con el aparato. Los
niños no pueden realizar las tareas de limpieza y manteni-
miento sin supervisión.
AVISO
Este aparato puede ser utilizado por niños de ocho años
o más, siempre y cuando cuenten con supervisión o se
les haya enseñado cómo utilizarlo de forma segura y com-
prendan los peligros que supone. La limpieza y manteni-
miento no deben ser realizados por niños, salvo que sean
mayores de ocho años y estén supervisados. Mantenga el
aparato y su cable fuera del alcance de los niños con menos
de ocho años de edad. Los aparatos pueden ser utilizados
por personas con discapacidades físicas, sensoriales o men-
tales, o con falta de experiencia o conocimientos, siempre
y cuando cuenten con supervisión o se les haya enseñado
cómo utilizarlo de forma segura y comprendan los peligros
que supone. Los niños no deben jugar con el aparato.
•Siempre desenchufe el aparato antes de limpiarlo y cuando no
lo esté usando.
•Las supercies marcadas con este símbolo se calientan
durante su uso (el símbolo está presente solo en algunos
modelos).

4
|
Español
PRECAUCIONES DE SEGURIDAD
•Extreme las precauciones cuando mueva un aparato que con-
tenga aceite caliente u otro tipo de líquido caliente.
•No utilice el aparato para un uso diferente de aquel para el que
ha sido diseñado.
•El aparato debe estar correctamente instalado antes de iniciar
su funcionamiento, para garantizar que no hay ningún compo-
nente eléctrico accesible. Asegúrese de que no llega corriente
al aparato durante los trabajos de instalación, reparación o
mantenimiento.
•Asegúrese de que el aparato ha sido instalado y conectado
a tierra de manera correcta por un técnico cualicado. Para
garantizar la seguridad eléctrica de este aparato, debe haber
continuidad entre el aparato y un sistema efectivo de conexión
a tierra. Es imperativo que se cumpla con este requisito básico
de seguridad. En caso de duda, solicite a un electricista cuali-
cado que revise el sistema eléctrico de la casa. El fabricante
no se hace responsable de cualquier daño ocasionado por la
falta o inadecuación de un sistema de toma a tierra efectivo.
INSTRUCCIONES DE SEGURIDAD IMPORTANTES
•Si el enchufe o el cable de alimentación están dañados, deben
ser sustituidos por un servicio técnico para evitar cualquier
riesgo.
•El uso de accesorios no recomendados por el fabricante del
aparato puede provocar lesiones.
•No deje el cable colgando sobre el borde de la mesa o enci-
mera, ni deje que toque las supercies calientes.
•No lo coloque en o cerca de un quemador eléctrico o que-
mador de gas caliente, ni en un horno caliente.
•Mantenga todo el embalaje (bolsas de plástico, espuma de
poliestireno) lejos de los niños.
•Asegúrese de que puede accederse a la toma utilizada en
cualquier momento, permitiendo desenchufar el aparato en
caso necesario. Para desconectar, apague el interruptor de
encendido en “OFF” y desenchúfela solamente de la pared.
Nunca tire del cable de alimentación, pues podría dañarlo.

wolfappliance.com
|
5
PRECAUCIONES DE SEGURIDAD
INSTRUCCIONES DE SEGURIDAD IMPORTANTES
•No utilice un cable alargador para conectar el aparato a la
electricidad, pues no garantiza la seguridad necesaria del apa-
rato (peligro de sobrecalentamiento).
•Los trabajos de instalación y reparación solamente deben ser
realizados por un técnico cualicado de conformidad con las
normativas de seguridad locales y nacionales. Las repara-
ciones y otros trabajos realizados por personas no autorizados
pueden ser peligrosos y anularán la garantía.
•Utilice únicamente piezas de repuesto originales. Solo en
ese caso el fabricante podrá garantizar la seguridad de esta
máquina.
•Nunca abra la carcasa exterior del aparato. Forzar los com-
ponentes o conexiones eléctricas y las piezas mecánicas es
peligroso y puede dañar la máquina.
•Si la máquina se instala en combinación con otros aparatos,
debe instalarse una base protectora entre el aparato y la
unidad.
•No instale ni utilice en el exterior, incluso si se instala en el
mueble de visualización.
•Llene el depósito de agua únicamente con agua del grifo
fresca y fría. El agua tibia o caliente, u otros líquidos, pueden
dañar la máquina.
•Cambie diariamente el agua para evitar la generación de bac-
terias o moho.
•No utilice agua mineral. El agua mineral deja importantes resi-
duos de calcio en la máquina que pueden dañar la unidad.
•Llene el depósito de granos únicamente con granos de café.
No llene este depósito con café molido, pues podría dañar la
unidad de molido.
•¡El azúcar puede dañar el aparato! No debe introducir en la
máquina granos de café caramelizados o pretratados o cual-
quier otra bebida que contenga azúcar.

6
|
Español
PRECAUCIONES DE SEGURIDAD
•Los aparatos deben descalsicarse con regularidad. En zonas
con agua muy dura, es necesario descalsicar la máquina con
mayor frecuencia. El fabricante no se hace responsable de los
daños derivados de una descalsicación insuciente.
•No sujete la cafetera cuando esté extraída. No deje tazas con
líquidos o materiales corrosivos o inamables sobre el aparato.
Coloque todos los accesorios necesarios para hacer el café en
su recipiente designado cuando termine de usarlos. No deje
sobre el aparato objetos grandes que podrían obstruir el movi-
miento u objetos poco estables.
•ESTA UNIDAD ÚNICAMENTE ESTÁ DESTINADA PARA USO
DOMÉSTICO. No está concebida para utilizarse en zonas de
cocina de personal en tiendas, ocinas y otros entornos labo-
rales, granjas, por clientes en hoteles, moteles y otros entornos
de tipo residencial, ni en hostales.
GUARDE ESTAS INSTRUCCIONES
INSTRUCCIONES DE SEGURIDAD IMPORTANTES
•Nunca coloque una taza con una mezcla de café y alcohol
bajo el dispensador de café, pues las piezas de plástico de la
unidad podrían incendiarse.
•El agua caliente y el vapor suministrado pueden provocar que-
maduras. Utilice estas funciones con cuidado. Nunca coloque
ninguna parte del cuerpo bajo la boquilla de vapor o el dis-
pensador de agua caliente. No utilice nunca la máquina para
limpiar objetos.
•Nunca utilice un limpiador de vapor para limpiar la máquina.
El vapor a presión podría dañar los componentes eléctricos y
ocasionar un cortocircuito.
•Nunca haga café, agua caliente o vapor mientras el aparato
esté extraído. Asegúrese siempre de que el aparato está inac-
tivo antes de extraerlo. ¡Si no observa esta precaución podría
dañar el aparato! La única excepción se contempla para
ajustar el molino de café, que debe realizarse con la máquina
extraída (consulte el apartado “AJUSTE DEL MOLIDO”).

wolfappliance.com
|
7
SISTEMAS DE CAFÉ
Características del sistema de café
CARACTERÍSTICA
1Placa de datos del producto
2Pantalla y panel de control
3Surtidor de café
4Depósito de agua
5Puerta de servicio
6Luz LED
7Bandeja recolectora
8Interruptor de encendido/apagado (detrás del panel de
control)
9Asa (para deslizar la unidad hacia adelante)
10 Depósito de leche
11 Surtidor de agua
Sistema de café (se muestra ICBEC24/S).
5
2
3
4
6
1
7
10 11
9
8
9
Panel de control
BOTÓN USOS
Encendido/En espera.
Accede a las opciones avanzadas.
Suministra agua caliente.
Selecciona el sabor.
Selecciona el volumen.
Inicia el ciclo.
Inicia el ciclo y duplica el volumen.
Hace un cappuccino.
Hace latte macchiato, caffelatte o leche con
espuma.
Sale de las opciones avanzadas.
Selecciona la próxima opción, avanza hacia
adelante.
Selecciona la opción anterior, retrocede.
Entrar.
Panel de control.
FUNCIONAMIENTO DEL SISTEMA DE CAFÉ
Utilizar el aparato por primera vez
1Llene el depósito de agua. Observe la siguiente
ilustración.
2Deslice la unidad hacia adelante y pulse el interruptor
de encendido situado detrás del panel de control frontal
(derecho).
3Seleccione el idioma deseado. Para seleccionar, desplá-
cese por los idiomas hasta visualizar el idioma deseado
y, a continuación, mantenga pulsado .
4Pulse . El agua caliente se dispensará del surtidor de
agua caliente.
5La unidad se apagará automáticamente una vez nali-
zado el encendido inicial.
DEPÓSITO DE AGUA
Depósito de agua.

8
|
Español
FUNCIONAMIENTO DEL SISTEMA DE CAFÉ
Colocación de la taza
El surtidor de café con dos alturas ajustables tiene dos
salidas. Se pueden colocar una o dos tazas bajo el surtidor.
Ajuste la altura del surtidor a la taza cuanto sea posible.
Observe las siguientes ilustraciones.
Antes de su uso
Para garantizar que se han eliminado todos los aceites resi-
duales del proceso de fabricación, limpie minuciosamente
el sistema de café con agua caliente y un detergente suave
antes de su uso. Aclárela y séquela con un paño suave.
Consulte la sección Recomendaciones de mantenimiento
en la página 11.
1Extraiga el depósito de agua, llénelo y vuelva a instalarlo.
Observe la siguiente ilustración.
2Utilizando el asa, deslice la unidad hacia adelante y
abra el compartimiento para granos enteros. Observe la
siguiente ilustración. Llene el compartimiento y, a conti-
nuación, vuelva a deslizar la unidad a su posición.
3Instale el surtidor de agua o el recipiente de leche.
4La unidad iniciará un ciclo de aclarado automático
durante el encendido inicial y antes de apagarse. Caerá
una pequeña cantidad de líquido del surtidor de café
durante el ciclo de aclarado.
DEPÓSITO DE AGUA
COMPARTIMIENTO DE
GRANOS ENTEROS
Depósito de agua.
Compartimiento de granos
enteros.
SURTIDOR
DE CAFÉ
Colocación de la taza.
Surtidor de café.
Opciones avanzadas
La función de opciones avanzadas permite al usuario selec-
cionar sus preferencias para las opciones enumeradas en la
siguiente tabla.
CONFIGURACIÓN FUNCIÓN
Aclarado Inicia el ciclo de aclarado.
Activar sonido Activa o desactiva un tono sonoro.
Descalsicación Inicia el ciclo de descalsicación. Consulte la
página 11.
Predeterminado Restaura todos los ajustes a la conguración
predeterminada de fábrica.
Estadísticas Muestra el número de bebidas elaboradas.
Contraste Ajusta el brillo de la pantalla.
Dureza Ajusta la dureza del agua (•••• más dura).
Ajuste de
temperatura
Ajusta la temperatura del café (•••• más
caliente).
Apagado
automático
Apaga la unidad tras 15 min, 30 min, 1 h, 2h
o 3 h.
Encendido
automático
Enciende la unidad, aclara y calienta en la
hora preestablecida.
Ajuste de hora Ajusta la hora del día. Necesario para el
encendido automático.
Ahorro de
energía
Activa o desactiva el modo de ahorro de
energía.
Congurar
idioma
Ajusta el idioma.
Configurar las opciones avanzadas:
1Para acceder al modo de opciones avanzadas, cuando
la unidad esté encendida, pulse para acceder a las
opciones.
2Pulse o para desplazarse por las opciones y, a
continuación, pulse para seleccionar la opción.
3Pulse o para seleccionar las preferencias y, a con-
tinuación, pulse para seleccionar la opción.
4Pulse para salir del modo de opciones avanzadas.
Café
GRANOS ENTEROS
No utilice granos caramelizados o de sabores.
1Pulse varias veces para seleccionar el sabor
deseado. Entre las opciones encontrará extra suave,
suave, estándar, fuerte, extra fuerte o ya molido.
2Pulse varias veces para seleccionar el volumen
deseado. Observe la tabla que aparece más abajo.
3Pulse para iniciar el ciclo. Pulse para iniciar el
ciclo y duplicar el volumen.
4Ajuste la altura del surtidor de café a la taza cuanto sea
posible.
Para todas las bebidas de 360 ml o más, aparecerá “LLENE
DE AGUA Y GRANOS, VACÍE LA BANDEJA Y EL CAFÉ
MOLIDO” en la pantalla. Cuando haya vericado los niveles,
pulse para iniciar el ciclo.
VOLUMEN
BEBIDA VOLUMEN
Espresso 30 ml
Café corto 90 ml
Café 270 ml
Café largo 360 ml
Other manuals for ICBEC24
1
Table of contents
Languages:
Other Wolf Coffee Maker manuals