Wolf Coffee System User manual

CLEANING, MAINTENANCE,
AND MORE
Coffee System
Use and Care Guide

2 | Wolf Customer Care 800.222.7820
Contents
3Coee System
4Safety Precautions
7Quick Start Guide
12 Coee System Operation
18 Care Recommendations
22 Troubleshooting
23 Wolf Warranty
Coffee System

wolfappliance.com | 3
Customer Care
The model and serial number are printed on the enclosed
product registration card. Both numbers are also listed on
the product rating plate. Refer to page 7 for rating plate
location. For warranty purposes, you will also need the
date of installation and name of your authorized Wolf
dealer. Record this information below for future reference.
SERVICE INFORMATION
Model Number
Serial Number
Date of Installation
Certified Service Name
Certified Service Number
Authorized Dealer
Dealer Number
If your product ever needs attention, be sure to use a
Wolf Factory Certified Service provider recommended
by our Customer Care Center, or select one from our list
of providers available at wolfappliance.com/locator. All
Factory Certified Service providers are carefully selected
and thoroughly trained by us.
Important Note
To ensure this product is installed and operated as safely
and eciently as possible, take note of the following types
of highlighted information throughout this guide:
IMPORTANT NOTE highlights information that is especially
important.
CAUTION
Indicates a situation where minor injury or product
damage may occur if instructions are not followed.
WARNING
States a hazard that may cause serious injury or
death if precautions are not followed.
IMPORTANT NOTE: Throughout this guide, dimensions in
parentheses are millimeters unless otherwise specified.
Coffee System

4 | Wolf Customer Care 800.222.7820
IMPORTANT INSTRUCTIONS
READ ALL INSTRUCTIONS
When using electrical appliances, basic safety
precautions should always be followed including
the following:
• Make sure the voltage of your electrical system
corresponds to the voltage shown on the
machine.
• Persons that lack physical, sensory, or mental
abilities or experience with the machine should
not use it without supervision or instruction by
a responsible person.
• Before service or maintenance, disconnect
power at the main button and unplug the unit.
• Do not touch hot surfaces. Use handles or
knobs.
• To protect against electrical shock, do not
immerse cord or plug in water or other liquid.
• Close supervision is necessary when any appli-
ance is used by or near children.
• Do not open the outer casing of the appliance.
• Unplug from outlet when not in use and prior
to cleaning. Allow to cool before putting on or
taking o parts.
• Do not operate any appliance with a damaged
cord or plug or after the appliance malfunctions
or has been damaged in any manner. Return
appliance to the nearest authorized service
facility for examination, repair, or adjustment.
• Do not place on or near a hot gas or electric
burner or in a heated oven.
• The use of accessory attachments not recom-
mended by the appliance manufacturer may
cause injuries.
• Do not allow the cord to hang over the edge of
a table or counter or touch hot surfaces.
• Do not submerge the cord or plug in water or
other liquids.
• Use extreme caution when moving an appli-
ance containing hot oil or other hot liquids.
• To disconnect, turn any control to “o," then
remove plug from wall outlet.
Safety Precautions

wolfappliance.com | 5
Safety Precautions
IMPORTANT INSTRUCTIONS
GENERAL SAFETY PRECAUTIONS
• Do not use appliance for anything other than
intended use.
• The appliance must be properly installed prior
to operation to make sure no electrical com-
ponents are accessible. Make sure power is
not supplied to the appliance while installation
work, repairs, or maintenance is done.
• A short power cord is provided to reduce risks
of becoming entangled or tripping over the
cord.
• Verify the appliance is properly installed and
grounded by a qualified technician. To guar-
antee the electrical safety of this appliance,
continuity must exist between the appliance
and eective grounding system. It is imperative
this basic safety requirement be met. If there
is any doubt, have the electrical system of the
house checked by a qualified electrician. The
manufacturer cannot be held responsible for
damages caused by the lack, or inadequacy, of
an eective grounding system.
• Do not use an extension cord to connect the
appliance to electricity. Extension cord does
not guarantee the required safety of the appli-
ance (danger of overheating).
Safety Precautions
• Installation work and repairs must be done by a
trained technician in accordance with national
and local safety regulations. Repairs and other
work by unauthorized persons could be dan-
gerous and may void the warranty.
• Use only original spare parts. Only then can
the manufacturer guarantee the safety of this
machine.
• Never open the outer casing of the appliance.
Tampering with electrical connections or com-
ponents and mechanical parts is dangerous and
may cause machine damage.
• Do not install or use outdoors.
• Never use a steam cleaner to clean the appli-
ance.
• Fill the water tank only with cold, fresh tap
water. Warm or hot water or any other liquids
may damage the machine.
• The appliance must be maintained daily.
Change the water daily to prevent bacteria or
mold growth.

6 | Wolf Customer Care 800.222.7820
Safety Precautions
WARNING
Do not look directly or with an optical instru-
ment into the lighting.
WARNING
Risk of burns when dispensing hot beverages.
WARNING
PROPOSITION 65 FOR CALIFORNIA RESIDENTS
Cancer and Reproductive Harm—
www.P65Warnings.ca.gov
SAVE THESE INSTRUCTIONS
Safety Precautions
IMPORTANT INSTRUCTIONS
GENERAL SAFETY PRECAUTIONS
• Do not use mineral water. Do not fill anything
but coee beans into the beans container. Do
not fill ground coee in the beans container.
• Caramelized or otherwise pretreated coee
beans or other beverages containing sugar
must not be put in the appliance.
• Never place a cup with an alcohol-coee mix-
ture underneath the coee dispenser.
• The hot water and steam dispensed could
cause scalding. These functions must be used
carefully. Never hold any parts of the body
under the steam nozzle or the hot water dis-
penser. Never use the machine to clean objects.
• Descale the appliance regularly with descal-
ing solution. In areas with very hard water, the
machine may need to be descaled more often.
The manufacturer cannot be held responsible
for damages resulting from insucient descal-
ing.
• Never make coee, hot water, or steam when
the appliance is removed from the opening.
Always make sure the appliance is inactive
before removing it. The only exception is
adjusting the coee mill, which must be done
with the machine out.

wolfappliance.com | 7
Controls
The Wolf Coee System uses touchscreen technology to
select preferences and other options.
Quick Start Guide
Coee System Features
FEATURES
1Product Rating Plate
2Touchscreen
3Coee Spout
4Water/Milk Spout Receptacle
5Water Tank (behind service door)
6Service Door
7LED Lighting
8Drip Tray
9Standby Power Button
10 Main Power Button (behind control panel)
11 Handle (to slide unit forward)
12 Milk Container
13 Water Spout
Coee System (EC2450TE shown)
Touchscreen
6
10
3
5
4
8
12 13
11
7 2
9
1

8 | Wolf Customer Care 800.222.7820
Prior to Use
1 Slide the unit forward, press the main power button,
then slide the unit back. Refer to the illustration below.
2 Touch the stand-by power button. Refer to the
illustration below.
3 Use the test strip provided to determine water hardness.
Refer to User Options on page 14 to adjust the hardness
setting.
4 Clean the unit thoroughly with hot water and a mild
detergent.
5 Rinse and dry with a soft cloth.
Quick Start Guide
MAIN POWER
BUTTON STANDBY
POWER
BUTTON
Main power button
Standby power button
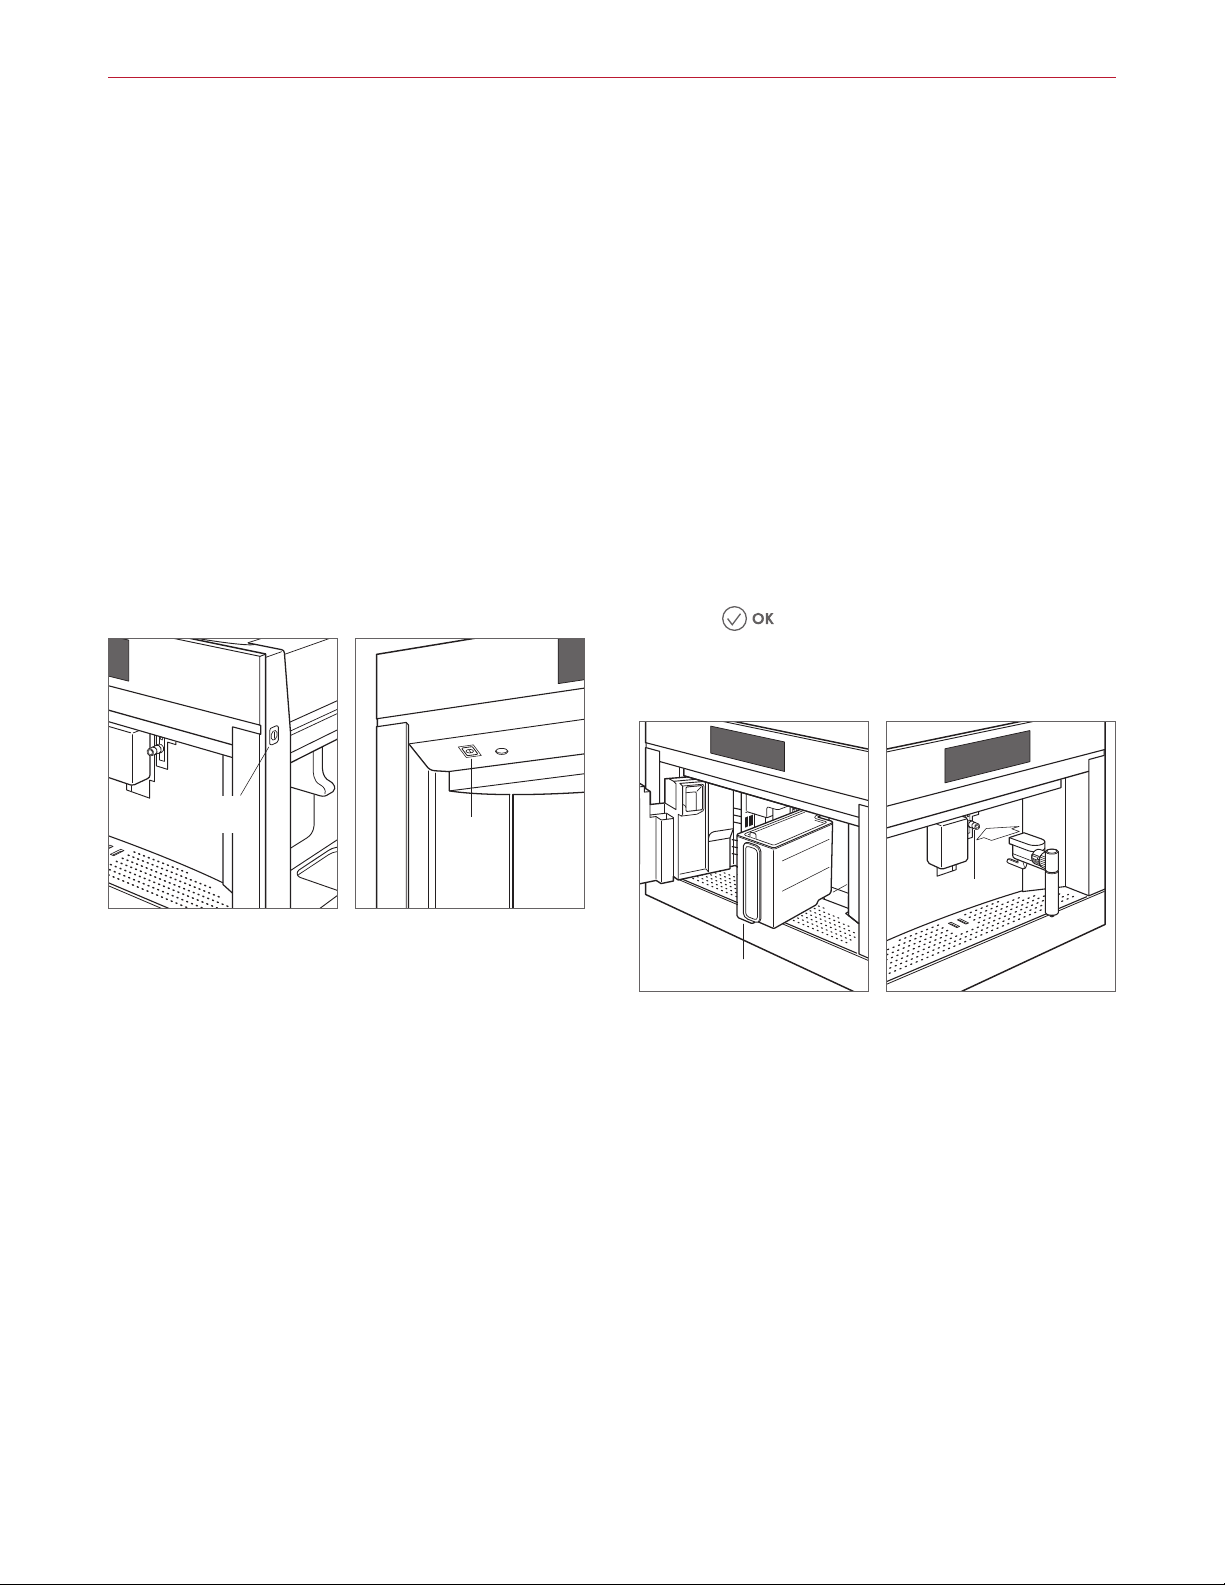
1 Open the service door, then remove the water tank.
Refer to the illustration below. NOTE: If installed, the
water spout must be removed to open the service door.
2 Fill the water tank with water.
3 Insert the water spout into the receptacle. Two beeps
indicate the water spout is installed correctly. Refer to
the illustration below.
4 Place the rinse container below the water spout.
5 Select the desired language. To select, scroll through
the languages until the desired language appears, then
touch the corresponding icon.
6 Touch . Hot water is dispensed from the water
spout.
WATER TANK
RECEPTACLE
Water tank
Water spout
6
7
8
9
10
11

wolfappliance.com | 9
Quick Start Guide
Milk Container
To froth milk:
1 Turn the knob on the milk container to Insert.
2 Place the milk container into the receptacle. A beep
indicates the container is installed correctly.
3 Turn the knob to the desired froth setting. Refer to the
chart below.
4 Turn the knob to Clean when dispensing is complete.
appears on the touchscreen as a reminder to
clean the spout, if the process was not completed. The
reminder goes away when cleaned or when the milk
container is removed.
5 Follow the instructions on the touchscreen.
6 Remove the milk container and store in the refrigerator.
FROTH SETTING
The milk container dial is adjustable for optimum froth
production.
SETTING AMOUNT
No Froth
Minimum Froth
Maximum Froth
Auto-O
The unit turns o automatically after 30 minutes of inactiv-
ity. The duration is adjustable to 15 min, 30 min, 1 hr, 2 hr,
or 3 hr. Touch the standby power button to turn on the
control panel touchscreen before use. Refer to the illustra-
tion below.
NOTE: Due to the rinsing process, place the rinse con-
tainer below the coee spout before each use. Refer to the
illustration below.
To adjust Auto-O duration:
1 Touch .
2 Touch or until Auto-O appears on the
touchscreen.
3 Touch Auto-O until the desired duration appears.
4 Touch .
STANDBY
POWER
BUTTON
RINSE
CONTAINER
Standby power button
Rinse container

10 | Wolf Customer Care 800.222.7820
Quick Start Guide
Coee Drinks
IMPORTANT NOTE: Do not use oily, caramelized, or
flavored beans.
To make coee drinks:
1 Touch multiple times to select the desired
strength.
2 Touch multiple times to select the desired size.
3 Touch the desired drink type to start the cycle.
4 Adjust the height of the coee spout to be as close to
the cup as possible.
NOTE: Near the end of the cycle, +Extra appears on the
touchscreen. If desired, touch +Extra to continue dispens-
ing water over the grounds to increase the drink volume.
Touch once the desired volume is dispensed.

wolfappliance.com | 11
Quick Start Guide
Beverage Options
BEVERAGE % COFFEE % MILK % WATER FROTH SMALL MEDIUM* LARGE X-LARGE
Espresso 100 1.0 oz (30 mL) 1.4 oz (41 mL) 1.6 oz (47 mL) 4.1 oz (121 mL)
Espresso x2†100 2.0 oz (59 mL) 2.7 oz (80 mL) 3.2 oz (95 mL) 8.1 oz (240 mL)
Doppio+ 100 3.2 oz (95 mL) 4.1 oz (121 mL) 4.9 oz (145 mL) 6.1 oz (180 mL)
Coee 100 4.9 oz (145 mL) 6.1 oz (180 mL) 7.3 oz (216 mL) 8.1 oz (240 mL)
Long Coee‡100 4.3 oz (127 mL) 5.4 oz (160 mL) 6.5 oz (192 mL) 8.1 oz (240 mL)
Coee Pot 100 10.1 oz (299 mL) 15.2 oz (450 mL) 20.3 oz (600 mL) 25.4 oz (751 mL)
Americano 25 75 4.1 oz (121 mL) 5.1 oz (151 mL) 6.1 oz (180 mL) 7.6 oz (225 mL)
Latte 20 80 None 8.1 oz (240 mL) 10.1 oz (299 mL) 12.2 oz (361 mL) 15.2 oz (450 mL)
Macchiato 60 40 Max 1.4 oz (41 mL) 1.7 oz (50 mL) 2.0 oz (59 mL) 2.5 oz (74 mL)
Latte Macchiato 20 80 Min 4.1 oz (121 mL) 5.1 oz (151 mL) 6.1 oz (180 mL) 7.6 oz (225 mL)
Cappuccino** 55 45 Max 4.1 oz (121 mL) 5.1 oz (151 mL) 6.1 oz (180 mL) 7.6 oz (225 mL)
Cappuccino Mix†† 55 45 Max 4.1 oz (121 mL) 5.1 oz (151 mL) 6.1 oz (180 mL) 7.6 oz (225 mL)
Cappuccino+ 65 35 Max 4.1 oz (121 mL) 6.4 oz (189 mL) 7.7 oz (228 mL) 9.6 oz (284 mL)
Flat White 25 75 Min 7.0 oz (207 mL) 8.8 oz (260 mL) 10.5 oz (311 mL) 13.2 oz (390 mL)
Hot Milk 100 Any 6.5 oz (192 mL) 8.1 oz (240 mL) 9.7 oz (287 mL) 12.2 oz (361 mL)
Hot Water 100 8.5 oz (251 mL)‡‡
Steam 100 3.0 oz (89 mL)‡‡
*Default quantity. Touch to customize. †Intended for two separate cups. ‡Double strength. **Milk dispensed, then coee. ††Milk and coee
dispensed simultaneously. ‡‡Touch stop at any time for smaller quantity.
NOTE: All quantities are estimates. Actual results ± 20%.

12 | Wolf Customer Care 800.222.7820
Water Filter
The water filter contains ion exchange resins and active
carbons, which reduce limescale and absorb chlorine and
other contaminants. Replace the filter every two months.
To install the water filter:
1 Remove the new filter from the package.
2 Touch .
3 Touch or until Water Filter appears on the touch-
screen.
4 Touch Water Filter.
5 Turn the dial on the filter until the following two months
numbers appear. "Turn the dial indicator until the next 2
months are displayed" appears on the touchscreen.
6 Touch .
7 Turn the filter upside down and place it under a running
faucet for one minute. "Run water into filter hole until it
comes out from openings" appears on the touchscreen.
Refer to the illustration below.
8 Touch .
9 Insert the filter into the (full) water tank for 10 seconds
to allow bubbles to escape. "Immerse filter in the water
tank letting air bubbles escape" appears on the touch-
screen.
10 Touch .
1 Align the filter with the housing at the bottom of the
tank. "Insert filter into its housing and push it down
to bottom" appears on the touchscreen. Refer to the
illustration below.
2 Press to secure the filter to the housing. "Insert water
tank" appears on the touchscreen.
3 Close the tank lid, then install the water tank on the
machine. "Place 0.5 L container under outlets, press
OK to fill filter" appears on the touchscreen.
4 "Insert water spout until product chimes" appears on
the touchscreen.
5 Insert the water spout, and place a container under the
water spout, then touch .
6 NOTE: appears on the touchscreen when the water
filter replacement reminder is turned on. appears
on the touchscreen when the water filter must be
replaced.
Coffee System Operation
Flush water filter
Water filter installation
11
12
13
14
15

wolfappliance.com | 13
Water Filter
To replace the filter or remove the filter reminder:
1 Touch .
2 Touch or until Water Filter appears on the touch-
screen.
3 Touch Water Filter.
4 Turn the dial on the filter until the following two months
numbers appear. "Turn the dial indicator until the next 2
months are displayed" appears on the touchscreen.
5 Touch Replace Filter or Remove Filter, then follow the
instructions on the touchscreen.
Coffee System Operation

14 | Wolf Customer Care 800.222.7820
User Setup
The User Setup feature allows the user to select from the
preferences listed below.
USER OPTIONS
Rinsing Start rinse cycle.
Descale Turn descale cycle on.
Water Filter Turn water filter reminder on or o.
Drink Settings View drink settings (Strength, Milk, Coee).
Set Time Adjust time of day. Required for Auto-Start.
Auto-Start Turns unit on, rinses, and heats at preset time.
Auto-O Turn unit o after 15 min, 30 min, 1 hr, 2 hr,
or 3 hr.
Energy Saving Turns energy saving mode on or o.
Coee
Temperature
Adjust coee temperature (Low, Medium,
High, Max).
Water
Hardness
Adjust water hardness (1 softest, 4 hardest).
Set Language Select language (English, Spanish, French,
Italian, German, Dutch, or Chinese).
Beep Turn audible tone on or o.
Cup Lighting Turn lights on or o.
Background Adjust touchscreen background color
(Black, White).
Demo Mode Provides a guided tour for common
functions.
Factory Settings Reset to factory default settings.
Statistics View beverage production quantities.
USER OPTIONS
To set user options:
1 Touch .
2 Touch or to scroll through options.
3 Touch the desired option.
4 Touch to exit.
AUTO-START
Auto-Start turns the unit on, rinses, and preheats at a
specified time to decrease the time to prepare a drink.
The clock must be set to the correct time to work properly.
appears on the touchscreen when Auto-Start is turned
on.
To set Auto-Start:
1 Touch .
2 Touch or , then touch Auto-Start.
3 Touch or until the desired start time appears.
4 The unit defaults to O. Touch O to toggle On.
5 Touch .
Coffee System Operation

wolfappliance.com | 15
Favorite
To save favorite drink settings:
1 Touch to select the desired user profile.
2 Touch .
3 Select the desired drink option.
4 Touch + or – to select the desired strength.
5 Touch .
6 For milk drinks, insert the milk container and adjust the
dial to the desired setting.
7 Milk is dispensed. Touch when the desired
amount of milk is dispensed and to save the setting.
8 Coee is dispensed. Touch when the desired
amount of coee is dispensed and to save the setting.
Coffee System Operation
Coee
To use whole beans:
1 Pull the unit forward.
2 Open the whole bean compartment lid. Refer to the
illustration below.
3 Fill the compartment, then slide the unit back in.
4 Place a minimum 4 oz (120 mL) container below the
coee spout.
5 Adjust the height of the coee spout to be as close to
the cup(s) as possible. Refer to the illustration below.
6 The unit automatically rinses upon initial start-up and
before turning o. A small amount of liquid dispenses
from the coee spout during the rinse cycle. Place the
rinse container under the spout, if desired.
WHOLE
BEANS
COFFEE
SPOUT
Whole bean compartment
Adjust coee spout

16 | Wolf Customer Care 800.222.7820
Coffee System Operation
Coee Pot
CAUTION
Do not use pre-ground coee. Use whole beans only.
The Coee Pot option produces larger amounts of coee.
The coee strength and size are adjustable, or touch
to customize. Refer to Beverage Options on page 11. Make
sure the water tank is full and the grounds container is
empty before starting the cycle.
Pre-Ground Coee
CAUTION
More than one scoop causes the unit to clog.
To use pre-ground coee:
1 Touch multiple times until appears.
2 Slide the unit forward and open the pre-ground coee
lid. Refer to the illustration below.
3 Use the provided scoop to place one scoop of pre-
ground coee into the compartment, then close the lid.
4 Slide the unit back into position.
5 Touch multiple times to select the desired size.
6 Touch the desired drink type to start dispensing.
7 Adjust the height of the coee spout as close to the
cup as possible.
PRE-GROUND
COFFEE
Pre-ground compartment

wolfappliance.com | 17
Coffee System Operation
Hot Water
Dispense hot water to make tea or preheat cups. Preheat-
ing cups allow beverages to stay hot longer.
To dispense hot water:
1 Insert the water spout into the receptacle. Two beeps
indicate the water spout is installed correctly. Refer to
the illustration below.
2 Place a cup under the water spout.
3 Touch to start dispensing water.
4 Touch when the desired amount is dispensed.
Grind Adjustment
CAUTION
Adjustment must be made while the mill is operating.
The grind adjustment can take up to three drinks to
become noticeable. Do not adjust more than one
setting per grind.
Adjust the grind if coee delivery is too fast or too slow.
Turn the dial clockwise for faster delivery (coarser grind) or
counterclockwise for slower delivery (finer grind). Refer to
the illustration below.
RECEPTACLE
Water spout
GRIND
ADJUSTMENT
Grind adjustment dial

18 | Wolf Customer Care 800.222.7820
Care Recommendations
Milk Container
CAUTION
Only the milk container liner is dishwasher safe.
Do not place any other milk container parts in the
dishwasher. Do not submerge the lid or the milk con-
tainer in water.
Use hot water and a mild detergent to wash the lid and
milk container.
To clean the milk container:
1 Press the tabs on both sides of the milk container lid,
then remove the lid.
2 Pull the intake tube down to remove.
3 Pull the milk spout back to remove. Refer to the
illustration below.
4 Rotate the froth adjustment knob to Insert, then pull the
knob to remove.
5 Use a toothpick to remove any debris from the channel
on the knob. Refer to the illustration below.
INTAKE
TUBE
MILK
SPOUT
FROTH
ADJUSTMENT
DIAL
CHANNEL
Milk container lid
Froth adjustment knob
1 Remove the liner from the milk container. Refer to the
illustration below.
LINER
Milk container liner
6

wolfappliance.com | 19
Care Recommendations
Descale
CAUTION
Only use EcoDecalk descaling solution.
"Descaling needed. Press ok to start" appears on the
touchscreen when the unit needs to be descaled. Touch
to begin descale or touch to delay the
descale process. appears on the touchscreen as a
reminder to descale, if the process is delayed.
To descale the unit:
1 Remove the water tank and empty completely. Refer to
the illustration below.
2 Pour descaling solution into the tank to line A, then add
water until it reaches line B.
3 Install the water tank.
4 Insert the water spout into the receptacle, then place a
large, minimum 85 oz (2.5 L), container under the coee
and water spouts.
5 Touch .
6 Touch or until "Descale" appears on the touch-
screen.
7 Touch .
8 "Descaling" and a progress bar appear on the touch-
screen.
1 After approximately 25 minutes, "Rinse and fill water
tank up to max level" appears. Rinse and fill the water
tank with water and empty the container.
2 Install the water tank and place the container under the
spouts.
3 Touch . "Rinsing please wait" appears on the
touchscreen. The water tank may need to be filled
multiple times to complete the descale process.
4 When "Descale complete press OK" appears, fill the
water tank, and touch .
WATER TANK
Water tank
9
10
11
12

20 | Wolf Customer Care 800.222.7820
Cleaning
Use the following information for simple cleaning recom-
mendations.
STAINLESS STEEL
1 Use a non-abrasive stainless steel cleaner and apply
with a soft lint-free cloth.
2 Lightly wipe the surface with a water-dampened micro-
fiber cloth followed by a dry polishing chamois.
3 Always follow the grain of the stainless steel.
TOUCHSCREEN
1 Use a spray degreaser to remove fingerprints and food
soil. Spray on a cloth before wiping the touchscreen.
COFFEE SPOUT
1 Clean periodically using a sponge.
2 Remove any coee deposits in the holes with a
toothpick.
WATER TANK
1 Clean periodically (about once a month) with a damp
cloth and mild dish soap.
2 Rinse and towel dry.
DRIP TRAY AND GROUNDS CONTAINER
1 Empty and clean the drip tray before the water level
indicator protrudes from the cup tray.
2 Empty and clean the grounds container when "Empty
grounds container" appears.
3 Rotate the drip tray access door downward, then open
the service door.
4 Remove and empty the drip tray and grounds container.
Refer to the illustration below.
5 Wash with warm water and mild dish soap.
6 Rinse and towel dry.
PRE-GROUND COMPARTMENT
1 Check periodically to verify the pre-ground coee
funnel is not blocked.
INTERIOR
1 Open the service door.
2 Vacuum residue and remove coee deposits with a
sponge.
DRIP
TRAY
GROUNDS
CONTAINER
Drip tray and grounds container
Care Recommendations
Table of contents
Languages:
Other Wolf Coffee Maker manuals