WolfVision VZ-9 User manual

INSTRUCTIONS
BEDIENUNGSANLEITUNG
INSTRUCTIONS
BEDIENUNGSANLEITUNG
Ethernet / LAN - Software 1.2
for Visualizers:
VZ-9, VZ-9plus
VZ-27plus, VZ-27plus², VZ-57plus
VZ-C11, VZ-C12, VZ-C12², VZ-C30, VZ-C32
Check out our Internet Homepage for additional information
www.wolfvision.com/support
ENGLISH / DEUTSCH
R

Printed in Austria, November 2006 Design and specifications are subject to change !
1
IBM-compatible PC
Image transfer / Visualizer control via Browser and WolfVision Ethernet/LAN software are supported.
System Requirements (recommended minimum)
- Microsoft Windows 98, ME, NT 4.0, 2000 or XP (95 and NT 4.0 Terminal Server are not supported)
- Pentium II 500 MHz with 32 Mbytes RAM (Pentium III with 128 Mbytes or more recommended)
- Display resolution of 800 x 600 (1024 x 768 or more are recommended)
- 256 colors (65535 colors or more are recommended)
- One free 10BASE-T port (100BASE-TX is recommended)
- tested Browsers:
Apple Macintosh
Image transfer / Visualizer control via Browser are supported.
System Requirements (recommended minimum)
- Mac OS 10.2 or higher
- G4 with 1 GHz with 256 Mbytes RAM (512 Mbytes recommended) or better
- Display resolution of 800 x 600 (1024 x 768 or more are recommended)
- 256 colors (65535 colors or more are recommended)
- One free 10BASE-T port (100BASE-TX is recommended)
- tested Browsers: Safari 2.0 and
Microsoft Internet Explorer 5.5 (or newer), Netscape Navigator 7.1 (or newer),
Mozilla 1.5 (or newer), Opera 7.11 (or newer) and Firefox 1.0 (or newer).
(or newer) Firefox 1.5 (or newer).
Legal Information
Before you install the software, please be aware that with the installation of the WolfVision Ethernet
software, the user accepts the following:
- It is not allowed to use the software with other devices than WolfVision Visualizers.
- It is not allowed to make copies of the software for other purposes than backup or archival storage.
- Any reverse engineering, e.g. to de-compile or to de-assemble the software, is not allowed.
- Ownership and copyright of the software are reserved for WolfVision GmbH.
- WolfVision GmbH does not give any warranty for faultlessness of the software.
- WolfVision GmbH is not liable for any damages that may be caused by the usage of the software.
Ethernet / LAN
The LAN connection (10BASE-T/100BASE-TX) can be used
for controlling the Visualizer over a computer network, image transfers and firmware updates.
The Visualizer has a built-in web server and can be accessed through a standard Internet
browser from a connected PC. No additional software is required for image transfers and
controlling. Only firmware updates via LAN require additional software (It can be
downloaded from: www.wolfvision.com/support).
Supported protocols are: TCP/IP, ICMP, ARP
Image Transfer Resolution: Still Image: 1024x768 and 512x384, Live Image: 160x120
ENGLISH

Ethernet cross cable
Host
PREVIEW USB LAN
2
Connecting the Visualizer to a computer / network
There are two methods to establish a LAN connection between the Visualizer and a computer or
network:
Method 1: Direct connection using a cross-over cable
If you want to connect the Visualizer to only one computer just connect the LAN-port (RJ-45) of
the Visualizer to the LAN-port of your computer using an cross-over Ethernet cable (UTP
Category 5).
Please note:
With this direct connection the length of the cable is limited.
It depends on the quality of the cable and the quality of the network card of the PC how long the cable can be.
However we recommend that it should not be longer than approx. 10m (30 feet).
For longer cable runs use straight network cables and a Hub or Switch (see method 2).
Connect the LAN-port (RJ-45) of the Visualizer to the Hub or Switch using an Ethernet straight
cable (UTP Category 5). Any port of the Hub/Switch can be used, except the cascade port (This
port has a cross-over connection).
Please note:
When connecting the Visualizer to the other unit on the network, the communication protocol of the two units
is adjusted automatically to 10BASE-T/100BASE-T and HDX/FDX (i.e. “Automatic negotiation”). Therefore it is
necessary that the unit communicating with the Visualizer also supports automatic negotiation. However
nearly all units today support this standard.
Method 2: Network connection using a Hub or Switch
Ethernet straight cable Ethernet straight cables
Host
HUB / Switch Host
PREVIEW USB LAN

Before the Visualizer can be accessed from the web browser of the computer, the IP-addresses
of both units must be set to IP-addresses which allow them to communicate with each other.
The easiest method is to set the Visualizer to automatically receive the settings for IP-address,
Subnet Mask and Gateway from a DHCP (Dynamic Host Configuration Protocol) server on your
network. All Visualizers support DHCP servers.
By default, DHCP is activated on all units, changeable to manual settings in the on-screen menu.
IP address from DHCP
Subnet mask from DHCP
Gateway from DHCP
Please note:
On VZ-9, DHCP is supported on units with serial number 095501 and higher. Older VZ-9 units require manual
settings.
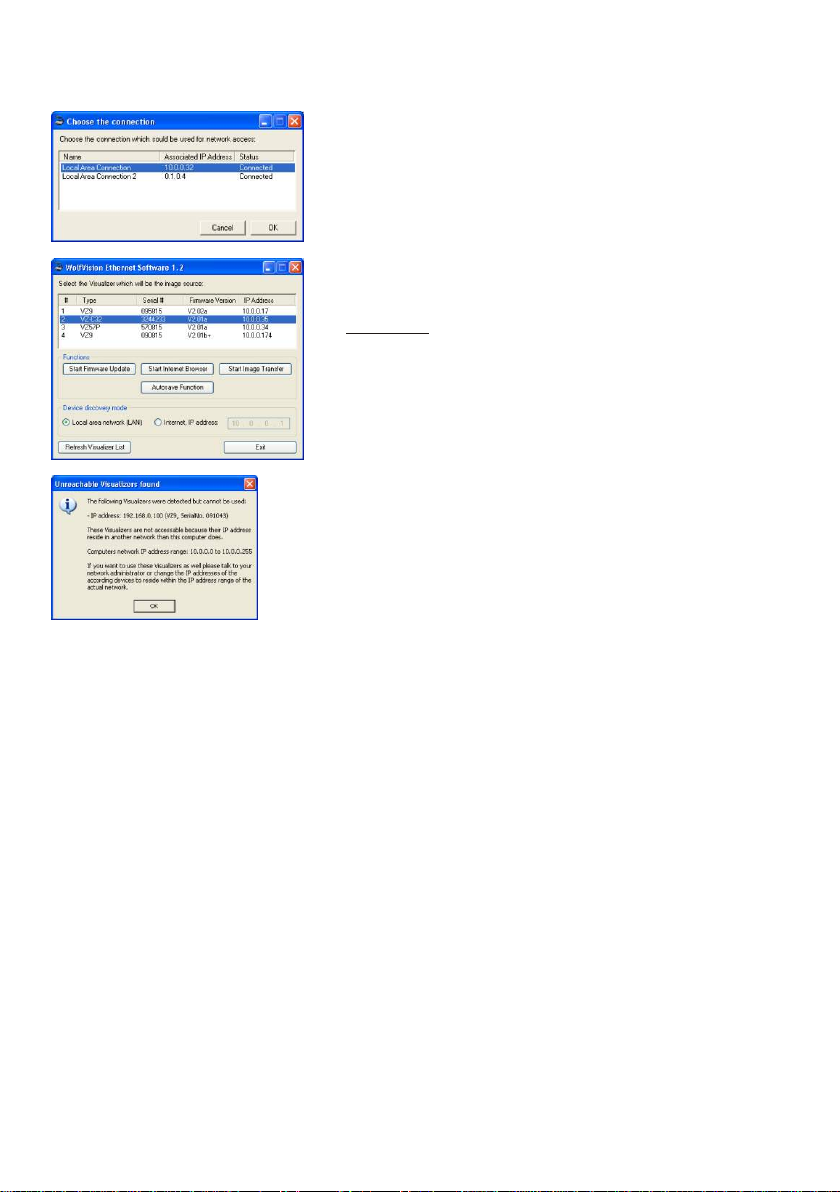
If the computer is in the same IP-address space (i.e. if it starts with 192.168...) and the default IP-
address of the Visualizer (192.168.0.100) is not already in use by another unit in the same
network, the Visualizer and computer can communicate immediately. If not, either the IP-address
of the Visualizer or the IP-address of the computer must be changed.
It is recommended to leave the network address of the computer as it is (because in most cases
it is also used for other network operations) and to set the IP-address of the Visualizer to an
address in the same IP-address space.
The address spaces available for internal networks either begin with 192.168.x.x. or with
10.x.x.x).
If you work in a larger network ask your computer network administrator for an available IP-
address for the Visualizer. For a small network (without an administrator) use this method to find
out the IP-address of your PC: Under Windows 2000/XP go to Start - Programs -Accessories -
Command Prompt and type "ipconfig".
If your IP address is (for example): 10.0.0.4 then set the Visualizer to an address beginning with
10.0.0. which is not already in use by another unit. For example: 10.0.0.100.
If your IP address is (for example): 192.168.0.7 and you are unable to communicate with the
Visualizer, maybe there is another unit on the network using the IP-address 192.168.0.100.
Try setting it to a different address in the same address space (for example: 192.168.0.209).
The "Gateway" is the IP-address of the internet router (or internet gateway) of your network. If
you only work with the Visualizer on a local network a gateway setting is not required. Only if you
want to access the Visualizer over the internet the IP-address of your internet router/gateway
must be added in the gateway field.
Please Note:
If the gateway setting is not available on a VZ-9 Visualizer, it is necessary to upgrade the firmware of the VZ-9
to version v1.10a or later, because older firmware versions did not support the gateway feature.
More information on firmware updates can be found at: www.wolfvision.com/wolf/fware.html
The IP-address, Subnet mask and Gateway-address of the Visualizer can be changed in the
Visualizer's on-screen menu (see next page).
3
Setting the IP-addresses of the Visualizer and the PC

In order to access the built-in web server of the
Visualizer just open the standard web browser
on your PC and type the IP-address of the
Visualizer in the address field.
Then you will see the start page of the
Visualizer. If not please check the cable
connection or the IP-addresses of the
Visualizer and PC (see previous page).
Please note:
Even if the image is frozen on the Visualizer, the
image output to the network will not be affected. The
split-screen (image memory) is not available through
the network.
4
Web server functions
Changing the IP-Address of the Visualizer
- Start the Visualizer, enter the on screen menu and select
Advanced Settings / Ethernet Settings.
- Set Ethernet Protect to OFF and change the IP-address,
subnet mask and Gateway to the desired value.
- Confirm the new settings (the confirm line will appear on
the screen after the network settings are changed)
- Set Ethernet mode to:
IMAGE AND CONTROL
IMAGE ONLY
CONTROL ONLY
OFF
Please note:
- In the Ethernet mode menu, the availability of
image transfer and remote control function can
be selected.
- In picture 3, you can see the default settings with deactivated
DHCP.
- If there is more than one unit with the same IP-address within
the network, a network conflict will occur and both units may not
be able to communicate with the network anymore, as long as
they both have the same IP-address. Therefore, set the IP-
address carefully!
- VZ-9 Visualizers with Firmware lower then v1.10a need a
Firmware Update in order to support the Gateway-function.
- VZ-9 Visualizers with serial numbers lower then 095501 do not
support DHCP.
- New layout of on-screen menu since firmware version v2.02a.
Firmware update files can be downloaded for free at
www.wolfvision.com/wolf/fware.html
Picture 1
Picture 3
Picture 2
VZ-C32 Menu
Exposure Settings
Color Settings
Output Settings
Preset Control
Recall Factory Settings
Exit
> Advanced Settings
VZ-C32 Menu
Exposure Settings
Color Settings
Output Settings
Preset Control
> Advanced Settings
Recall Factory Settings
Exit
Advanced Settings
> Ethernet Settings
Power Settings
Misc. Settings
Height Adjustment
Return
Model: VZ-C32 V2.03c
Ser-Nr.: 321048
MAC: 00-0C-92-01-D8-D8
Advanced Settings
Power Settings
Misc. Settings
> Ethernet Settings
Height Adjustment
Return
Model: VZ-C32 V2.03c
Ser-Nr.: 321048
MAC: 00-0C-92-01-D8-D8
Ethernet Settings
> Ethernet Protect ON
DHCP OFF
IP-Adress 192.168. 0.100
Subnet-Mask 255.255.255. 0
Gateway-IP 0. 0. 0. 0
Confirm new Settings
Ethernet-Mode IMAGE+CONTROL
Return
Ethernet Settings
> Ethernet Protect ON
DHCP OFF
IP-Adress 192.168. 0.100
Subnet-Mask 255.255.255. 0
Gateway-IP 0. 0. 0. 0
Confirm new Settings
Ethernet-Mode IMAGE+CONTROL
Return

Status Information
On Status information page, the current
state of the Visualizer can be checked.
Available information:
- Device Information like serial number,
Visualizer model, installed firmware
version
- Ethernet-settings like Mac-address, IP-
address, subnet mask and standard
gateway
- Operating hours
- Lamp status
- Power / Light settings
- Output resolution
- Image configuration like Detail, Focus,
Iris, Key-Lock, OSD-Menu, etc.
Please note:
On Professional and Ceiling Visualizers the
Status Information feature is available since
Firmware version v1.30a from March 2006. All
VZ-9 Visualizer models also support this
feature.
E-Mail Notification
WolfVision Visualizers offer the possibility of E-
Mail notification.
On E-Mail Settings you can define up to 3
recipients.
Alarm Email:
for i.e. a lamp is blown, the Visualizer sends an
E-Mail to the registered recipients automatically.
Startup Email:
every time, the Visualizer is switched on, it
sends an E-Mail to the recipients.
Weekly Status Report:
The Visualizer sends every week an E-Mail with
the current state. The week begins when the
Visualizer is connected to mains (mains switch
on, if available).
Please note:
E-Mail notification is a new feature introduced with
Firmware v1.30a in March 2006. Older units may need
a Firmware Update for this feature. VZ-9 Visualizers
support this feature starting with serial number 095501
(manufactured after March 2006).
xxx.xxx.xxx.xxx
5

Displaying live images
When the LIVE-link [LIVE] is clicked on the
start page, a live image from the Visualizer
is displayed. In addition the web browser
will also open a new window with a remote
control of the Visualizer.
Please note that JavaScript must be
enabled in order to see the live image.
Popups need to be enabled.
The frame rate of the live image is max.
3.75 frames per second. It depends on
the processing capacity of the PC, the
network environment, the number of
connected units etc.
Please note:
If the Visualizer is switched off while a live image is in display, the PC displaying the live image may
(depending on the web browser in use) continue the internal processing even if the web browser is closed.
Normally, this causes no problem. However, if this is repeated again and again, the operation of the host may
become unstable. In this case restart your PC.
Displaying still images
When clicking the CAPTURE-link of the Visualizer start page, a still image with 1024x768 pixels
from the Visualizer is displayed. Using the CAPTURE-PREVIEW-link a still image with 512x384
pixels is displayed. These images can be saved with the save function of your web browser (In
Internet Explorer right-click on the image and use "Save image...").
Operation of remote control
When the LIVE-link [LIVE] at the Visualizer main page is clicked, a Live image is displayed and
also a new window with a remote control for the Visualizer will be opened.
Please note:
The CONTROL-page is only available, if the control function is activated in the Visualizer’s on screen menu.
6

IMPORTANT:
When you receive your Visualizer the version of the Ethernet-software on the supplied CD-
ROM may be out of date. WolfVision constantly improves this software and adds important
new features to it.
Thus we highly recommend that you download the latest version of the WolfVision Ethernet-
software from the internet at www.wolfvision.com/support
instead of using the old software version from the CD-ROM, which was shipped with your unit!
1.1. IMPORTANT
Please de-install previous versions of this software
before you install the new version! Choose "WolfVision
Ethernet software" from "Start/System settings/Control
panel/Software (Add or Remove Programs)" menu and
press the remove button. Otherwise an error could occur.
1.2
Open you internet browser and go to:
www.wolfvision.com/support
to check for updates.
1.3
Download the latest version of the WolfVision Ethernet-
software and store it in a folder on your harddisc.
1.4
Start the installation of the WolfVision USB-software by
double clicking on the wolflan_win.exe file.
1.5
Click "Setup"-button to start installation.
1.6
Click "Ok"-button to start the file extraction.
1.7
Click "Next"-button to proceed the installation.
Ethernet / LAN Software
The Windows-based WolfVision Ethernet Software is not necessary to access the Visualizer, but
it is a comfortable tool, especially for administrators of a larger number of Visualizers. It offers the
possibility to update the firmware, to access a Visualizer via internet browser and image
transfers.
Installing Ethernet / LAN Software
7

IMPORTANT
During installation, maybe you are asked if you want to
replace newer files on your computer by older ones, then
keep the newer ones.
1.9
Click "Next"-button to continue the installation.
IMPORTANT:
If older versions of the Ethernet-software were not de-
installed before you tried to install the Software version
1.2, an error message will appear.
De-install previous version of the Ethernet-software and
re-start installation.
1.10
Click "Close"-button to finish the installation.
8
1.8
The installer will start. The program files and USB-drivers
will be installed in the directory (by default):
C:\Program Files\WolfVision\Ethernet.
(Please note: on German Windows installation, default
path: C:\Programme\WolfVision\Ethernet)
Enter a different location if required.
Choose the setup-mode to install the software for all
users or only for the current user.

Usage of Ethernet / LAN Software
In the browser window, the desired Visualizer can be
selected (all connected Visualizers are shown). When
more than one Ethernet connections are available, the
desired connection can be selected in the displayed
window.
With the discovery mode you can choose between local
network area (LAN) or Internet. With Internet selection,
the respective IP-address has to be entered (contact
your network administrator).
Please note:
If a Visualizer is behind a firewall and should be discovered over
the internet, the following ports should be allowed for
communication on the firewall: 50913 and 50914 for UDP/TCP
traffic.
When one or more Visualizers will be detected that are
not in the computers network IP address range, a
message will appear "Unreachable Visualizer found".
If you want to use these Visualizers as well, please talk
to your network administrator or the change the IP
address of the according devices to be in the IP address
range of the current network.
9

10
Capturing images with the Ethernet / LAN Software
To capture images, select the "Start Image Transfer"-
button. In the pop-up menu, the desired resolution can
be selected.
The captured image will be shown on the computer
screen and can be stored on a data medium by mouse
click.
Please note:
the computer is blocked until the image is stored or the process
is aborted.
With the "Auto Save"-function, images will be
permanently transferred. You can choose between
Autosave button or a time interval to start the next
transfer. There is also a possibility to select the image
resolution and file format.
Possible file formats are:
- BMP (Windows Bitmap) files (*.bmp)
- JPEG (Joint Photographic Experts Group) files (*.jpg)
- PNG (W3C Portable Network Graphics) files (*.png)
- TIFF (Tag Image File Format) files (*.tif)
Please note:
The file compression can only be selected for JPG-files. It
affects the quality of the stored image.
Please note:
For Professional and Ceiling Visualizers the speed of image
transfers via LAN was improved in March 2006 with Firmware
version v1.30a. Older units should be updated to this Firmware
version (or higher).
VZ-9 Visualizers with serial number higher than 095501 also
support the improved image transfer speed.

11
Update Visualizer Firmware
After the firmware transfer, the Visualizer needs about 50
seconds to install the new firmware.
Do not disconnect the Visualizer in this state.
When the firmware installation aborted accidentally, the
Visualizer restores factory installed firmware.
Download the latest firmware for your Visualizer from the
internet and store it on a local data medium.
http://www.wolfvision.com/wolf/fware.html
Select the Visualizer to update, click the "Start Firmware
Update" button, select the respective firmware file
(*.w19) and click the "open"-button.
Important for VZ-9:
In March/April 2006 Wolfvision introduced a slightly upgrated version of the VZ-9 with a new mainboard
(hardware change). These units have serial numbers higher than 095501 and they support the following
additional features:
- E-Mail Notification
- DHCP-Client
- Control only mode over LAN
- Improved speed of image transfers over LAN
When choosing the Firmware Update for your VZ-9 please check your serial number, because starting with
serial number 095501 VZ-9 Visualizers require a different Firmware Update file. However there is no risk that
you may upload the wrong Firmware Update file. WolfVision Visualizers refuse to upload a false Firmware
Update file.
IMPORTANT
It is not possible to access an Visualizer during it's
firmware update process. An error message will appear.
IMPORTANT
It is not possible to execute more than one instance of
this application at the same time on the same computer.
An error message will appear on the screen.
The displayed status bar shows the
progress of the firmware update.

Gedruckt in Österreich, November 2006 Technische Änderungen vorbehalten !
IBM-kompatibler PC
Bildübertragung / Visualizer Steuerung via Browser und WolfVision Ethernet/LAN Software werden
unterstützt.
System Voraussetzung (empfohlene minimal Ausstattung)
- Microsoft Windows 98, ME, NT 4.0, 2000 oder XP (95 und NT 4.0 Terminal Server nicht unterstützt)
- Pentium II 500 MHz mit 32 Mbyte RAM (Pentium III mit 128 Mbyte oder besser wird empfohlen)
- Bildschirmauflösung 800 x 600 (1024 x 768 oder höher wird empfohlen)
- 256 Farben (65535 Farben oder mehr werden empfohlen)
- 1x 10BASE-T Anschluss (100BASE-TX wird empfohlen)
- getestete Browser: oder neuer
Apple Macintosh
Bildübertragung / Visualizer Steuerung via Browser wird unterstützt.
System Voraussetzung (empfohlene minimal Ausstattung)
- Mac OS 10.2 oder höher
- G4 mit 1 GHz mit 256 Mbyte RAM (512 Mbyte empfohlen) oder besser
- Bildschirmauflösung 800 x 600 (1024 x 768 oder höher wird empfohlen)
- 256 Farben (65535 Farben oder mehr werden empfohlen)
- 1x 10BASE-T Anschluss (100BASE-TX wird empfohlen)
- getestete Browser: Safari 2.0 der neuer und
Microsoft Internet Explorer 5.5 ( ), Netscape Navigator 7.1
(oder neuer), Mozilla 1.5 (oder neuer), Opera 7.11 (oder neuer) und Firefox 1.0 (oder neuer).
(o ) Firefox 1.5 (der neuer).
Rechtliche Informationen
Bevor Sie die Software installieren beachten Sie bitte, dass Sie die folgenden Hinweise mit der
Installation akzeptieren:
- Es ist nicht erlaubt die Software mit anderen Geräten als WolfVision Visualizer zu verwenden.
- Es dürfen keine Kopien dieser Software außer zur Sicherung bzw. Archivierung angefertigt werden.
- Jegliche Rückwärtsentwicklung, wie dekompilierung der Software ist nicht erlaubt.
- Eigentumsrecht und Urheberrecht dieser Software nur für WolfVision GmbH vorbehalten.
- WolfVision GmbH gewährt keine Garantie auf Fehlerfreiheit der Software.
- WolfVision GmbH ist nicht Haftbar für Schäden die durch die Benutzung der Software verursacht
werden.
Ethernet / LAN
Der LAN Anschluss des Visualizers (10BASE-T/100BASE-TX) kann
zur Steuerung des Visualizers über ein Netzwerk benutzt werden. Es können auch Bilder an den
PC übertragen werden oder Firmware-Updates des Visualizers durchgeführt werden.
Der Visualizer hat einen eingebauten Webserver welcher mit einem Standardbrowser des
angeschlossenen Computers (PC) erreicht werden kann. Es ist keine spezielle Software für die
Bildübertragung und Steuerung notwendig.
Nur für Firmware-Updates via LAN wird eine zusätzliche Software benötigt (diese kann von
www.wolfvision.com/support heruntergeladen werden).
Unterstützte Protokolle: TCP/IP, ICMP, ARP
Bildauflösung: Momentaufnahme: 1024x768 und 512x384, Live Bild: 160x120
DEUTSCH
1

Ethernet Cross-over Kabel (gekreuzt)
Host
PREVIEW USB LAN
2
Anschluss des Visualizers an den Computer / das Netzwerk
Es gibt zwei Möglichkeiten den Visualizer an das Computernetzwerk anzuschließen:
Methode 1: Direkte Verbindung mit einem Cross-over Kabel
Wenn der Visualizer an nur einen Computer angeschlossen werden soll, verbinden Sie einfach
den LAN-Anschluss (RJ-45) des Visualizers mit dem LAN-Anschluss des Computers mit einem
Cross-over Ethernet Kabel (UTP Category 5)
Bitte beachten Sie:
Die Kabellänge ist bei dieser direkten Verbindung limitiert. Diese ist abhängig von der Qualität des
Netzwerkkabels und der Qualität der Netzwerkkarte im PC.
Die empfohlene Kabellänge beträgt ca. 10m. Für längere Kabelverbindungen empfehlen wir nicht-gekreuzte
Netzwerkkabel (Cat5) und einen Hub oder Switch (siehe Methode 2).
Verbinden Sie den LAN-Anschluss (RJ-45) des Visualizers mit dem Hub oder Switch unter
Verwendung eines nicht-gekreutztem (straight) Netzwerkkabels (UTP Category 5). Jeder
Anschluss des Hubs/Switches kann benutzt werden mit Ausnahme des Kaskadenanschlusses
(Dieser Anschluss hat eine gekreuzte Verbindung).
Bitte beachten Sie:
Wenn der Visualizer an die anderen Geräte im Netzwerk angeschlossen wird, wird das
Kommunikationsprotokoll beider Geräte automatisch eingestellt auf 10BASE-T/100BASE-T und HDX/FDX
(z.B. “Automatic negotiation”). Voraussetzung für eine reibungslose Kommunikation ist jedoch dass das Gerät
das mit dem Visualizer kommunizieren soll, ebenso “Auto Negotiation” unterstützt. Dies ist jedoch heutzutage
Standard.
Methode 2: Netzwerkverbindung mit einem Hub oder Switch
Ethernet Kabel (nicht-gekreuzt) Ethernet Kabel (nicht gekreuzt)
Host
HUB / Switch Host
PREVIEW USB LAN

Bevor der Visualizer mit einem Webbrowser über einen Computer erreicht werden kann, müssen
die IP-Adressen beider Geräte eingestellt werden um eine Kommunikation zuzulassen.
Die einfachste Methode ist den Visualizer darauf einzustellen IP-Adresse, Subnet Maske und
Gateway von einem DHCP (Dynamic Host Configuration Protocol) Server in ihrem Netzwerk zu
beziehen. Alle Visualizer unterstützen DHCP-Server.
DHCP ist standardmäßg bei allen Geräten aktiviert, die Einstellungen können im On-Screen Menü
geändert werden. IPAdresse über DHCP
Subnet Maske über DHCP
Gateway über DHCP
Bitte beachten Sie:
Beim VZ-9 wird DHCP erst ab der Seriennummer 095501 (und höher) unterstützt. Ältere VZ-9 müssen
manuell eingestellt werden.
Wenn der Computer im selben IP-Adressenbereich liegt (d.h. wenn die IP-Adresse mit 192.168...
beginnt) und die Standardeinstellung des Visualizers (192.168.0.100) durch kein anderes Gerät im
Netzwerk benutzt wird, kann der Visualizer sofort mit dem Computer kommunizieren. Falls nicht,
muss entweder die IP-Adresse des Visualizers oder des Computers geändert werden.
Es wird empfohlen die Netzwerkeinstellungen des Computers zu belassen (da in den meisten
Fällen das Netzwerk auch für andere Netzwerkoperationen benutzt wird) und nur die
Einstellungen des Visualizers zu ändern.
Adressen die in internen Netzwerken frei vergeben werden können, beginnen entweder mit
192.168.x.x oder mit 10.x.x.x.
In einem größeren Netzwerk fragen Sie bitte den Netzwerksadministrator nach einer freien IP-
Adresse. Bei kleinen Netzwerken (ohne Administrator) benutzen Sie folgende Methode um die IP-
Adresse Ihres Computers herauszufinden:
PC: Windows 2000/XP klicken Sie Start - Programme - Zubehör - Eingabeaufforderung und geben
"ipconfig" ein.
Falls Ihre IP-Adresse z.B. 10.0.0.4 lautet, dann ändern Sie die IP-Adresse des Visualizers auf
10.0.0.x (x steht für eine Zahl zwischen 0 und 255, welche nicht von einem anderen Gerät benutzt
wird). Zum Beispiel: 10.0.0.100.
Falls Ihre IP-Adresse (z.B.) 192.168.0.7 lautet und es nicht möglich ist auf den Visualizer
zuzugreifen, dann prüfen Sie bitte ob ein anderes Gerät im Netzwerk die IP-Adresse
192.168.0.100 (Standard IP-Adresse des Visualizers) benutzt. Ändern Sie die IP-Adresse auf
einen andere im selben Adressenbereich (z.B. 192.168.0.209).
Der "Gateway" ist die IP-Adresse des Internet Routers (bzw. Internet Gateways) ihres Netzwerkes.
Wenn Sie den Visualizer nur in einem lokalen Netzwerk betreiben, dann ist der Gateway Eintrag
nicht notwendig. Nur wenn der Visualizer über das Internet erreichbar sein, soll ist es notwendig
die IP-Adresse des Routers/Gateways einzutragen.
Bitte beachten Sie:
Gateway-Einträge sind beim VZ-9 Visualizer erst ab Firmware Version v1.10a (und höher) möglich.
Falls nötig kann die Firmware upgedatet werden. Informationen zum Firmwareupdate finden Sie unter:
www.wolfvision.com/wolf/fware.html
Die IP-Adresse, Subnet Maske und die Gateway-Adresse des Visualizers können im On-Screen
Menü geändert werden (siehe nächste Seite).3
Einstellen der IP-Adressen des Visualizers und des Computers

Um den eingebauten Webserver des
Visualizers zu nutzen, öffnen Sie den Standard-
browser Ihres PCs und geben die IP-Adresse
des Visualizers imAdressenfeld ein.
Falls die Homepage des Visualizers nicht
geöffnet wird, prüfen Sie bitte die Netzwerk-
verbindung und die IP-Adressen des
Visualizers und Computers (siehe vorige Seite).
Bitte beachten Sie:
Ein gefrorenes Bild (Freeze-Funktion) hat auf die
Bildübertragung über das Netzwerk keine Auswirkung.
Ein Split-Bild (Bildspeicher) ist über das Netzwerk
nicht verfügbar.
Abbildung 1
4
Web Server Funktion
Ändern der IP-Adresse des Visualizers
Abbildung 3
- Schalten Sie den Visualizer ein und öffnen Sie im On-
Screen Menü den Punkt Advanced Settings / Ethernet
Settings.
- Stellen Sie Ethernet Protect auf OFF und ändern Sie die
IP-Adresse, Subnet Maske und die Gateway-Adresse auf
den gewünschten Wert.
- Bestätigen Sie die neuen Einstellungen (”Confirm new
Settings” erscheint sobald eine Änderung vorgenommen
wurde.
- Stellen Sie den Ethernet Modus (mode) auf:
IMAGE AND CONTROL (Bild und Steuerung)
IMAGE ONLY (nur Bildübertragung)
CONTROL ONLY (nur Steuerung)
OFF (aus)
Bitte beachten Sie:
- Im Ethernet Mode Menü kann die Verfügbarkeit der
Bildübertragung und der Steuerung eingestellt werden.
- In Abbildung 3 sehen Sie die Standardeinstellung bei
deaktiviertem DHCP.
- Wenn mehr als ein Gerät mit der selben IP-Adresse im Netzwerk
vorhanden ist entsteht ein Netzwerkkonflikt und beide Geräte
können nicht mehr mit dem Netzwerk kommunizieren.
Setzen Sie die IP-Adresse sehr gewissenhaft!
- Die Gateway-Funktion ist beim VZ-9 erst ab der Firmware-
Version v1.10a (und neuer) verfügbar.
- DHCP wird beim VZ-9 erst ab der Seriennummer 095501
(und höher) unterstützt. Bei älteren Geräten müssen die
Einstellungen manuell vorgenommen werden.
- Ab der Firmwareversion V2.02a wurde das Layout des
On-Screen Menüs neu gestaltet.
Firmwareupdates können gratis heruntergeladen werden von
http://www.wolfvision.com/wolf/fware.html
Abbildung 2
VZ-32 Menu
Exposure Settings
Color Settings
Output Settings
Preset Control
Recall Factory Settings
Exit
> Advanced Settings
VZ-32 Menu
Exposure Settings
Color Settings
Output Settings
Preset Control
> Advanced Settings
Recall Factory Settings
Exit
Advanced Settings
> Ethernet Settings
Power Settings
Misc. Settings
Height Adjustment
Return
Model: VZ-C32 V2.03c
Ser-Nr.: 321048
MAC: 00-0C-92-01-D8-D8
Advanced Settings
Power Settings
Misc. Settings
> Ethernet Settings
Height Adjustment
Return
Model: VZ-C32 V2.03c
Ser-Nr.: 321048
MAC: 00-0C-92-01-D8-D8
Ethernet Settings
> Ethernet Protect ON
DHCP OFF
IP-Adress 192.168. 0.100
Subnet-Mask 255.255.255. 0
Gateway-IP 0. 0. 0. 0
Confirm new Settings
Ethernet-Mode IMAGE+CONTROL
Return
Ethernet Settings
> Ethernet Protect ON
DHCP OFF
IP-Adress 192.168. 0.100
Subnet-Mask 255.255.255. 0
Gateway-IP 0. 0. 0. 0
Confirm new Settings
Ethernet-Mode IMAGE+CONTROL
Return

Status-Abfrage / Status Information
Mit Hilfe der Status-Abfrage kann der
aktuelle Status des Visualiers angezeigt
und überprüft werden.
Folgende Informationen werden gezeigt:
- Geräteinformation wie Seriennummer,
Modelbezeichnung, Versionsnummer
der installierten Firmware
- Etherneteinstellungen (settings) wie
Mac-Adresse, IP-Adresse, Subnet
Mask und standard Gateway
- Betriebsstunden
- Lampenstatus
- Power / Beleuchtungseinstellung
- Einstellung der Auflösung
- Bildeinstellungen wie Detail, Fokus,
Iris, Key-Lock, OSD-Menü, etc.
Bitte beachten:
Bei Professionellen und Decken Visualizern
ist das Status Information Feature ab der
Firmware Version v1.30a vom März 2006
inkludiert. Auch alle VZ-9 Visualizer Modelle
unterstützen dieses Feature.
E-Mail Benachrichtigung / E-Mail Notification
WolfVision Visualizers bieten die Möglichkeit der
E-Mail Benachrichtigung. Es können bis zu 3
Empfängeradressen definiert werden.
Alarm Email:
z.B. bei einer defekten Lampe, sendet der
Visualizer automatisch ein E-Mail an die
eingetragenen Empfängeradressen.
Startup Email:
Bei jedem Einschalten des Visualizers wird
automatisch ein E-Mail an die eingetragenen
Empfängeradressen gesendet.
Weekly Status Report:
Der Visualizer sendet jede Woche automatisch
ein E-Mail an die eingetragenen Empfänger-
adressen mit dem aktuellen Status des Gerätes.
Die Zeitmessung startet mit Anschließen des
Gerätes (Hauptschalter muss auf "I" stehen, falls
verfügbar.
Bitte beachten Sie:
E-Mail Benachrichtigung ist ein neues Feature das im
März 2006 mit Firmware Version v1.30a eingeführt
wurde. VZ-9 Visualizer unterstützen dieses Feature erst
am Seriennummern 095501 (Produktionsdatum ab März
2006)
xxx.xxx.xxx.xxx
5

Übertragung des Live-Bildes
Durch Klicken des Live-Links [LIVE] auf der
Startseite wird das Live-Bild dargestellt.
Der Web-Browser öffnet ein neues zusätzliches
Fenster mit einer Fernsteuerung.
Bitte beachten Sie, dass Javascript auf
Ihrem Computer verfügbar sein muss
um ein Live-Bild darzustellen zu können.
Popups müssen aktiviert sein.
Die Bildrate (frame rate) des dargestellten Bildes
beträgt max. 3,75 Bilder pro Sekunde und ist
abhängig von der Leistungsfähigkeit Ihres
Computers, der Netzwerkumgebung und der
Anzahl der angeschlossenen Geräte usw.
Bitte beachten:
Sollte der Visualizer während der Live-Bild-Übertragung abgeschaltet werden, so stellt der Computer
möglicherweise weiterhin das “Live-Bild” dar bis der Web-Browser geschlossen wird (dies ist vom
verwendeten Browser abhängig). Normalerweise verursacht dies keine Probleme. Wenn dies immer wieder
wiederholt wird, so kann der Host unstabil werden, eventuell muss der Computer dann neu gestartet werden.
Darstellen von Momentaufnahmen
Durch Anklicken des CAPTURE-Links [CAPTURE] wird eine Momentaufnahme mit 1024x768
Pixel im Fenster des Web-Browsers dargestellt. Bei Benutzung des Links CAPTURE-PREVIEW
[CAPTURE-PREVIEW] wird eine Momentaufnahme mit 512x384 Pixel dargestellt. Diese Bilder
können mit der Speicherfunktion des verwendeten Web-Browsers gespeichert werden
(z.B. Internet Explorer: rechte Maustaste klicken und dann “Bild speichern unter”).
Funktion der Fernbedienung
Durch Anklicken des LIVE-Links [LIVE] auf der Startseite des Visualizers wird das Live-Bild
dargestellt und auch ein neues Fenster mit der Fernbedienung geöffnet.
Bitte beachten Sie:
Die Fernbedienung ist nur verfügbar wenn die Funktion “CONTROL” im Menü des Visualizers aktiviert ist
(siehe vorige Seite).
6

Ethernet / LAN Software
WICHTIG:
Möglicherweise könnte die Version der Ethernet-Software, welche Sie mit Ihrem Visualizer
erhalten haben nicht mehr aktuell sein. WolfVision verbessert und erweitert diese Software
ständig.
Deshalb empfehlen wir den Download der neuesten Version der WolfVision Ethernet-Software
vom Internet: www.wolfvision.com/support
Statt der Verwendung der möglicherweise älteren Software Version auf der mitgelieferten
CD-ROM!
1.1 IMPORTANT
Bevor eine neue Version der Ethernet-Software installiert
wird sollte die alte Version deinstalliert werden!
Wählen Sie "WolfVision Ethernet Software" der
"Start/Einstellungen/Systemsteuerung/Software"
Menü und drücken dann die "Entfernen"-Taste..
Ansonsten wird eine Fehlermeldung angezeigt.
1.2
Öffnen Sie Ihren Internetbrowser:
www.wolfvision.com/support.
1.3
Downloaden Sie die neueste Version der WolfVision
Ethernet-Software und speichern diese auf Ihrer
Festplatte.
1.4
Starten Sie die Installation durch Doppelklick auf die
gedownloadete Datei wolflan_win.exe.
1.5
Klicken Sie auf "Setup" um die Installation zu starten.
1.6
Klicken Sie auf "Ok" um die Dateien zu extrahieren.
1.7
Klicken Sie auf "Next" um mit der Installation
fortzufahren.
Installieren der Ethernet / LAN Software
7
Die Windows-basierende WolfVision Ethernet Software ist für eine Verbindung zum Visualizer
zwar nicht unbedingt notwendig, aber sie ist ein komfortables Werkzeug, insbesondere für
Administratoren einer größeren Anzahl an Visualizern. Sie ermöglicht Firmwareupdates,
angeschlossene Visualizer können aus einer Liste gewählt werden (Web-Browser startet
automatisch) und es können Bilder an den PC übertragen werden.

1.9
Klicken Sie auf "Next" um die Installation zu starten.
1.10
Klicken Sie auf “Close” um die Installation abzuschließen
8
1.8
Die Installation wird gestartet und die Programmdateien
werden standardmäßig im Verzeichnis:
C:\Programme\WolfVision\Ethernet Software
gespeichert. Der Speicherort kann geändert werden.
Wählen den Sie den Setupmodus um die Software für
alle Benutzer dieses Computers oder nur den derzeit
angemeldeten Benutzer zu installieren.
WICHTIG:
Während der Installation erscheint möglischerweise eine
Abfrage ob Sie neuere Systemdateien durch ältere
ersetzen wollen, dann behalten Sie die Neueren.
WICHTIG:
Falls eine ältere Version der Ethernet-Software vor
Installation der Version 1.2 nicht deinstalliert wurde,
erscheint eine Fehlermeldung.
Deinstallieren Sie die ältere Version und starten Sie die
Installation erneut.
Other manuals for VZ-9
1
This manual suits for next models
8
Table of contents
Languages: