Wondlan WFM-01 User manual

WFM-01
QUICK START GUIDE
WONDLAN
Read me carefully before use
Wireless Monitor with Follow Focus

What's in the box Let's check if you have
everything you need.
Wireless video
transmission system Follow focus receiver Driving Motor
System Accessory
1.System’s main body
2.300MM HDMI cable
3.Transmitter
6.Mobile Battery
4.F770 battery
5.HDMI adapter
1.Main body of receiver
2.Quick locking buckle
3.6F22-9V 680mAH battery
4.Quick battery charger
1.Main body of driving
motor
2.Driving Gear*2
( Modulus 0.8,0.4)
3.Follow focus ring belt*2
1.Screwdriver
2.Aluminum Box
with strap
3.Instruction Disc
3)3 adapters for battery
1)2600mAH battery
2 ) USB power cable
Parts Checklist

Quick Installation Guide
1. Mount the camera onto the base plate and strap
the focus ring on the lens.
2.1 Use Phillips screwdriver to remove the battery
cover,screws and open the battery compartment.
2.2 Remove insulation tape from the electrode and install
the battery (pay attention to the positive and negative battery
button).
2. Install the wireless follow focus system.
3. Install the wireless video transmission system.
3.1 Connect the HDMI adaptor /HDMI cord to the camera.
2.3 Push the battery in the battery compartment and install
the battery cover.
2.4 Take 2pcs M4 screws from the plastic bag and mount the
quick bracket on to receiver.
2.5 Remove the screws on the motor and mount the gear
on the motor and tighten the screws.
2.6 Install the quick draws on the 15mm tube. Make sure
the motor gear pressed against the focus ring.
2.7 Insert the power cord of the driver to the socket of the
receiver.
Wireless Monitor with Follow Focus

4. Install the main body of the system
4.1 Install the F770 battery onto the battery plate on the
back of the main body.
5.2 The black switch only controls the monitor.
3.2 Connect the power cord with USB plug to the battery.
3.3 Connect the other end of the power cord to the Mini
USB plug and then to the signal transmitter .
3.4 Connect the transmitter to the camera.
4.2 Connect the 300mm HDMI cord to the back and the
bottom of the system main body.
5. Power switch
5.1 Turn on the red switch. It is the main switch of the
whole system.
Become our fans for the latest news, lmmaking news & tips,
huge prizes and Wondlan exclusives!
Quick Installation Guide
Wireless Monitor with Follow Focus

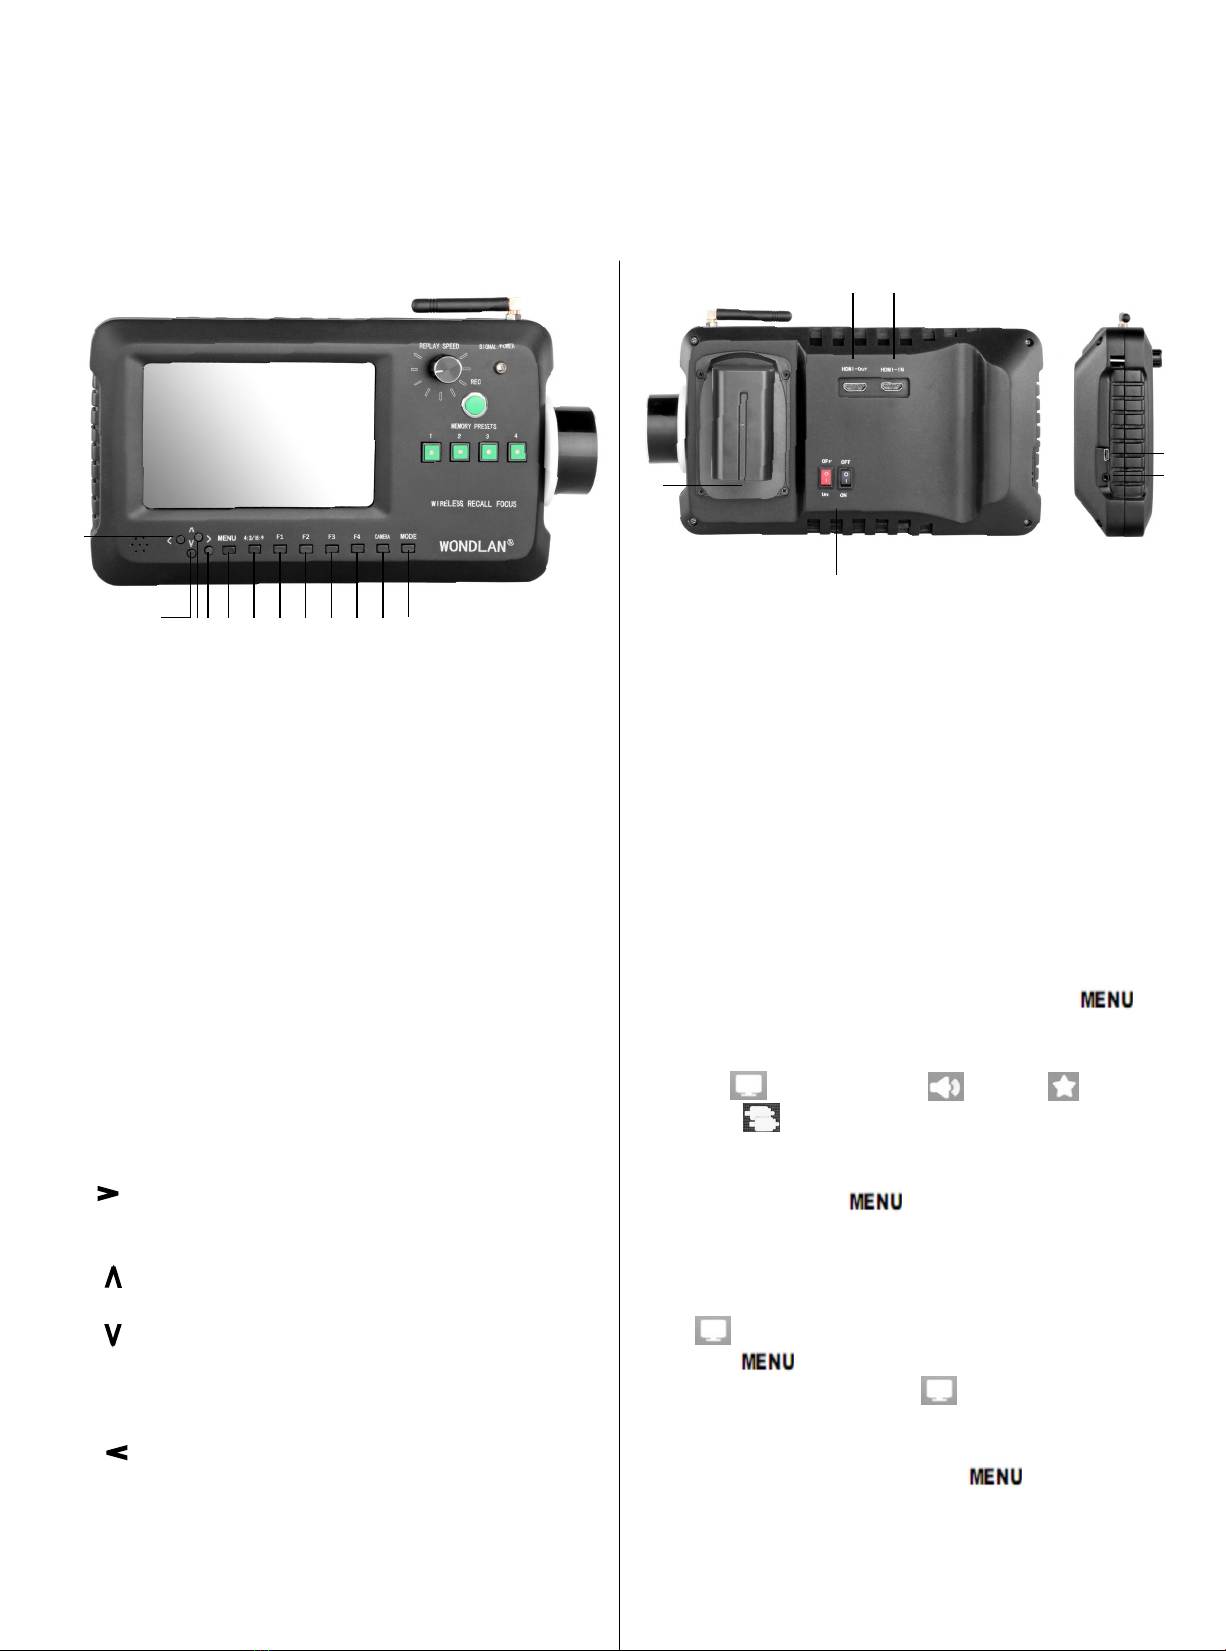
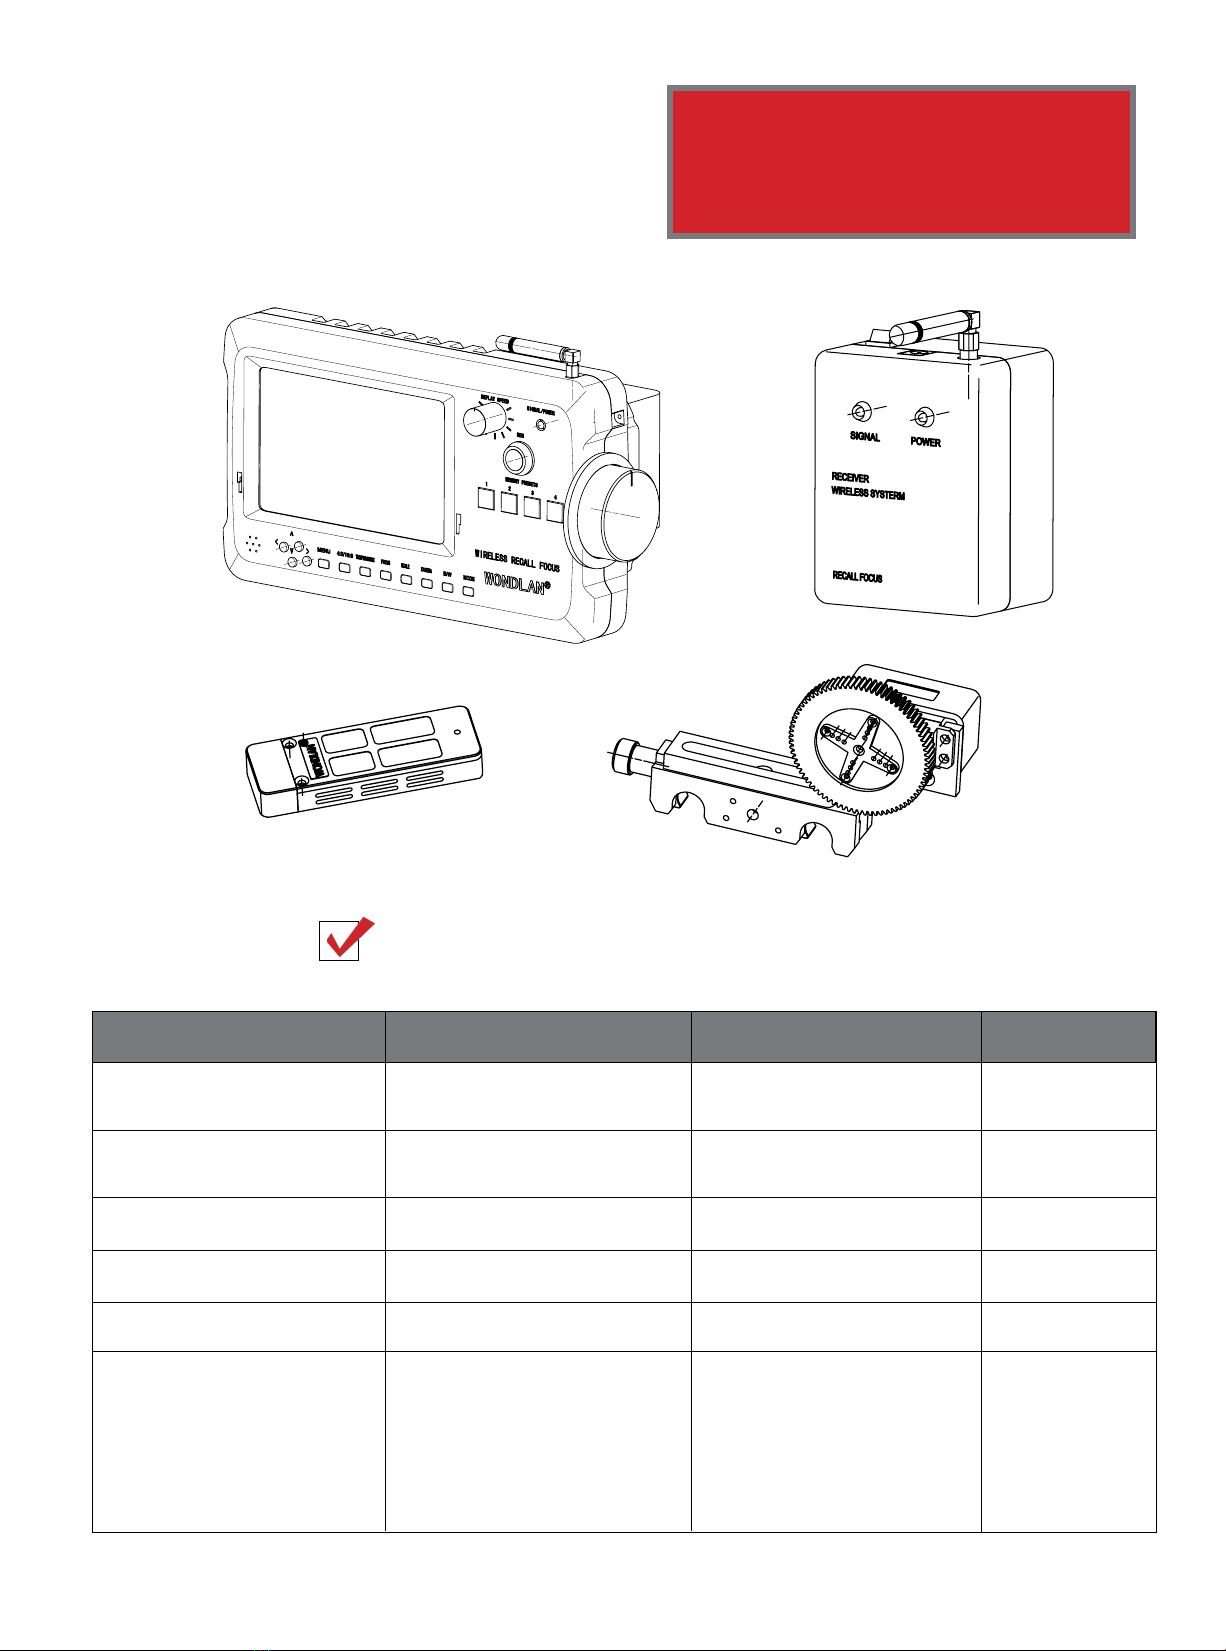
A.Product description
1.HDMI-IN: HDMI High Definition signal input
2.HDMI-OUT: HDMI High Definition signal
output
3.Power switch: ON Power on, OFF Power off
4.Battery plate:according to the different
requirements attached
5.Phone jack (side)
6.Data upgrade jack (side)
B、Menu function introduction
In the operating status, press button“ ”,
then enter into OSD mode. Press the unit button
“∧” or “∨ "to select the options which you
need: (display result) (sound) (system
setting) (scan position adjust), after select
the button you need, press “<”or “>”on
the unit to confirm, if need to exit OSD menu,
repress button “ ”.
3
4
12
5
6
1
2
3
4
5
678
9
12
10
11
1. MODE:To switch HDMI / Video input signal
2. CAMERA:Photography (Camera) mode
3. F4:Custom button, can select (Screen marker,
monochrome display, point to point, peaking focus
assist, false colors filter, exposure, brightness
histogram, scanning mode, center marker,
segmentation ) one of them as definition function
4. F3:Custom button, see F4
5. F2:Custom button, see F4
6. F1:Custom button, see F4
7. 4:3/16:9:To change the display ratio
8. MENU:Menu button, pop up or close menu
9. > (RIGHT):Volume up, In OSD menu for
right adjustment, function confirm or increase the
value of analog on the menu
10. ∧(UP):Up adjustment button, menu item
selection button
11. ∨ Image static shortcut keys(DOWN):
Down adjustment button, menu item selection
button, press the button directly, which enables
the movable picture still in the picture
12. < (LEFT):Volume down, In OSD menu
for left adjustment, function confirm or decrease
the value of analog on the menu
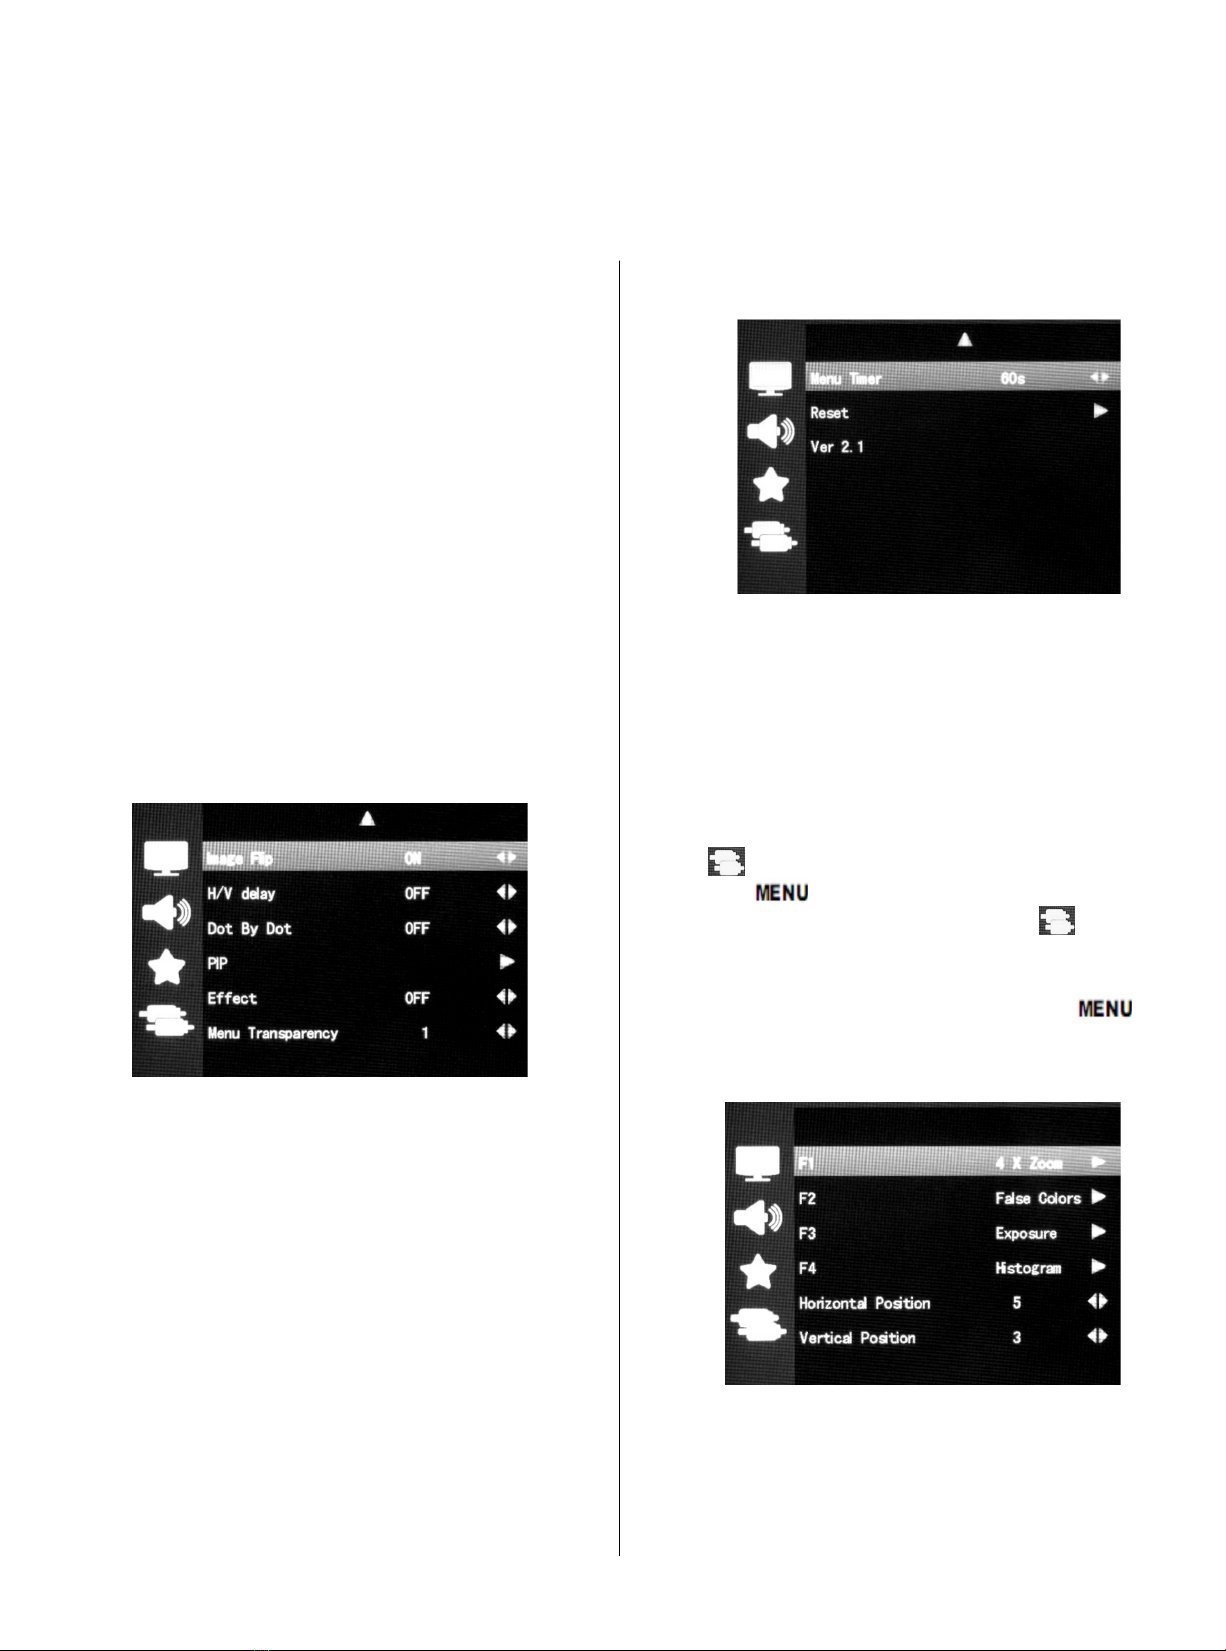
C、 Display result setting
Press " "key, pop up OSD menu as below,
” <”or “> "to select , press " < " or " >
" to confirm, press “∧”or“∨” to select the
adjustment, then use " < " or " > " to adjust or
select the adjustment. Press" " to exit。
User Guide
Wireless Monitor with Follow Focus

◆ Menu page 1 picture
Contrast: To adjust the brightest and darkest
ratio of the image
Brightness: To adjust the image's brightness
Saturation: To adjust the saturation
Tint: Adjustment of the NTSC signal in the
composite video mode,The other mode is invalid
Sharpness: To adjust the depth to the image
Color Temp: Use the adjustment the color
temperature can be preset ( user, 6500K.7300K,
9300K)
◆ Menu page 2 picture
Picture Mode: the image brightness, standard,
soft, the user (the contrast, brightness, and
color settings) effect settings
Aspect Ratio: full screen display, point to point,
panoramic. Zoom2, Zoom 1, 4:3 mode selection
D、 Sound setting
Press " "key, pop up OSD menu as below,
” ∧”or “∨ "to select , press " < " or " >
" to confirm, press “∧”or “∨” to select the
adjustment, then use " < " or " > " to adjust or
select the adjustment. Press" " to exit.
Volume: To adjust the volume
Balance: To adjust 2-channel (L&R)
E、 System setting
Press " " key, pop up OSD menu as
below,“∧“or“∨”to select , press " < "
or " > " to confirm, press “ ∧ ”or“ ∨ ”to
select the adjustment, then use " < " or " > " to
adjust or select the adjustment. Press" " to
exit.
◆ Menu page 1 picture
User Guide
Wireless Monitor with Follow Focus

◆ Menu page 2 picture
Image Flip: the U/D, L/R of the image around
flip
H/V delay: H/V delay optional switch
Dot By Dot: In the video, the point to point
display. Observing the image more clearly
PIP: To display two inputs signal picture at the
same time, can adjust picture position, size,
picture interchange, double picture, picture out
picture mode
Effect: Menu display effect
Menu Transparency: To select the OSD display
effect
◆ Menu page 3 picture
Menu Timer: To control the automatic
disappearance time after menu pop up
Reset: On system parameters and settings
recover factory settings
Ver 2.0: Menu software version number
F、 Custom button and scan setting
Press " " key, pop up OSD menu as
below,“ ∧“ or “ ∨ ” to select , press "
< " or " > " to confirm, press “∧”or “∨”to
select the adjustment, then use " < " or " > " to
adjust or select the adjustment. Press" " to
exit.
Language: Chinese, English
Screen Marker : Picture framing marker
selection frame(off,96%,93%,90%,85%,
80%)
Center Marker: Screen center marker(cross
marker)display setting
Scan Mode: To deal with special image
(standard, over scan, under scan)
Check Field: Color, black and white /
monochrome switching, to switch image color,
black and white, monochrome (red, green, blue)
Camera: Canon 5D II or similar camera when
shooting, image NO Deformation, NO black, NO
delay, perfect without distortion
User Guide
Wireless Monitor with Follow Focus

F2:The corresponding panel button F2 custom
button function definition of choice setting(Screen
marker, monochrome display, point to point,
peaking focus assist, false colors filter, exposure,
brightness histogram, scanning mode, center
marker, segmentation).
F3:The corresponding panel button F3 custom
button function definition of choice setting(Screen
marker, monochrome display, point to point,
peaking focus assist, false colors filter, exposure,
brightness histogram, scanning mode, center
marker, segmentation).
F4:The corresponding panel button F4 custom
button function definition of choice setting(Screen
marker, monochrome display, point to point,
peaking focus assist, false colors filter, exposure,
brightness histogram, scanning mode, center
marker, segmentation).
Horizontal Position: To adjust the image display
(L/R)
Vertical Position: To adjust the image display(U/
D)
◆ Menu page 2 picture
F1:The corresponding panel button F1 custom
button function definition of choice setting(Screen
marker, monochrome display, point to point,
peaking focus assist, false colors filter, exposure,
brightness histogram, scanning mode, center
marker, segmentation).
User Guide
Wireless Monitor with Follow Focus
Horizontal Size: To adjust the image L/R stretch
Vertical Size: To adjust the image U/D stretch
Become our fans for the latest news, lmmaking news & tips,
huge prizes and Wondlan exclusives!

1. Controller power switch & receiver power switch:
Controller power light is on for 2 seconds, then off; red power
light and blue signal light of the receiver are always on.
2. Reset settings of the controller:
Before use the follow focus the need to be reset, adjusting
the focusing knob clockwise or counterclockwise to one end
and pressing the key 1 and 4 simultaneously for about 2
seconds. LED lights reset setting is completed.
3. Memory keys use methods:
Adjust them to the desired focus and press the memory
button 1 for one second; if the indicator light on the button is
on and red signal light is on for one second, it indicates the
success of this focus memory the move to the next focus
memory. At the same time, press memory key 2, 3, and 4,
to respectively record the focus.
4. The dial function:
When adjust the desired focus the focus position can be
recorded manually by engraving lines.
6. Infrared wireless shutter function:
Only suitable for Canon, Nikon SLR cameras.
Applicable occasions:
Wireless Follow Focus can complete zoom widely in
Steadicam movement lens, rocker lens and the orbital
motion lens.
Note:
It should be reset before each use, or the motor does
not work.
It may be insensitive in operation, because the battery
voltage is too low. Please replace the battery timely.
Infrared Shutters are divided into Canon and Nikon. Tell
the customer service staff about your camera model
when purchase.
5. Playback speed adjustment key:
Uses the memory button to switch the focus and adjust
speed. Adjusting the speed knob can change the speed
of the motor (with the memory effect, different shooting
effects can be achieved and speed can be changed
during zoom).
Become our fans for the latest news, lmmaking news & tips,
huge prizes and Wondlan exclusives!
User Guide
Wireless Monitor with Follow Focus

无线跟焦视频传输系统
配置明细表 请您确认包装中是否有
以下配置:
无线视频传输系统 跟焦器接收系统 无线跟焦驱动器 附件
1. 无线跟焦视频传输系统主
机(含 F770 电池扣板、背带)
2.300MM 长 HDMI 视频传
输连接线
3. 影音传输发射器
6. 移动电源
4.F770 电池 (含充电器)
5.HDMI 大转校转换接头
1. 无线跟焦器接收器主机
(含 3 个 M4X10 螺钉)
2. 快速卡口
3.6F22-9V 680mAH 充电电池
4. 快速充电器
1. 驱动器主体
2. 跟焦轮 *2(0.8M、0.4M
模数)
3. 跟焦环 *2
1. 十字单头螺
丝刀
2. 航空铝箱含
背带
3. 说明书光盘
3)3 种多功能转接头(苹果、
USB 发射器、充电)
1)电源 power 2600mAH
2 )USB 电源线
配置清单

一、安装相机及跟焦器环:将相机安装到
云台,将跟焦环安装在镜头对焦环上。
1.用十字螺丝刀松开接收器主机电池盖板的螺丝。
2. 拔下电极上的绝缘胶布,安装电池。
二.安装无线跟焦系统。
三 . 安装无线视频发射系统。
1. 将 HDMI 转接头(或转接线)安装至摄影机上。
无线跟焦视频传输系统快速安装指南
3. 将电池推入电池仓内,安装电池盖板。
4. 拆下接收器壳体的两个螺钉,将快速卡扣安装至
接收器主体上。
5. 拆下驱动器主体的螺钉,将跟焦齿轮安装在电
机上,旋紧螺钉。
6. 将驱动器和接收器分别安装到 15MM 导管上,
驱动齿轮与跟焦环贴近。
7. 连接接收器和驱动器:将驱动器上的导线插入
接收器插孔。

四 . 安装无线视频传输系统主体。
1. 将 F770 电池安装在主体电池扣板上。
2. 黑色开关为屏幕显示电源开关。
2. 将电源线一头(USB)连接至移动电源。
3. 将电源线另一头加装充电端口 (MiniUSB) 连接
至发射器电源端口。
4. 将发射器与摄影机连接:即发射器连接至
HDMI 转接头。
2. 将 300mm HDMI 连接线一头接至主题背部
HDMI IN 插口,另一头接至主体底部 HDMI 插口。
五 . 电源开关。
1. 打开无线跟焦视频传输系统电源键:红色开关
为无线跟焦系统和视频传输模块电源总开关。
无线跟焦视频传输系统快速安装指南
想了解更多拍摄技巧,免费获取丰厚奖品吗?
快来加入美国万德兰国际!

一 . 面板说明
1.HDMI-IN: HDMI 高清信号输入。
2.HDMI-OUT: HDMI 高清信号输出。
3. 电源开关 : ON 电源接通,OFF 断开电源。
4. 电池扣板:可根据客户的具体要求,配套不同
的规格。
5. 耳机插座(侧面)
6. 数据升级口(侧面)
二 . 操作菜单说明
在工作状态下按下机子的“ ”键,即进入
相应的 OSD 菜单操作,按本机上的“ ∧ ”或“ ∨”
键来选择所需查看或调整的选项: (显示效
果) (声音) (系统设置) (自定义键
及扫描调整),在选择相应的选项后,按动本机
上的“ < ”或“ > ”键进行确认,退出 OSD
菜单,则再按一次“ ”
无线跟焦视频传输系统使用指南
3
4
12
5
6
1
2
3
4
5
678
9
12
10
11
1. MODE:信号输入 HDMI/AV 模式选择。
2. CAMERA: 相机模式 。
3. F4:
自定义键可将(框形标记、单色显示、点对点、
峰值辅助对焦、伪色彩、过曝提示、亮度直方图、
扫描模式、中心标记、分割、放大)选择一项作为
本键的定义功能 。
4. F3:自定义键 。
5. F2:自定义键 。
6. F1:自定义键 。
7. 4:3/16:9:屏幕画面比例的选择。
8. MENU:菜单键。
9. >
(RIGHT):音量增加,菜单中为向右调整键,
功能确定或增加菜单中模拟量的值。
10. ∧(UP):向上调整键,菜单中用于项目向上
选择 。
11. ∨ 图像静止快捷键(DOWN):向下调整键,
菜单中项目选择键,当无菜单显示时,直接按动此
键,可使活动画面静止在当前画面。
12.<
(LEFT):音量减小 ,菜单中为向左调整键,
功能确定或减少菜单中模拟量的值 。
三. 显示效果设置
按“ ”键,出现以下的 OSD 菜单,“∧
”或“ ∨ ”键来选择 ,按动“ < ”或“ >
”键确认,以“ ∧ ”或“ ∨”键选择调整项目,
然后再用“ < ”或“ > ”键进行各调整量的调
整或选择。退出按“ ”键。

◆ 菜单 1 页画面
对比度:图像画面最亮处与最暗处比例的调整
亮 度:调整图像画面的明亮度
色 度:对色彩饱和度的调整
色 调:在复合视频模式下对 NTSC 制信号的颜
色调整,其它模式无效
清晰度:调整图像的层次感
色 温:使用该调整项可对色温进行预先设置(用
户,6500K.7300K,9300K)
无线跟焦视频传输系统使用指南
◆ 菜单 2 页画面
图像模式:对图像的明亮、标准、柔和、用户 ( 对
比度,亮度,色度的自行设置 ) 的效果设置
画面比例:图像的满屏、点对点、全景。缩放 2、
缩放 1、4:3 等模式的选择
四 . 声音设置
按“ ”键,出现以下的 OSD 菜单,“∧
”或“ ∨ ”键来选择 ,按动“ < ”或“
> ”键确认,以“ ∧ ”或“ ∨”键选择调整项
目,然后再用“ < ”或“ > ”键进行各调整量
的调整或选择。退出按“ ”键。
音 量:调整声音的大小
平 衡:调整耳机左右声道声音的平衡
五 . 系统设置
按“ ”键,出现以下的 OSD 菜单,“∧
”或“ ∨ ”键来选择 ,按动“ < ”或“ >
”键确认,以“ ∧ ”或“ ∨”键选择调整项目,
然后再用“ < ”或“ > ”键进行各调整量的调
整或选择。退出按“ ”键。
◆ 菜单 1 页画面

无线跟焦视频传输系统使用指南
◆ 菜单 2 页画面
镜像开关:图像的上下左右翻转
行场消隐显示:行场消隐部分可选开关
S 点对点:在进行录像时,采用点对点显示。观
测图像更清晰
画中画:在屏幕上同时显示两个输入视频信号的
画面,可调整画面位置、大小、画面互换、双画面、
画外画等模式
菜单效果:菜单显示呈现的效果
菜单透明度:对菜单显示透视效果进行选择
◆ 菜单 3 页画面
菜单显示时间:菜单弹出后,不进行操作自动消
失的时间控制
复 位:对系统的参数及设置恢复出厂设置状态
Ver 2.0 :菜单软件版本号
六 . 自定义键及扫描的设置
按“ ”键,出现以下的 OSD 菜单,“∧
”或“ ∨ ”键来选择 ,按动“ < ”或“ >
”键确认,以“ ∧ ”或“ ∨”键选择调整项目,
然后再用“ < ”或“ > ”键进行各调整量的调
整或选择。退出按“ ”键。
语 言: 简体中文,英文选项
框形标记: 画面取景框标记选择(关,96%,
93%,90%,85%,80%)
中心标记: 屏幕中心标记(十字标记)显示设
置
扫描模式: 特殊图像适应处理(标准,过扫描,
欠扫描)
单色显示: 彩色黑白 / 单色切换,可对图像进行
彩色、黑白、单色(红、绿、蓝) 之间的切换
摄影模式:摄影模式即用佳能 5D II 或类似相机
进行拍摄时,从监视器观察到的是录像的即时图
像,图像不变形、不黑屏,不延时,完美不失真。
F1:对应面板按键 F1 自定义键的按键功能进
行定义选择设定(框形标记、单色显示、点对点、
峰值辅助对焦、伪色彩)用户可进入子菜单后
选定其中一个子项,按“ ”确定为本按键
的功能。

想了解更多拍摄技巧,免费获取丰厚奖品吗?
快来加入美国万德兰国际!
无线跟焦视频传输系统使用指南
F2: 对应面板按键 F2 自定义键的按键功能进行
定义选择设定(框形标记、单色显示、点对点、
峰值辅助对焦、伪色彩)
F3:对应面板按键 F3 自定义键的按键功能进行
定义选择设定 ( 过曝提示、亮度直方图、扫描模式、
中心标记、分割 )
F4:对应面板按键 F4 自定义键的按键功能进行
定义选择设定 ( 过曝提示、亮度直方图、扫描模式、
中心标记、分割 )
水平位置:对图像的显示位置进行左右移动调整
垂直位置:对图像的显示位置进行上下移动调整
◆ 菜单 2 页画面
水平幅度:对图像显示幅度进行左右拉伸调整
垂直幅度:对图像显示幅度进行上下拉伸调整

无线跟焦视频传输系统使用指南
一、打开控制器和接收器电源开关:
控制器 : 电源灯会亮 2 秒钟,之后熄灭;接收器 :
电源红灯常亮,信号蓝灯常亮。
二、控制器复位设置:
跟焦器使用前需要复位设置,将调焦旋钮顺时针
或逆时针旋节到一端位置,同时按下1、4键约2秒,
LED 灯亮复位设置完成。
三、记忆按键使用方法:
调节到所需焦点,按下记忆按钮 1 约 1 秒,按钮
上的指示灯亮及 signal 红灯亮 1 秒,表明此焦点
记忆成功。可进行下一焦点记忆,同理按下记忆
键 2、3、4 分别进行焦点记忆。
四、划线刻度盘功能:
调节到所需焦点时可以手动刻线记录焦点位置。
五、回放速度调节键:
使用记忆按钮切换相应的焦点同时可进行速度
调节,调节速度旋钮可改变马达的运转速度,
(配合记忆效果使用,可实现不同的拍摄效果,
变焦期间同时变速)。
六、红外无线快门功能:
仅适用于佳能、尼康单反相机。
适用场合:
无线跟焦器可广泛的在斯坦尼康运动镜头、
摇臂镜头和轨道运动镜头中实现变焦。
注意事项:
每次使用前必须复位操作,不然电机没有响应;
使用中操作不灵敏时,表明电池电压过低,请
及时更换电池;
红外快门分为佳能、尼康型,购买时请与客服
说明机型;
想了解更多拍摄技巧,免费获取丰厚奖品吗?
快来加入美国万德兰国际!

Contact infornation of Wondlan customer service department
Phone:+86-25-58851945
Email:[email protected]
www.wondlan.com
Table of contents
Other Wondlan Camera Accessories manuals