Workzone 268 User manual

4 SHELF TALL CABINET
ARMARIO CON 4 ESTANTES
English ....... 02
Español ....... 17
User Manual
Manual
del usuario

Contents
Package contents/Parts
Assembly
Notes
General information
Reading and storing the user manual
Explanation of symbols
Safety
Proper use
Safety instructions
First use
Checking the cabinet and package contents
Assembling the cabinet
Cleaning and maintenance
Storage
Technical data
3
5
13
14
14
14
14
14
14
15
15
15
16
16
16
...................................................
...........................................................................
.................................................................................
.........................................................
.................................
..........................................................
................................................................................
................................................................................
..................................................................
.............................................................................
.....................
.........................................................
..............................................
..............................................................................
...................................................................

3
A
2x
4x
4x
4x
2x
C
B
D
Package contents/Parts
HANDLESCREW
SHELFDOOR ELEMENT
SIDE PANELTOP/BOTTOM
I
8x
U
Package contents/Parts
in one plastic bag

4
2x METALLIC
PLATE SET
1x MAGNET SET
4x SMALL SCREW
SET
BASE FEETCONNECTION
FOR DOOR ELEMENT
CONNECTION
FOR SIDE PANEL
CONNECTION
FOR BACK PANEL
BACK PANEL
COVER STRIP
FOR DOOR ELEMENT
COVER CAP
Package contents/Parts
2x2x
2x
K
00 P
2x in one plastic bag
NM
1x
L
J

5
1
2
Assembly
Assembly

6
Assembly
4
3

7
Assembly
6
5
Jx1
Lx2
LJL

8
Assembly
8
7
J
+
J
+
x3
x1

9
Assembly
10
9
L
K
KKK
L
L
K
x2
x2
x3
x1
LEFT DOOR

10
Assembly
12
11
x3
x1
RIGHT DOOR

11
Assembly
14
13

12
Assembly
15

13
Notes
Notes

14
General information
Safety
Proper use
The cabinet is exclusively designed for storing
small items and is appropriate for internal
use only. The cabinet must be fixed to a wall
by using four screws (screws not included) to
ensure maximum load capacity. Choose the
screws according to the surface.
Loads should be equally distributed over the
whole shelf. Maximum load on the individual
shelf is 44 lbs.
The cabinet is intended for personal use and
not suitable for commercial purposes.
Only use the cabinet as described in this user
manual. Any other use is considered improper
and may result in damage to property or
persons. The manufacturer or vendor cannot
be held liable for damages or injury incurred
through improper or incorrect use.
Safety instructions
Risk of injury!
The cabinet contains small parts and plastic
packaging bags. Children can choke or
suffocate on the small parts, due to risk of
suffocation.
−Keep children away from small parts.
−Make sure that children do not play with
the plastic packaging bags.
Risk of injury!
The cabinet has interconnecting parts in
which fingers can be pinched.
−Exercise caution during assembly to
ensure that your fingers are not pinched in
between any of the parts.
General information
Reading and storing the user
manual
This user manual accompanies this
cabinet (hereafter referred to as the
“cabinet”) and contains important
information on setup and handling.
Before assembling and using the cabinet,
read the user manual carefully. This
particularly applies to the safety instructions.
Failure to do so may result in personal injury
or damage to the cabinet.
Keep the user manual for further use. Make
sure to include this user manual when
passing the cabinet on to third parties.
Explanation of symbols
The following symbols and signal words are
used in this user manual, on the cabinet or on
the packaging.
This signal symbol/word designates a hazard
with moderate risk, which may result in death
or severe injury if not avoided.
This signal symbol/word designates a hazard
with low risk, which may result in minor or
moderate injury if not avoided.
This signal word warns of possible damage to
property.
WARNING!
CAUTION!
NOTICE!
WARNING!
CAUTION!

15
First use
Assembling the cabinet
Risk of damage!
Improper handling of the cabinet may result
in damage to the cabinet or other property.
−Assemble the cabinet on a flat, even, and
dry surface.
−Use caution when assembling the cabinet
and follow the instructions as written in
this user manual.
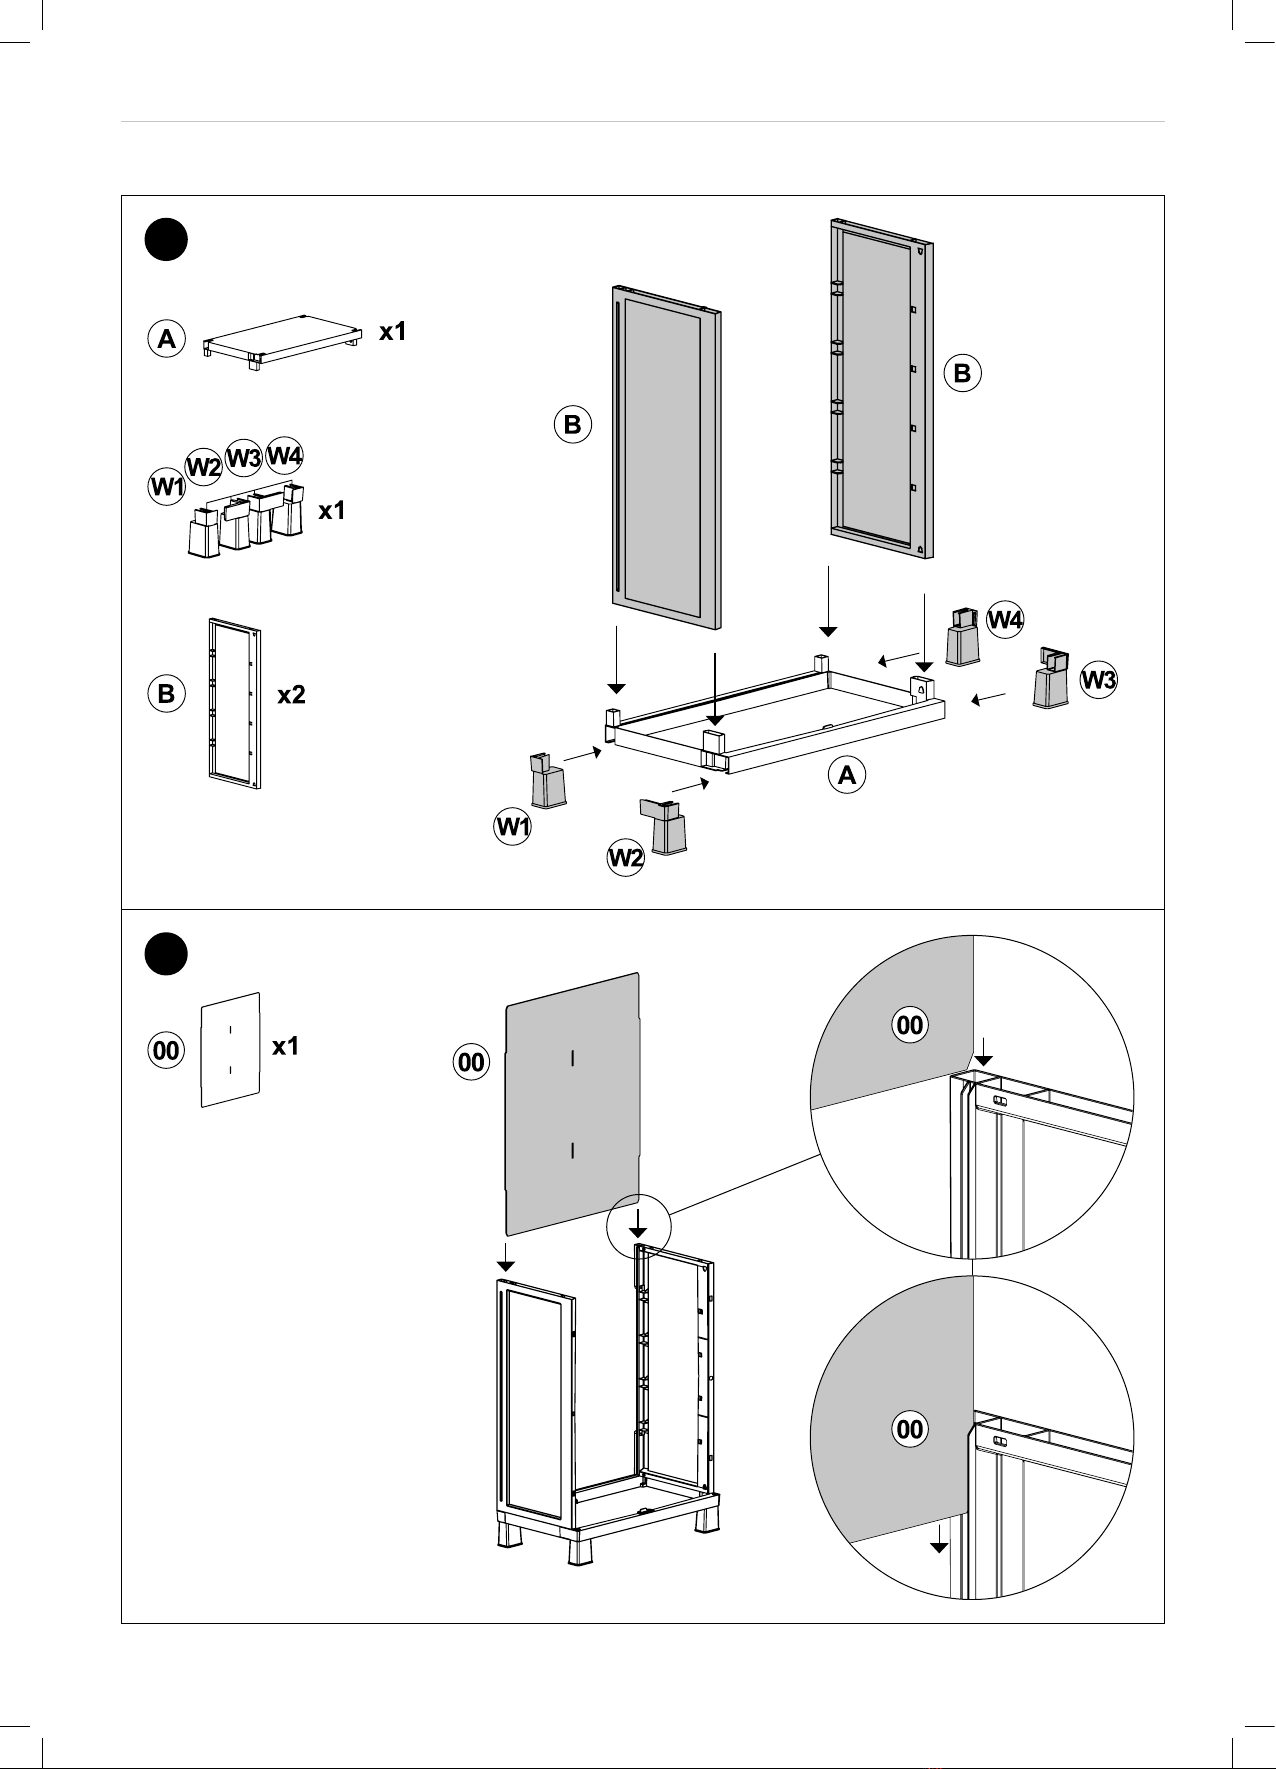
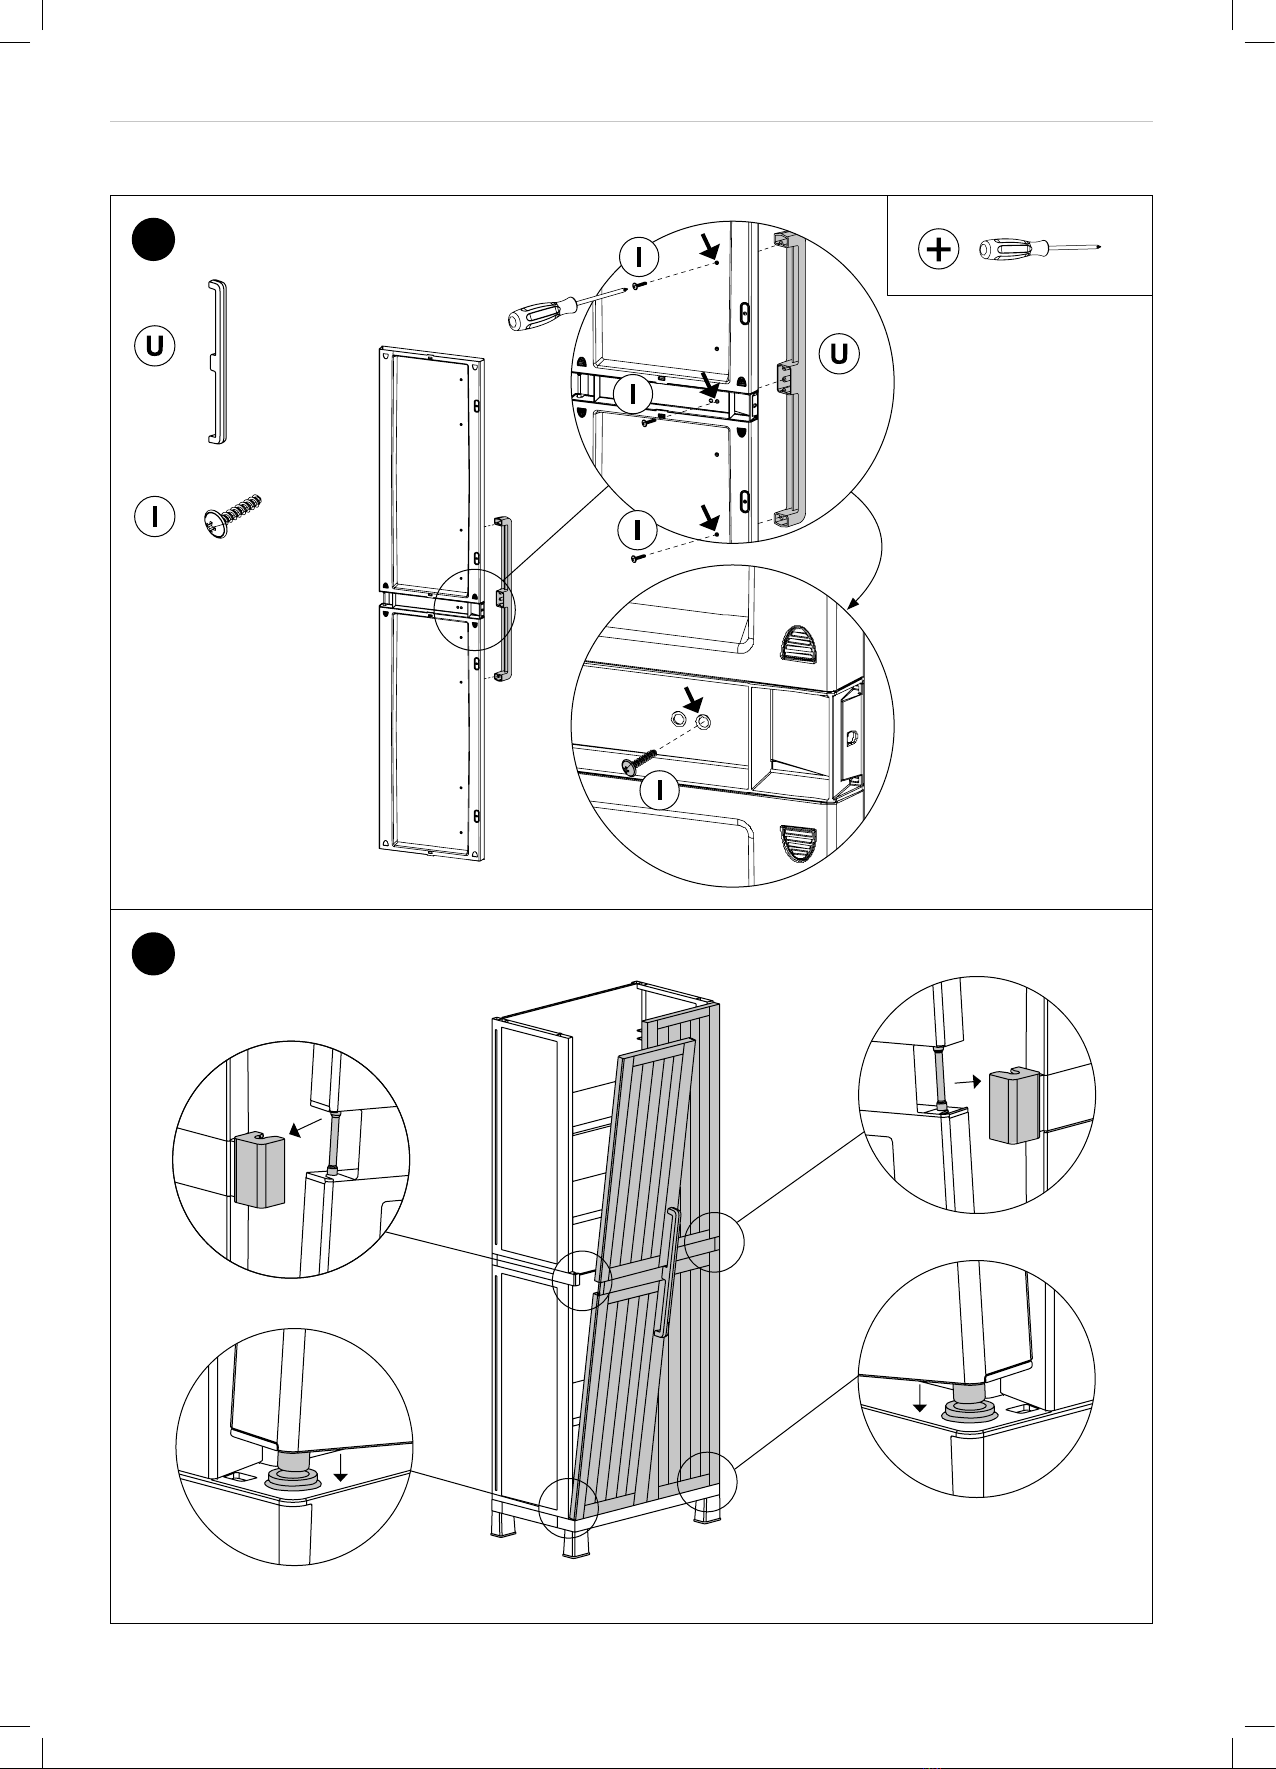
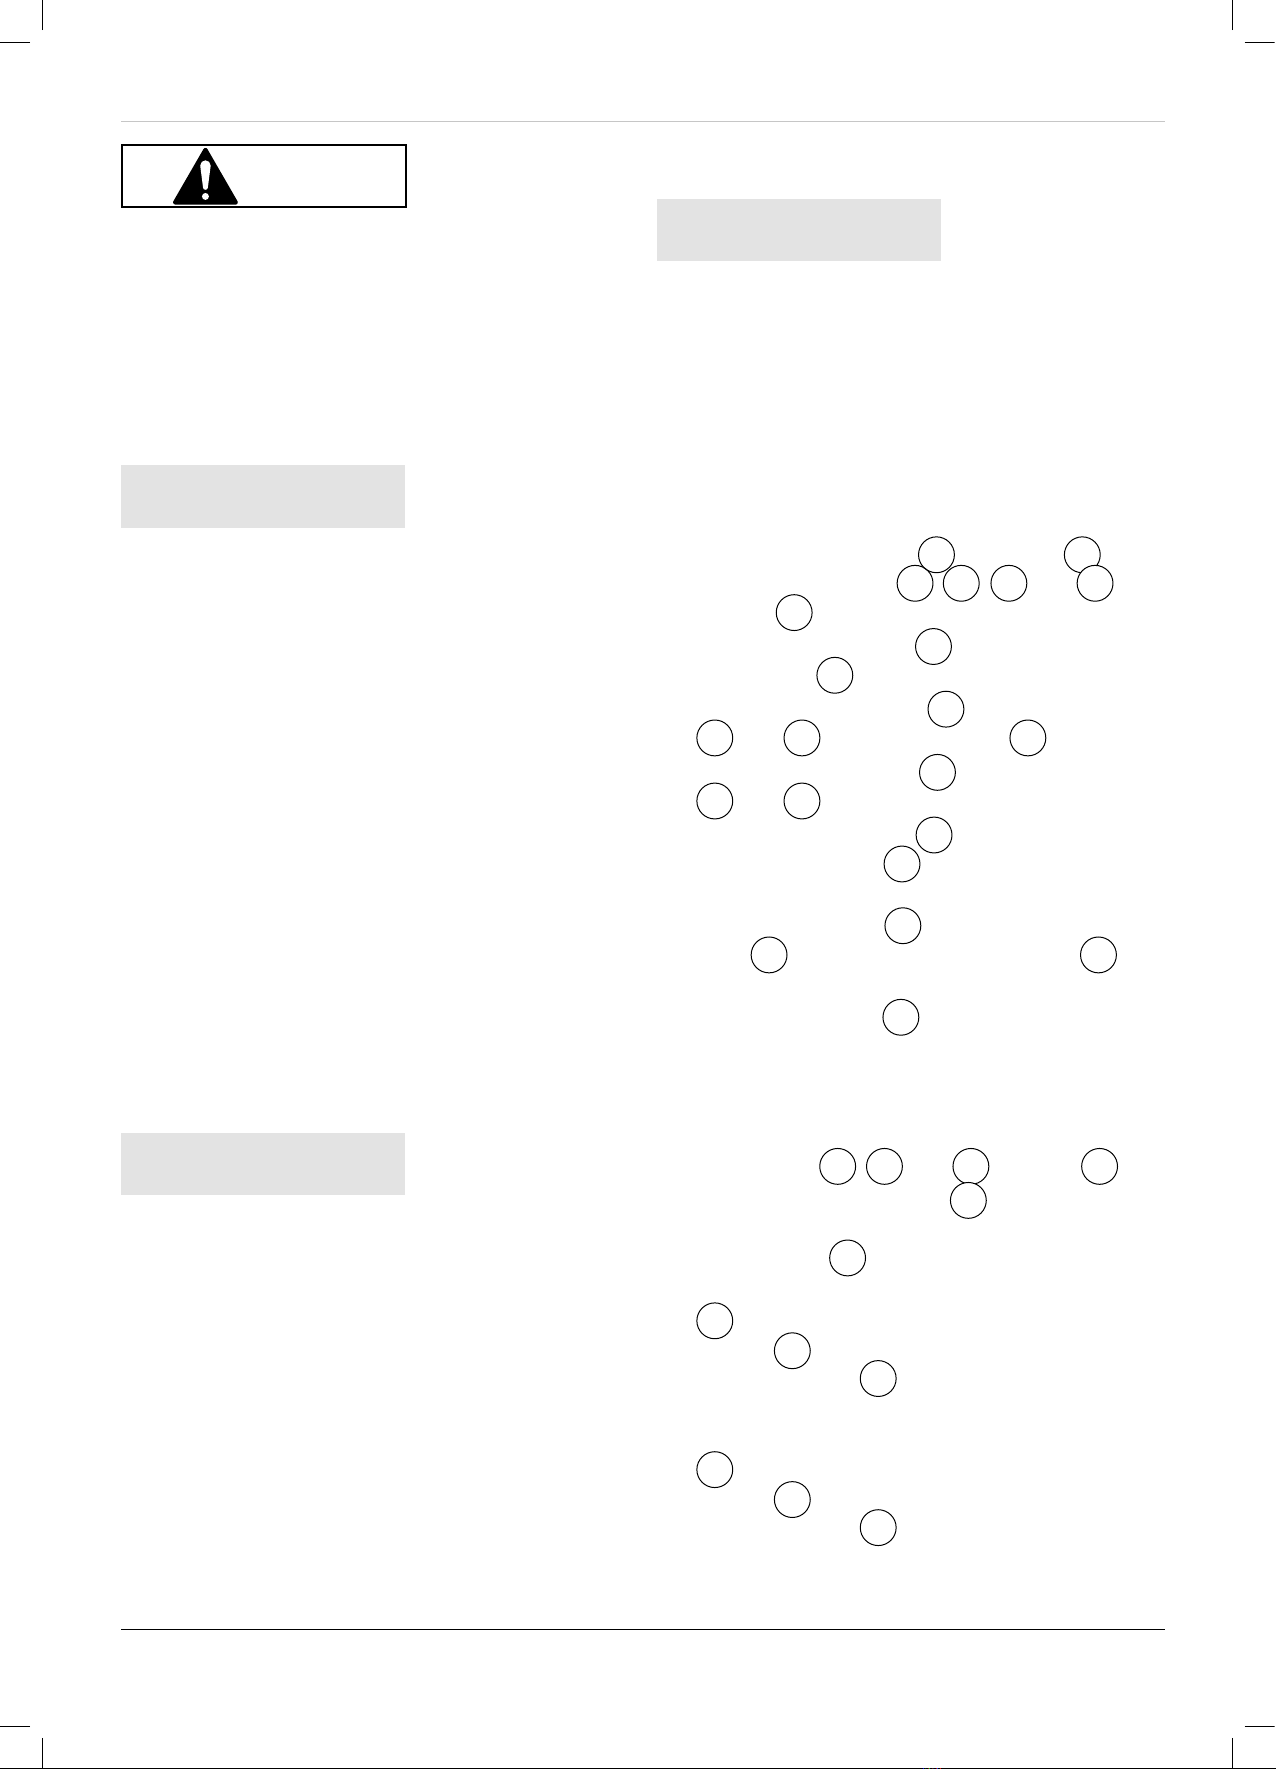
1. Insert the side panels to bottom .
Insert the base feet , , and to
bottom .
2. Insert the back panel to the rails of the
side panels , ensuring it stays in position.
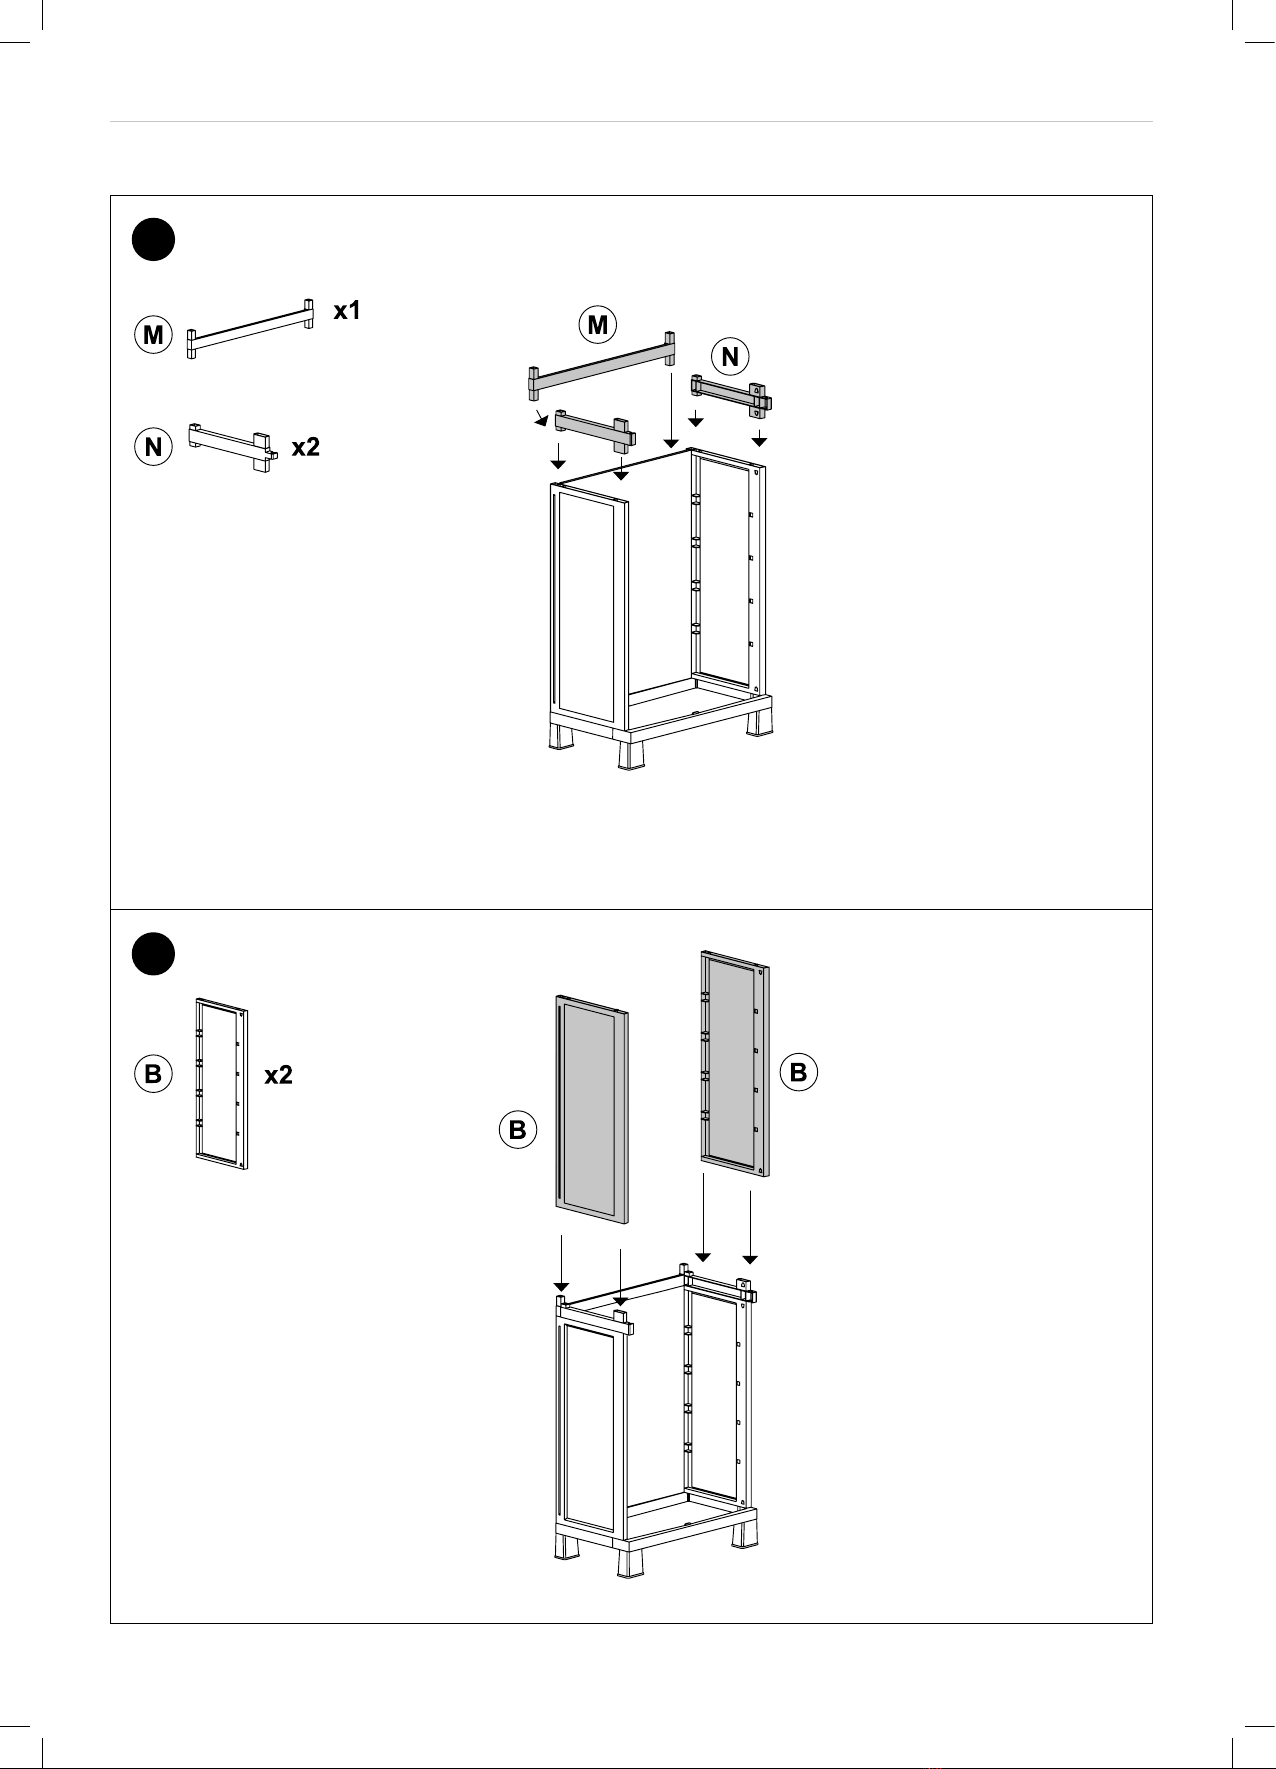
3. Insert the connections to the back panel
and to the side panels .
4. Insert the side panels to the connections
and .
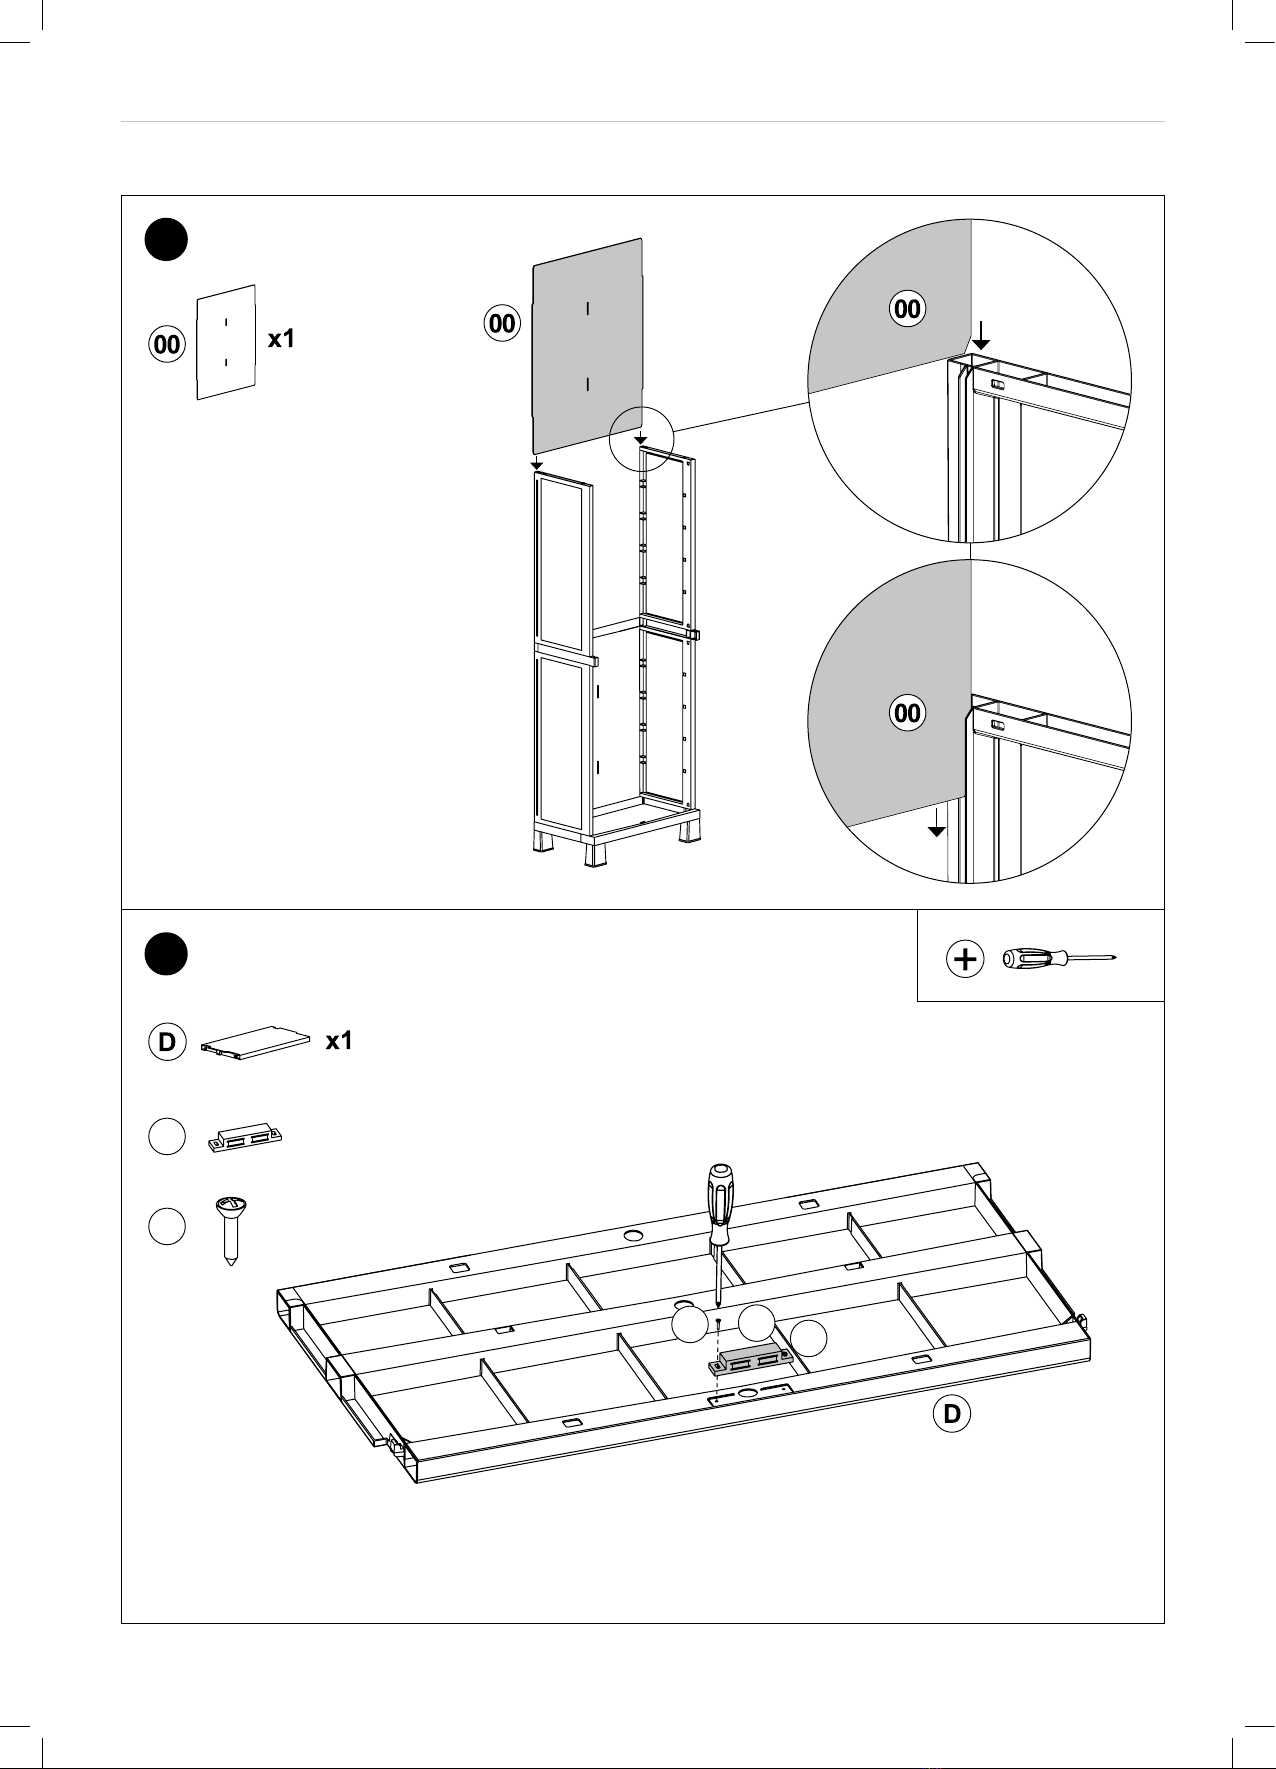
5. Insert the back panel to the two rails
of the side panels , ensuring it stays in
position.
6. Insert the magnet on the back side of the
shelf and fix it with 2 small screws by
using a screwdriver.
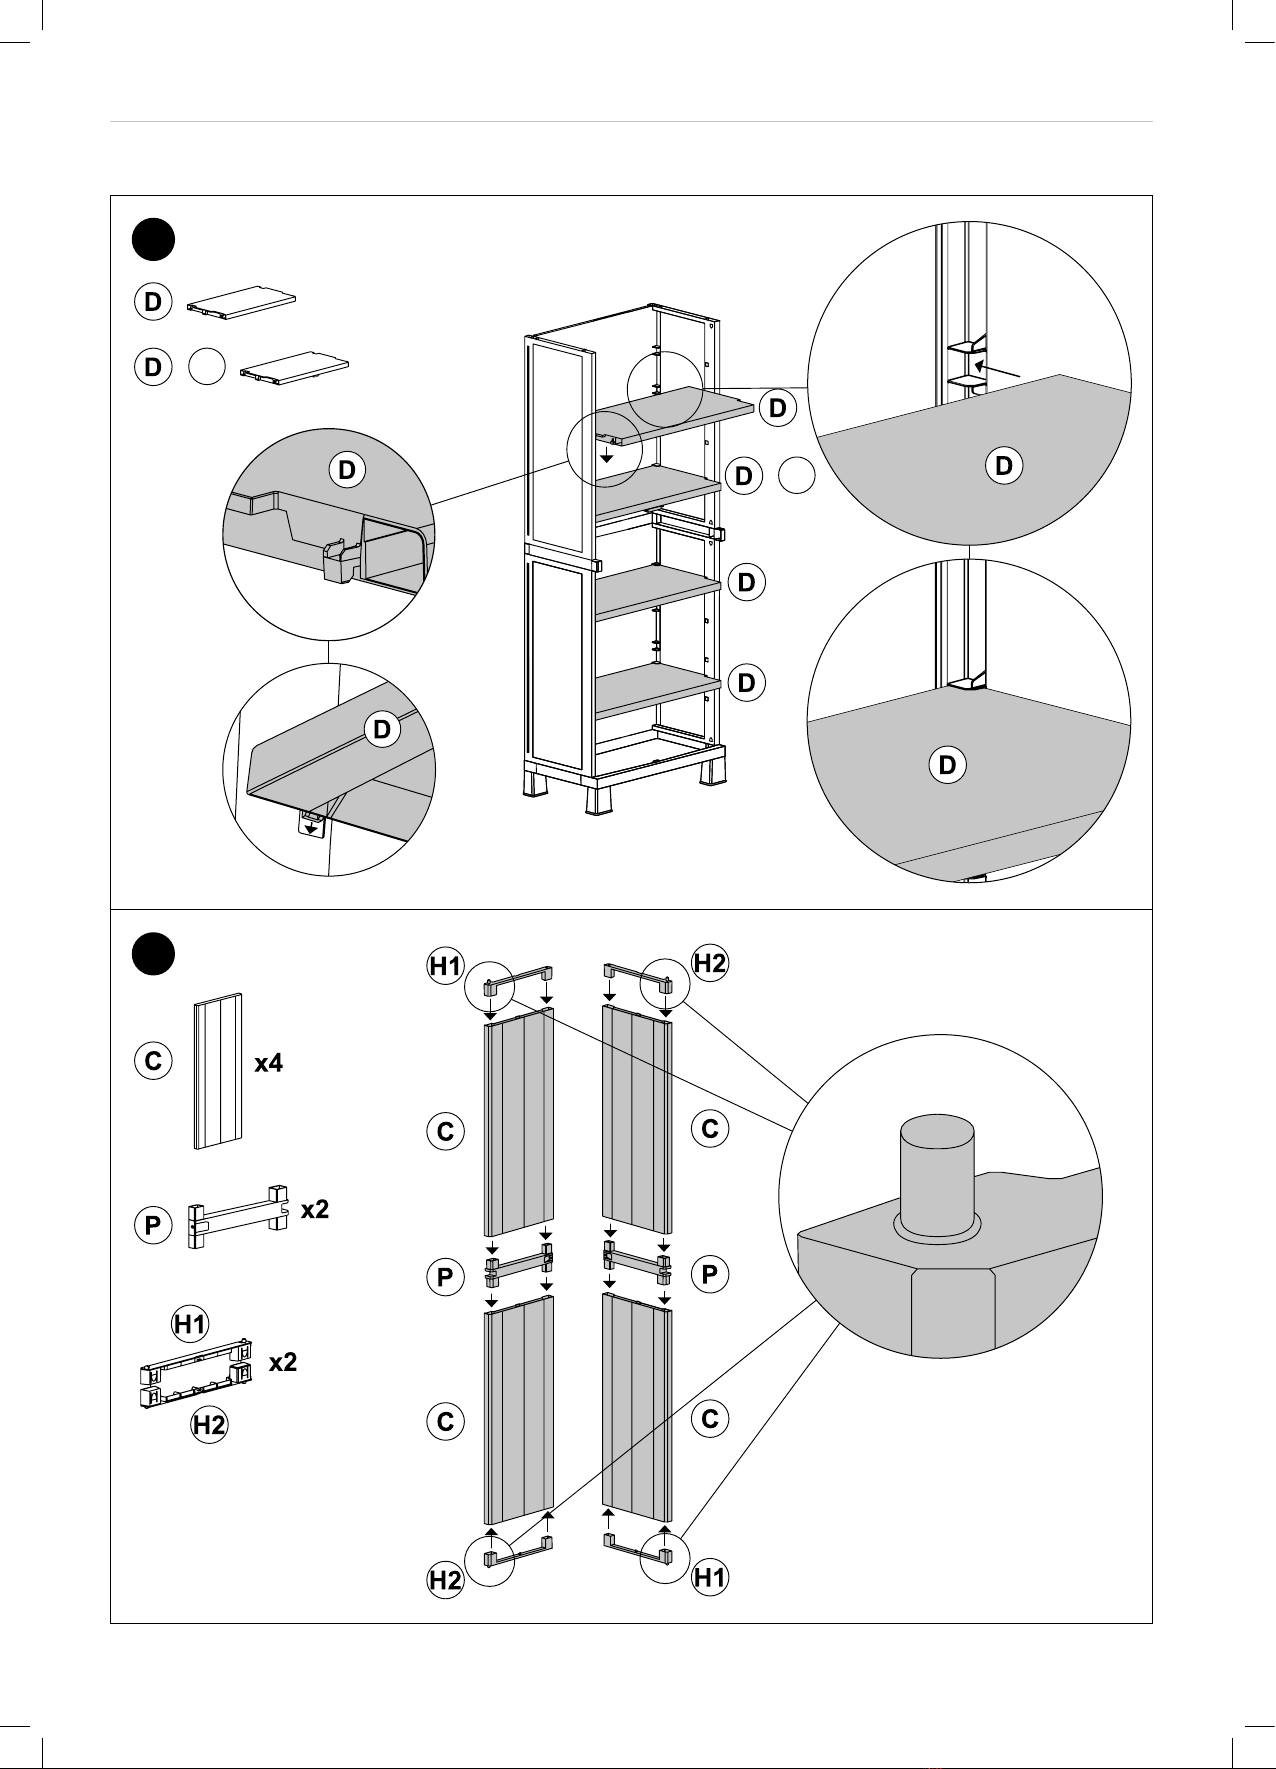
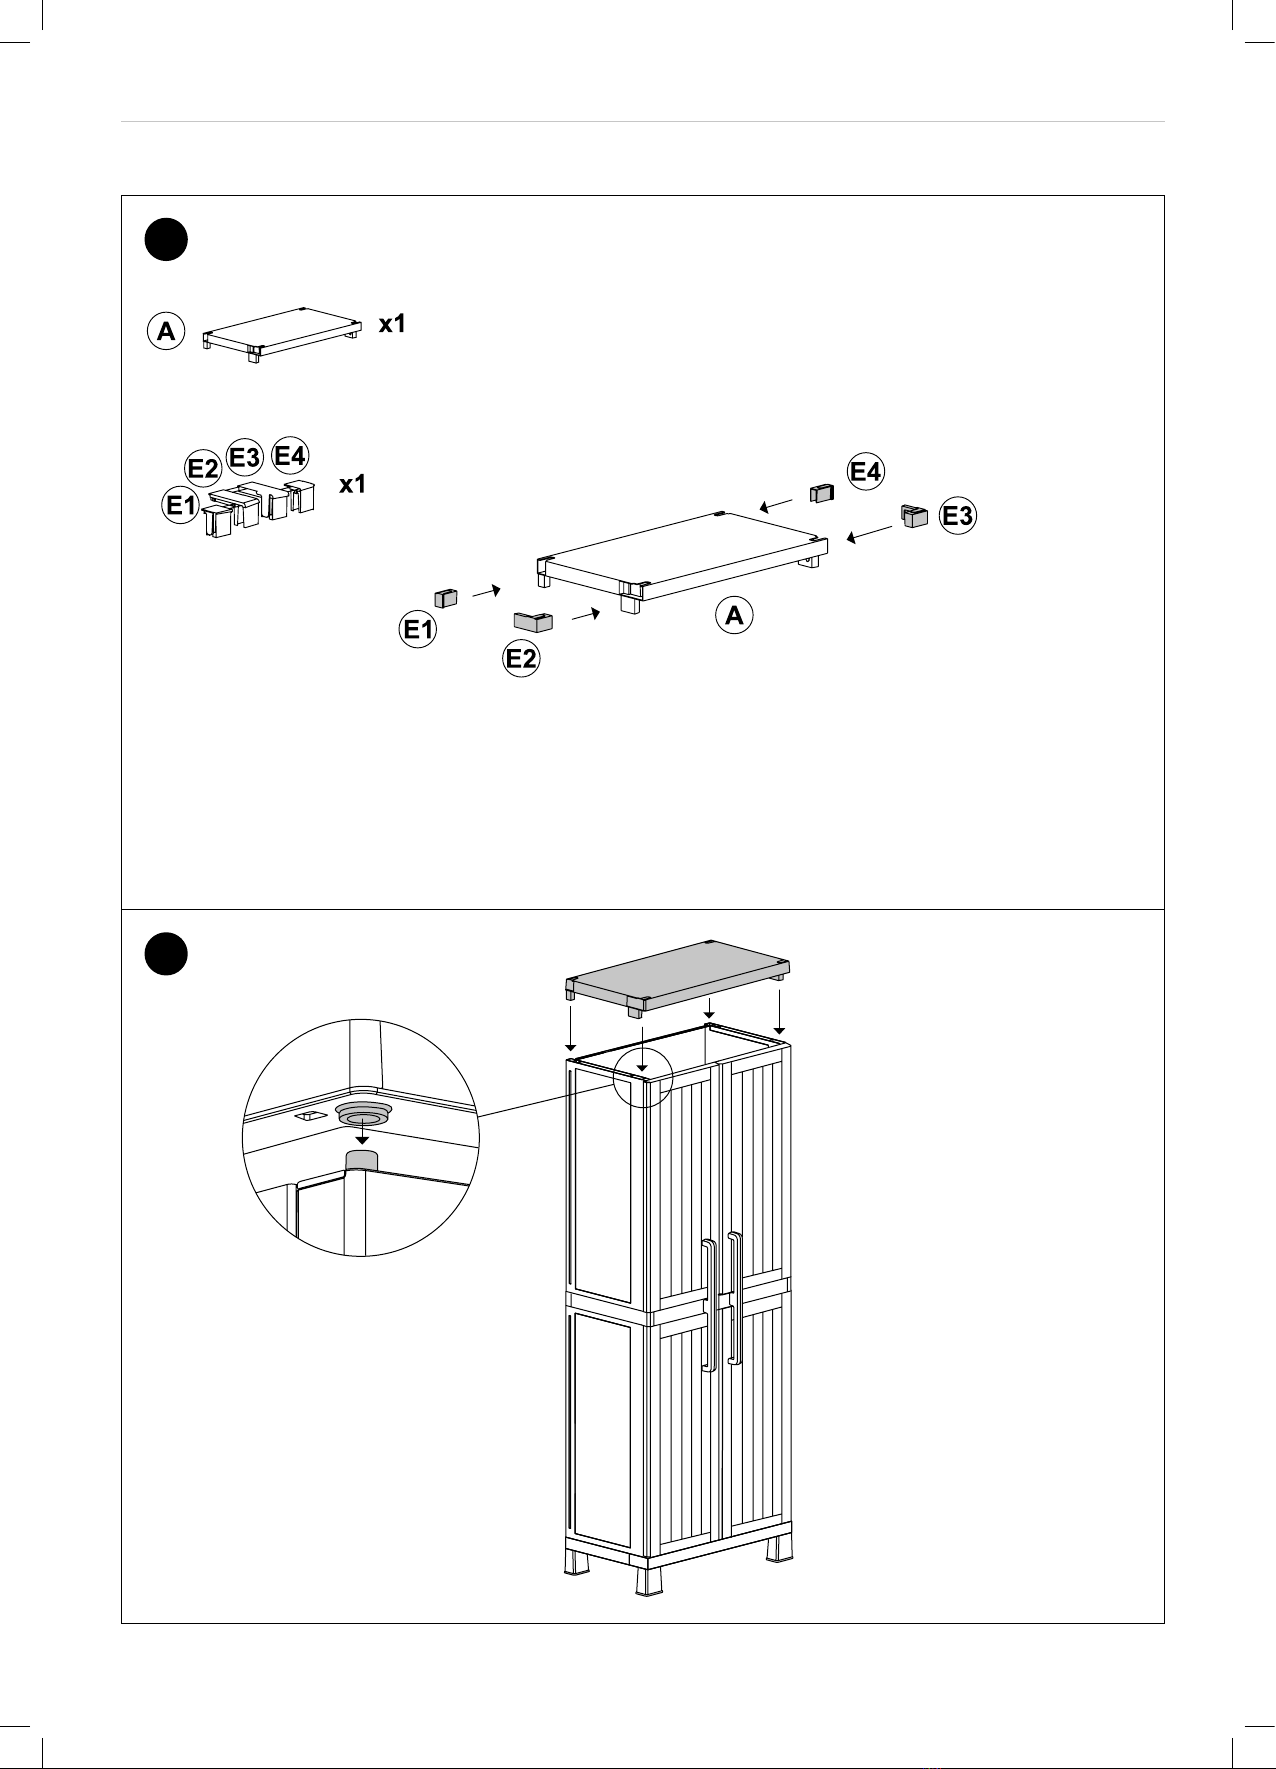
7. Insert the shelves following the
instructions of the enlarged detail drawings
until the end. Position the shelf with the
magnet on the third position counting bottom
up.
8. Insert parts , and on parts .
9. Insert the metallic plates to the upper
panels of the doors and fix the plates with the
small screws by using a screwdriver.
10. Left door: make holes by turning the screws
clockwise with a screwdriver. Insert the
handle to the door and fix the handle
with the screws by using a screwdriver. Be
careful to drill holes on the call out only.
11. Right door: make holes by turning the screws
clockwise with a screwdriver. Insert the
handle to the door and fix the handle
with the screws by using a screwdriver. Be
carefulv to drill holes on the call out only. The
plastic bag contains two additional screws:
Risk of injury!
Improperly secured cabinet may tip over and
cause injury.
−Make sure all parts are securely assembled.
−Secure the cabinet to a wall using four
screws (not included).
−Do not stand on the shelves.
Risk of damage!
Improper handling of the cabinet may result
in damage to the cabinet or other property.
−Place the cabinet on a flat, even, and dry
surface.
−Do not place the cabinet on soft ground.
−Do not use the cabinet if any of the
parts are cracked, broken, damaged, or
deformed. Replace damaged parts only
with suitable original spare parts.
−Keep the cabinet away from hot surfaces
(e.g. wood burning stove).
First use
Checking the cabinet and package
contents
Risk of damage!
Be cautious when opening the packaging
with a sharp knife or other pointed object, to
prevent damaging the cabinet.
1. Take the individual parts of the cabinet out of
the packaging.
2. Check to make sure all parts are included.
3. Check whether the individual parts of the
cabinet are damaged. If so, do not assemble
or use the cabinet. Contact the manufacturer
via the service address indicated on the
warranty card.
CAUTION!
NOTICE!
NOTICE!
NOTICE!
B
B
B
B
J
D
D
H1 H2 P
K
C
L
L
U
U
I
I
I
B
N
M
NM
00
00
00
W1 W2 W3
A
A
W4
I

16
Cleaning and maintenance
Technical data
keep for future uses (if necessary).
12. Fix the doors to the structure as shown in
the drawing.
13. Insert parts , , and to top .
14. Fix the top to the structure.
15. Fix the cabinet to a wall by using four screws
(screws not included).
Cleaning and maintenance
Risk of damage!
Improper handling of the cabinet may result
in damage to the shelves.
−Do not use any abrasive cleaners, brushes
with metal or nylon bristles, or sharp or
metallic cleaning utensils such as knives,
hard scrapers and the like. They could
damage the surfaces.
−Use a damp cloth to wipe off the cabinet. Then
let all parts dry completely.
−For tougher stains, a mild detergent may be
used.
−Periodically check to make sure the screws
(not included) are still tightly screwed into the
wall.
Storage
All parts must be completely dry before being
stored.
−Always store the cabinet in a dry area.
−Protect the cabinet from direct sunlight.
Model:
Dimensions (W × D × H):
Product code:
268
25.59 x 14.8 x 68.11 in
90047
NOTICE!
C
E1 E2 E3 E4 A

Índice
Contenido/Piezas
Ensamblaje
Notas
Información general
Leer y guardar este manual del usuario
Descripción de símbolos
Seguridad
Uso apropiado
Instrucciones de seguridad
Primer uso
Verificación del armario y del contenido
Ensamblaje del armario
Limpieza y mantenimiento
Almacenamiento
Datos técnicos
18
20
28
29
29
29
29
29
29
30
30
30
31
31
31
.................................................................
...........................................................................
.....................................................................................
............................................................
..................................
............................................................
.............................................................................
.............................................................................
.......................................................
............................................................................
.................................
.............................................................
..................................................
..................................................................
......................................................................

18
A
2x
4x
4x
4x
2x
C
I
B
D
8x
Contenido/Piezas
Contenido/Piezas
en una bolsa plástica
U MANIJATORNILLO
ESTANTEELEMENTO DE LA PUERTA
PANEL LATERALTAPA/FONDO

19
Contenido/Piezas
2x2x
2x
00 P
2x
N
M
1x
K
en una bolsa plástica
L
J
2x PLACA
METÁLICA
1x IMÁN
4x TORNILLO
PEQUEÑO
PATACONEXION
DE LA PUERTA
CONEXION
DEL PANEL LATERAL
CONEXION
DEL PANEL POSTERIOR
PANEL
POSTERIOR
TAPA DE LA PUERTAKIT DE TAPA

20
1
2
Ensamblaje
Ensamblaje
Table of contents
Other Workzone Indoor Furnishing manuals

Workzone
Workzone ASPECT BC1800 Installation guide

Workzone
Workzone ELITEDESK1400 Installation guide

Workzone
Workzone ELITEBC1800 Installation guide

Workzone
Workzone NANCYBC900 Installation guide

Workzone
Workzone ASPECT1000 Installation guide

Workzone
Workzone 5TBS19 User manual

Workzone
Workzone PINTO BC1200 Installation guide