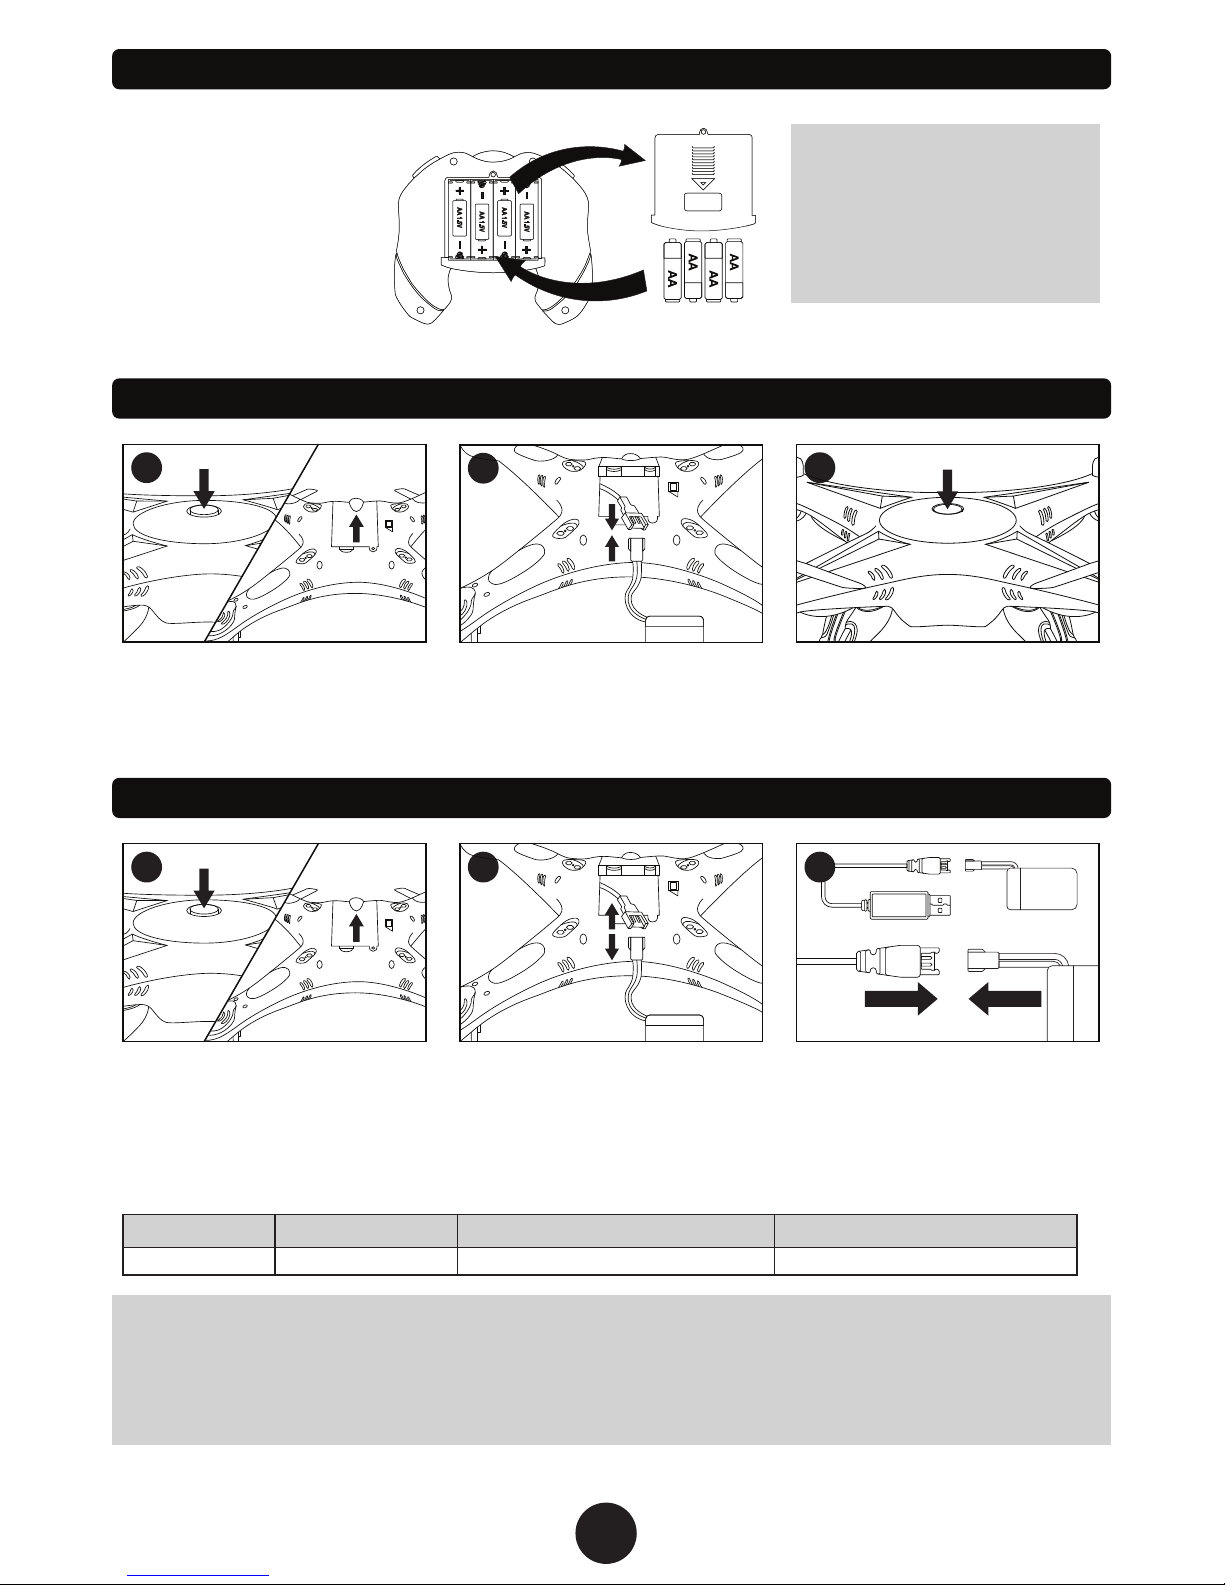
World Tech Toys Pogue Drone User manual

INSTRUCTION MANUAL
ITEM NO. 33777

TABLE OF CONTENTS
INTRODUCTION
SAFETY & PRECAUTIONS
DRONE DIAGRAM
TRANSMITTER DIAGRAM
INSTALLING THE TRANSMITTER BATTERY
INSTALLING THE DRONE BATTERY
CHARGING THE DRONE BATTERY
INSTALLING THE ROTOR GUARDS
INSTALLING THE LANDING SKIDS
FLYING THE DRONE
FLYING THE DRONE - SPECIAL FUNCTIONS
ADJUSTING THE TRIM
POST FLIGHT
REPLACING THE ROTORS
NOTES:
TROUBLESHOOTING
3
3
4
4
5
5
5
6
6
7
PREFLIGHT PREP / SYNCING THE DRONE TO THE REMOTE 6
8
9
10
10
11
11
2

INTRODUCTION
SAFETY & PRECAUTIONS
Thank you for purchasing this amazing World Tech Toys product. This drone is suitable for indoor and
outdoor flight. Please carefully read the entire manual before operating this drone and keep it for
reference in the future.
1. Important Instructions
2. Safety Instructions
3. Flight Environment
4. Attention Before Flying
1) This product is not a toy. It is a precision piece of equipment with integrated mechanical
technologies, electronic, aero dynamics and radio frequencies. To avoid accidents, the
operator must read these instructions carefully, prior to operation. If operated incorrectly,
serious physical injury and/or property loss may occur.
2) This product is suitable for operators with previous hobby flying experience, age 14 and up.
3) Only fly in a safe environment that is legal for remote control flying.
4) We are not responsible for the operation and control of this device and related safety
responsibilities.
1) The minimum recommended flying area is 25ft x 25ft x 15ft.
2) Be sure that the transmitter and drone batteries are fully charged.
3) Be sure that the throttle is at its lowest position to avoid premature flight.
4) Always turn on the drone first, then turn on the transmitter. Incorrect operation may result in
failure and the possible influencing of other devices in area.
5) Ensure that all plugs and wires are secure and in place as they may loosen over time.
The inside of this drone is integrated with precision electronic and mechanical parts. Avoid
contact with water and wet environments as it may result in parts breakdowns and accidents
may occur.
1) Always operate far away from obstacles and crowds. This drone has uncertain flying speeds
and conditions which present potential danger. Fly away from people, animals, high buildings,
high voltage wiring, etc. To ensure a safe and fun flying environment avoid bad weather
conditions like wind, rain, and thunder.
2) Avoid high temperatures. This drone is made of metal, plastic, electronic components and
other materials. Keep away from any heat source and avoid using in high temperatures to
prevent transformation and broken parts resulting from the heat.
3

DRONE DIAGRAM
TRANSMITTER DIAGRAM
Power Light
Power Button
Flip Stunt ModeSpeed Modes
Left/Right Turning Trim
Ascend/Descend
[Left/Right Turning]
Forward / Backward
(Left / Right Sideways Flight)
Forward / Backward Trim
Left / Right Sideways Trim
4
Landing Skids
Landing
Skids
LED
Lights
BOTTOM OF DRONE
Battery
Compartment
Rotor
Rotor Guard
Slots
Power
Button

Battery Cover
4 AA Batteries
(Not included.)
First remove the screw on
the battery cover and then
remove the battery cover
itself. Next install 4 AA
batteries with the correct
polarity. Finally replace the
battery cover and screw it
in place.
CAUTION:
1. Make sure the polarity of the
batteries are correctly installed.
2. Do not mix old and new
batteries.
3. Do not mix different types
of batteries.
INSTALLING THE TRANSMITTER BATTERIES
INSTALLING THE DRONE BATTERY
CAUTION WHILE CHARGING:
Do not charge with batteries still installed. Do not charge battery unsupervised. Do not immediately charge after
use. Do not overcharge battery. Ideal charge time is 50-60 minutes. Overcharging can cause a catastrophic
failure. Always charge on dry and ventilated areas away from any heat source or flammable materials. Always
use the original USB charging cable provided. Promptly change and replace old or defective batteries.
Battery Type Battery Specification Usage Duration Charge Time
BATTERY PACK SPECIFICATIONS
LiPo Battery 3.7V 380mAh Flight Duration 6 - 8 minutes Charging Time 50 -60 minutes
5
1 3
Test the power by pressing in on the
drones power button. The drones
lights will turn on if the battery was
installed properly.
Make sure the battery is turned off
by pressing the button on top of the
drone so that it sticks out. Open the
battery compartment.
CHARGING THE DRONE BATTERY
Remove the battery from the battery
compartment underneath the drone.
Disconnect the battery cable from
the drones power cable located
inside the compartment.
Connect the battery pack to the
included USB charger then plug the
USB to any powered USB port.
Make sure the battery is turned off
by pressing the button on top of the
drone so that it sticks out. Open the
battery compartment.
Connect the battery cable to the
drones power cable located inside
the compartment. Then place the
battery inside and close the cover.
2
31 2

6
INSTALLING THE LANDING SKIDS
INSTALLING THE ROTOR GUARDS
NOTE: The landing skids are all identical and can be
installed in any of the landing skid slots on the drone.
Turn off the drone and turn over to install the landing
skids.
Line up the landing skid with the three slots on any of
the drones landing skid slots and push into place.
Secure each landing skid with a single screw using the
supplied screwdriver.
NOTE: The rotor guards are all identical and can be
installed on any rotor arm of the drone.
Make sure the drone is turned off and ready the four
rotor guards and screws.
Line up the rotor guard with one of the rotor arms on
the drone, make sure the pegs on the guard fit into the
three slots on the end of each arm.
Secure each rotor guard with a single screw in the
center slot of the drones rotor arm.
PREFLIGHT PREP / SYNCING THE DRONE TO THE REMOTE
1. Make sure the battery pack is connected, in the battery compartment and the battery cover is
closed securely.
2. Press the power button in on the top of the drone and place the drone on a flat surface with no
obstructions in its flight path. The drone’s LED lights will begin to flash.
3. Turn on the Remote Control pressing the button at the center of the remote. The remotes power
indicator will start flashing.
4. Push the left joystick on the remote all the way down, then all the way up, then all the way back
down again. The remote will beep twice and the LED lights on the drone and the power indicator
light on the remote will stop flashing. This means the drone is paired. (If this does not occur, turn off
the remote and drone and try again.
5. Once paired, the drone is ready to fly. All you need to do is gently push up on the transmitters
throttle stick and the rotors will start to spin. Continue slowly pressing up the on throttle stick to take
off. It is STRONGLY recommended that you use the drone outdoors during initial flights.

7
FLYING THE DRONE
BASIC FLYING CONTROLS
Before flying the drone for the first time please read
the instructions carefully and make sure you fully
understand how to control your drone.
Left Spin
Right Spin
Left Spin/Right Spin
Move Right/Move Left
Move Right
Front
Back
Move Left
Throttle
Move Forward/Backward

8
FLYING THE DRONE - SPECIAL FUNCTIONS
LOW POWER AUTO LANDING
When the four lights on bottom of drone start flashing during flight the battery is running low. For safety, the
drone will slowly start to descend and automatically land.
EMERGENCY SHUT DOWN
As a safety feature, when the drones rotor blades are jammed or stopped by a collision the drone will stop
motor functions and need to be readied for flight again to resume operation.
LAUNCH TOSS TAKE OFF
Built-in 6-axis gyro technology allows you to throw a successfully readied drone straight into the air to fly.
After you have paired the drone to the transmitter just pick up the drone and toss into the air and press up
on the throttle. The drone will right itself and level out midair.
FLIP STUNT MODE
Have the drone hovering at least 10 feet off the ground. Press the Flip Stunt
Mode button and push the right joystick in the direction you want the drone
to perform a single flip. Normal function will resume after the flip.
SPEED CONTROL
The drone has 3 speed settings. Low, medium and high speed. The drone will always default to low speed
when you first turn it on. Press the SPEED CONTROL button once and you will hear 2 beeps, meaning it is
now on medium speed. Press the SPEED CONTROL button again and you will hear 3 beeps, meaning it
is now on high speed. Press the button again to cycle back to low speed.
EASY MODE
Simplifies drone controls by limiting command directions based on pilot direction.
Use Easy Mode when you are having difficulty telling which direction the drone is
pointing because of distance. Follow the instructions below to use Easy Mode.
PILOT
TAKING OFF
FRONT
BACK
PILOT
FLIGHT AREA
For Easy Mode to work properly you must launch the
drone with the front of the drone facing away from the pilot
as shown in the illustration to the left.
Easy Mode will not work if the button is pressed while the
drone is to the side or behind the pilot. The drone must
remain in front of the pilot, as shown in the illustration to
the right (flight area).
Once Easy Mode is activated, the drone control will be
relative to the direction of pilot, not the direction of the
drone. The drone will fly toward the pilot when pressing
down on the Forward/Backward stick (right joystick) and
away when pressing up. Hold the Easy Mode button for 3
seconds again to deactivate it.

9
ADJUSTING THE TRIM
When the drone moves without transmitter input, adjust the trim controls until hovering is stable.
Drone is turning
to the right.
Move Right
Trim
Push the LEFT TRIM
button until the drone
stops turning.
Push the BACKWARD
TRIM button until the
drone stops.
Turn Left
Trim
Drone is moving
forward.
Drone is turning
to the left.
Push the RIGHT
TRIM button until the
drone stops turning.
Turn Right
Trim
FRONT
BACK
Push the FORWARD
TRIM button until the
drone stops.
Forward
Trim
Drone is moving
backward.
FRONT
BACK
Push the MOVE
RIGHT TRIM button
until the drone stops.
Drone is moving
to the left.
FRONT
BACK
Move Left
Trim
Push the MOVE
LEFT TRIM button
until the drone stops.
Drone is moving
to the right.
FRONT
BACK
Backward
Trim

10
REPLACING THE ROTORS
The rotors may become damaged during a
collision. The drone comes with 4 spare rotors.
Please replace damaged rotors immediately.
The drone comes with 2 A rotors and 2 B rotors.
The A and B rotors must be installed on specific
locations on the drone for it to fly properly. Check
the bottom of each rotor to see if it’s labeled
either A or B. Use the illustration above to install
them in the correct location.
FRONT
BACK
A B
B A
Use the included screwdriver to
unscrew and remove the screw on the
rotor.
Remove the damaged rotor by lifting
upward. Be sure not to
misplace the screw.
Place the correct A or B rotor on top of
the peg.
Replace the screw on the rotor.
Repeat the process for any other
rotors that need replacing.
POST FLIGHT
After you are done flying the drone make sure the battery pack is disconnected and the transmitter
power is turned off. If you are not going to use the drone for a long period of time, please remove the AA
batteries from the transmitter to prevent them from draining or leaking.

11
TROUBLESHOOTING
PROBLEM CAUSE SOLUTION
Drone is unresponsive. The
Transmitter light keeps flashing.
Drone is unresponsive.
Transmitter light is ON. Drone is
unresponsive.
Drone’s rotors spins
but doesn’t take off.
Drone is shaking when flying.
Drone still moves forward after
adjusting the trim.
Drone moves while hovering
without transmitter input. Trim needs to be adjusted. Adjust the trim.
Gyroscope midpoint is off. Turn off both transmitter and drone.
Go through power on process and make
sure you place the drone on a flat
surface before taking off.
Transmitter batteries are
installed incorrectly.
Transmitter and or drone
is not powered ON.
Turn both transmitter and drone ON.
Transmitter batteries are drained.
Drone’s battery pack
is drained.
Rotor blades are damaged. Replace the damaged rotor blades.
Drone is not on a
flat surface.
Place the drone on a flat surface
before attempting to take off.
Charge the drone’s battery pack.
Drone’s battery pack is drained. Charge the drone’s battery pack.
Install fresh batteries to the transmitter.
Install the batteries with the
correct polarity.
Transmitter is not syncing with
drone.
Repeat the power up process.
NOTES:

12
NOTES:
Website: www.worldtechtoys.com
Email: [email protected]
Phone: (877) 498-8697
Monday - Friday / 8:00AM - 5:00PM / Pacific Time
WWW.WORLDTECHTOYS.COM
MADE IN CHINA
SPECIFICATIONS,
COLORS AND CONTENT
MAY VARY FROM ILLUSTRATIONS
Table of contents
Other World Tech Toys Quadcopter manuals

World Tech Toys
World Tech Toys STRIKER SPY DRONE 34937 User manual

World Tech Toys
World Tech Toys PARTNER SPY DRONE UFO 35879 User manual

World Tech Toys
World Tech Toys STRIKER SPY DRONE User manual

World Tech Toys
World Tech Toys Striker 33743 User manual

World Tech Toys
World Tech Toys Horizon Spy Drone ZX-34895 User manual

World Tech Toys
World Tech Toys Enforcer Spy Drone ZX-34911 User manual