Wortmann Terra Mobile 1510 series User manual

MW74(6)0K QC .book Page 1 Monday, July 13, 2009 4:32 PM

Contents
About this Quick Guide ....................................................................1
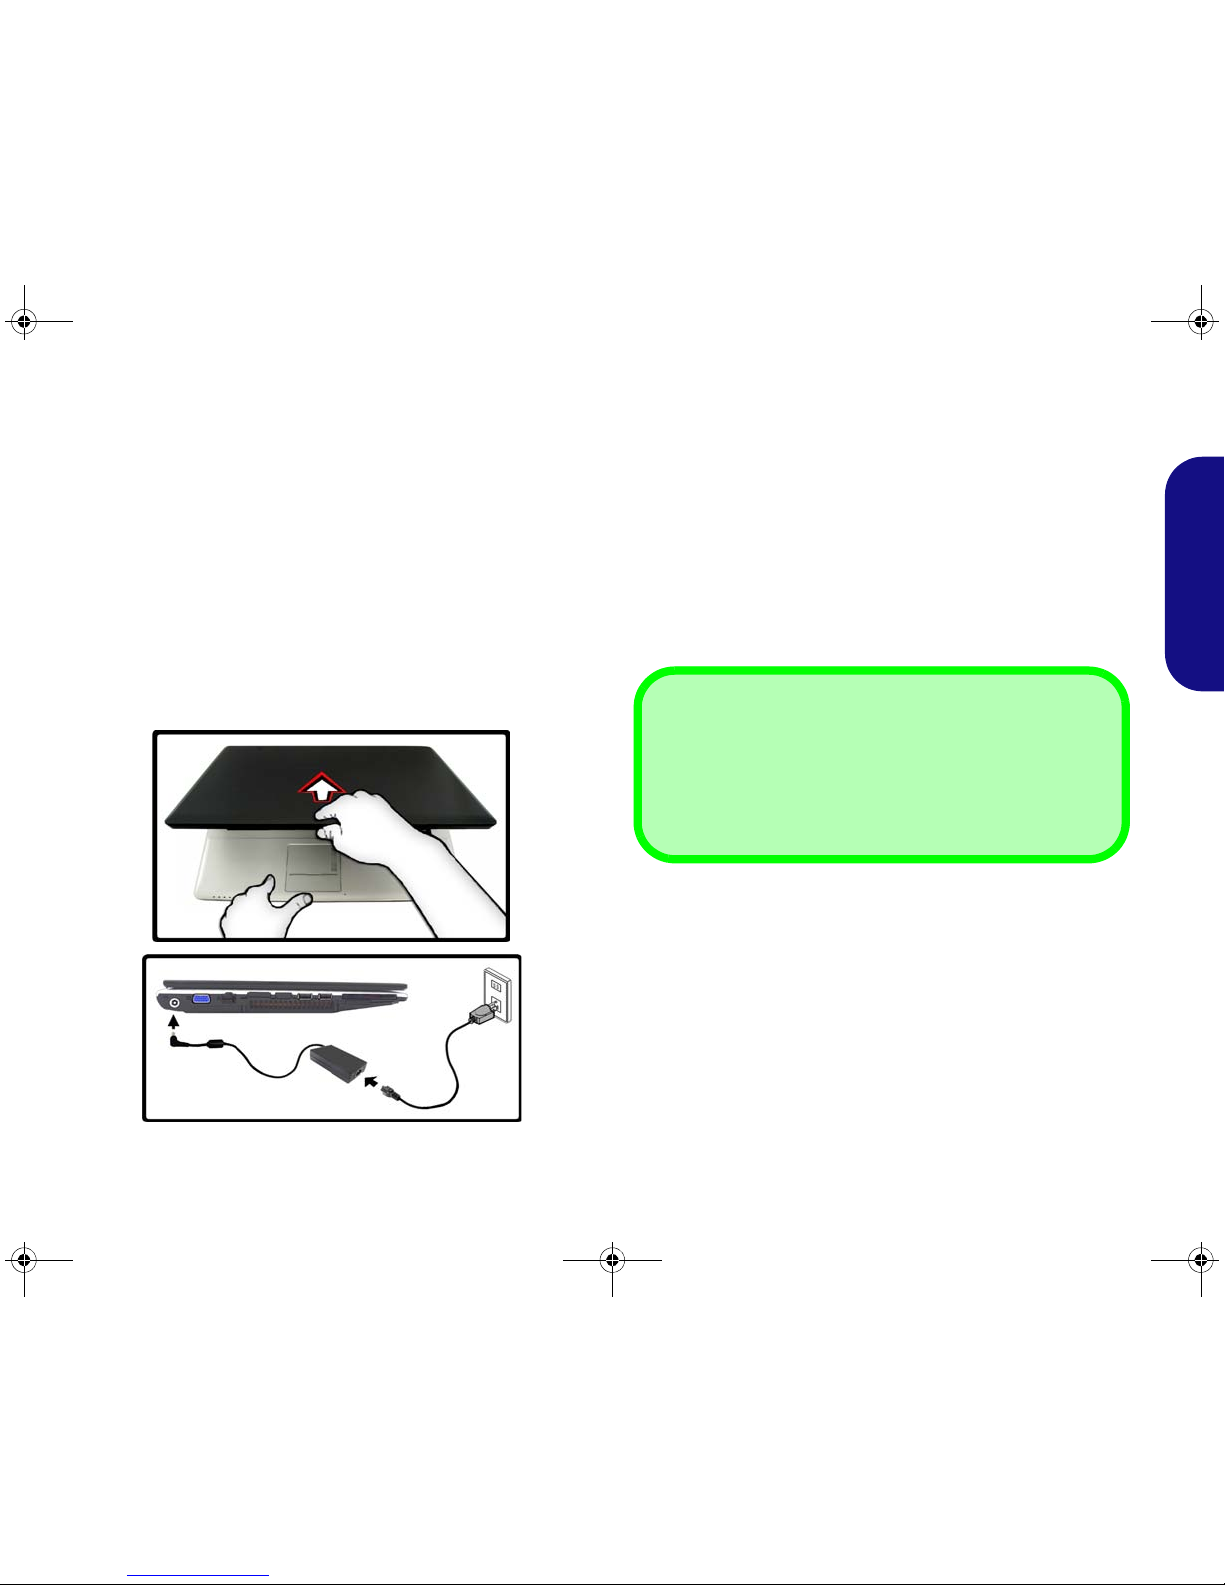
System Startup ..................................................................................3
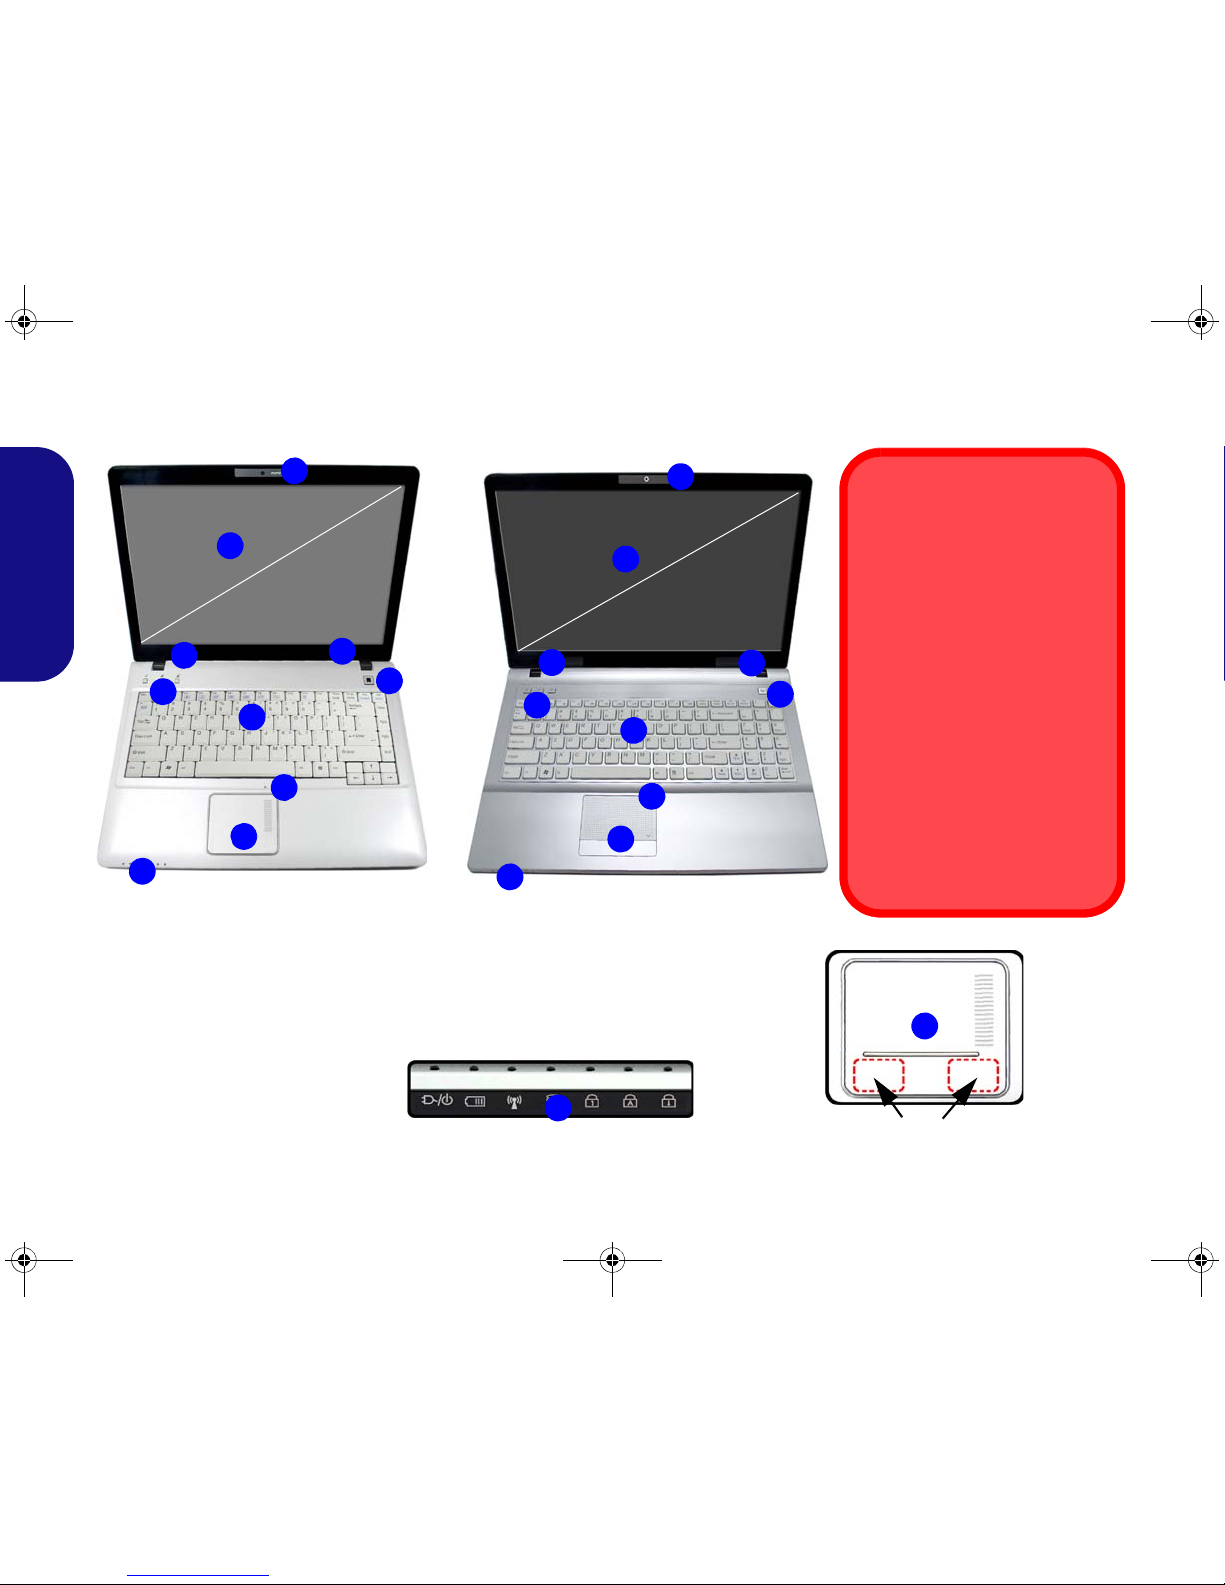
System Map: Front View with LCD Panel Open .............................4
System Map: Front, Left, Right, Rear & Bottom Views .................5
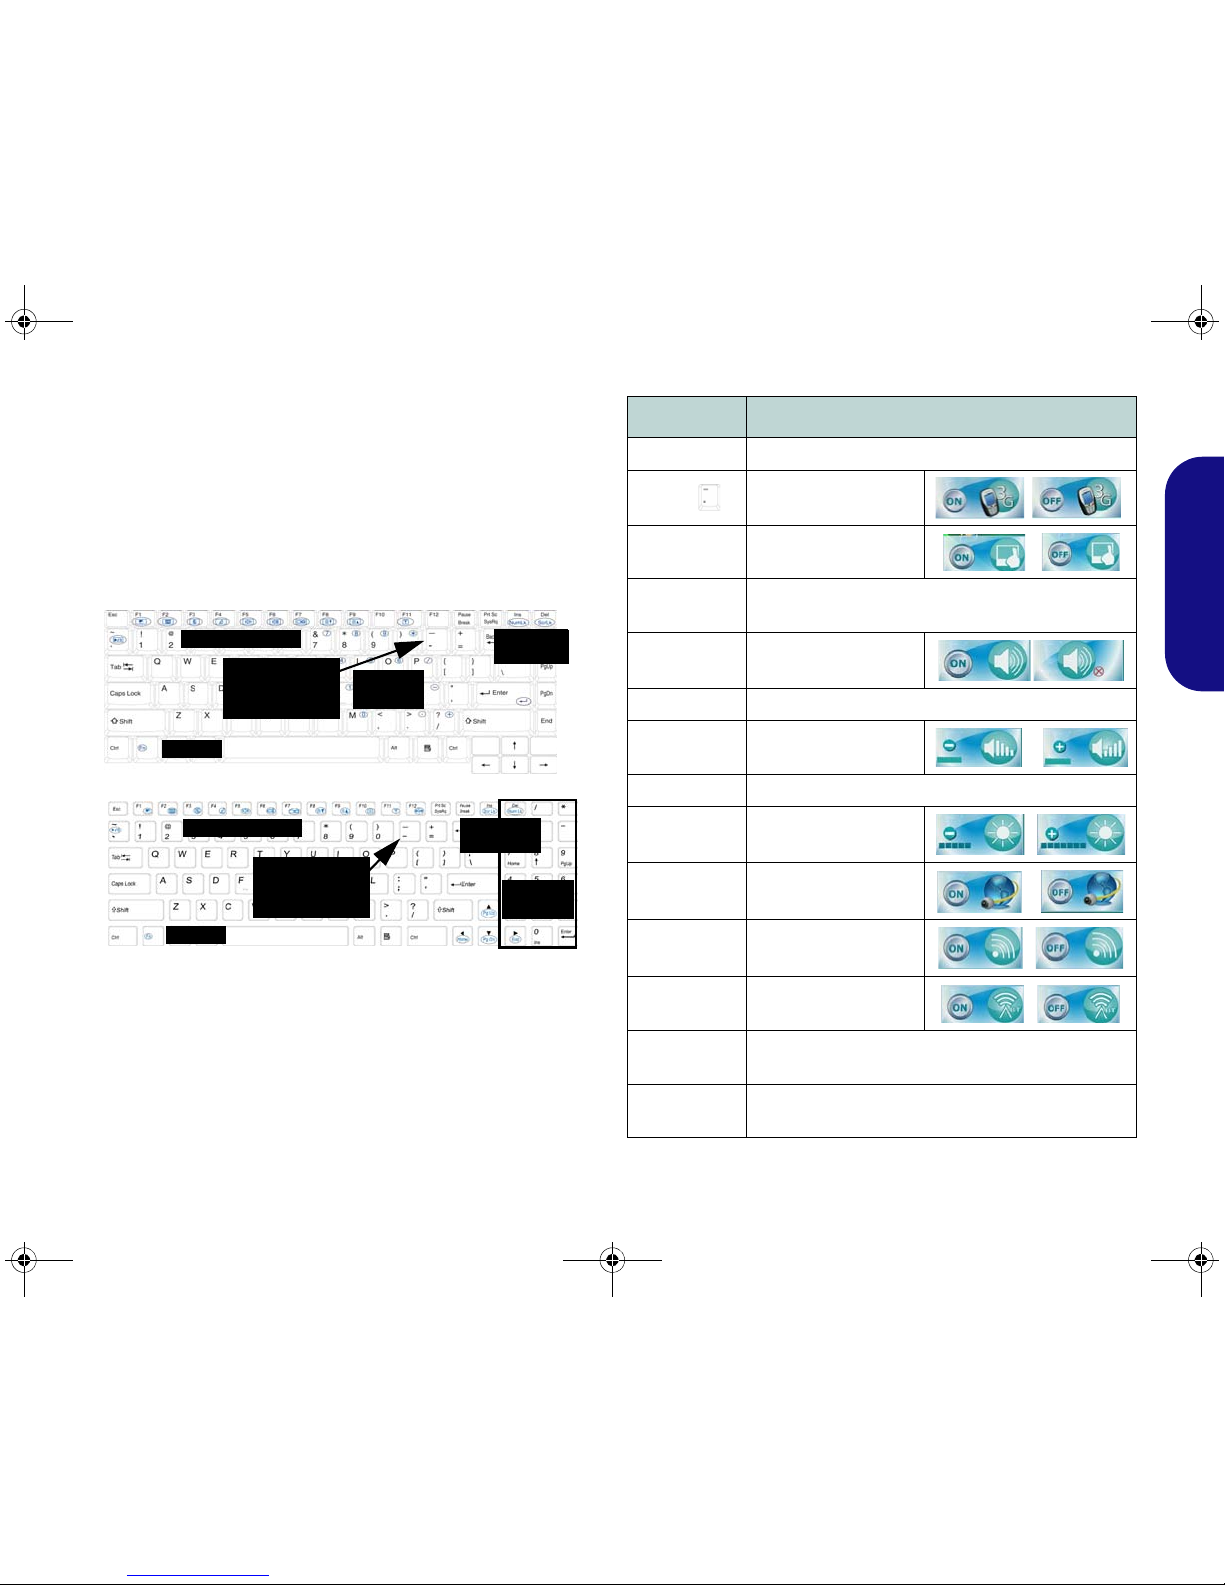
LED Indicators ..................................................................................6
Keyboard ...........................................................................................7
3.75G/HSPA Module ........................................................................8
Driver Installation .............................................................................9
Troubleshooting ..............................................................................10
Specifications ..................................................................................11
Inhalt
Über diese Kurzanleitung ...............................................................13
Schnellstart ......................................................................................15
Systemübersicht: Ansicht von vorne mit geöffnetem
LCD-Bildschirm .............................................................................16
Systemübersicht: Ansicht von vorne, links, rechts, hinten
und unten .........................................................................................17
LED-Anzeigen ................................................................................18
Tastatur ...........................................................................................19
3.75G/HSPA-Modul .......................................................................20
Installation der Treiber ....................................................................21
Troubleshooting ..............................................................................22
Technische Daten ............................................................................23
Sommaire
A propos de ce guide rapide ............................................................25
Guide de démarrage rapide .............................................................27
Carte du système : Vue de face avec l’écran LCD ouvert ..............28
Carte du système: Vues de face, gauche, droite, arrière &
dessous ............................................................................................29
Indicateurs LED ..............................................................................30
Clavier .............................................................................................31
Module 3.75G/HSPA ......................................................................32
Installation du pilote ........................................................................33
Dépannage .......................................................................................34
Spécifications ..................................................................................35
Contenidos
Acerca de esta guía rápida ...............................................................37
Guía rápida para empezar ................................................................39
Mapa del sistema: Vista frontal con panel LCD abierto .................40
Mapa del sistema: Vistas frontal, izquierda, derecha, posterior
y inferior ..........................................................................................41
Indicadores LED .............................................................................42
Teclado ............................................................................................43
Módulo 3.75G/HSPA ......................................................................44
Instalación de controladores ............................................................45
Solución de problemas ....................................................................46
Especificaciones ..............................................................................47
Sommario
Informazioni su questa guida rapida ...............................................49
Guida di avvio rapido ......................................................................51
Descrizione del sistema: Vista anteriore con pannello LCD
aperto ...............................................................................................52
Descrizione del sistema: Vista anteriore, sinistra, destra, posteriore
e inferiore ........................................................................................53
Indicatori LED .................................................................................54
Tastiera ............................................................................................55
Modulo 3.75G/HSPA ......................................................................56
Installazione driver ..........................................................................57
Risoluzione dei problemi ................................................................58
Specifiche tecniche ..........................................................................59
MW74(6)0K QC .book Page I Monday, July 13, 2009 4:32 PM

1
Quick Guide
About this Quick Guide
This quick guide is a brief introduction to getting your system started. This is a supplement, and not a substitute for the
expanded English language User’s Manual in Adobe Acrobat format on the Device Drivers & Utilities + User’sManual
disc supplied with your computer. This disc also contains the drivers and utilities necessary for the proper operation of
the computer (Note: The company reserves the right to revise this publication or to change its contents without notice).
Some or all of the computer’s features may already have been setup. If they aren’t, or you are planning to re-configure
(or re-install) portions of the system, refer to the expanded User’s Manual. The Device Drivers & Utilities + User’s
Manual disc does not contain an operating system.
Regulatory and Safety Information
Please pay careful attention to the full regulatory notices and safety information contained in the expanded User’s Man-
ual on the Device Drivers & Utilities + User’s Manual disc.
© June 2009
Trademarks
AMD and Athlon are trademarks/registered trademarks of Advanced Micro Devices, Inc.
MW74(6)0K QC .book Page 1 Monday, July 13, 2009 4:32 PM

2
Quick Guide
Instructions for Care and Operation
The computer is quite rugged, but it can be damaged. To prevent
this, follow these suggestions:
•Don’t drop it, orexpose it to shock. If the computer falls, the case and
the components could be damaged.
•Keep it dry, and don’t overheat it. Keep the computer and power sup-
ply away from any kind of heating element. This is an electrical appli-
ance. If water or any other liquid gets into it, the computer could be
badly damaged.
•Avoid interference. Keep the computer away from high capacity trans-
formers, electric motors, and other strong magnetic fields. These can
hinder proper performance and damage your data.
•Follow the proper working procedures for the computer. Shut the
computer down properly and don’t forget to save your work. Remem-
ber to periodically save your data as data may be lost.
Servicing
Do not attempt to service the computer yourself. Doing so may vi-
olate your warranty and expose you and the computer to electric
shock. Refer all servicing to authorized service personnel. Unplug
the computer from the power supply. Then refer servicing to qual-
ified service personnel under any of the following conditions:
• When the power cord is damaged or frayed.
• If the computer has been exposed to any liquids.
• If the computer does not work normally when you follow the operating
instructions.
• If the computer has been dropped or damaged (do not touch the poison-
ous liquid if the LCD panel breaks).
• If there is an unusual odor, heat or smoke coming from your computer.
Safety Information
• Only use an AC/DC adapter approved for use with this computer.
• Use only the power cord and batteries indicated in this manual. Do not
dispose of batteries in a fire. They may explode. Check with local codes
for possible special disposal instructions.
• Do not continue to use a battery that has been dropped, or that appears
damaged (e.g. bent or twisted) in any way. Even if the computer contin-
ues to work with a damaged battery in place, it may cause circuit dam-
age, which may possibly result in fire.
• Make sure that your computer is completely powered off before putting
it into a travel bag (or any such container).
• Before cleaning the computer, make sure it is disconnected from any
external power supplies, peripherals and cables (including telephone
lines). It is advisable to also remove your battery in order to prevent
accidentally turning the machine on.
• Use a soft clean cloth to clean the computer, but do not apply cleaner
directly to the computer. Do not use volatile (petroleum distillates) or
abrasive cleaners on any part of the computer.
• Do not try to repair a battery pack. Refer any battery pack repair or
replacement to your service representative or qualified service person-
nel.
Battery Disposal & Caution
The product that you have purchased contains a rechargeable
battery. The battery is recyclable. At the end of its useful life, un-
der various state and local laws, it may be illegal to dispose of
this battery into the municipal waste stream. Check with your lo-
cal solid waste officials for details in your area for recycling op-
tions or proper disposal.
Danger of explosion if battery is incorrectly replaced. Replace
only with the same or equivalent type recommended by the
manufacturer. Discard used battery according to the manufac-
turer’s instructions.
MW74(6)0K QC .book Page 2 Monday, July 13, 2009 4:32 PM

3
Quick Guide
System Startup
1. Remove all packing materials.
2. Place the computer on a stable surface.
3. Securely attach any peripherals you want to use with the
computer (e.g. keyboard and mouse) to their ports.
4. Attach the AC/DC adapter to the DC-In jack on the left of the
computer, then plug the AC power cord into an outlet, and
connect the AC power cord to the AC/DC adapter.
5. Use one hand to raise the
lid/LCD to a comfortable viewing
angle
(do not exceed 120 degrees)
;
use the other hand (as
illustrated in Figure 1) to support the base of the computer
(Note: Never lift the computer by the lid/LCD).
6. Press the power button to turn the computer “on”.
Figure 1 - Computer with AC/DC Adapter Plugged-In
System Software
Your computer may already come with system software
pre-installed. Where this is not the case, or where you are
re-configuring your computer for a different system, you
will find this manual refers to the Microsoft Windows Vis-
ta operating system. Further information on installing the
drivers and utilities is available in Chapters 4 & 7 of the
expanded User’s Manual on the Device Drivers & Utili-
ties + User’s Manual disc.
Model Differences
This computer series includes two different model types
(each model includes different design styles). The exact
outward appearance and some of the Hot-Key buttons
may appear slightly different from those illustrated in this
manual, however all the ports, components and functions
etc. are the same for each design style (see “System Map:
Front View with LCD Panel Open” on page 4).
Shut Down
Note that you should always shut your computer down by
choosing the Shut Down command from the Lock Button
Menu in Windows Vista. This will help prevent hard disk or
system problems.
MW74(6)0K QC .book Page 3 Monday, July 13, 2009 4:32 PM

4
Quick Guide
System Map: Front View with LCD Panel Open
Figure 2 - Front View with LCD Panel Open
1. Built-In PC Camera (Optional)
2. LCD
3. Speakers
4. Power Button
5. Hot-Key Buttons
6. Keyboard
7. Built-In Microphone
8. TouchPad & Buttons
9. LED Indicators
2
5
1
7
8
4
6
9
3
3
Model A Model B
Wireless Device
Operation Aboard Aircraft
The use of any portable elec-
tronic transmission devices
aboard aircraft is usually pro-
hibited. Make sure the wire-
less modules are OFF if you
are using the computer
aboard aircraft.
Use the key combinations to
toggle power to the 3.75G/
HSPA/WLAN/Bluetooth mod-
ules, and check the LEDindica-
tor/visual indicator to see if the
modules are powered on or not
(see Table 1 on page 6/
Table 3 on page 7).
2
5
1
7
8
4
6
9
3
3
14.1” WXGA 15.6” HD
TouchPad Buttons (valid operation area)
8
9
MW74(6)0K QC .book Page 4 Monday, July 13, 2009 4:32 PM

5
Quick Guide
System Map: Front, Left, Right, Rear & Bottom Views
Figure 3 - Front, Left, Right, Rear & Bottom Views
1. LED Indicators
2. DC-In Jack
3. External Monitor Port
4. RJ-45 LAN Jack
5. Vent
6. 3 * USB 2.0 Ports
7. ExpressCard/54(34) Slot
8. 7-in-1 Card Reader
9. S/PDIF-Out Jack
10. Microphone-In Jack
11. Headphone-Out Jack
12. Optical Device Drive Bay
13. Security Lock Slot
14. Battery
15. Bluetooth Module
Cover
16. RAM & CPU Bay
Cover
17. Hard Disk Bay
Cover
2
1
78
46
3
Left
Right
Bottom
9
5
Front
Rear
10 6
15
16
13
12
17
14
5
5
14
11
17
14
5
5
16
Model A
Model B
Bottom
Overheating
To prevent your computer from over-
heating make sure nothing blocks
any vent while the computer is in use.
MW74(6)0K QC .book Page 5 Monday, July 13, 2009 4:32 PM

6
Quick Guide
LED Indicators
The LED indicators on the computer display helpful infor-
mation about the current status of the computer.
Table 1 - LED Indicators
Hot-Key Buttons
The Hot-Key buttons give instant access to the default In-
ternet browser and e-mail program, and allow you to tog-
gle the Silent Mode on/off with one quick button press.
Table 2 - Hot-Key Buttons
*When enabled, Silent Mode will reduce fan noise and
save power consumption. Note this may reduce computer
performance.
Icon Color Description
Orange DC Power is Plugged In
Green The Computer is On
Blinking Green The Computer is in Sleep Mode
Green Number Lock (Numeric Keypad)
Activated
Green Caps Lock Activated
Green Scroll Lock Activated
Orange The Battery is Charging
Green The Battery is Fully Charged
Blinking
Orange The Battery Has Reached Criti-
cally Low Power Status
Green Hard Disk Activity
Green The Wireless LAN Module is
Powered On
Orange TheBluetoothModule isPowered
On
Hot-Key Button Function
Activate the Default E-Mail Browser
Activate the Default Internet Program
Toggle *Silent Mode
MW74(6)0K QC .book Page 6 Monday, July 13, 2009 4:32 PM

7
Quick Guide
Keyboard
The keyboard includes a numeric keypad for easy numeric
data input. Model A has an embedded numeric keypad
while Model B’s numeric keypad is on the right side of
the keyboard. Pressing Fn + NumLk/Num Lk turns on/
off the numeric keypad. It also features function keys to
allow you to change operational features instantly.
Figure 4 - Keyboard
Function Keys
The function keys (F1- F12 etc.) will act as hot keys when
pressed while the Fn key is held down. In addition to the
basic function key combinations, visual indicators are
available when the hot key driver is installed. Table 3 - Function Keys & Visual Indicators
Function Keys NumLk &
ScrLk
Model A
Numeric
Keypad
Fn Key
3.75G/HSPA
Module Power
Toggle
Function Keys
Numeric
Keypad
Fn Key
3.75G/HSPA
Module Power
Toggle
Model B
Num Lk &
Scr Lk
Keys Function/ Visual Indicators
Fn + ~ Play/Pause (in Audio/Video Programs)
Fn + 3.75G/HSPA Mod-
ule Power Toggle
Fn + F1 TouchPad Toggle
Fn + F2 Turn LCD Backlight Off (Press a key to or use
TouchPad to turn on)
Fn + F3 Mute Toggle
Fn + F4 Sleep Toggle
Fn +
F5/F6 Volume Decrease/
Increase
Fn + F7 Display Toggle
Fn + F8/F9 Brightness
Decrease/Increase
Fn + F10 PC Camera Power
Toggle
Fn + F11 WLAN Module
Power Toggle
Fn + F12 Bluetooth Module
Power Toggle
Fn + NumLk/
Num Lk Numeric Keypad Toggle
Fn + ScrLk/
Scr Lk Scroll Lock Toggle
MW74(6)0K QC .book Page 7 Monday, July 13, 2009 4:32 PM

8
Quick Guide
3.75G/HSPA Module
If you have included an optional 3.75G/HSPA module in
your purchase option, follow the instructions below to in-
stall the USIM card (which will be provided by your ser-
vice provider), and then run the appropriate application
supplied with your module.
USIM Card Insertion
1. Turn off the computer, and turn it over and remove the battery
(slide the latches in the direction indicated below and slide
the battery out).
2. Loosen screws ( - ) and carefully (a fan and cable are
attached to the underside of the cover) disconnect the cable
and remove the cover.
Figure 5 - Remove the RAM & CPU Bay Cover
3. Insert the USIM card as you would into your mobile phone.
4. Slide the SIMLOCK towards the hinge (in the direction to the
arrow illustrated in Figure 6) in order to release the lock and lift
it up.
Figure 6 - Unlock the SIMLOCK
5. Insert the USIM card and close the SIMLOCK.
6. Lock the SIMLOCK by pushing it in the direction of the arrow in
Figure 7 until it clicks into the lock position.
Figure 7 - Lock the SIMLOCK
7. Replace the cover (and cable), screws and battery.
1
2
4
5
4
3
22
3
4
Model A Model B
5
1 1
MW74(6)0K QC .book Page 8 Monday, July 13, 2009 4:32 PM

9
Quick Guide
Driver Installation
The Device Drivers & Utilities + User’s Manual disc con-
tains the drivers and utilities necessary for the proper op-
eration of the computer. This setup will probably have
already been done for you. If this is not the case, insert the
disc and click InstallDrivers (button), or OptionDrivers
(button) to access the Optional driver menu. Install the
drivers in the order indicated in Figure 8. After install-
ing each driver it will become grayed out (if you need to
reinstall any driver, click Unlock).
Manual Driver Installation
Click the Browse CD button in the Drivers Installer ap-
plication and browse to the executable file in the appropri-
ate driver folder.
If a
Found New Hardware
wizard appears
during the in-
stallation procedure, click Cancel, and follow the installa-
tion procedure as directed.
Windows Update
After installing all the drivers make sure you enable Win-
dows Update in order to get all the latest security updates
etc. (all updates will include the latest hotfixes from Mi-
crosoft).
Driver Installation General Guidelines
As a general guide follow the default on-screen instructions
for each driver (e.g. Next >Next >Finish) unless you are an
advanced user. In many cases a restart is required to install
the driver. Make sure any modules (e.g. PC Camera, WLAN
or 3.75G/HSPA) are ON before installing the appropriate
driver.
Figure 8
Install Drivers
MW74(6)0K QC .book Page 9 Monday, July 13, 2009 4:32 PM

10
Quick Guide
Troubleshooting
Problem Possible Cause - Solution
The Wireless LAN/
Bluetooth/3.75G/HSPA
modules cannot be
detected.
The modules are off. Check the LED indicator to see if the module is on or off (see Table 1 on
page 6). If the LED indicator is off, then press the Fn + F11 (WLAN), Fn + F12 (Bluetooth) or Fn +
(3.75G/HSPA) in order to enable the modules (see Table 3 on page 7).
The Bluetooth module is
off after resuming from
Sleep.
The Bluetooth module’s default state will be off after resuming from the Sleep power-saving state. Use
the key combination (Fn + F12) to power on the Bluetooth module after the computer resumes from
Sleep.
A file cannot be copied to/
from a connected
Bluetooth device.
Transferring data between the computer and a Bluetooth enabled device is supported in one direction
only (simultaneous data transfer is not supported). If you are copying a file from your computer to a
Bluetooth enabled device, you will not be able to copy a file from the Bluetooth enabled device to your
computer until the file transfer process from the computer has been completed.
The captured video files
from the PC Camera are
taking up too much disk
space.
Note that capturing high resolution video files requires a substantial amount of disk space for each file.
Note that the Windows Vista system requires a minimum of 15GB of free space on the C: drive
system partition. It is recommended that you save the capture video file to a location other than the
C:drive, limit the file size of the captured video or reduce video resolution (Options >Video Capture
Pin... >Output Size).
MW74(6)0K QC .book Page 10 Monday, July 13, 2009 4:32 PM

11
Quick Guide
Specifications
Latest Specification Information
The specifications listed in this here
are correct at the time of going to
press. Certain items (particularly
processor types/speeds and CD/
DVD device types) may be changed,
delayed or updated due to the man-
ufacturer's release schedule. Check
with your service center for details.
CPU
The CPU is not a user serviceable
part. Accessing the CPU in any way
may violate your warranty.
Processor
AMD® Athlon™64 Processor
TF20 (1.6GHz)
65nm (65 Nanometer) Process
Technology,
512KB L2 Cache, 533MHz FSB,
TDP 15W
LCD Options
Model A:
14.1" WXGA TFT LCD
Model B:
15.6" HD TFT LCD
Core Logic
AMD RS690E + SB600 Chipset
Memory
Two 200 Pin SO-DIMM Sockets
Supporting DDR2 667MHz Memory
Memory Expandable up to 4GB
Video Adapter
ATI Radeon™ X1200
Shared Memory Architecture up to 512MB
MS DirectX® 9.0 compatible
BIOS
One 8Mb SPI Flash ROM
Phoenix™ BIOS
Storage
One Changeable 12.7mm(h) Optical
Device Type (Super Multi Drive Module)
One Easy Changeable 2.5" 9.5 mm (h)
SATA (Serial) HDD
Audio
High Definition Audio Compliant Interface
2 * Built-In Speakers
Built-In Microphone
Keyboard
Model A:
“WinKey” keyboard (with embedded
numeric keypad)
Model B:
Full-size “WinKey” keyboard (with numeric
keypad)
Pointing Device
Built-in TouchPad (scrolling key
functionality integrated)
MW74(6)0K QC .book Page 11 Monday, July 13, 2009 4:32 PM

12
Quick Guide
Security
Security (Kensington® Type) Lock Slot
BIOS Password
Interface
Three USB 2.0 Ports
One Headphone-Out Jack
One Microphone-In Jack
One S/PDIF Out Jack
One RJ-45 LAN Jack
One DC-in Jack
One External Monitor Port
One ExpressCard/34(54) Slot
Communication
10Mb/100Mb Base-T Ethernet LAN
802.11b/g/n Wireless LAN Half Mini-Card
Module (Option)
1.3M Pixel USB PC Camera Module
(Factory Option)
Bluetooth 2.1 + EDR Module (Factory
Option)
3.75G/HSPA Mini-Card Module (Factory
Option)
Card Reader
Embedded 7-in-1 Card Reader (MS/ MS
Pro/ SD/ Mini SD/ MMC/ RS MMC/ MS
Duo)
Note: MS Duo/ Mini SD/ RS MMC Cards
require a PC adapter
Power
6 Cell Smart Lithium-Ion Battery Pack,
4400mAH
9 Cell Smart Lithium-Ion Battery Pack,
7200mAH (Option)
Full Range AC/DC Adapter
AC Input: 100 - 240V, 50 - 60Hz
DC Output: 19V, 3.42A or 18.5, 3.5A
(65W)
Environmental Spec
Temperature
Operating: 5°C - 35°C
Non-Operating: -20°C - 60°C
Relative Humidity
Operating: 20% - 80%
Non-Operating: 10% - 90%
Dimensions & Weight
Model A:
336mm (w) * 250mm (d) * 24.8 - 35.7mm
(h)
2.2 kg With 6 Cell Battery and ODD
Model B:
374mm (w) * 256mm (d) * 25 - 37.9mm (h)
2.7 kg With 6 Cell Battery and ODD
Optional
802.11b/g/n Wireless LAN Half Mini-Card
Module
9 Cell Smart Lithium-Ion Battery Pack,
7200mAH
1.3M Pixel USB PC Camera Module
(Factory Option)
Bluetooth 2.1 + EDR Module (Factory
Option)
3.75G/HSPA Mini-Card Module (Factory
Option)
MW74(6)0K QC .book Page 12 Monday, July 13, 2009 4:32 PM

13
Kurzanleitung
Über diese Kurzanleitung
Diese Kurzanleitung soll einen Überblick über die Schritte geben, die dazu notwendig sind, das System zu starten. Dieses ist
nur eine Ergänzung und kein Ersatz für das erweiterte englischsprachige Benutzerhandbuch, das auf der mitgelieferten Disc
Device Drivers & Utilities + User's Manual im Adobe-Acrobat-Format vorliegt. Diese Disc enthält auch die Treiber und Uti-
lity-Programme, die für einen einwandfreien Betrieb des Computers notwendig sind (Hinweis: Das Unternehmen behält sich
das Recht vor, diese Publikation ohne Vorankündigung zu überarbeiten und den Inhalt zu verändern).
Einige oder alle Funktionen des Computers sind bereits eingerichtet worden. Falls das nicht der Fall ist oder wenn Sie ein-
zelne Teile des Systems neu konfigurieren (oder neu installieren) möchten, finden Sie eine Anleitung im erweiterten Benut-
zerhandbuch. Die Disc Device Drivers & Utilities + User's Manual enthält nicht das Betriebssystem.
Einhaltung gesetzlicher Vorschriften und Sicherheitshinweise
Beachten Sie sorgfältig die Hinweise zu gesetzlichen Vorschriften und zu Sicherheitshinweisen im erweiterten Benutzer-
handbuch auf der Disc Device Drivers & Utilities + User's Manual.
© Juni 2009
Warenzeichen
AMD und Athlon sind warenzeichen/eingetragenes warenzeichen von Advanced Micro Devices, Inc.
MW74(6)0K QC .book Page 13 Monday, July 13, 2009 4:32 PM

14
Kurzanleitung
Hinweise zu Pflege und Betrieb
Das Notebook ist zwar sehr stabil, kann aber dennoch beschädigt wer-
den. Damit es nicht dazu kommt, sollten Sie die folgenden Hinweise
beachten:
•Das Gerät darf nicht herunterfallen und in anderer Form Stößen aus-
gesetzt werden. Wenn der Computer fällt, können das Gehäuse und andere
Komponenten beschädigt werden.
•Das Gerät darf nicht nass werden und sich nicht überhitzen. Computer
und Netzteil dürfen nicht in der Nähe von Wärmequellen stehen oder gela-
gert werden. Dies ist ein elektrisches Gerät. Wenn Wasser oder andere
Flüssigkeiten eindringen, kann der Computer stark beschädigt werden.
•Vermeiden Sie Interferenzen mit anderen Geräten. Halten Sie den
Computer fern von magnetischen Feldern, die von Stromquellen, Monito-
ren, Magneten etc. erzeugt werden. Die können die Leistung beeinträchti-
gen und Ihre Daten beschädigen.
•Achten Sie auf die richtige Bedienung des Computers. Schalten Sie ihn
erst aus, wenn alle Programme geschlossen wurden (speichern Sie Ihre
Daten!). Speichern Sie regelmäßig Ihre Daten, da diese verloren gehen
können, wenn der Akku verbraucht ist.
Reparatur
Nehmen Sie vor dem Reinigen des Wenn Sie versuchen, den Compu-
ter selbst zu reparieren, können Ihre Garantieansprüche verloren ge-
hen. Außerdem besteht Stromschlaggefahr für Ihre Gesundheit und
das Gerät durch frei liegende Teile. Lassen Sie Reparaturarbeiten nur
von qualifizierten Reparaturfachleuten durchführen, insbesondere
wenn folgende Umstände vorliegen:
• Wenn das Netzkabel oder der AC/DC-Adapter beschädigt oder zerschlis-
sen sind.
• Wenn der Computer Regen ausgesetzt war oder mit Flüssigkeiten in
Berührung gekommen ist.
• Wenn der Computer unter Beachtung der Bedienungsanweisungen nicht
korrekt arbeitet.
• Wenn der Computer heruntergefallen ist oder beschädigt wurde (berühren
Sie nicht die giftige Flüssigkeit des LCD-Bildschirms).
• Wenn ein ungewöhnlicher Geruch, Hitze oder Rauch aus dem Computer
entweicht.
Sicherheitsinformationen
• Verwenden Sie nur einen AC/DC-Adapter, der für die Verwendung mit die-
sem Computer zugelassen ist.
• Verwenden Sie nur das Netzkabel und die Akkus, die in diesem Benutzer-
handbuch spezifiziert sind.Entsorgen Sie die Akkus nicht in Feuer. Sie
können explodieren. Richten Sie sich nach den regional gültigen Entsor-
gungsvorschriften.
• Verwenden Sie den Akku nicht mehr, wenn er heruntergefallen ist oder in
anderer Weise beschädigt (z.B. verzogen) ist. Auch wenn der Computer
mit dem beschädigten Akku zu funktionieren schein, können dadurch
Stromkreise beschädigt werden, die schließlich einen Brand verursachen
können.
• Achten Sie darauf, dass Ihr Computer ausgeschaltet ist, wenn Sie es fur
den Transport z.B. wahrend einer Reise in eine Tasche einpakken.
• Nehmen Sie vor dem Reinigen des Computers den Akku heraus, und tren-
nen Sie es von allen externen Stromquellen, Peripheriegeräten und Kabeln
(einschließlich Telefonkabel) ab.
• Reinigen Sie den Computer mit einem weichen, sauberen Tuch. Tragen Sie
das Reinigungsmittel nicht direkt auf den Computer auf. Verwenden Sie
keine flüchtigen Reinigungsmittel (Petroleumdestillate) oder Scheuermittel
zum Reinigen des Computers.
• Versuchen Sie nicht, Akkus zu reparieren. Lassen Sie die Akkupacks durch
den Servicevertreter oder qualifiziertes Fachpersonal reparieren oder aus-
tauschen.
Entsorgen der Akkus/ Batterien & Achtung
Das von Ihnen gekaufte Produkt enthält einen aufladbaren Akku.
Dier Akku ist wiederverwertbar. Nach verschiedenen nationalen und
regionalen Getzgebungen kann es verboten in, einen nicht mehr ge-
brauchsfähigen Akku in den normalen Hausmüll zu werfen. Informie-
ren Sie sich bei Ihrem regionalen Entsorgungsunternehmen über
Recycling-Möglichkeiten oder korrekte Entsorgung.
Wenn ein falscher Akku eingesetzt wird, besteht Explosionsgefahr.
Tauschen Sie den Akku nur durch den gleichen oder einen bauglei-
chen Typ aus, der vom Hersteller empfohlen wird. Entsorgen Sie den
verbrauchten Akku entsprechend der Anweisungen des Herstellers.
MW74(6)0K QC .book Page 14 Monday, July 13, 2009 4:32 PM

15
Kurzanleitung
Schnellstart
1. Entfernen Sie das gesamte Verpackungsmaterial.
2. Legen Sie den Computer auf eine stabile Unterlage.
3. Schließen Sie alle Peripheriegeräte, die Sie mit dem Computer
verwenden wollen (z. B. Tastatur und Maus), an die
entsprechenden Schnittstellen an.
4. Schließen Sie den AC/DC-Adapter an die DC-Eingangsbuchse
an der linken Seite des Computers an. Verbinden Sie dann das
Netzkabel mit einer Netzsteckdose und dem AC/DC-Adapter.
5. Klappen Sie den Deckel/LCD vorsichtig mit einer Hand auf, und
öffnen Sie ihn auf einen angenehmen Sichtwinkel (jedoch nicht
weiter als 120°). Mit der anderen Hand halten Sie das Unterteil
des Computers fest (siehe Abb. 1 unten) (Hinweis: Heben Sie
den Computer niemals am Deckel/LCD hoch).
6. Drücken Sie auf den Netzschalter, um den Computer
einzuschalten.
Abb. 1 - Computers mit angeschlossenem AC/DC-Adapter
Systemsoftware
Möglicherweise wurde der Computer bereits mit vorinstal-
lierter Software ausgeliefert. Ist das nicht der Fall, oder
wenn Sie den Computer für ein anderes System neu konfi-
gurieren möchten, finden Sie dazu eine Anleitung in diesem
Handbuch zum Betriebssystem Microsoft Windows Vista.
Weitere Informationen zur Installation der Treiber und
Hilfsprogramme finden Sie in den Kapiteln 4 und 7 des er-
weiterten Benutzerhandbuchs auf der Disc Device Drivers
& Utilities + User's Manual.
Modellunterschiede
Diese Computer-Serie umfasst zwei verschiedene Modellty-
pen (für jedes Modell gibt es unterschiedliche Designs). Es
ist möglich, dass das Design und einige der Hot-Key-Tasten
anders aussehen als in diesem Benutzerhandbuch abgebildet.
Die Anschlüsse, Komponenten, Funktionen usw. sind jedoch
bei allen Ausführungen gleich (siehe “Systemübersicht: An-
sicht von vorne mit geöffnetem LCD-Bildschirm” auf
Seite 16).
Herunterfahren
Bitte beachten Sie, daß der Computer immer mit dem Befehl
Herunterfahren in das Menü der Schaltfläche Sperren in
Windows Vista heruntergefahren werden muß. Dadurch wer-
den Festplatten- bzw. Systemprobleme vermieden.
MW74(6)0K QC .book Page 15 Monday, July 13, 2009 4:32 PM

16
Kurzanleitung
Systemübersicht: Ansicht von vorne mit geöffnetem LCD-Bildschirm
Abb. 2 - Ansicht von vorne mit geöffnetem LCD-Bildschirm
1. PC-Kamera (optional)
2. LCD-Bildschirm
3. Lautsprecher
4. Netzschalter
5. Hot-Key-Tasten
6. Tastatur
7. Mikrofon
8. TouchPad mit Tasten
9. LED-Anzeigen
2
5
1
7
8
4
6
9
3
3
Modell A Modell B
Die Benutzung drahtlos
angeschlossener Geräte in
Flugzeugen
In der Regel ist die Benutzung jegli-
cher tragbarer elektronischer Funk-
geräte in Flugzeugen verboten.
Achten Sie darauf, daß die Wire-
less-Module AUSGESCHALTET
sind, wenn Sie den Computer im
Flugzeug benutzen.
Drücken Sie die entsprechenden
Tastenkombinationen, um jeweils
das 3.75G/HSPA-, das WLAN- oder
das Bluetooth-Modul zu aktivieren.
Prüfen Sie anhand der LED-Anzei-
gen/visuellen Anzeigen, ob die Mo-
dule eingeschaltet sind (siehe
Tabelle 1 auf Seite 18 & Tabelle 3
auf Seite 19).
2
5
1
7
8
4
6
9
3
3
14,1” WXGA 15,6” HD
TouchPad-Tasten (wirksamer Tastenbereich)
8
9
MW74(6)0K QC .book Page 16 Monday, July 13, 2009 4:32 PM

17
Kurzanleitung
Syst
emübersicht:Ansichtvon vorne, links,rechts,hinten und unten
Abb. 3 - Ansicht von vorne, links, rechts, hinten und unten
1. LED-Anzeigen
2. DC-Eingangsbuchse
3. Schnittstelle für externen Monitor
4. RJ-45 LAN-Buchse
5. Luftungsoffnung
6. 3 USB 2.0 Anschlüsse
7. ExpressCard/54(34)-Steckplatz
8. 7-in-1 Kartenleser
9. S/PDIF-Ausgangsbuchse
10. Mikrofon-Eingangsbuchse
11. Kopfhörer-Ausgangs-
buchse
12. Schacht für optisches Lauf-
werk
13. Sicherheitsschloß-Buchse
14. Akku
15. Abdeckung des Bluetooth-
Modulfachs
16. Abdeckung des CPU/RAM-
Schachts
17. Abdeckung des Festplat-
tenschachts
2
1
78
46
3
Unten
9
5
10 6
15
16
13
12
17
14
5
5
14
11
17
14
5
5
16
Modell A
Modell B
Vorderseite
Linke Seite
Rechte Seite
Hintenseite
Unten
Überhitzung
Zum Schutz vor Überhit-
zung Ihres Computers
dürfen die Luftungsoff-
nung(en) nicht während
das Notebook in Betrieb
ist verdeckt werden.
MW74(6)0K QC .book Page 17 Monday, July 13, 2009 4:32 PM

18
Kurzanleitung
LED-Anzeigen
Die LED-Anzeigen auf dem Computer zeigen wichtige In-
formationen über den aktuellen Status des Computers.
Tabelle 1 - LED-Anzeigen
Hot-Key-Tasten
Mit den Hot-Key-Tasten haben Sie einen direkten Zugriff
auf den Standard-Internetbrowser und Ihr E-Mail-Standard-
programm, und Sie können mit nur einem schnellen Tasten-
druck den Leise-Modus ein- oder ausschalten.
Tabelle 2 - Hot-Key-Tasten
*Wenn der Leise-Modus aktiviert ist, werden die Lüfterge-
räusche und der Stromverbrauch reduziert. Beachten Sie,
dass sich dabei auch die Leistung des Computers verringern
kann.
Symbol Farbe Beschreibung
Orange Der AC/DC-Adapter ist angeschlossen
Grün Der Computer ist angeschaltet
Lampe
blinkt grün Das System ist im konfigurierten Ener-
giesparmodus
Grün Die Funktion NumLk (Nummerntastatur)
ist aktiviert
Grün Caps-Lock ist aktiviert
Grün Scroll-Lock ist aktiviert
Orange Der Akku wird geladen
Grün Der Akku ist voll geladen
Lampe
blinkt
orange
Der Akku hat einen kritisch niedrigen
Stromstatus erreicht
Grün Es wird auf die Festplatte zugegriffen
Grün Das WLAN-Modul ist eingeschaltet
Orange Das Bluetooth-Modul ist eingeschaltet
Hot-Key-Taste Funktion
Das Standard-E-Mail-Programm aktivieren
Einen Standard-Internet browser aktivieren
Leise-Modus ein-/ausschalten*
MW74(6)0K QC .book Page 18 Monday, July 13, 2009 4:32 PM
Table of contents
Languages:
Other Wortmann Laptop manuals