Wuxi iData Technology Company iData 70 User manual

Operation Manual
iData 70

Contents
Operation Manual.........................................................................................................1
1 Introduction ...............................................................................................................1
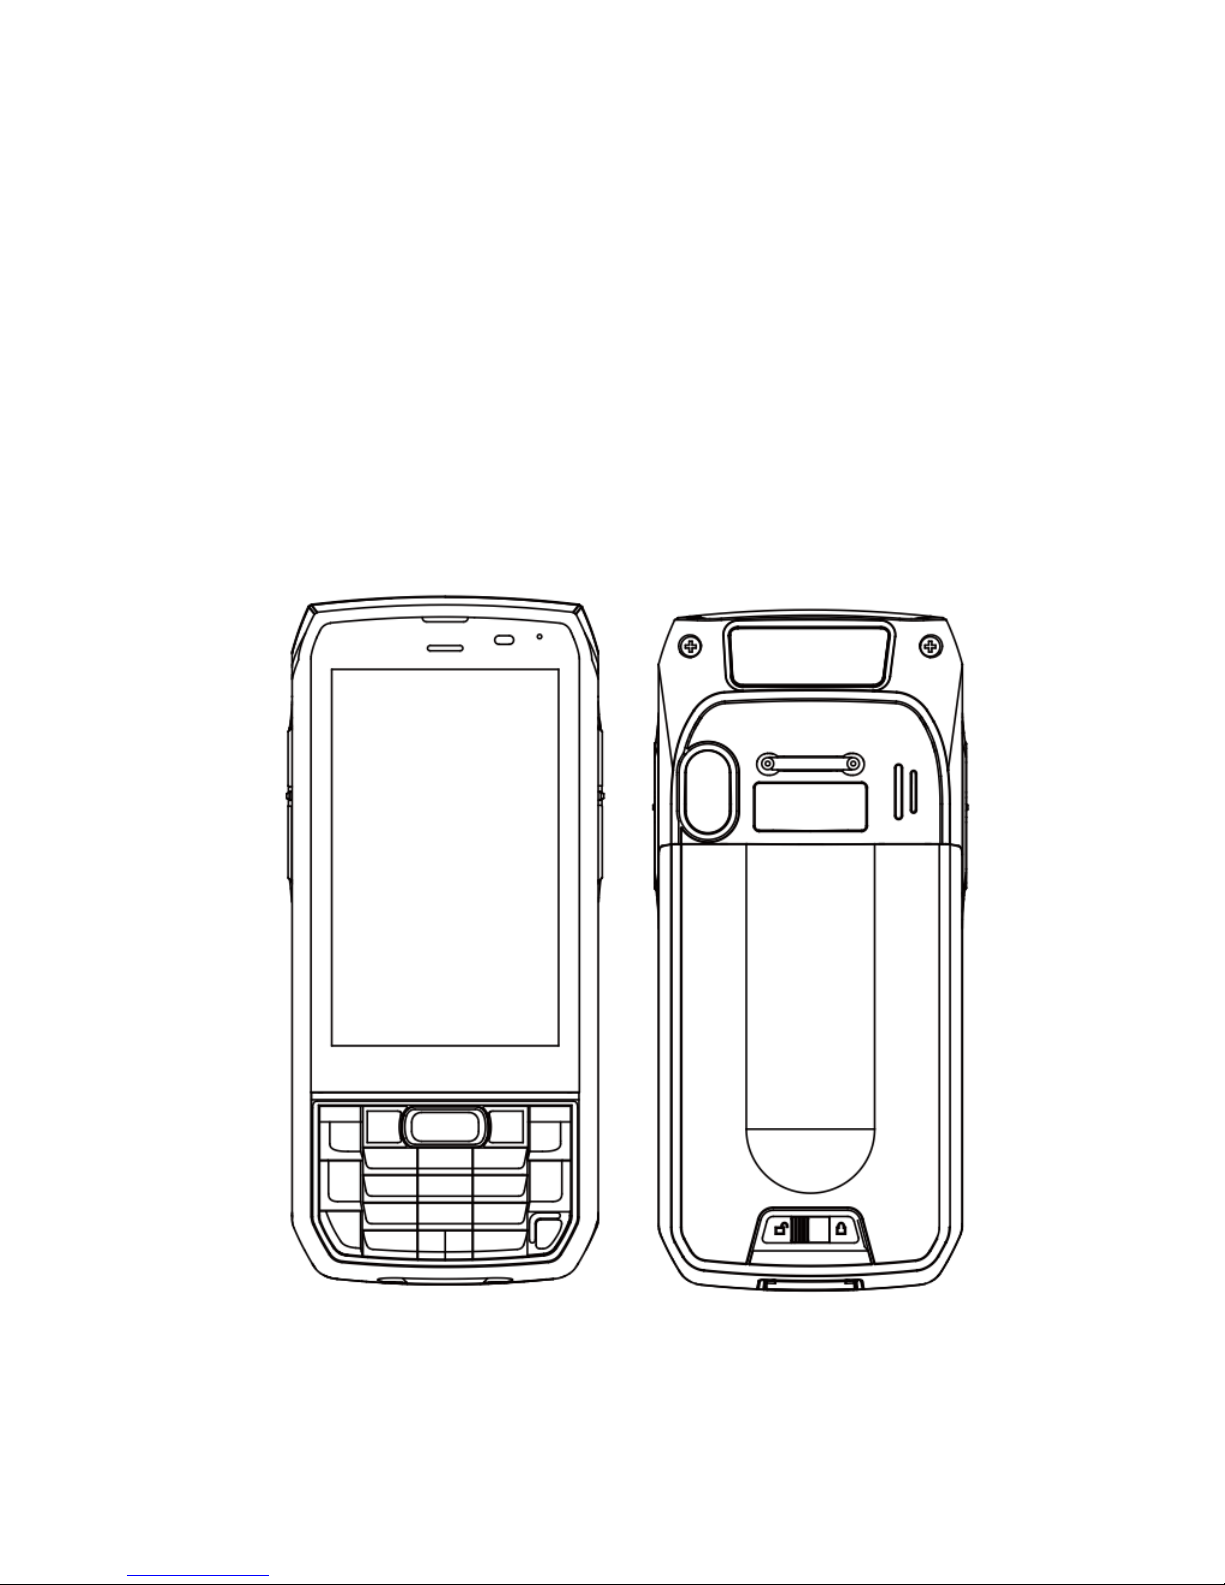
1.1 iData 70 overview...........................................................................................................................1
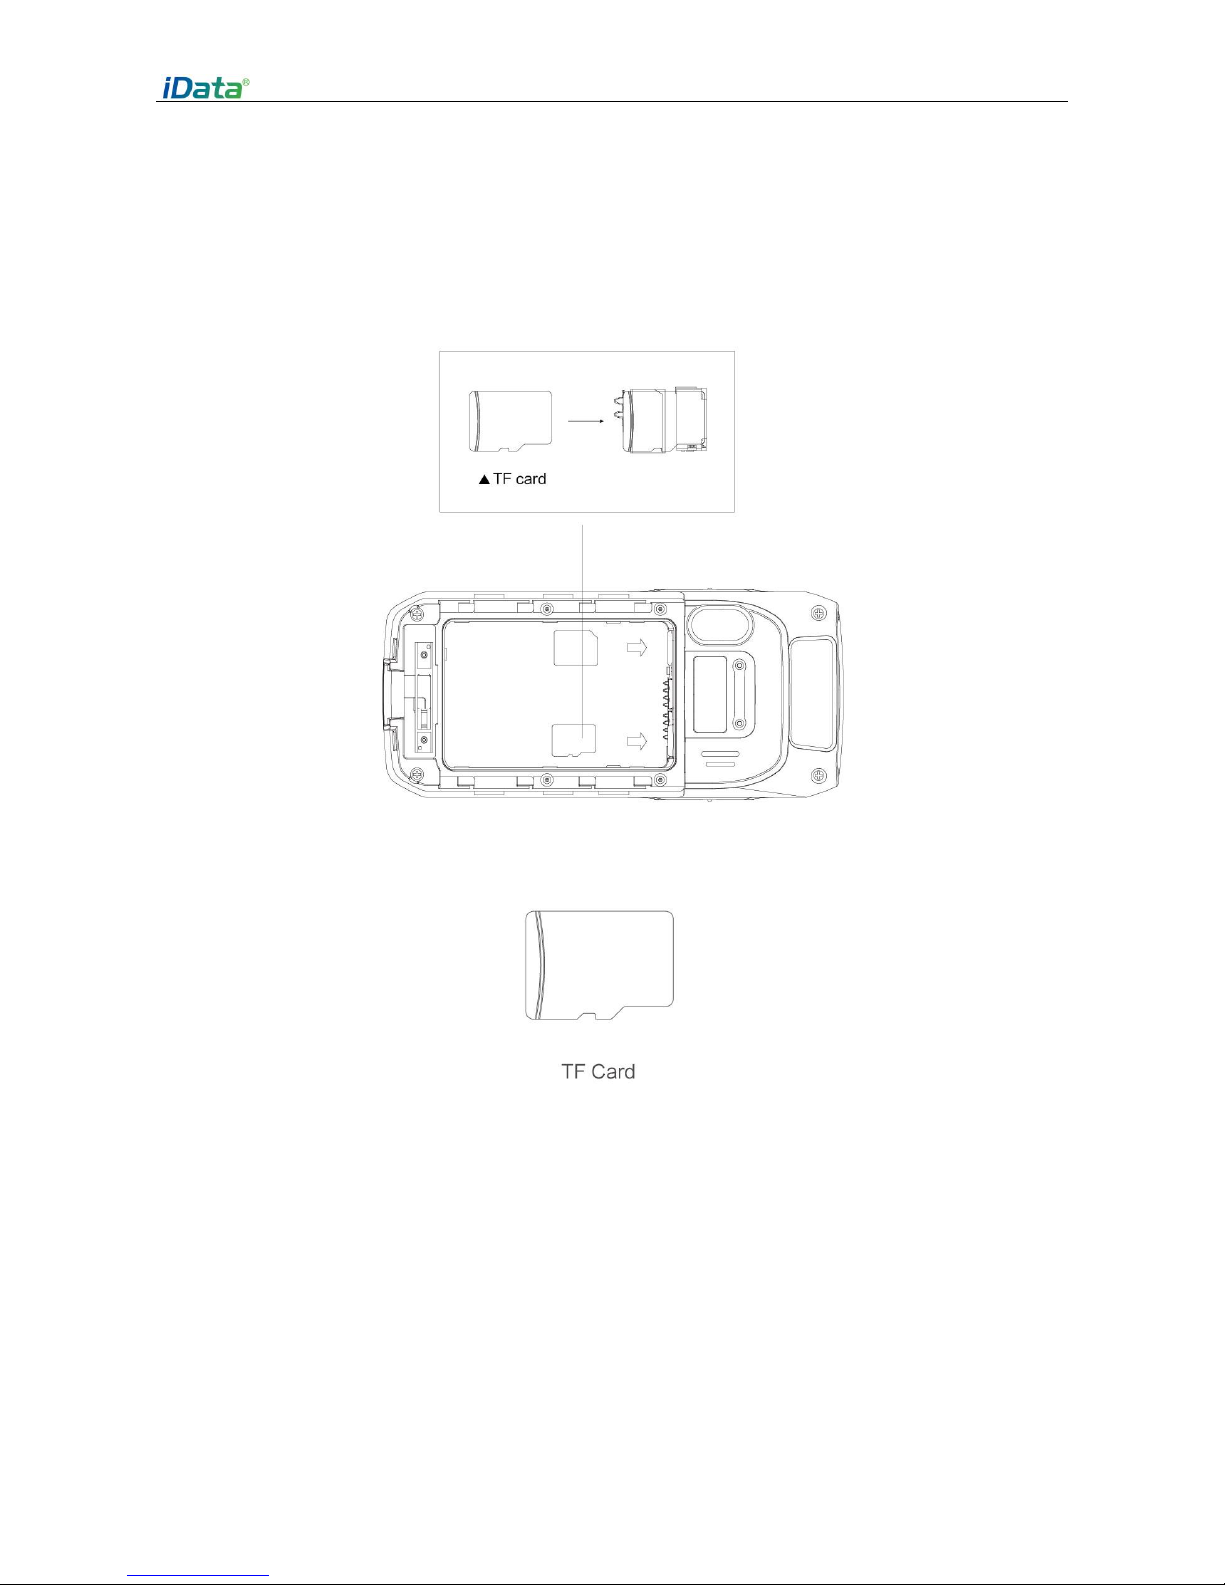
1.3 Insert a SIM card ............................................................................................................................3
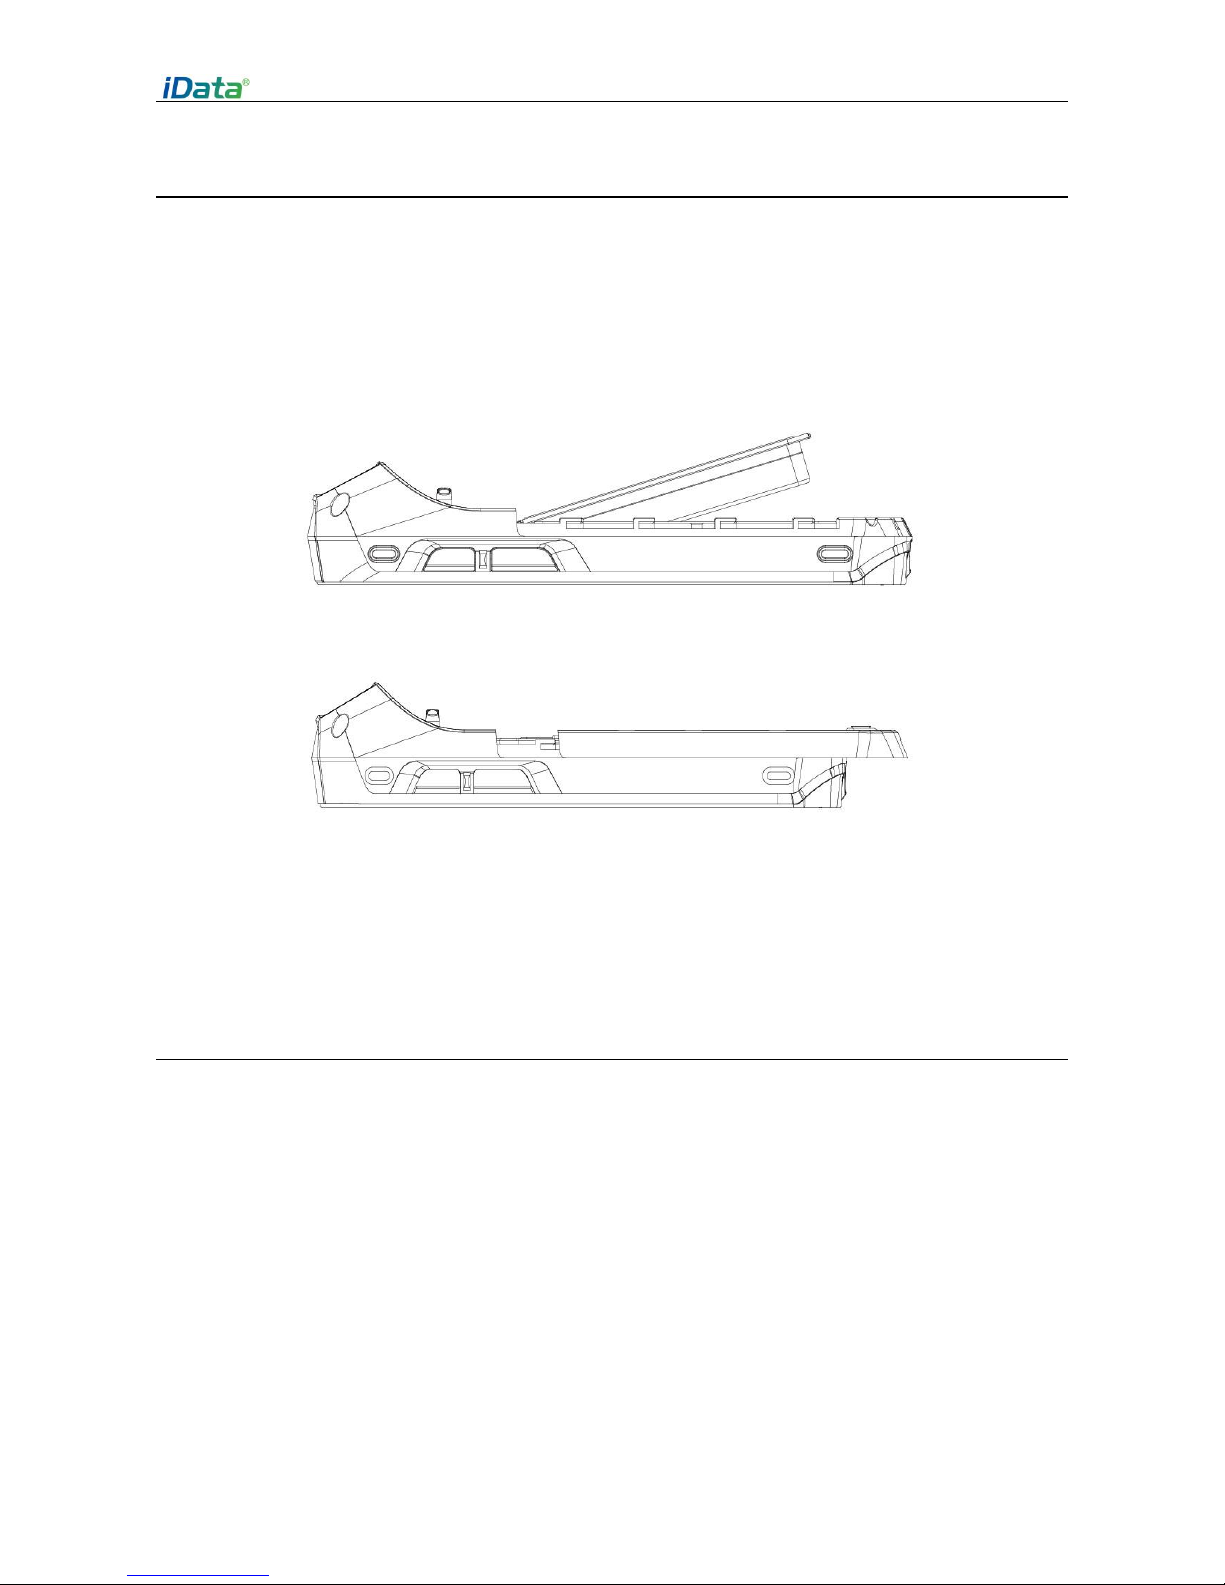
1.4 Install the battery ...........................................................................................................................4
1.5 Remove battery..............................................................................................................................4
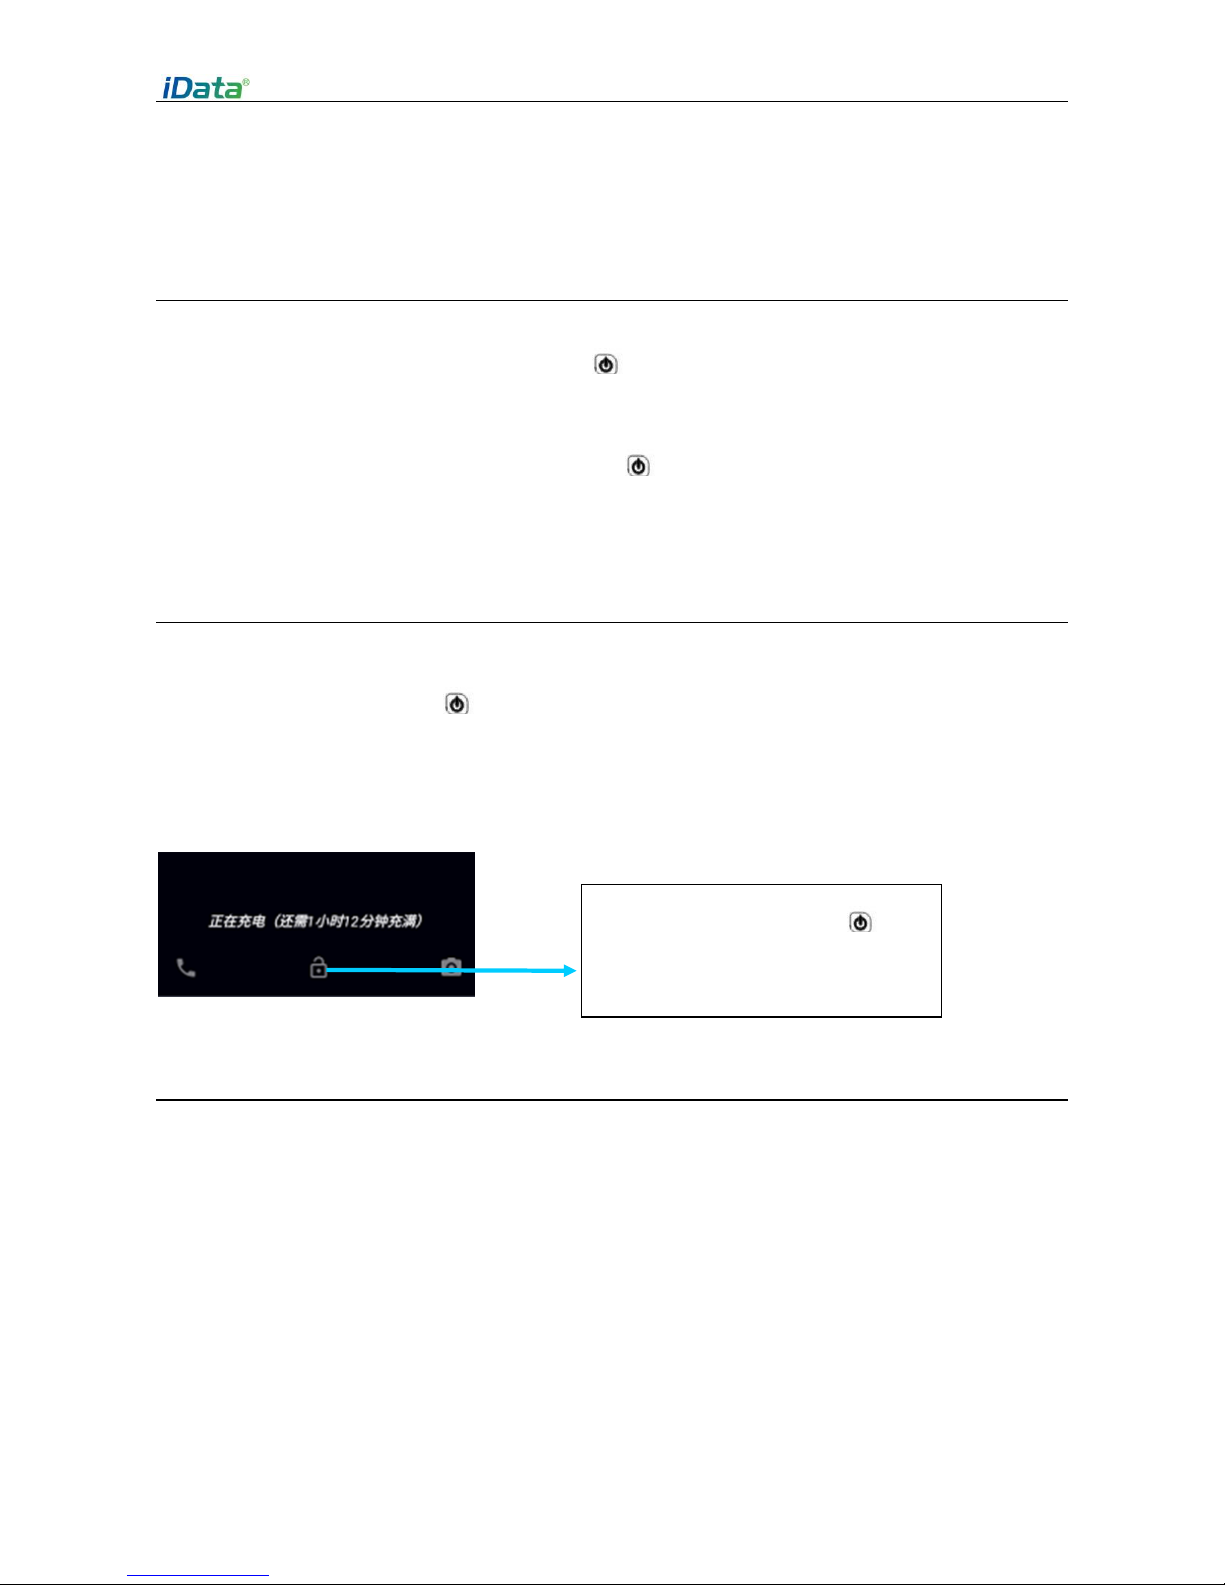
1.6 Charging battery.............................................................................................................................6
2 Use iData 70................................................................................................................7
2.1 Start up and Shutt down ................................................................................................................7
2.2 Device lock and unlock...................................................................................................................7
2.3 Device keys.....................................................................................................................................7
2.4 Home screen ..................................................................................................................................8
2.5 Status icons and indicators.............................................................................................................9
2.6 Basic settings................................................................................................................................10
3 Email Function.................................................................................................................................14
3.1 Emails ...........................................................................................................................................14
4.1 Data connection ...........................................................................................................................16
4.2 Wi-Fi connection..........................................................................................................................17
4.3 Bluetooth......................................................................................................................................18
4.4 GPS ...............................................................................................................................................19
4.5 Connect PC with USB ...................................................................................................................20
4.6 Synchronization............................................................................................................................20
5 iData 70 Scanning demo introduction.....................................................................22
5.1 iScan installation and operation...................................................................................................22
6 Manage iData 70 ......................................................................................................23
6.1 Install application .........................................................................................................................23
6.2 Uninstall application.....................................................................................................................23
6.3 Manage application......................................................................................................................24
7 Use precautions and troubleshooting.....................................................................25
7.1 iData 70 use precautions..............................................................................................................25
7.2 Trouble shooting ..........................................................................................................................26
Appendix .....................................................................................................................29

iData 70 operation manual
- 1 -
1 Introduction
1.1 iData 70 overview
fig 1-1 iData 70 front view
fig 1-2 iData 70 back view

iData 70 operation manual
- 2 -
1.2 Insert a TF card
Insert a TF card as follows:
Push the TF card same as the sign direction below into card slot.
fig 1-3 Insert TF card

iData 70 operation manual
- 3 -
1.3 Insert a SIM card
Insert a SIM card as follows:
Insert SIM card as below direction into card slot.
fig 1-4 Insert SIM card

iData 70 operation manual
- 4 -
1.4 Install the battery
Installing the battery as follows:
1. Push the battery to the battery compartment and press it downwards.
2. Close the battery cover, push forward, press it downward.
3. Push right the battery cover then it’s locked.
Fig 1-5 Installing battery
1.5 Remove battery
Remove the battery cover as follows:
1. Push the battery lock to the right.
2. Pull up the back cover and battery from notching slot of the battery cover.

iData 70 operation manual
- 5 -
fig 1-6 Removing battery

iData 70 operation manual
- 6 -
1.6 Charging battery
You can charge the battery in below 2 ways:
1. Connect to USB cable for charging iData 70;
2. Use a desktop stand for charging iData 70;
When it’s charging, LED instructor is red, when it turns to green means battery is full charged.
When battery is insufficient, iData 70 pops up warning messages.
When battery is dying, iData 70 automatically shuts down.
★Notes:
Battery charging time can be more than or less than 3 hours. Charging interruption won’t cause
damage to battery. Battery life depends on iData 70 actual usage, such as all iData 70 functions,
operation mode, data transmission etc.
★Hints:
To make sure iData 70 has a longer standby time, please do as follows to save battery
consumption;
•Charge iData 70 when it’s not used
•Set hibernate time longer (Home screen->Application->Settings->Display->Hibernate)
•Disconnect all wireless activities when iData 70 is not used

iData 70 operation manual
- 7 -
2 Use iData 70
2.1 Start up and Shutt down
Make sure SIM card is inserted, battery is set and charged, then you can start up iData 70.
1. Starting up, press and hold the power button on the right top of the device, it will show up
the starting up page, after it’s launched then entering the Android operating system, it takes some
time for starting, please be patient.
2. Shutting down, press and hold the power button on the right top of the device, it pops up
the shut-down option dialog, then click Shut down.
2.2 Device lock and unlock
Lock device
Short press the power button .Device will also lock itself when there’s no operations to the
device within the auto-lock screen time set by system default or customized.
Unlock device
2.3 Device keys
iData 70 has physical keys, shown as below, 20 keys in total, divided into function key, digit key,
symbol key and scan key.
Among iData 70 physical key board, functional keys from left to right corresponding to Android
system delete key, up key, scan key, down key and ENTER, function keys on the left-bottom
corresponding to 1Aa key and Fn key.
Scanning key: Scanning
Deletion key: Delete
Direction key: Move up/down operations
ENTER: Operation confirm
Short press the power button , slide
the unlock to the right on the Home
screen.

iData 70 operation manual
- 8 -
Function keys 1Aa and Fn actual usage displayed as below:
2.4 Home screen
There’s 1 Home screen for iData 70, you can switch screen by sliding left or right. You can open any
Apps by tapping its icon shown on the screen.
Fn key
Deletion key
Scanning key
Enter
Direction key
1Aa key
Scanning key

iData 70 operation manual
- 9 -
★Hints:
•You can add/delete Apps icon on the screen blank places.
•You can view all Apps by clicking the application tray.
2.5 Status icons and indicators
Status icons and indicators shown on the status bar on the top of the screen, displays the device
status, info and notice.
tab 2-1 Status icons
Icon
Instruction
Icon
Instruction
WLAN
Signal
Bluetooth
Airplane mode
USB
Limited access to internet
Miss call
USB mapping
New message
Charging
Modulator-demodulator log
Fully charged
Mute
Multiple notification icons,
exceeding display range
Desktop application

iData 70 operation manual
- 10 -
USB connect to PC Pea Pod
EDGE
★Instruction
As device software upgraded constantly, status symbol shown above might be different to the ones
on devices, please follow the actual situation.
2.6 Basic settings
2.6.1 Date and Time
Set the Date and time based on actual need.
Find this icon:
->Settings
->Date and Time
->Set date or set time
2.6.2 Display setting
Find this icon:
->Setting
->Display
->Brightness/Wallpaper/Screen latency/Fonts

iData 70 operation manual
- 11 -
2.6.3 Sound setting
Find this icon:
->Setting
->Profiles
->Standard/Silence/Meeting/Outdoors
->Set regular Sounds/Ring by choosing different profiles

iData 70 operation manual
- 12 -
2.6.4 Security setting
Find this icon:
->Settings
->Backup and Reset
->Restore factory settings
Click Phone Reset, then Erase all contents, device starts to restore factory settings.
★Notes
This operation will erase below data
•Accounts
•System and Apps data and settings
•Downloaded Apps
Below data remains
•Current system and bundled Apps
•TF card data, like music and pictures
2.6.5 Language and Input settings
Find this icon:
->Settings
->Language and Input
->Select Language, choose any language you want to switch in the list
->Select Default, choose any input method you want in the list

iData 70 operation manual
- 13 -
2.6.6 Custom settings
Find this icon:
->Settings
->Custom settings
->User defined setting Turn On/Turn Off custom functional keys
2.6.7 Shortcut
You can add shortcut on the Home screen for the device.

iData 70 operation manual
- 14 -
On the Home screen, you can tap and drag the Apps icon from the application tray to Home screen
for adding the shortcut you want.
2.6.8 Widgets
You can add widgets like clock, music player and calendar to Home screen.
On Home screen, tap application tray icon and slide to Widgets page, tap and drag the tools you
want to the Home screen.
Open widgets by tapping the widgets icon.
3 Email Function
3.1 Emails
Email can send/receive mail messages.
★Instruction
Create a mail account on iData 70, take 163 mail box as example, after log in, click settings on the
upper right of the page, access the Accounts option, choose and check all the server and
receive/send email options, then save, mail account setup completed.
Find this icon:
->Emails
1. Input email address and password, tap Next, it starts to connect to email account;

iData 70 operation manual
- 15 -
2. Set Email check and synchronize frequency, then go to Next;
3. Input a name for the account creation, tap Next, it goes to the mail check and reading page.
Delete account
1. On the mail page, tap Menu then Settings;
2. Choose the mail account you want to delete, open the settings page;

iData 70 operation manual
- 16 -
4 Network and connection synchronize
4.1 Data connection
Network configuration
Network is already set before delivery。You can choose a new network manually by software
configuration if original network setting was deleted by mistake.
Find this icon:
->Settings
->More
->Mobile Network
->Preferred Network Type
Create GPRS data connection then access the Internet
Search and register Network manually-manual search network-network carrier
You need to make sure SIM card is inserted into iData 70 before establishing GPRS data connection.
Usually network setting is already set, if it was deleted by mistake, you can set the network
according to below instruction which takes China Mobile as sample:

iData 70 operation manual
- 17 -
4.2 Wi-Fi connection
Find this icon:
->Settings
->Wi-Fi and Network
->WLAN
1. Tapping WLAN OFF/ON button to open and search for network. If WLAN is already opened, click
“Scan”, then all in-scoped network will be listed out.
2. Click the network name you want to connect, input the connection password when it pops up
the password dialog.
3. Click Connect then Wi-Fi connection will be completed.

iData 70 operation manual
- 18 -
4.3 Bluetooth
Opening Bluetooth function can connect to other Bluetooth compatible devices (like computer,
cellphone) and exchange messages. It is more stable by establishing connections in the range that
without any solid obstruction.
Find this icon:
->Settings
->Wi-Fi and network
->Bluetooth
1.Tap the Bluetooth OFF/ON button, switch on and search other Bluetooth devices;
2.From the Bluetooth device list, choose the one you want to connect to;
3.Input the PIN code in the dialog, tap “confirm” to connect to the device.
4. Tap the device icon which is already connected, you can see the Forget and File transfer options,
operate by actual need.
Table of contents