X4-TECH SOI T8.5 User manual

1
A. CAUTIONS
1. Never attempt your own maintenance. If something appears strange,
please turn the TV off and consult your TV dealer. The TV is composed
of many delicate electronic components that can be damaged or broken if
you open the TV or attempt to modify it.
2. Do not exposing the TV to high humidity, dust, steam, oil, smoke, direct
sunlight etc.
3. Do not use thinners or other chemical reagent. Wipe the TV off with a
soft cloth if it gets dirty.
4. Do not leave the TV in excessively hot or cold places.
Permissible storage temperatures are within the range of -25 to +60 .
Permissible operation temperatures are within the range of 0 to +40 .
5. Only use specified adaptors and power sources.
6. Turn power OFF when not in use and unplug the adaptor.
7. Avoid dropping and strong impact.
For your safety, the driver should not watch TV or operate the controls
while driving. Please note that watching and operating the TV while
driving are prohibited by law in some countries.
It doesn t mean the TV is broken with some light or dark colour dots on
the LCD, it s an insurmountable condition with the TFT-LCD technology.
,
,
Instruction manual

B. ASPECT
1. Main Part
(1) Remote sensor
(2) Selecting DTV/ATV/AV source button
(3)ANS button
(to select Volume, Brightness, Contrast Colour, Tint )
(4) TV complex button
(up, down, right, left ,ok buttons)
(5) TV menu button
(6) Power (standby ) ON/OFF button
(7) Power indication
(8) Speakers
(9) LCD screen
(10) Antenna
(11) Set stand
(12) Video input socket
(13) Left/Right Audio input socket
(14) Earphone socket
(15) DTV audio video output socket
(16) DC power input socket(10~15V)
(17) Main power switch
(18) Screw hole
DTV:DVB-T digital TV
ATV: Analogue TV
DTV:DVB-T digital TV
ATV: Analogue TV
23
9
8
10
12
14
15
16
17
18
13
11
1234567

4
5
14
15
ANSANS
SOURCESOURCE
2. Remote Control
1. STANDBY to switch the TV on from standby or off to standb y.
2. NUMERIC KEYS Used to select channels or enter progr amm ing param eters.
3. LEFT/RIGHT( / ) Move the DTV left or right highlight marked curs or.
Adjust volume.
4. UP/DOWN( / ) Move up or down highlight marked cursor. And turn to the
next or previous channel.
5. MENU Displays the Menu on th e sc reen .
6. TV/RADIO Receiver switches between DTV mode and Radio mode.
7. RED/GREEN/YELLOW DTV Function keys in menu.
8. EXIT Use in DTV menu go back to previous menu
9. OK To select DTV menu option , or to display channel list
10. LCD ON/OFF switch the LCD panel ON/OFF
11. AUDIO To select DTV audio mode: Left, Right, Stereo, language. To select
ATV sound system
12. GUIDE Displays the DTV/Radio Program Guide.
13. MUTE Used to enable or disable the audio.
14. INFO To display the TV channel status or various program information of current service.
15. RECALL Return to the previous menu or switch to the last view Channel.
16. SLEEP TIME To enter sleep time setup.
17. SOURCE To select DTV, ATV,AV, VGA source (Some TV sets withoutVGA)
18. ANS To select Volume , Brightness, Contrast, Colour, Tint adjusting mode.
19. MIRROR only AV mode use to mirror the picture
MIRRORMIRROR
LCD
ON/OFF
LCD
ON/OFF
19

AC Household Current:
The optional AC adaptor allows the TV to be powered by standard household
current (please look over the symbol of the AC adaptor.)
Car Battery (DC 12V):
The optional car adaptor (apply to the car with - polarity connected to the
ground) allows the TV to be powered by a car battery through the vehicle s
cigarette lighter.
D. POWER SUPPLY
E. BASIC OPERATION
Turning on power
Slide the MAINPOWER Located on
the back sideof the mainunit .
Selecting DTV/AV/ATV source
1)Turn on the power of the connected
video equipment.
2)Press the SOURCE button toselect the
applicable input source.the screen
displays DTV/AV/ATV mode at the
upper left cornereach time SOURCE
is pressed.
ON-screen display
AV mode
DTV
DTV mode
AV
NOTE:NOTE:
6
7
ATV mode
ATV
If there is notsignal, the screen willdisplay :"NO SIGNAL"
1.Rod Antenna
(1)Install the rod antenna clockwise rotation(figure 1)
(2)Uninstall the rodantenna anticlockwise movement(figure 2)
2.Use the Antenna adapter (IEC to F-type connect) to
connect outdoor Antenna
(1)Install the antennaadapter clockwise rotation (figure 1)
(2)Uninstall the antenna adapter anticlockwise movement (figure 2)
(1) (2)
(1) (2)
C. RF input(ANT input)

89
5).Press to adjustthe tint (tintonly NTSC
system using )
4).Press LEFT/RIGHT( / ) button toadjust the colour
LEFT/RIGHT ( / ) button
............50
............50
1)Changing channels using thenumeric buttons ,You can select
a
Changing the channelsChanging the channels
2)Changing channels withthe UP/DOWN( / ) button toone by
one to selectchannels.
one-digit channel ortwo-digit channel .
ATV allow you to selectup to 100Positions(channel 0 to99)
1)At ATV/AV mode press menu buttonto select FUNCTION
menu, Press the UP/DOWN( / ) button to selectthe function,
Press the LEFT/RIGHT( / ) buttonto transfer thefunction items,
The screen displays
LANGUAGE: Press the UP/ DOWN
( / )buttonto select thelanguage .Press the
LEFT / RIGHT( / )button to changethe language
Picture up and down: Press the UP/ DOWN( / ) button toselect .
Press the LEFT/ RIGHT( / ) button to turn the pictureup and down.
ASPECT MODE: Press the UP/ DOWN( / ) button toselect ASPECT.
Press the LEFT/ RIGHT( / ) button to turn the 16:9or 4:3 picture.
Function selectionFunction selection
LANGUAGE ENGLISHLANGUAGE ENGLISH
ASPECT 16:9ASPECT 16:9
FUCTIONFUCTION
NORMALNORMAL
1).Press LEFT/RIGHT( / )button to adjustthe brightness.
2).Press LEFT/RIGHT( / )button to adjustthe contrast
Adjusting the picture setting
1).Press the ANS button to select brightness
contrast, colour,tint (tint only NTSC system using)
2).Press LEFT/RIGHT( / )button to adjustthe brightness,
contrast, colour,tint.
To mute sound
1).Press the MUTEbutton to temporarilyturn off the sound .
Screen display themute mark .
2).Press the MUTEor LEFT/RIGHT( / )button to turnthe
sound back tothe previous level.
Sound volume
1).PressANS to selectvolume .
2).press the RIGHT( ) buttonto increase soundvolume adjusting.
The segment of indicator increases.
3).Press the LEFT ( )button decreasesound volume.
The segment of indicator decreases.
............50
............50
............50
............50
Press one or two Digit
buttons.

11
10
1. Press the MENU button, the PRESET menu screen appears.
2. Press theUP/DOWN( / ) button to selectthe desired function
mode.
3. Each timeyou press the LEFT/RIGHT( / ) button ,the setting
for individual itemis change asfollows:
The mode changesin the followingorder
Channels Skip
The mode changesin the followingorder
Fine tune
The frequency changesto allow finetuning.
BAND: changes Band VHFL VHFH UHF
Channel Setting
The mode changesin the followingorder
AUTO PAL NTSC SECAM
Colour System
Sound System
BG DK I
YES NO
M L
Press the remotecontrol AUDIOto change the ATV sound system
SKIP THIS
1. Press theMENU button, thePRESET menu screen appears.
2. Press theUP/DOWN( / )button to select AUTO SEARCH item.
3. Press theLEFT/RIGHT( / )button ,all the TV stations in your
area that canbe received bythe LCD TV set are automatically preset
between channels 0to 99.
4. The screen shows whateveris on channel1 when fullauto channel
preset is finished.
1. Press theMENU button, thePRESET menu screen appears.
2. Press theUP/DOWN( / )button to select item.
3. Press theLEFT/RIGHT( / ) button to locatethe channel you
want to presetto the position.
4. Press theUP/DOWN( / )button to select MANUAL SEARCH
item.
CHANNEL
F. PRESET ATV
Presetting the channels(AUTO search)
Notes:
1.When starting theAuto searching after setting,The colour system and
sound system forall channel arestored into memory.
2.Unused channels areautomatically skipped.
Presetting the channels(Manual Search)
CHANNELCHANNEL
COLOUR SYSTEMCOLOUR SYSTEM
SOUND SYSTEMSOUND SYSTEM
AUTOAUTO
BGBG
MANUAL SEARCHMANUAL SEARCH
FINE TUNEFINE TUNE
SKIP THISSKIP THIS
11
NONO
5. Press theLEFT/RIGHT( / )button search is initiated and when
a ATV signal is received duringthe search .the search stops.
6. Repeat step2.3.4.5 above topreset the channel position for other
broadcasts etc.
PRESETPRESET
AUTO SEARCHAUTO SEARCH
200.25MHZ200.25MHZ
BANDBAND VHFHVHFH

12
13
G . PRESETDTV MENU:
(A). Antenna Active
Antenna ActiveAntenna Active
Press , , or button to select Antenna Active ,Then press OK button.
If you select"enable ",the tunercan provide 5Vpower supply.
Press or buttonto select Enableor Disable.
AntennaAntenna EnableEnable
5V On
Press OK Keyto select Exit:Back
Press the [MENU]button when theTV is DTV mode, then the Preset
program setting menuwill be shownon the screen.
Channel SearchChannel Search
Channel EditChannel Edit
InstallationInstallation
22
33
11
Main MenuMain Menu
Press OK Keyto selectPress OK Keyto select
Press , , or to select your desired recommend function.
Press [EXIT] buttonto return theupon interface.
Press [MENU] buttonto exit themenu interface.
1. Installation
InstallationInstallation
Press , , or button to select Installation ,Thenpress OK button.
Antenna ActiveAntenna Active
System SetupSystem Setup
1
2
System SetupSystem Setup
(B). System Setup
Press , , or button to select System Setup ,Then press OK button.
Local TimeLocal Time
User InterfaceUser Interface
VideoVideo
System InformationSystem Information
Factory ResetFactory Reset
11
22
33
44
55
When power on,[First Installation] willbe shown onthe screen if unit
without any channelstored
First InstallationFirst Installation
AreaArea UKUK
OSD LanguageOSD Language
OKOK
Time zoneTime zone
AntennaAntenna
Auto ScanAuto Scan
EnglishEnglish
GMT +1GMT +1
5V off5V off
Press , toselect first Installation, then press OK button.
Area : Press , to select the appropriate area.
OSD Language :Press , toselect to yourpreference language.
Time zone: Press , to select timezone.
Antenna : Press , to selet 5V on or 5V off sothat the tunerwill
or won t provide 5Vpower supply.
Auto Scan :Press OK andbegin to autosan.
If you don t want to do the first installations, please press the EXIT
button to exit.
,
,

15
14
TV SystemTV System PALPAL
16:916:9
Pan&ScanPan&Scan
Screen RatioScreen Ratio
4:3 Handing4:3 Handing
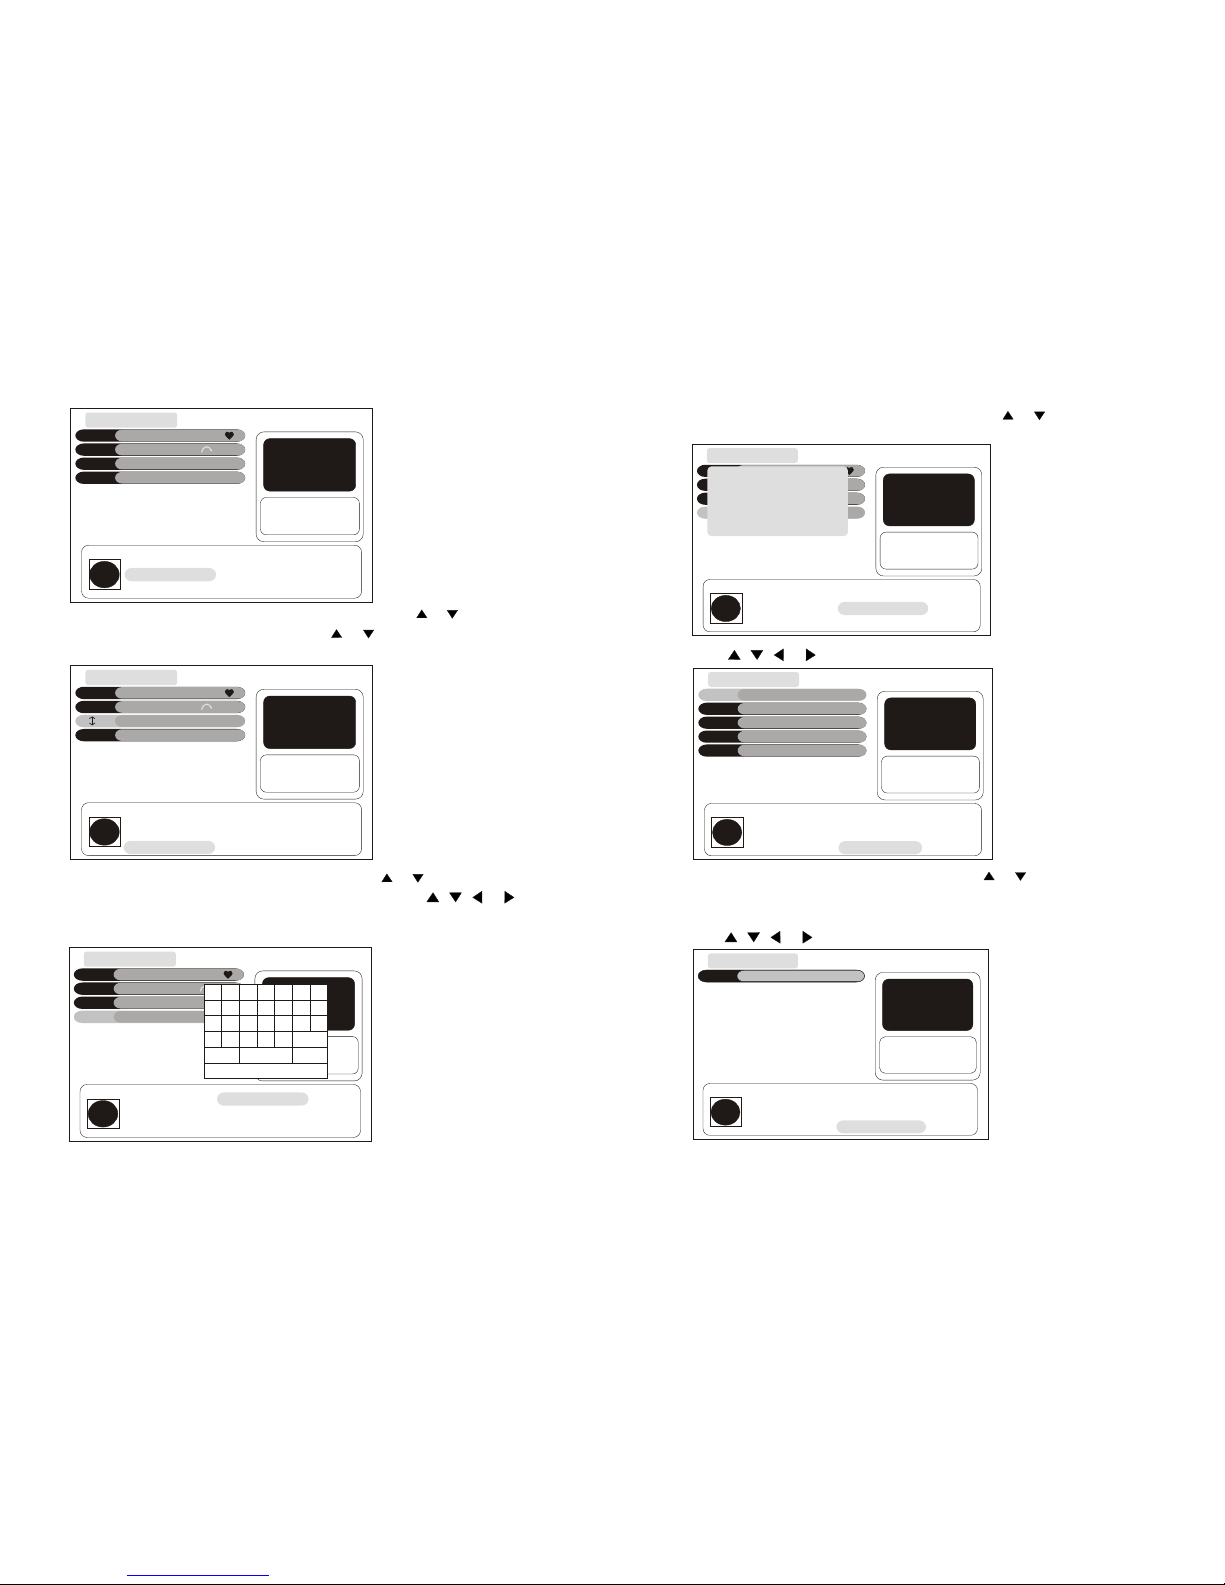
Press key to select PAL/SECAM/NTSC
Video
Press , , or button to select Video ,Then press OK button.
Press or buttonto select TV System , Screen Ratio or 4:3 Handing ,
Then press or button to set it .
VideoVideo
2. Channel Search
Channel Search
Press , , or button to select Channel Search ,Then press OK button.
AreaArea
FrequenyFrequeny
Band WidthBand Width
ModeMode
Scan ModeScan Mode
AustraliaAustralia
Pross LEFT/BIGHT keyto Soloct Froquency.Pross LEFT/BIGHT keyto Soloct Froquency.
CCHH[[44]]5577..55MMHHZZ
AutoAuto
Manual ScanManual Scan
LevelLevel 15%15%
0%0%
QualityQuality
OSD Language: Controlthe language asto you preference.
OSD Transparency:Customise the OSDtransparency.
Local TimeLocal Time
Time zoneTime zone
Summer timeSummer time
DateDate
MonthMonth
YearYear
TimeTime
GMT+1GMT+1
OnOn
2323
99
20062006
11:0611:06
Press OK Key to select Exit:BackPress OK Key to select Exit:Back
User Interface
Press , , or button to select User Interface ,Then press OKbutton.
Press or buttonto select Languageor Transparencyitem, Thenpress
or button tochange the language.
Press OK Key to select Exit:BackPress OK Key to select Exit:Back
OSD LanguageOSD Language
OSD TransparencyOSD Transparency
EnglishEnglish
35%35%
User InterfaceUser Interface
Local Time
Press , , or button to select Local Time ,Then press OK button.
Press or buttonto select Time zoneor Summer timeitem ,Then press
or button toset it .
System Information
Press , , or button to select System Information ,Then press OK
button. You can seethe receiver Hardwareand Software updatedetails.
System SetupSystem Setup
Local TimeLocal Time
User InterfaceUser Interface
VideoVideo
System InformationSystem Information
Factory ResetFactory Reset
11
22
33
44
55
System InformationSystem Information
NEC uPD61110NEC uPD61110
S/W Version: uPD61110 V3.02S/W Version: uPD61110 V3.02
h/W Version: 3.0h/W Version: 3.0
Last Update: 2006.11.06Last Update: 2006.11.06
Factory Reset
Press , , or button to select Factory Reset ,Then press OKbutton.
Press or buttonto select Yes or No, then press OK button.
Note: this actionwill erase allthe date youhave store in the receiver ,Be
sure that you want toperform this functionbefore you proceed .
System SetupSystem Setup
Local TimeLocal Time
UserInterfaceUserInterface
VideoVideo
System InformationSystem Information
Factory ResetFactory Reset
11
22
33
44
55
All Date areErasing
Are you sure?
All Date areErasing
Are you sure?
YesYes NoNo
7MH7MHZZ
Scan ModeScan Mode Auto ScanAuto Scan

17
16
TV ChannelTV Channel
RADIO ChannelRADIO Channel
11
22
This menu enableyou to setupthe channel ofDVB-T. Such as movechannels,
make your ownfavorite channels list,skip channels anddelete channels from
the list.
3. CHANNELEDIT
(A). Preset TV Channel
Please select Channel Edit, then press OK button.
Channel 1Channel 1
Channel 2Channel 2
Channel 3Channel 3
Channel 4Channel 4
Channel 5Channel 5
0: Skip Edit
1: Delete Edit
2: Move Edit
0: Skip Edit
1: Delete Edit
2: Move Edit
3: Name Edit
4: Sort Edit
5 Fav Edit
3: Name Edit
4: Sort Edit
5 Fav Edit
474MHz
BW[8MHz]
CH 21
474MHz
BW[8MHz]
CH 21
00010001
00020002
00030003
00040004
00050005
helphelp
Channel EditChannel Edit
Add To Fav-1Add To Fav-1
Press [ 0] button toselect Skip Edititem. then press or button to select
channel, press [OK]button, will display beside the program,press [OK]
button again toremove this logo,when you press or button in no-menu
state,the program willskip.
Press or buttonto select Frequency,Then press OKbutton.
Press or buttonto select desiredrecommend Frequency.
Press or buttonto select theAuto scan,then press OKbutton to search
program with autosearch format. Itwould search allthe currently TV
program and storethem automatically.
If you wantto stop theAUTO SEARCH mode, pleasepress the [EXIT]
button.
Note: You may be wait fora moment when the TV finished
AUTO SEARCH.
Youmay be waitfor a moment when the TV bestopped AUTO
SEARCH.
Channel SearchChannel Search
FrequencyFrequency
Band WidthBand Width
ModeMode
Scan ModeScan Mode
Scan ModeScan Mode
CH[45]666MHzCH[45]666MHz
Select Frequency ,OK:CH tableSelect Frequency ,OK:CH table
8MHz8MHz
AutoAuto
Manual ScanManual Scan
Auto ScanAuto Scan
LevelLevel 15%
0%
QualityQuality
TP ListTP List
CH[4]57.5MHz
CH[5]64.5MHzCH[5]64.5MHz
CH[6]177.5MHzCH[6]177.5MHz
CH[7]184.5MHzCH[7]184.5MHz
CH[8]191.5MHzCH[8]191.5MHz
CH[9]198.5MHzCH[9]198.5MHz
CH[10]205.5MHzCH[10]205.5MHz
CH[11]212.5MHzCH[11]212.5MHz
Press the , to select Area, then Press left/right to select the
appropriate area.
Channel 1Channel 1
Channel 2Channel 2
Channel 3Channel 3
Channel 4Channel 4
Channel 5Channel 5
0: Skip Edit
1: Delete Edit
2: Move Edit
0: Skip Edit
1: Delete Edit
2: Move Edit
3: Name Edit
4: Sort Edit
5 Fav Edit
3: Name Edit
4: Sort Edit
5 Fav Edit
474MHz
BW[8MHz]
CH 21
474MHz
BW[8MHz]
CH 21
00010001
00020002
00030003
00040004
00050005
helphelp
Skip ChannelSkip Channel
Press [ 1] button toselect Delete Edititem. then press or button to
select channel, press[OK] button youcan delete thechannels.

18 19
Press [ 3] button toselect Name Edit.then press or button to select
channel, press [OK]button ,a keyboardis shown, press , , or to
select a letter, and the [OK] button to overwrite the current by anther letter,
press [OK] buttonto confirm thechange name whenyour have finished.
Press [ 4] button toselect Sort Edit.then press or button to
select channel, Press1,2,3,4,or 5 buttonyou can sortthe channels.
(B). Preset RADIO Channel
Press , , or button to select RADIO Channel ,Then pressOK button.
It's the sameas "Preset TV Channel".
BBC PARLMNTBBC PARLMNT
474MHz
BW[8MHz]
CH 21
00010001
Channel 1Channel 1
Channel 1Channel 1
Channel 2Channel 2
Channel 2Channel 2
Channel 4Channel 4
Channel 4Channel 4
Channel 5Channel 5
Channel 5Channel 5
0: Skip Edit
1: Delete Edit
2: Move Edit
0: Skip Edit
1: Delete Edit
2: Move Edit
0: Skip Edit
1: Delete Edit
2: Move Edit
0: Skip Edit
1: Delete Edit
2: Move Edit
0: Skip Edit
1: Delete Edit
2: Move Edit
0: Skip Edit
1: Delete Edit
2: Move Edit
3: Name Edit
4: Sort Edit
5 Fav Edit
3: Name Edit
4: Sort Edit
5 Fav Edit
3: Name Edit
4: Sort Edit
5 Fav Edit
3: Name Edit
4: Sort Edit
5 Fav Edit
3: Name Edit
4: Sort Edit
5 Fav Edit
3: Name Edit
4: Sort Edit
5 Fav Edit
474MHz
BW[8MHz]
CH 21
474MHz
BW[8MHz]
CH 21
474MHz
BW[8MHz]
CH 21
474MHz
BW[8MHz]
CH 21
00010001
00010001
00020002
00020002
00030003
00030003
00040004
00040004
helphelp
helphelp
helphelp
Name editName edit
Sort EditSort Edit
A
H
O
V
Other Space Save
G
N
U
DEL
F
M
T
E
L
S
Z
D
K
R
Y
C
J
Q
X
B
I
P
W
Channel 5
1--Sort by Channel name
2--Sort by Internal list
3--Sort by Lock
4--Sort by Scramble
5--Sort by Factory default
Add To Fav-1Add To Fav-1
Channel 1Channel 1
Channel 1Channel 1
Channel 2Channel 2
Channel 2Channel 2
Channel 4Channel 4
Channel 4Channel 4
Channel 5Channel 5
Channel 5Channel 5
0: Skip Edit
1: Delete Edit
2: Move Edit
0: Skip Edit
1: Delete Edit
2: Move Edit
0: Skip Edit
1: Delete Edit
2: Move Edit
0: Skip Edit
1: Delete Edit
2: Move Edit
3: Name Edit
4: Sort Edit
5 Fav Edit
3: Name Edit
4: Sort Edit
5 Fav Edit
3: Name Edit
4: Sort Edit
5 Fav Edit
3: Name Edit
4: Sort Edit
5 Fav Edit
474MHz
BW[8MHz]
CH 21
474MHz
BW[8MHz]
CH 21
474MHz
BW[8MHz]
CH 21
474MHz
BW[8MHz]
CH 21
00010001
00010001
00020002
00020002
00030003
00040004
00040004
helphelp
helphelp
Delete ChannelDelete Channel
Move IndexMove Index
Press [ 2] button toselect Move Edititem. then press or button to
select channel, press[OK] button, press or button tothe place you
want and press[OK] button ,theprogram move tothe currently place. Press , , or button to select TV Channel ,Then pressOK button.
Channel 1Channel 1
Channel 2Channel 2
Channel 3Channel 3
Channel 4Channel 4
Channel 5Channel 5
0: Skip Edit
1: Delete Edit
2: Move Edit
0: Skip Edit
1: Delete Edit
2: Move Edit
3: Name Edit
4: Sort Edit
5 Fav Edit
3: Name Edit
4: Sort Edit
5 Fav Edit
474MHz
BW[8MHz]
CH 21
474MHz
BW[8MHz]
CH 21
00010001
00020002
00030003
00040004
00050005
helphelp
Add To Fav-1Add To Fav-1
Press [5] buttonto select Favlist, then press or button toselect
channel. Press OKbutton you canset the channelsto favor list.

press [AUDIO] buttonto show thelist of availableaudio language forthe
channel you arewatching, you canchange the audiolanguage you wantto
hear by pressthe or button,and press [OK]button to confirm.
Audio
eng 2/2eng 2/2
StereoStereo
GUIDE (EPG)
YourDTV has an Electronic ProgramGuide(EPG)
to help younavigate programs throughall the possible viewing
options. This receiver is equippedwith a uniquedual EPG system
which gives youeasy way toview the program information. The
DTV Guide supplies information suchas program listingsand
starting and endingtimes for allavailable programs. Press the
GUIDE key whileyou are viewinga program and the Program
Guide screen will be displayed.
Navigate event: Press the Left Right key,
you can navigatethe event informationin four days.
Change channel: Press the Up Down key,you
can change theviewing channel.
Change fav list: Press the red key,you can select which
favorite type channelshould be listed.
Reserve: Press the Yellow key,you can reserve theevent you
want.
NOTICE:
This service isnot offered byall channels. Program
information will beavailable only when it is includedin the
transmission.
Depending on the receiving quality the page searching can last up
to half a minute until the start side 100 is displayed.
At the bottom of the text page links to other pages are displayed
with the colours red, green, yellow and blue. The red, green,yellow
button can be used for these links. The "TV/RADIO" button
complies with the blue button.
You can also navigate with the up
And the down button and
with the 0 9 buttons.
Teletext and subtitle
You can start the teletext and subtitle with the yellow button of
the remote control and confirm the appearing window with the
''OK'' button .You exit the teletext and subtitle by using ''EXIT''
button.
20 21
While viewing TV orRadio channel variousfunction can beapplied using
your remote control.
press [INFO] buttonto show youthe information ofthe current channel.
press [OK] buttonto display thechannel list ofTV, Radio channel directly.
It's convenient foryour selecting.
H . Basic function
Info
OK
LevelLevel 0%0%
0%0%
QualityQuality
Channel 1Channel 1 [CH21] 1013[CH21] 1013
PP
19:2519:25 2/22/2 FFTTEE
ProgProg
Channel 1Channel 1
Channel 2Channel 2
Channel 3Channel 3
Channel 4Channel 4
Channel 5Channel 5
00010001
00020002
00030003
00040004
00050005

22 23
button to go back to TV.
You can see the actual page number on the left side and the
requested page number on the right side at the top of the teletext
page. The page searching is displayed on the left side.
Teletext is only available when receiving DVBT channels.
OTHER
Sound track
In digital broadcasts,multiple audio languagescan be simultaneously
transmitted by theprogram provider. The Audio control menu appears
when the Audio key is pressedon the channel having different types
of sounds. You can change the desired audio languageand audio mode
of current service.
This service isnot offered byall channels. Teletext and subtitle information
will be available only when it is included inthe transmission.
NOTICE:
Plug the earphonemini-plug into theearphone jack locatedon the rear side
of the set.
J. LISTENING WITH A EARPHONE
Earphone
No sound willbe heard fromthe main unitspeakers when
connecting the earphoneset.
Notes:
K. TROUBLESHOOTING
Before calling forrepair service,cheak thefollowing items for possible
remedies to theencoutered symptoms.
TV set
There is no
picture or
sound.
There is no
picture or
sound,just
noise.
picture is
not clear.
The picture is
too dark.
Remote control
does not work.
picture is light
or improperly
tinted.
There is no
picture.
There is no
sound.
Problem Check item
Make sure theAC adapteris properly
inserted in the power outlet.
Reception other thanthose of broadcasting
stations can be considered.
Make sure theinput mode isset to TV.
Make sure themain power switchof the
main unit is on.
Make sure thecolour system isright
Fluorescent lamp may have reached the end
of service life.
Make sure thesound system isright
Make sure the volume is not set to minimum.
Make sure thesound is notset to mute.
Make sure theheadphone is notconnected.
Make sure theantenna cable isproperly
connected.
Bad reception canbe considered.
Make sure theantenna cable isproperly
connected.
Bad reception canbe considered.
Check Contrast andBrightness adjustment.
Fluorescent lamp mayhave reached theend
of service life.
Check to seeif batteries inthe remote control
have sufficient power.
Make sure theremote sensor windowis not
under strong fluorescent lighting.
Check colour adjustment.(NTSCmode)
1. Press theSLEEP key to display the sleep time screen.
2. Press theLEFT/RIGHT( / )to set thesleep time (in minutes).
I. ADJUSTING THE SLEEP TIMER SETTINGS
The setting can be set in 10 . 20 . 30 . 40 . 50 . 60 ....... 200 .
210 . 220 . 230 . 240 minutes

24
TROUBLESHOOTING(Continued)
Antenna
The picture
is doubled or
tripled
The picture
is spotted
There are stripes
on the screenor
colours fade
The reception maybe weak.
The state ofthe broadcast mayalso be bad.
Make sure theantenna is facingthe right direction.
Make sure theoutside antenna isnot disconnected.
Make sure theantenna is facingthe right direction.
There may bereflected electric wavesfrom mountains
or buildings.
There may beinterference from automobiles,trains,high
voltage lines,neon lights,etc.
There may beinterference between theantenna cable
and power cable.Try positioning them further apart.
Is the unitreceiving interference fromother devices?
Thansmission antennas ofradio broadcasting stations
and transmission antennas of amateur radios and cellular
phones may also cause interference.
Use the unitas far apartas possible fromdevices that
may cause possible interference.
The picture
is not sharp
The picture
moves
Problem Check item
L. SPECIFICATIONS
LCD COLOUR TV COMPARISON
Video colour systems
TV sound systems
TV Turning System
AUTO PRESET
CATV
PAL/NTSC/SECAM
I/DK/BG/M/L
Auto preset 99ch.
Yes
ATV
FUNCTION
~Hyper Band
25
LCD panel
Number of pixels
Luminance
Lamp life
Viewing angles
Audio amplifier
Speakers
Terminals
Video input
Left RightAudio input
Earphone output
DTV AV output
Power supply
Weight
Accessories
8.5(9) TFTLCD
480 x RGBx 234
ITEMS MODEL Slo T8.5
Standard DVB-T
DTV
FUNCTION
Transport stream
Profile&level
Input frequency
COFDM spectrum
Demodulation method
Audio type
Audio sampling rate
MPEG-2 MP@ML
2k and 8k mode
QPSK,16QAM,64QAM
Single channel,Dual channel, joint stereo,Sereo
AV output
2
250 cd/m
10,000 Hours
00
H:120 V:100
0.25W x 2
2 x 4 cm, 2
RCA
RCAx2
Remote control, Antenna, ACadapter, AV cable,
IEC to F-typeconnector.
CS
P
F-type female
3.5 mm jack(Rear)
DC 10-15 V,AC 110 - 240 V
0.8 Kg w/oaccessories
1/32,1/16,1/8,and1/4
Guard interval
ANT input
3.5 mm jack(Rear)
Audio.Video.Output
32,44.1and 48KHz
VHF ,UHF
ISO/IEC 13818
Car adapter,Earphone, Batteries Box

Notice: This manual is only for you reference, any change to the
design and specifications will not be advised.
Table of contents
Other X4-TECH LCD TV manuals