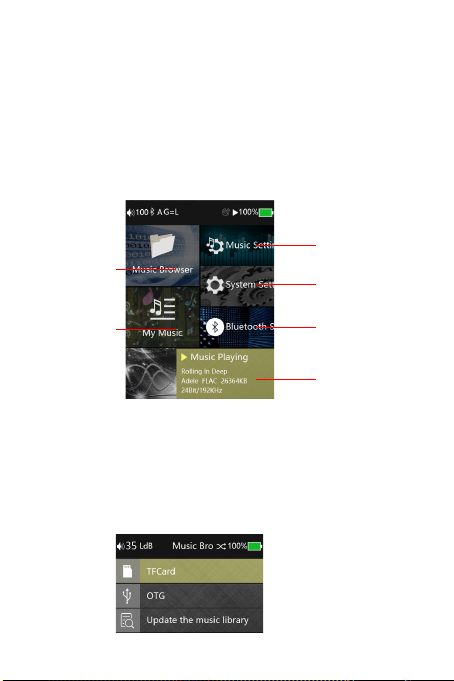
Buttons and Interfaces
1) Update Media
There are "Automatic" and "Manual" two options, you can set the player to scan
automatically when SD card is inserted.
2) Gain Setting
There are two options of "G = L and" G = H "for low gain 0dB and high gain 6dB.
When using high-impedance headphones, you can choose high gain to get
more enjoyable sound quality.
3) Digital Filter
There are two kinds of digital filter: Sharp Decay and Slow Decay.
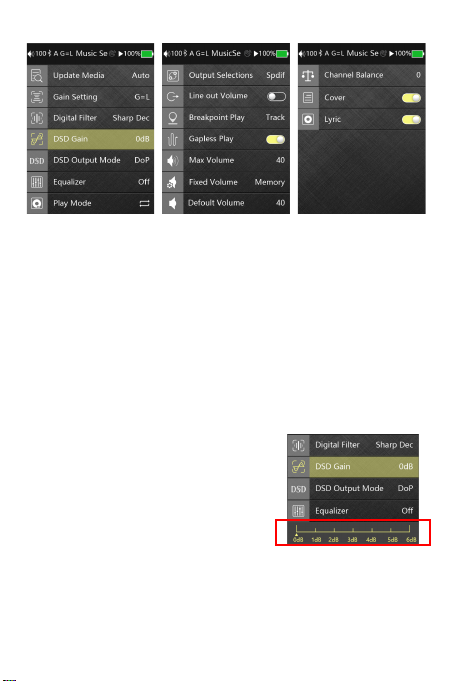
4) DSD gain
When playing DSD music, you can adjust the
gain value. Press OK to pop up the submenu,
0-6dB adjustment (as shown below), use the
Switch button to adjust, press the OK button
to finish.
5) DSD Output Mode
This menu sets the S/PDIF out, USB AUDIO
OUT output mode, can be set to D2P or DoP. When set to D2P mode, DSD
audio will be converted to PCM signal. When set to DoP mode, the DSD audio
will output the native signal.
Note: 1, S/PDIF out supports up to DSD64 native code, PCM192KHz/24Bit
output, any signal is higher will be converted to PCM or down-output.
1 USB Port, with a variety of features
A: Connect with the computer, you can copy, delete and manage the song files;
B: Support external USB flash drive, removable hard disk, etc., play songs from
external storage device;
C: Set the USB mode to DAC mode, X20 can be used as the USB DAC, such
as connecting the computer USB port, decoding the USB audio signal,
maximum support DSD256, PCM192KHz/24Bit (driver required)
D: USB audio output, X20 can output USB audio, through the TYPE-C OTG
cable to the decoder, maximum output DSD256 (DOP), PCM192KHz/24Bit;
E: S/PDIF out, can be connected through the TYPE-C to S/PDIF out cable and
connect to a decoder’s coaxial input port (This cable needs customization).
2 Power Button
Long press On / Off, short press On / Off display.
3 Volume +
Short press once to increase one level of volume, long press to increase the
volume until the maximum.
4 Volume -
Short press once to reduce one level of volume, a long press to reduce the
volume until the minimum.
5 Reset Button
When the player crashes or other abnormalities appears, you can poke the reset
button to restart the player.
6 SD Card Slot
Micro SD card slot, maximum support 256GB SD card.
7 LINE OUT / Coaxial Output Onterface
When set to LO in the Setup, it is a LINE OUT output that provides a high-quality
sound source, when connected, the volume can be set to Adjustable or Auto
Max; when set to S/PDIF, it becomes a coaxial audio output, volume cannot be
adjusted.
8 PHONE Jack (3.5mm)
Can connect with 16-300 ohm impedance headphones, unplug the headset will
automatically stop playing.
9 Balanced Jack (2.5mm)
Can connect with 16-300 ohm impedance headphones, unplug the headset will
automatically stop playing music.
10 Next / Down (witch Button)
1. HD 2.4-inch IPS screen, 7H hardness glass, effective anti-scratch while
maintaining the sharpness of screen.
2. DAC using ESS9018K2M.
3. File format:
1) Support .ISO & .DFF & .DSF format, maximum support native DSD256;
2) Support DXD format, up to 384KHz/32Bit;
3) Support lossless format FLAC, APE, WAV, ALAC, AIFF, support up to
384KHz/32Bit;
4) Support lossy format MP3, WMA, AAC and other formats;
5) Support CUE, M3U, M3U8 files;
4. 10-level custom EQ adjustments.
5. Support SD card up to 256GB.
6.The sound stage is broader from the Balanced output, and the background is
purer.
7. Bi-directional Bluetooth 4.0 transmission, support for Apt-x Bluetooth protocol.
8. Hiby Link function.
9. Support car play mode.
10. Bidirectional USB Type-C interface, keep pace with the times.
11. Dual active ultra-low phase noise oscillator as clock source.
12. Optimized power circuit design.
13. CNC aluminum alloy shell.
1
2
3
4
5
6
10
11
12
13
14
7 8 9
In the playback interface, short press cut to next song, long press fast forward;
non-playing interface for flipping down to select menu items.
11 Play / Pause / Confirm Button
Short press Play / Pause in playback interface, short press to confirm in setting
interface, adjust setting value or save for use.
12 Previous / Up (Switch Button)
In the playback interface, short press cut to previous song, long press fast
forward; non-playing interface for flipping up to select menu items.
13 Back Key
Enter the menu, press the Back key to return to the previous menu; in the music
player interface or other user interface, long press the back button for 2 seconds
to return to the main menu interface.
14 Shortcut
Short press to pop up / close the current interface’s shortcut menu, but short
press in the main interface is to enter the Playback Settings.
Set the volume limit to play music to prevent excessive volume to hurt hearing
caused by misoperation.
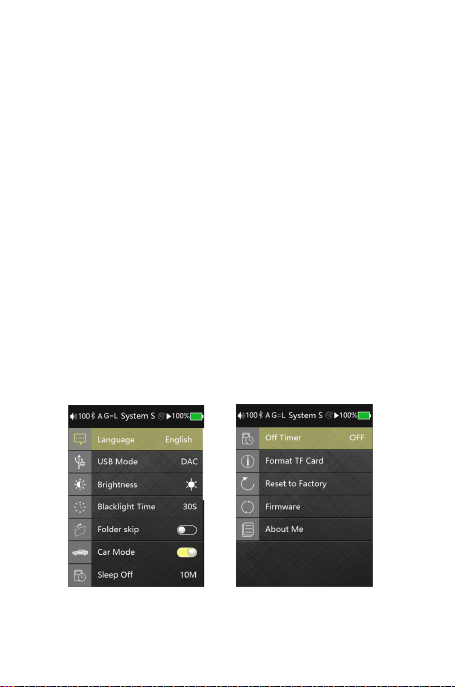
13) Default Volume Mode
There are Default and Memory two modes. Default mode means the player will
power on with the default volume you set. Memory mode means the player will
memorize the volume value and power on with it.
14) Default Volume
Here you can customize the default volume value.
15) Channel Balance
Short press the OK button pop-up channel balance adjustment window,
maximum support ten levels of adjustment for both channel.
16) Lyrics Display
When this function is turned on, the lyrics can be displayed on the playback
page when playing.
17) Cover Display
When this function is turned on, will show album cover when playing, show the
system default cover when this function is off.
2
2, USB AUDIO OUT support up to DSD256 original code, PCM 384KHz/32Bit
output.
6) Equalizer (EQ)
Press OK to enter the EQ menu for EQ adjustment:
Press the Switch key to EQ mode selection,
EQ modes include: Rock, Classic, Jazz, Pop, Dance,
Vocals, Blues, Metal, etc.; Each frequency can be
precisely adjusted under Custom mode:
①, Press the OK button to enter the Custom mode
②, Press the switch button to select the frequency
band to be adjusted.
③, Press the OK button, confirm the selected frequency band, use Switch key
to adjust, after one frequency band adjustment is completed, press the OK key
to confirm this frequency band adjustment is completed.
④, Repeat the second, third step to adjust other frequency.
7) Play Mode
Play mode: Sequence, Repeat all, Random play, Repeat 1.
8) Output Selection
There are two output methods, Spdif and Line out.
9) Line out Adjustment
When connecting Line out output, the volume of the player can be adjusted after
the switch is turned on. When this switch is off, system default to the maximum
volume and cannot be adjusted.
10) Pointbreak Playback
There are three modes for Pointbreak Playback: Off, Track, and Location; when
selected the Track mode, after restart, the player will be playing the same song
from the beginning,00:00, and it select the Location mode, the player would
memorize the location of the track and start from there.
11) Seamless Playback
Seamless Playback is mainly for the player to automatically switch tracks
smoothly, more user-friendly continuous enjoy high-quality music.
12) Maximum Volume