manuals.online logo
Brands
  1. Home
  2. •
  3. Brands
  4. •
  5. XM Satellite Radio
  6. •
  7. Car Receiver
  8. •
  9. XM Satellite Radio XpressR XMCK-20P User manual

XM Satellite Radio XpressR XMCK-20P User manual

user guide
XMCK-20P
Quick Start
1. Set up your XpressR
2. Activate your XM subscription online http://activate.xmradio.com or by
phone 1 800 XM RADIO (1-800-967-2346 )
3. Listen to XM*
4. Manage your channels using presets
Quick Start
2
*Hardware and required monthly subscription sold separately. Installation cost and other fees and taxes, including a one-time activation fee
may apply. Subscription fee is consumer only. XM products, programming, services, and fees are subject to change, at any time, without no-
tice. Channels with frequent explicit language are indicated with an XL. Channel blocking is available for XM radio receivers by calling 1-
800-XM-RADIO. Subscriptions subject to Customer Agreement available at xmradio.com. XM service only available in the 48 contiguous
United States. ©2007 XM Satellite Radio Inc. All rights reserved.
Contents
3
IInnttrroodduuccttiioonn.............................................. 4
eatures............................................................ 4
Safety Instructions........................................ 5
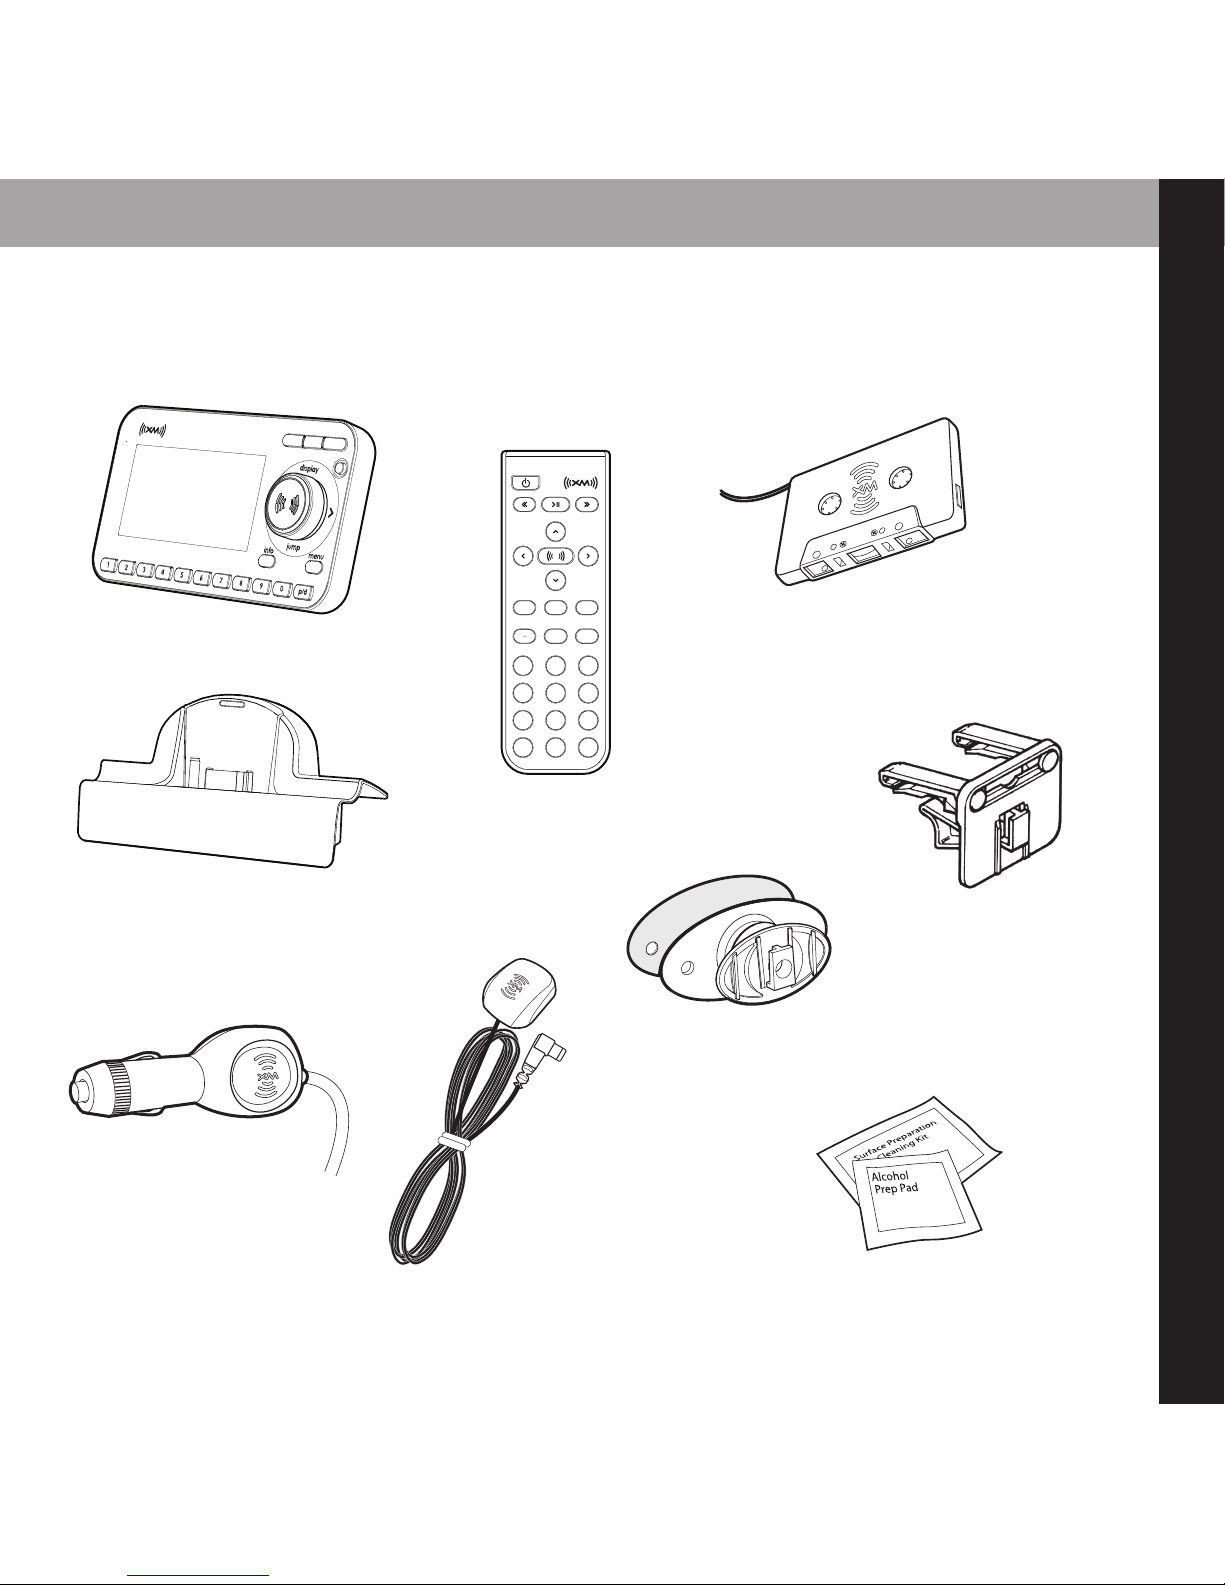
What’s in the Box .......................................... 7
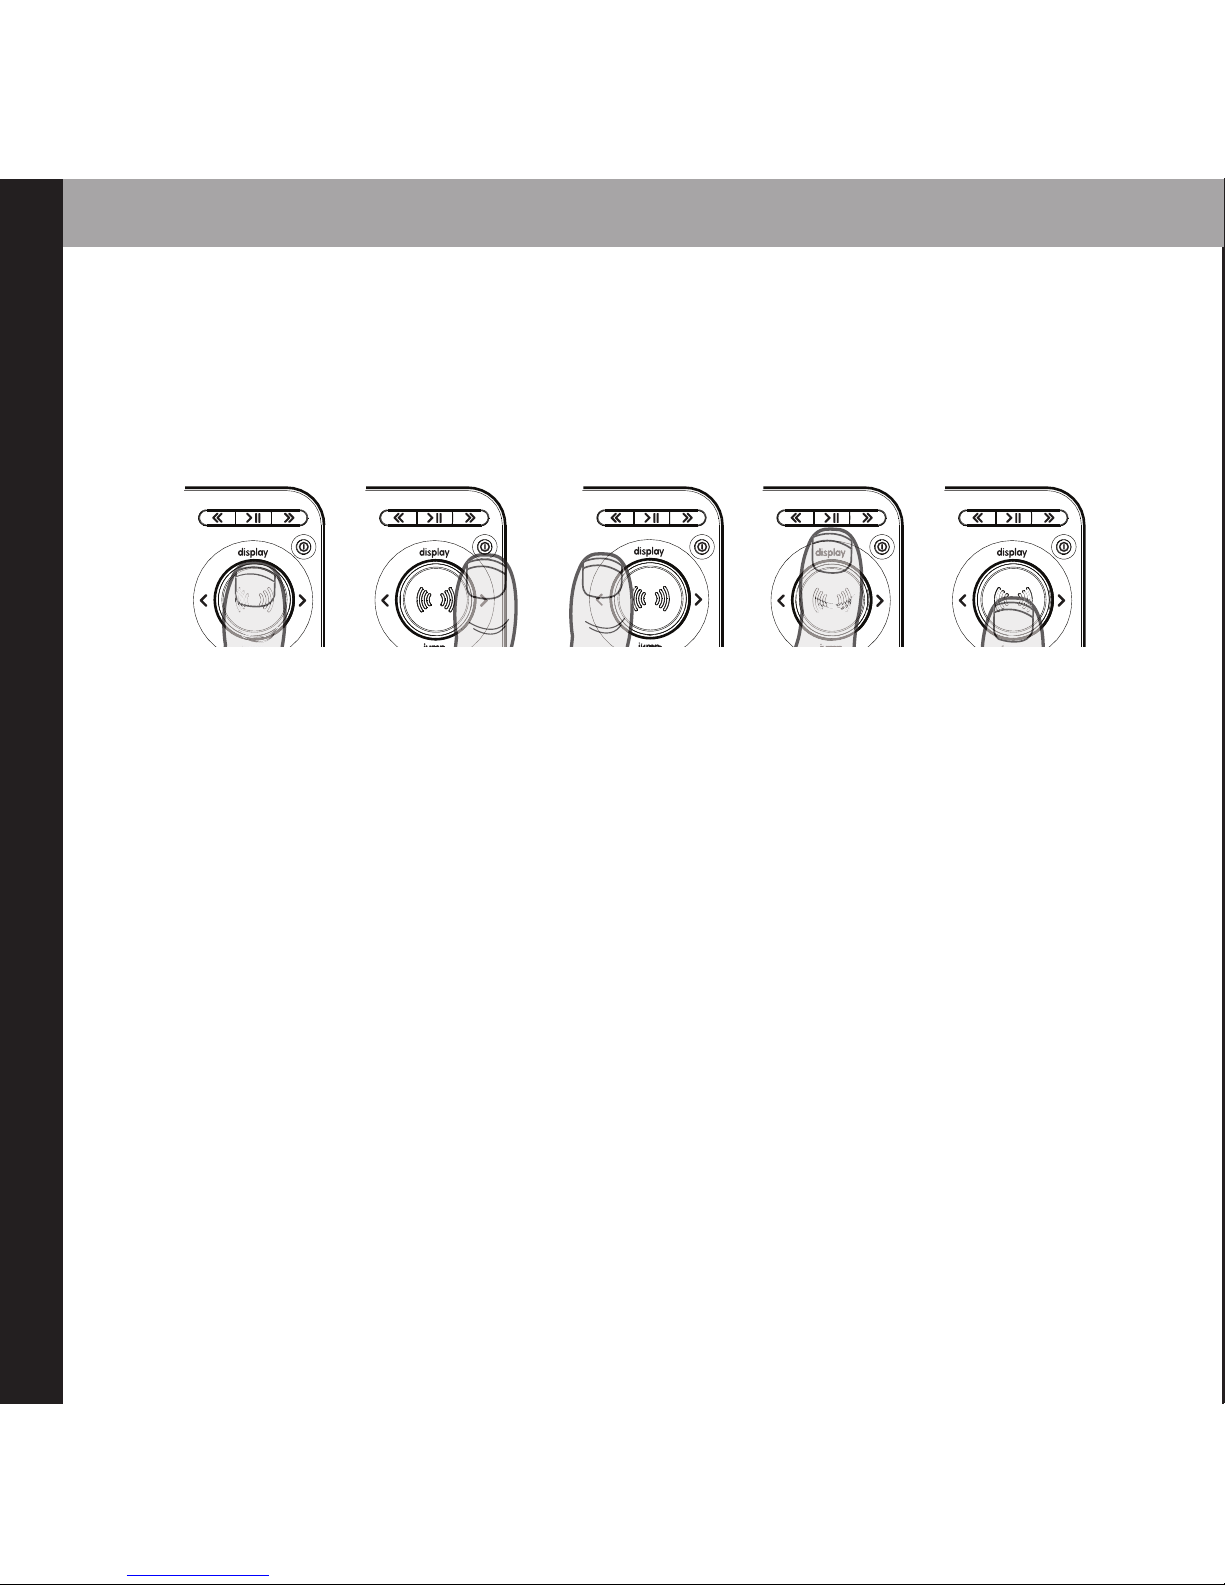
XpressRControls ............................................ 8
Remote ............................................................ 9
Using this Guide ........................................ 10
VVeehhiiccllee IInnssttaallllaattiioonn............................ 11
Mounting the XM Antenna .................... 14
Installing the Vent or Swivel Mount .... 15
How to Receive XM Through your Car’s
Stereo ............................................................ 17
Making Your M Radio an XM Radio .. 20
AAccttiivvaattiioonn..................................................23
UUssiinngg yyoouurr XXpprreessssRR............................ 25
XXpprreessssRRCCoonnttrroollss
Listening to Live XM.................................. 26
Direct Entry .................................................. 27
Using Presets................................................ 27
Categories .................................................... 28
Jump .............................................................. 28
Info .................................................................. 29
Display............................................................ 29
30-Minute Replay ...................................... 31
TuneSelect .................................................... 34
MMeennuu OOppttiioonnss............................................ 35
Change Display .......................................... 35
Edit Alerts...................................................... 37
Stocks ............................................................ 39
Info Extras .................................................... 40
Channel Access .......................................... 41
Antenna Aiming ........................................ 44
Set Time ........................................................ 44
actory Defaults.......................................... 47
M Modulator.............................................. 47
Line Out ........................................................ 49
Set Tone ........................................................ 50
CCuussttoommeerr uuppppoorrtt.............................. 51
Troubleshooting ........................................ 52
Specifications .............................................. 54
Product Registration ................................ 56
Patent Information .................................... 57
FFCCCC ttaatteemmeenntt...................................... 58
WWaarrrraannttyy.................................................... 59
4
introduction
Features
Congratulations on your purchase of the Audiovox XpressR. Your new XpressR
includes:
Multi channel monitoring, view six channels at once
View current and previous channels at the same time
Shortcut to M frequencies
Scan music category
30 minute Replay- Pause and replay up to 30 mintues of live broadcast.
GameSelect- inds your favorite sport and team events.
TuneSelect- inds your favorite songs by song title or artist name if they are currently
playing on any XM channel.
Personalized Stock and Sports Tickers- Track your favorite stocks and sports scores on
your XpressR’s display while listening to your favorite music.
A bright, white LED backlit display with “Auto Dimming” capabilities.
Enjoy XM’s 170 channels from coast to coast, with over 80,000 hours of entertainment
each month. XM offers musical choice, variety, and discovery – worlds beyond your
own collection – plus a wide range of news, sports, talk, comedy, kids, and entertain-
ment channels. Hear XM live, or replay what you missed.
We recommend that you read the entire manual before using your XpressR.
introduction
5
Safety Instructions
Plea e read and under tand all the in truction to avoid injury to your elf and/or damage
to your Xpre R. Plea e be aware that XM claim no re pon ibility for damage from data
lo due to breakdown, repair, or
other cau e .
XXpprreessssRRDDiiggiittaall AAuuddiioo PPllaayyeerr
 Do not expose to extreme temperatures (above 140° or below -4° , or above 60°C
or below -20°C).
 Do not expose to moisture. Do not use XpressRnear or in water.
 Do not let any foreign matter spill into XpressR.
 Do not expose to chemicals such as benzene and thinners. Do not use liquid or
aerosol cleaners. Clean with a soft damp cloth only.
 Do not expose to direct sunlight, fire, flame or other heat sources for a prolonged
period.
 Do not try to disassemble and/or repair XpressRyourself.
 Do not drop your XpressRor subject it to severe impact.
 Do not place heavy objects on XpressR.
 Do not subject XpressRto excessive pressure.
 Do not touch the XpressRwith wet hands.
 Do not store in dusty areas.
6
CCaauuttiioonn::Opening the case may result in electric shock.
CCaauuttiioonn::The uninsulated parts inside the power adapter and cradle may cause electric
shock or fire. or your safety, please do not open these components. Do not let metallic
objects, such as necklaces or coins, come into contact with the power adapter plugs.
CCaauuttiioonn::To avoid electric shock, use the power adapter only with an outlet that
matches the shape of the adapter’s plug.
CCaauuttiioonn::Make sure that you insert the adapter’s plug all the way into the outlet.
CCaauuttiioonn::Do not plug several devices into the same electrical outlet.
IImmppoorrttaanntt::Always read and understand the user guide to prevent problems.
WWaarrnniinngg::Use the power adapter and cradle away from water sources to avoid fire or
electric shock.
EEnnvviirroonnmmeennttaall IInnffoorrmmaattiioonn
ollow local guidelines for waste disposal when discarding packaging and electronic
appliances.
Your Satellite Radio receiver is packaged with cardboard, polyethylene, etc., and does
not contain any unnecessary materials.
WWaarrnniinnggss
When using this product it is always important to keep your eyes on the road and
hands on the wheel. Not doing so could result in personal injury, death, and/or dam-
age to your XpressRReceiver, accessories, and/or to your vehicle or other property.
XpressRshould be placed in your vehicle where it will not interfere with the function of
safety features, e.g., deployment of airbags. ailure to correctly place XpressRmay re-
sult in injury to you or others if the unit becomes detached during an accident and/or
obstructs the deployment of an airbag.
introduction
introduction
7
What’s in the Box?
8
5
2
7
4
1
9
6
3
mute
info menu
display
0
jump p/d
+
XpressR
Car Cradle
Car Power Adapter
Remote Control
XM Car Antenna
Cassette Adapter
Swivel Mount
Vent Mount
Swivel Mount Preparation Kit
introduction
8
3300--MMiinnuuttee RReeppllaayy BBuuttttoonnss
Pause and replay up to 30
minutes of live XM broadcast.
XpressRFunctions
PPoowweerr BBuuttttoonn
DDiissppllaayy
Changes the way content is
viewed on the display.
LLeefftt aanndd RRiigghhtt AArrrroowwss
Search for channels by
category.
55--wwaayy NNaavviiggaattiioonn KKnnoobb
Previews channels; also selects
various menu options.
MMeennuu
Access advanced features
and configuration options.
XXMM BBuuttttoonn
Confirms selection for chan-
nel and menu items also press
and hold to TuneSelect.
PPrreesseett//DDiirreecctt
Selects between direct
channel entry and up to 30
presets.
JJuummpp
Switches between
current channel and
previous channel.
IInnffoo
Displays either your
personal stock or info
extras information.
NNuummbbeerr KKeeyyss
Enter a channel di-
rectly or select your
favorite preset.
introduction
9
8
5
2
7
4
1
9
6
3
mute
info menu
display
0
jump p/d
+
Remote Control Functions
3300--MMiinnuuttee RReeppllaayy BBuuttttoonnss
Pause and replay up to 30
minutes of live XM broadcast
PPoowweerr BBuuttttoonn
DDiissppllaayy
Changes the way content
is viewed on the display
AArrrrooww BBuuttttoonnss
Select menu entries,
change channels.
MMeennuu
Access advanced features
and configuration options.
XXMM BBuuttttoonn
Confirms selected channel
or menu options.
PPrreesseett//DDiirreecctt
Selects between direct
channel entry and up to 30
presets.
JJuummpp
Switches between current
channel and previous chan-
nel
iinnffoo
Displays either your personal
stock or info extras informa-
tion.
NNuummbbeerr KKeeyyss
Enter a channel directly
or select your favorite
preset.
++ aanndd --
Change channels or control
volume for audio system
(sold separately)
MMuuttee
Silences live or replayed
XM content.
introduction
10
Usin the 5-way Navi ation Knob
The knob not only rotates, but it toggles. To toggle the knob, press on the edge and in the
direction you want to toggle.
Usin This Guide
Throughout this guide, you will see instructions such as Select MMeennuuAAnntteennnnaa AAiimmiinngg.
This tells you to perform the following actions:
1. Press the MMeennuubutton.
2. You will see a menu icon that represents “Antenna Aiming.” Rotate knob to highlight
Antenna Aiming, then press the XM button to select it.
Not all of the menu items described in this guide may appear on your XpressRdisplay.
Some menu items will only be seen when XpressRis used in an accessory home kit or
boombox (Sold Separately).
Toggle right Toggle left Toggle up Toggle downPress center button
(XM button)
vehicle installation
11
1
vehicle installation
12
Vehicle installation
Every vehicle i different; for your afety, follow all in truction carefully. Con ult a
profe ional in taller if you have que tion .
1. To begin, first decide which method of installation is best for your vehicle:
Cassette Adapter (Included): Use the cassette adapter if your vehicle’s audio system
has a built in cassette player.
XM ureConnect ( old eparately): You can listen to your XpressRthrough your car
stereo by using XpressR’s built-in M modulator and the XM SureConnect. Simply find
an unused M frequency on the stereo and set your XpressRto transmit on that same
frequency.
FM Direct Adapter ( old eparately): The third option is the M Direct Adapter. We
recommend professional installation if you choose to use this method of install.
Audio input: Some vehicles come with an audio input jack. If your vehicle has this
type of input you can simply use a mini audio cable (sold separately).
vehicle installation
13
2. Once you have chosen your method of installation, next decide where in your vehicle
you would like to mount your XpressR. The two included methods are vent mount
and swivel mount:
3. Next decide the best location for your XM antenna. Mount this antenna to the
roof or trunk of the vehicle. During installation, make sure you are outdoors and the
antenna is not obstructed by tall buildings.
4. inally you will connect all of the plugs to the car cradle and lock your XpressRinto
place. Once in place you can activate your XpressR
Now that you have all of the parts you need, you are ready to begin installing your
XpressR.
Swivel MountVent Mount
tep 1: Mounting the XM Antenna
Mount the XM antenna to the roof or trunk of the vehicle. During installation,
make sure you are outdoors and the antenna is not obstructed by tall buildings.
or best results mount the XM antenna to the outside of your vehicle. Below are
the recommended options.
The XM antenna contains a strong magnet, allowing
it to stick to any metal parts of your vehicle.
vehicle installation
14
Magnet
option 1
option 2
Keep excess cable
behind or under
the dashboard.
tep 2: Installing the Vent Mount or wivel Mount
Installing the vent mount
To install the vent mount, find a horizontal vent that is strong enough to hold your
XpressRand car cradle. To remove the vent mount, push it into the vent and lift upwards
slightly to release the mount’s hooks from the vent vane.
Some parts of the vent mount can be adjusted
to better suit your vent.
vehicle installation
15
vehicle installation
16
Installing the swivel mount
To install the swivel mount, first find a suitable location. The swivel mount’s adhesive is
very strong and may be difficult to remove. Do not install this mount on leather sur-
faces and make sure the air temperature is at least 60° (15°C).
Clean the mounting surfaces with the
surface preparation kit.
Peel away the adhesive liner and firmly press the
swivel mount to the surface for 30 seconds. Allow
24 hours before using the mount
adhesive liner
vehicle installation
17
You can orient your swivel different ways
to accommodate the space available in
your vehicle.
If you need to remove the mount, carefully lift the adhesive pad with your fingers or a
spoon. Warming with a hair dryer for several minutes will help soften the adhesive. Your
swivel mount comes with an extra adhesive pad.
tep 3: How to receive XM through your car stereo
There are several methods of receiving XM through your car stereo
Cassette Adapter (Included): Use the cassette adapter if your vehicle’s audio system
has a built in cassette player.
You can adjust this screw to adjust
the tension of the mount with a
screwdriver.
vehicle installation
18
XM ureConnect ( old eparately): You can listen to your XpressRthrough your vehicle’s
audio system by using XpressR’s built-in M modulator and the XM SureConnect. Simply
find an unused M frequency on the stereo and set your XpressRto transmit on that same
frequency.
Professional Wired ( old eparately): The third option is the M Direct Adapter. We rec-
ommend professional installation if you choose to use this method of install.
Audio input: Some vehicles come with an audio input jack. If your vehicle has this type of
input you can simply use a mini audio cable (sold separately).
Plug the antenna, power adapter, and either the cassette adapter into the car cradle as
shown on the next page. The M Direct Adapter and the XM SureConnect are not pictured.
ANT IN
AUDIO OUT
AANNTT IINN
Plug in your XM antenna here. If
you choose the XM SureConnect
method of install, this is where
you plug it in.
AAUUDDIIOO OOUUTT
If you choose to use a cassette
adapter or a mini audio cable,
plug it in here.
DDCC IINN
This is where you plug in the
power adapter.
DC IN
vehicle installation
19
ANTINAUDIOOUT
DCIN
This is the set up if you choose to use the included cassette adapter.
ANT IN AUDIO OUT
If you haven’t already done so, hook the car cradle to the mount. Next slide your
XpressRinto the car cradle.
vehicle installation
20
Now that your XpressRis all set up, it is time to power it up. If you are using the XM
SureConnect you will need to read Step 4. If you are using the cassette adapter you are
all finished and ready to move on to activation on page 24.
tep 4: Making Your Vehicle’s FM Radio an XM Radio
Your XpressRcontains a built-in M modulator that requires the use of either the XM
SureConnect (sold separately) or the M Direct Adapter (sold separately) to transmit
the XM audio signal to your vehicle’s M radio.
The factory default setting for your XpressRis FM Modulator (Off). ollow the menu
instructions to change the menu setting to FM Modulator (On).
Turn on your car stereo. You will need to find a suitable M frequency in order to get
the best sound. A suitable M frequency is an unused frequency or weak station that is
not located near a strong M station in your area. ollow the steps below for more
help:
1. Go to www.xmradio.com/fmlocator for recommended M frequencies in your
area.
2. Enter your local USPS Zip Code.
3. You will see the recommended M frequencies in your area. Try the “vacant” chan-
nels first.
4. Set your vehicle’s M radio to one of the recommended frequencies. Now set your
XM receiver to the same frequency using the menu settings. or more information,
see M requency on page 47.
5. If the audio quality is not satisfactory, you can repeat these steps by choosing an-
other frequency.

Other manuals for XpressR XMCK-20P

1

Other XM Satellite Radio Car Receiver manuals

XM Satellite Radio CommanderMT XMRVRFM002 User manual

XM Satellite Radio

XM Satellite Radio CommanderMT XMRVRFM002 User manual

XM Satellite Radio XMR6910 User manual

XM Satellite Radio

XM Satellite Radio XMR6910 User manual

XM Satellite Radio XM-RVR-FM-001 User manual

XM Satellite Radio

XM Satellite Radio XM-RVR-FM-001 User manual

XM Satellite Radio onyX XDNX1 User manual

XM Satellite Radio

XM Satellite Radio onyX XDNX1 User manual

XM Satellite Radio XpressR XMCK-20P User manual

XM Satellite Radio

XM Satellite Radio XpressR XMCK-20P User manual

XM Satellite Radio XM SureConnect User manual

XM Satellite Radio

XM Satellite Radio XM SureConnect User manual

XM Satellite Radio XMC10 User manual

XM Satellite Radio

XM Satellite Radio XMC10 User manual

Popular Car Receiver manuals by other brands

LG LAC5800RP manual

LG

LG LAC5800RP manual

Kenwood KRC-PS979R instruction manual

Kenwood

Kenwood KRC-PS979R instruction manual

JVC KS-FX385S instructions

JVC

JVC KS-FX385S instructions

Alpine CDE-177BT Quick reference guide

Alpine

Alpine CDE-177BT Quick reference guide

Boss Audio Systems BV9370NV user manual

Boss Audio Systems

Boss Audio Systems BV9370NV user manual

AXTON A101 Installation & operation manual

AXTON

AXTON A101 Installation & operation manual

Kenwood DPX-8020MD Service manual

Kenwood

Kenwood DPX-8020MD Service manual

Clarion FB278RBT owner's manual

Clarion

Clarion FB278RBT owner's manual

Sony CDX-2250 - Cd Changer Service manual

Sony

Sony CDX-2250 - Cd Changer Service manual

Pioneer DEH-X66BT Service manual

Pioneer

Pioneer DEH-X66BT Service manual

Mercedes-Benz Audio 10 operating instructions

Mercedes-Benz

Mercedes-Benz Audio 10 operating instructions

Blaupunkt Concept Pro II Operating and installation instructions

Blaupunkt

Blaupunkt Concept Pro II Operating and installation instructions

Sony XR-5W497RB Service manual

Sony

Sony XR-5W497RB Service manual

Alpine IVA-C800R owner's manual

Alpine

Alpine IVA-C800R owner's manual

SoundMax SM-CMMD7000 instruction manual

SoundMax

SoundMax SM-CMMD7000 instruction manual

Magellan RoadMate N477 user manual

Magellan

Magellan RoadMate N477 user manual

Kenwood KDC-116S Service manual

Kenwood

Kenwood KDC-116S Service manual

Kenwood KDC-4080R Service manual

Kenwood

Kenwood KDC-4080R Service manual

manuals.online logo
manuals.online logoBrands
  • About & Mission
  • Contact us
  • Privacy Policy
  • Terms and Conditions

Copyright 2025 Manuals.Online. All Rights Reserved.