Xstatic Pro Lighting X-BTRI3W24 IRC User manual


2
High Power Outdoor Bar Washer,
24 RGB 3Watt LED Fixture User Manual

3
The IP Code (or International Protection Rating) consists of the
letters IP followed by two digits and an optional letter. As dened
in international standard IEC 60529, it classies the degrees of
protection provided against the intrusion of solid objects (including
body parts like hands and ngers), dust, accidental contact, and
water in electrical enclosures.
The rst number following IP indicates rating against intrusion
of Solids, while the second number rates uid resistance. Any
indoor light xture, professional grade or otherwise, would have
an IP20 rating, and is considered non-weather resistant.
IP66 Rating; Outdoor Fixture enclosure is protected from total
dust ingress, and protected from high pressure water jets from
any direction, and general weather.
CAUTION! READ BEFORE USE!
SAFETY INSTRUCTIONS:

4
FEATURES:
Please Note: Specications and improvements in
the design of this unit and this manual are subject
to change without any prior written notice.

5
● Voltage: 100V~240V, 50Hz~60Hz
● LEDs: 24 Tri-Color RGB @3W ea.
● Power Consumption: 80W
● Weight: 14.3 lbs / 6.5Kgs
● Dimensions: 45” x 4.5” x 4.5” / 114cm x 12cm x 12cm
● DMX In and Out
● LCD Control Screen with 3 navigation buttons
● Beam Angle: 40 degrees
TECHNICAL SPECIFICATIONS:

6
POWER and DMX Connections
The xture utilizes IP66 rated connectors to ensure proper operation
under various outdoor weather conditions. When connecting to the unit
from your source control, make sure your output connections are also in
a secure and controlled environment.
DMX and Power IN adapters allow for
connecting to your DMX control and pow-
er source.
POWER INSTRUCTIONS:
Based on standard 3-pin DMX connections, and using the DMX to IP
connector adaptor cable, you can link control and/or slave your lights into
a single, large array.
DMX-IN to IP adapter cable
Power and DMX IN ports on
xture housing
IP and DMX IN connectors

7
LINKING / DAISY CHAIN
DMX and Power Out Ports found on the
opposite end of the housing allow for
connecting more than one xture. For
Power linking, you can connect up to
20 units with using 110volts, and up to
38 units using 240volts.
DMX Linking allows for up to 30 units in a
chain without using a repeater or amplier.
OTHER DMX DEVICES
DMX and Power Out adapters allow for con-
necting other DMX enabled xtures and devices
to be used in your DMX chain.
POWER INSTRUCTIONS:
IP-to-IP DMX extension,
or linking cable
IP to DMX OUT adapter
Power and DMX Out Ports
BUILDING A DMX CHAIN
Connect two more more xtures with IP-DMX and Power Extension cables,
and enable the xtures in either DMX Channel or Slave mode. Below is an
example of the xture congurations:

8
MENU / CONTROLS:
SETUP MENU: You can easily setup and control your CHAMELEON LED
Bar from the on-board LCD screen. Using the MENU, SETUP, UP and
DOWN buttons, you will nd the following options to select and modify:
LED DISPLAY OPERATION - These instructions will provide access to
the setup and control of the DMX light.
1. PROGRAM MODE
To select a Static Color, press and hold the MENU (A) button until display
reads P.0 1., then tap A again to choose between options in Program 01 for
Static Color codes, and Flash or Strobe speed. Use the UP or DOWN (B or
C) buttons to increase or decrease each color value to choose the desired
hue, selecting between 8 colors reading 1.-r, 2.rg, 3.rg, 4.-g, 5.gb, 6.-b, 7.rb,
and 8.rg values.
Tap the MENU (A) button again until display shows F.00, to control the Flash
Speed from F.00 to F.99.
CHOOSING PROGRAMS:
The xture comes with 14 built-in programs titled P.02 - p. 14, with P.0 1 being
static color selection mode. While in the programs, the user can also set the
operation and strobe speeds. These presets will run in loop until stopped.
Press and hold the MENU (A) button until display reads P.0 1. Then use the
UP or DOWN (B or C) buttons to increase or decrease each program num-
ber value.
Tap the MENU (A) button again until display shows F.00, to control the Flash
Speed from F.00 to F.99. Tap the MENU (A) button again until display shows
S.00, to control the Program Speed from S.00 to S.99.
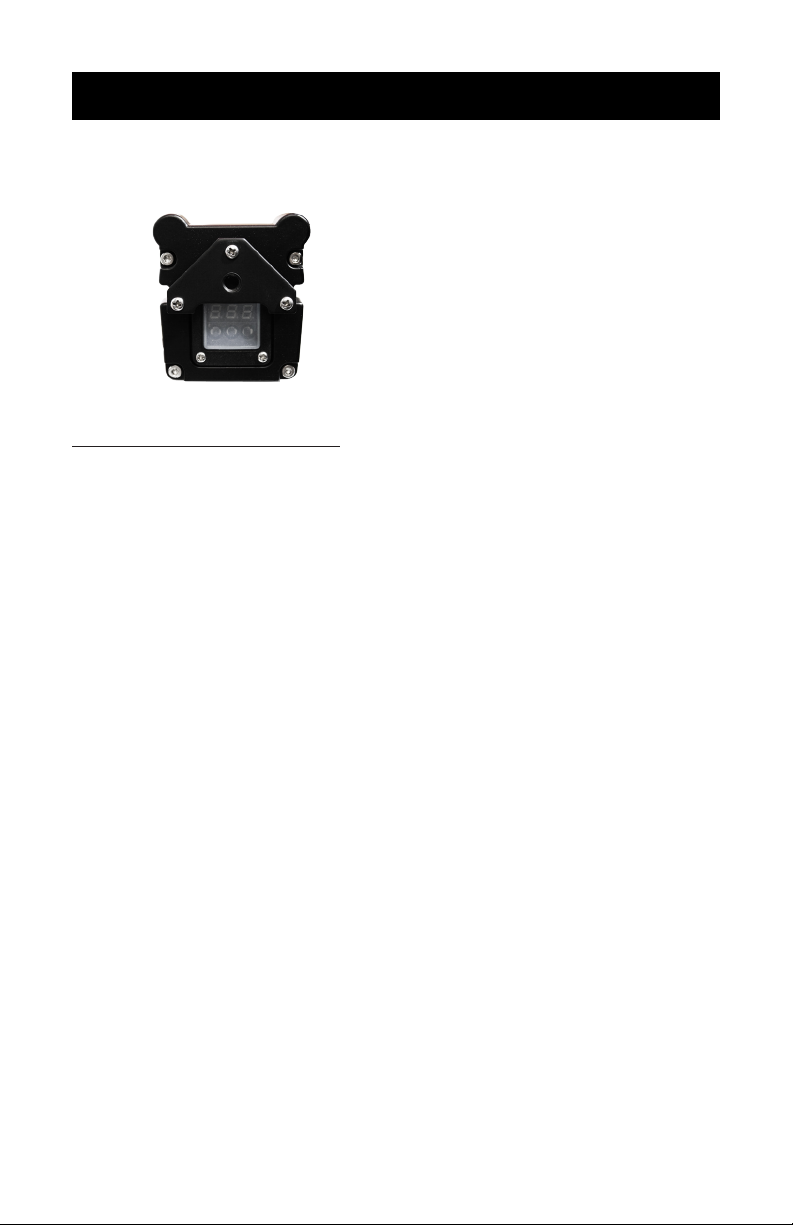
The Control Screen with MENU (A),
UP (B), and DOWN (C) Navigation
buttons. Found at end of xture.
If you do not nd this panel at one
end, look on other end.

9
MENU OPTIONS CONT’D:
Note that this xture has DMX Auto Detection, so regardless of any other Mode
setting, if there is DMX signal present, it will automatically turn on it’s DMX Mode.
When DMX is no longer present, the xture returns to previous Mode setting
(infrared remote control also disabled when in DMX Mode).
3. DMX MODE
Press and hold the MENU or A button until the next Menu selection appears.
Repeat until
001
displays on the Menu screen.
Here, you can select the DMX Channel by pressing the UP and DOWN (B
and C) buttons and selecting
001
-
512
. By default, the xture uses a 2
Channel Conguration.
Tap the A button to enter menu to select which DMX Program Setup to uti-
lize. Choose either Dp 1, Dp2, Dp3, or Dp4. (DMX Charts on page 10).
2. AUTO MODE
Press and hold the MENU, or A button, until the next Menu selection ap-
pears. Repeat until
AUT
displays on the Menu screen.
Tapping the A button again allows you to enter the Program Operation
Speed settings. You can scroll through S.0 1 to the highest speed at S.fl
(1-99).
Tap the MENU (A) button again until display shows F.00, to control the
Flash Speed from F.00 to F.99.
Tap the MENU (A) button again until display shows T.00, to control the Fade
Time from T00 to T99.
4. SLAVE MODE
Press and hold the MENU, or A button, to navigate the Menu selection until
SLA
displays on the Menu screen. The xture will then be slaved to which
ever lead device is being controlled.
Repeat this step to exit Slave Mode. Each xture acts as a Master when
not in Slave Mode.

10
DMX SETUP CHARTS
6. DMX SETUP MODE OPTIONS
These charts detail DMX setting options to access preset programs and
channel control assignments.
DMX Setup Mode 1: 3 Channel (DP1 / dp 1)
CH1 CH2 CH3
R G B
0-255 Light
(0 = OFF)
0-255 Light
(0 = OFF)
0-255 Light
(0 = OFF)
DMX Setup Mode 2: 14 Channel (DP2 / dp2)
CH1 CH2 CH3 CH4 CH5 CH6 CH7
R G B R G B R
0-255 Light
(0 = OFF)
0-255 Light
(0 = OFF)
0-255 Light
(0 = OFF)
0-255 Light
(0 = OFF)
0-255 Light
(0 = OFF)
0-255 Light
(0 = OFF)
0-255 Light
(0 = OFF)
CH8 CH9 CH10 CH11 CH12 CH13 CH14
G B R G B Flash Master
0-255 Light
(0 = OFF)
0-255 Light
(0 = OFF)
0-255 Light
(0 = OFF)
0-255 Light
(0 = OFF)
0-255 Light
(0 = OFF)
0-255 Light
(0 = OFF)
0-255 Light
(0 = OFF)
DMX Setup Mode 3: 7 Channel (DP3 / Dp3)
CH1 CH2 CH3 CH4 CH5 CH6 CH7
R G B No. DMX
Value
Function Speed Flash Master
0-255
Light
(0 =
OFF)
0-255
Light
(0 =
OFF)
0-255
Light
(0 =
OFF)
10-9 Off
Speed
0-255
Flash
0-255
0-255
Light
(0 = OFF)
210-19 Red
3 20-29 Yellow
4 30-39 Green
5 40-49 Cyan
6 50-59 Blue
7 60-69 Purple
870-79 White

11
DMX Setup Mode 3 (continued): 7 Channel (DP3 / Dp3)
CH1 CH2 CH3 CH4 CH5 CH6 CH7
R G B No. DMX
Value
Function Speed Flash Master
0-255
Light
(0 =
OFF)
0-255
Light
(0 =
OFF)
0-255
Light
(0 =
OFF)
980-89 Program 01
Speed
0-255
Flash
0-255
0-255
Light
(0 = OFF)
10 90-99 Program 02
11 100-109 Program 03
12 110-119 Program 04
13 120-129 Program 05
14 130-139 Program 06
15 140-149 Program 07
16 150-159 Program 08
17 160-169 Program 09
18 170-179 Program 10
19 180-189 Program 11
20 190-199 Program 12
21 200-209 Program 13
22 210-219 Program 14
23 220-229 Program 15
24 230-255 Program 16
DMX Setup Mode 4: 12 Channel (DP4 / dp4)
CH1 CH2 CH3 CH4 CH5 CH6
R G B R G B
0-255 Light
(0 = OFF)
0-255 Light
(0 = OFF)
0-255 Light
(0 = OFF)
0-255 Light
(0 = OFF)
0-255 Light
(0 = OFF)
0-255 Light
(0 = OFF)
CH7 CH8 CH9 CH10 CH11 CH12
R G B R G B
0-255 Light
(0 = OFF)
0-255 Light
(0 = OFF)
0-255 Light
(0 = OFF)
0-255 Light
(0 = OFF)
0-255 Light
(0 = OFF)
0-255 Light
(0 = OFF)
DMX SETUP CONTINUED:

12
BLACK OUT All LEDs to On or Off state
AUTO Auto/Demo Mode
SOUND Sound Reactive Settings
STROBE Flash On/Off and Freq. Settings
SPEED Rate at which Colors Change
SENSITITY Level of Sound Reactivity
%Used for the Dimming Percentage
MANUAL Sets Manual Color Mode
FADE | SNAP Fades to Next Color, or Black
+ / - Increase or Decrease Selection
As described earlier in this manual, AUTO and SOUND modes are selected
and then navigated with the + or - buttons to make program selection.
Selecting STROBE, SPEED, or SENSITIVITY while the light is in AUTO or
SOUND Modes will adjust those settings under the currently chosen Preset
Program.
The % button is used to set the dimming level of the selected color, usually
used with a MANUAL button sequence.
Pressing the MANUAL button and a sequence of numbers will select various
settings. These are described on the next page.
FADE/SNAP allows the user to force a color change, but as a fade effect.
IR REMOTE CONTROL:
7. INFRARED REMOTE OPTIONS
Your xture comes with an Infrared Remote Control. This requires aim-
ing the remote forward and at the face of the light in order to send it your
selections.
The remote has two sections of control, settings and colors. Each has
the associated selection the light will enter upon pressing. They are
described here:

13
IR REMOTE CONTROL:
On Buttons 0-9, the LEDs will display the associated colors when select-
ed.
012 3456789
White Red Amber Yellow1 Green Cyan Blue Purple Pink Yellow2
DIMMING MODE
By selecting MANUAL and then a Color Button labeled with either R, G,
or B, you can create your own color mix by increasing or decreasing the
value of that single color. These buttons are outlined on the remote in
the form of an upside-down “T” shaped box. Pressing + or - will increase
the brightness.
Press the button “MANUAL”, then press down “R”, “G” or “B” or “2” to
enter dimming mode. Press “0”~“9” buttons in turn, enter a number value
between 0-100. Press the “%” button again, to conrm the number is the
percentage of the color. For example, press the “MANUAL” + “R” + “5” +
“0” + “%” in turn, set the red LED brightness is on at 50%.
NOTE
The numbered buttons are used as the number, like “2”, or a color like “Amber” allows the buttons
to have two functions. Press the “MANUAL” button and next press a number button, it is only
equivalent to it’s color, like “Amber”. If press “2” button in other time, is equivalent to press “2”
numeric button. For example: Press the “MANUAL” + “2” + “5” + “0” + “%” in turn, set the Amber
led brightness is 50% dimmed.
9. RESTORE FACTORY SETTINGS
Pressing BLACK OUT on the remote, then 9, 8, and 7 will reset the
xture to default factory settings.
8. CARING FOR YOUR FIXTURE

(NO DIRECT SALES, DEALERS AND DISTRIBUTORS ONLY)
Please Register your product warranty on ProXDirect.com,
submit your testimonials and setup photos to our website,
& Tag us on your social media websites.
#proxdirect
Table of contents
Other Xstatic Pro Lighting Dj Equipment manuals
Popular Dj Equipment manuals by other brands

Hercules
Hercules DJ CONSOLE user manual

Chauvet Professional
Chauvet Professional Rogue Outcast 1 Beam user manual

WISDOMLIT
WISDOMLIT QB-807 User instructions

Chauvet
Chauvet maverick mk1 spot user manual

Flash professional
Flash professional P8100002 user manual

Triton Blue
Triton Blue DIMMER 1 CANAL TR-D1 user manual