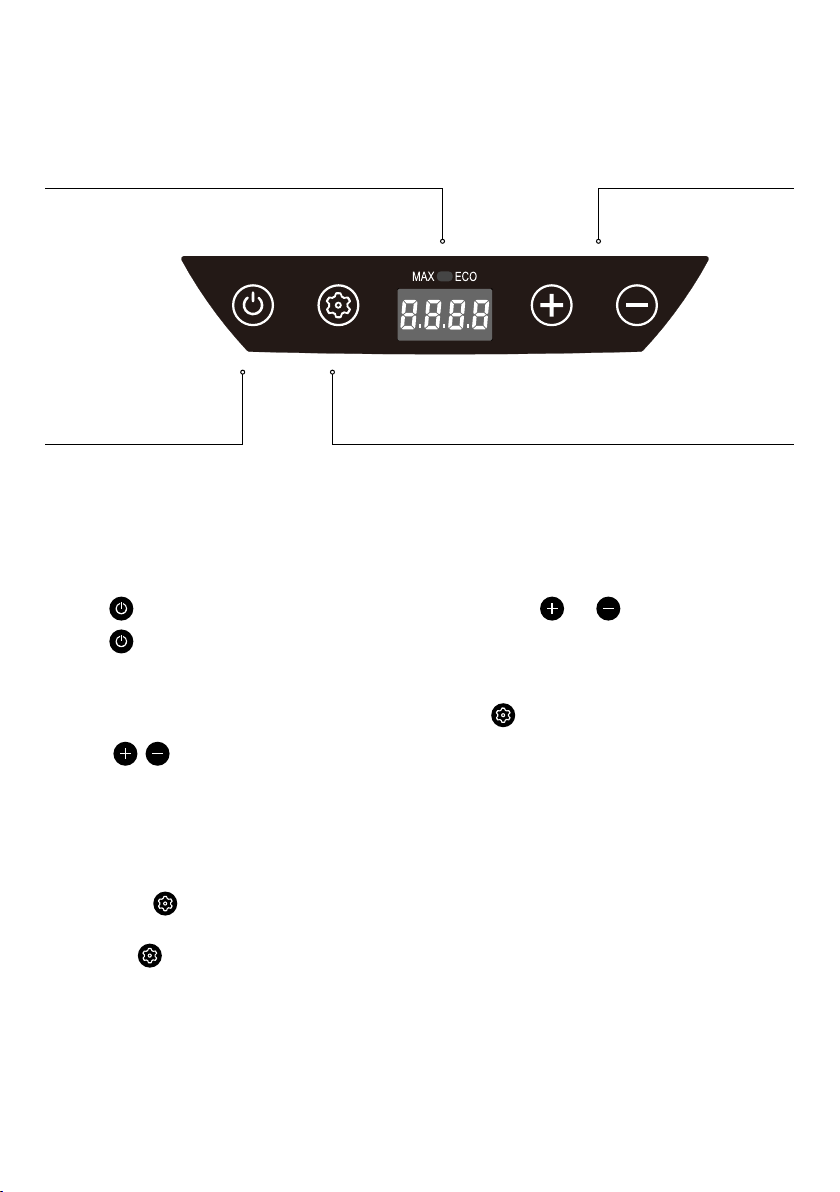
XTM DFR4020XTM User manual

04539 11/22
DRAWER
FRIDGE
30L
PLU 653329
DFR4020XTM

2 3
CONTENTS
Section Page
Contents 2
General Information & Safety Instructions 3
Appliance and Accessories 4
Installation 5
Power Requirements 6
Temperature Control 7
Temperature Control Unit 8
Using with Solar Panel or Generator 9
Tips and Suggestions 10
Trouble Shooting 11
Maintenance 11
INTRODUCTION
Dear Customer,
Thank you for purchasing this drawer fridge which has
passed through our extensive quality assurance processes.
Every care has been taken to ensure that it reaches you
in perfect condition. However, in the unlikely event that
you should experience a problem, or if you require any
assistance please do not hesitate to contact us;
If you have a problem, call customer service do not return
this portable fridge to the place of purchase.
Note: For convenience we suggest taking a photocopy of
your purchase receipt as the original may fade.
Due to continual product development, the actual product
may differ slightly from the product pictured.
CUSTOMER SERVICE
Australia: 1300 174 876
Operating times: Monday – Friday
8.00am - 5.00pm
Australian Eastern Standard Time (AEST)

2 3
GENERAL INFORMATION AND
SAFETY INSTRUCTIONS
Read this manual thoroughly before first use, even if
you are familiar with this type of product. The safety
precautions enclosed herein reduce the risk of fire,
electric shock and injury when correctly adhered to.
Keep the manual in a safe place for future reference,
along with purchase receipt and carton. If applicable,
pass these instructions on to the next owner of the
appliance.
Always follow basic safety precautions and accident
prevention measures when using an electrical
appliance, including the following:
Electrical Safety and Cord Handling
+ Correct voltage: Make sure your local outlet
voltage and circuit frequency corresponds to the
voltage indicated on the appliance rating label.
NOTE: INTENDED USE: This is a portable product,
designed for private use. It is exclusively designed
for use in cars, 4WD’s, caravans and other vehicles
including mobile homes and campervans. It is
designed to cool food and beverages and to be set up
and used in dry, weather protected areas.
+ Safe connection: Insert the power cord firmly into
a 12V or 24V DC socket. Do not alter the plug.
+ Protect from moisture: To protect against
electric shock, do not immerse the cord, plug or
the appliance itself in water or other liquid.
+ Ensure your hands are dry before handling the
plug or switching on the appliance. Do not use it
on wet surfaces.
+ Protect the power cord. Do not kink or damage
the power cord. Do not wrap it around the
appliance. Do not pull the unit by the cord. Do not
use the cord as a handle, close a door on the cord
or pull the cord around sharp edges or corners.
Keep the cord away from heated surfaces.
+ Never touch uninsulated cord with bare hands.
+ Always ensure that the correct voltage is applied
to the fridge. The voltage is stated on the fridge’s
data plate.
+ Never obstruct vents to the fridge’s compressor.
+ Defrost the fridge on a regular basis.
+ Never use hard or sharp implements to remove
ice from the cooling compartment.
+ Never use abrasive or solvent based materials
when cleaning the cooling compartment.
+ Do not use any electrical appliances inside the
cooling compartment.
NOTE: This appliance is not intended for use by
persons (including children) with reduced physical,
sensory or mental capabilities, or lack of experience
and knowledge, unless they have been given
supervision or instruction concerning use of the
appliance by a person responsible for their safety.
Children should be supervised to ensure that they do
not play with the appliance.
+ Do not expose to rain.
DO NOT STORE EXPLOSIVE
SUBSTANCES SUCH AS
AEROSOL CANS WITH A
FLAMMABLE PROPELLANT
IN THIS APPLIANCE.

4 5
APPLIANCE AND ACCESSORIES
MOUNTING BRACKETS, NUTS AND BOLTS
CONTROL PANEL
COMPARTMENT DIVIDERS
POWER SUPPLY
FRIDGE DRAWER
HANDLE
12V/24V DC POWER CORD
15AMP FUSE
(BACK OF UNIT)
12V / 24V DC POWER CONNECTION

4 5
INSTALLATION
After unpacking the fridge check that no parts
are missing. Place the unit in a dry place which is
protected against splashing water. Do not place
directly adjacent to sources of heat such as heating,
gas ovens, hot water, pipes or directly in the sun.
It is important that your appliance is installed and
operated in accordance with these instructions to
ensure its performance, efficiency and operation.
LOCATING AND MOUNTING
(1) Find a suitable location to mount the drawer
fridge, ensuring to keep at least 5 to 10cm space
around the compressor box to ensure sufficient
airflow and cooling performance.
(2) Attach the mounting brackets to the sides of the
drawer fridge body with supplied M6 bolts (2pcs
per bracket).
(3) Locate the fridge in its final position and fix in
position using the supplier M6 bolts and nuts
(1 set per bracket) or other suitable fixtures (not
supplied).
(4)Connect the DC cable to the socket in the rear
of the drawer fridge. Route the cable, ensuring
it is not pinched, cut or damaged, to the nearest
suitable cigarette outlet socket and plug in.
Air Flow
INSTALLATION ITEMS
M6 Nut x 4pcs - M6 Bolt x 12pcs - Bracket x 4pcs
KEY DIMENSIONS (IN MM)
734
569
435 41
500
478
250
734
569
435 41
500
478
250

6 7
POWER REQUIREMENTS
The fridge is designed to operate on DC voltage.
+ DC input 12V or 24V DC (e.g. car cigarette
lighter or car battery).
+ If the fridge is operating when the vehicle
ignition is switched OFF, the fridge will switch
OFF automatically when the power source
voltage falls below the Battery Protection cut-out
setting.
+ The fridge will automatically switch back ON when
the vehicle is re-started and the power source
voltage reaches the Battery Protection cut-in
setting.
OPERATING YOUR FRIDGE
WITH 12/24V DC
+ Plug the 12V/24V DC power cord into the DC
power socket (as highlighted over page) on the
end of the fridge and then connect to the vehicle
cigarette lighter socket or suitable 12V or 24V
DC power source.
+ The fridge will automatically turn on, there is no
requirement to switch the appliance on.
+ The display will automatically show the current
internal cabinet temperature.
+ For optimum performance and efficiency, it is
important that the fridge has a reliable DC power
source available. Direct connection to the battery
is recommended and reduces the risk of voltage
dropping to the appliance.
+ Use only the 2.5m DC power cord supplied with
the fridge.
IMPORTANT: If a DC extension cord is required
we recommended, as a minimum, use a 6mm dia.
(AWG11) 4.58mm2 Twin Sheath Two Core cord
with direct connection to the positive and negative
battery terminals with 15A inline fuse protection.
+ The fridge is equipped with an electronic control
system that will prevent polarity reversal. In the
event that the battery connection is reversed
the unit will not start or operate. The power
input socket is fitted with a 15A blade fuse for
protection.
12/24V DC POWER
REQUIREMENTS
If your fridge is cutting out prematurely, it could be
due to:
1. The low voltage protection being set too
high on the Battery Protection.
2. DC power cord and/or connections are
not suitable to carry the required current.
Check the power cord and all connections
and adjust the Battery Protection on the
control panel.
+ The fridge is equipped with a multi-level Battery
Protection that protects your vehicle battery
against excessive discharging when the fridge is
connected to 12V or 24V DC power source.
IMPORTANT: When using the fridge with DC power
supply, we recommended setting the Battery
Protection to LOW.
NOTE: A battery charger may only be connected to
the battery when the fridge has been disconnected
from the DC power source.
+ Over-voltage may cause damage to the
electronics of the fridge.
+ Your fridge is equipped with reverse polarity
protection. It protects your fridge against reverse
battery connection and short circuit.
+ As a protection for your battery, the fridge
switches OFF automatically if the power source
voltage is insufficient.
NOTE: It is important that the correct cord size and
gauge is used for the installation of the DC supply
as over distance the voltage can decrease if the
incorrect cord size and gauge cord is being used.
+ Always consult a qualified automotive electrician
when using a DC extension cord.

6 7
12V DC INPUT CUT OUT CUT IN
HIGH 11.3V 12.5V
MEDIUM 10.1V 11.4V
LOW 9.6V 10.9V
24V DC INPUT CUT OUT CUT IN
HIGH 24.6V 26V
MEDIUM 22.3V 23.7V
LOW 21.3V 22.7V
TEMPERATURE CONTROL
When your fridge is first connected to the DC power
input the appliance will automatically switch on
and the LCD control panel will display the current
cabinet temperature, Battery Protection and Cooling
Speed setting as well as the current input voltage.
+ The Temperature Controller provides the ability
to set the desired temperature level and display
the current cabinet temperature. The electronic
controller has been programmed to maintain an
average of the set temperature.
+ The compressor will start up when the internal
cabinet temperature increases 0.5 to 1.5 degrees
above the set temperature and will run until the
temperature is 0.5 to 1.5 degrees below the set
temperature.
BATTERY PROTECTION
SETTING
1. Fridge to automatically restart once input voltage
is reached and is to retain all original settings
prior to monitor being activated.
2. Audible beeping to be heard when monitor is
activated.

8 9
TEMPERATURE CONTROL UNIT
POWER
1. Press button to turn fridge ON.
2. Press button again to turn
fridge OFF.
TEMPERATURE SETTING
1. Press to set temperature. Wait for 3
sec for display to stop flashing, then setting
will be saved and display will change to actual
temperature reading
BATTERY PROTECTION
1 Press & hold button for 3 seconds to enter
battery protection setting mode
2 Press the button again to cycle between the
3 protection levels - H1 (Hi) -> L3 (Low) ->
N2 (Med)
3 Wait for 3 seconds for the display to stop
flashing, then the setting will be saved and the
display will show the actual temperature reading
TEMPERATURE SCALE
1. Press & Hold and buttons for 3 sec to
switch between Celcius (°C) or Fahrenheit (°F)
MAX/ECO MODE
1. Press button to switch between MAX mode or
ECO mode
MAX - Indicator will show green light
ECO - Indicator will show white light
POWER OFF MEMORY
If power is cut to the fridge, the ON/OFF status,
mode and temperature settings will resume to the
previous settings as soon as the power is restored.
SET BUTTONPOWER ON/OFF BUTTON
UP AND DOWN BUTTONSTEMP. DISPLAY

8 9
USING WITH SOLAR PANEL OR
GENERATOR
USING WITH SOLAR PANELS
+ The power consumption and efficiency of
your fridge makes it ideal to be used in
conjunction with solar panels to provide
recharging of the DC power source. Solar panels
will provide charge into the battery during the
daylight hours even while the appliance is
operating.
+ As the output from solar panels changes
depending on the level of sunlight and intensity,
your fridge cannot be connected directly to the
solar panels. The appliance must be connected to
a suitable DC battery and then the solar panels
connected to the battery.
+ We recommend the use of the quality portable
solar panel kits from 100 to 200 watts for use
with your fridge. DO NOT connect the fridge
directly to the solar panel as it will not work.
Connection must be via the battery.
USING PORTABLE
GENERATORS
+ It is important that the your fridge
is never connected directly to a generator. This
fridge is designed to operate directly
from a battery. Using from a generator may
result in damage to your fridge which
may void your appliance warranty.
+ Most generators are fitted with a DC power
output socket - DO NOT connect your fridge
directly to the DC power output of the generator
as this will result in damage to your fridge and
void warranty. Connection must be via the
battery.
+ When charging the battery using a digital or
inverter type generator, we recommend only
using a ‘smart battery charger’ that is fully
automatic, spark proof and reverse polarity
protected. The battery charger is connected
directly to the AC power output of the generator.
Only run this fridge directly from a battery
SOLAR PANEL GENERATOR CHARGER BATTERY FRIDGE

10 11
OWNERS MANUAL
TIPS AND SUGGESTIONS
+ When the appliance is being set at 0° or lower
temperatures, do not store glass bottles or liquids
such as beer, milk, juices or soft drinks in the unit
as these may freeze and shatter.
+ To improve the efficiency of your fridge
it is better to have the drawer as full as possible
at all times. A full drawer will provide lower
power consumption over 24 hours than a half
empty one. When the drawer is full there is
little air space between the goods so the cold air
is trapped, but when there is lots of air the
coldness cannot be captured and held. On a trip
it is a good idea to replace finished products with
bottles of water or similar. This will fill the empty
spaces and allow the coldness to remain within
the drawer.
+ Frequent drawer opening will allow warm air to
enter the drawer. Keep the number of times you
open the drawer to a minimum where possible.
+ When located in the rear of a car or trailer, it is
recommended that the appliance be kept away
from direct sunlight to reduce the risk of
increased heat. It should also be provided with
suitable ventilation to guarantee efficient power
consumption and performance. You must
remember that when a vehicle is parked in the sun
on a day where the ambient temperature is
+30°C, the interior of the vehicle can reach
+55°C.
MAINTENANCE AND SERVICE
Your fridge will be delivered cleaned from the
factory – you nevertheless should clean prior to
initial use. Take a cloth which has been slightly
moistened with lukewarm water. Pay attention that
no water drops into the seals and possibly damages
the electronics. Dry off the fridge with a cloth after
cleaning. Clean your fridge periodically and as soon
as it is dirty.
ATTENTION:
+ DO NOT use solvents or agents with sand or acid
parts for cleaning your fridge.
+ DO NOT use brushes, graters or hard sharp tools
to clean your fridge.
+ Before cleaning, the power cord should be
disconnected and the fridge switched OFF.
+ Clean the fridge inside and out with a damp cloth.
For stubborn dirt, use some sodium bicarbonate
dissolved in lukewarm water.
+ After washing, rinse with clean water and dry
carefully.
+ When storing your fridge for a long period
of time, DO NOT fully close the drawer. This will
prevent mould and odours. For additional queries,
service and maintenance please contact our After
Sales Support 1300 174 876. They will provide
you with expert advice on further information you
may require.
DISPOSAL
When it comes to the end of its working life, your
fridge should be disposed of responsibly to ensure
that it does not contaminate the environment. It
would be advisable to contact your local council for
where to recycle your fridge.

10 11
ERROR ISSUE POSSIBLE CAUSE
Fridge does not work
Check if power is connected properly (check plugs are securely positioned and
positive and negative not reversed)
Check power switch in ON
Check if cooling unit ventilation is not blocked or restricted
Check the fuse in the rear of the unit and at the supply
Poor cooling performance
Check that the drawer is securely closed
Check if there is any damage to the drawer seals
Check if cooling unit ventilation is not blocked or restricted
Check the set temperature is adequate
Abnormal noise
Check if refrigerator is level
Check for vibration sources in surrounding objects
Check for loose items in the fridge
Water flow type noise is normal and not sign of any fault in the unit
Condensation It is normal for some condensation to form on the refrigerator surface when
humidity is more than 75%
E1 Low Input Voltage
Power cord was inserted into the cigarette socket before car starts - wait for car
engine to start before plugging in
Battery protection level setting is too high - adjust the protection setting or
change to a power source with a higher output voltage
E2 Fan Fault Contact service to have the fan replaced
E3 Compressor Start Fault Shut down the fridge for 5 minutes and restart it - if it doesn’t fix the issue, follow
the procedures for E1 error
E4 Compressor Operation Fault Check the input voltage to the fridge and restart
E5 Overheat of Controller Shut down the fridge for 5 minutes and check for cooling unit ventilation
restrictions or blockages
E6 NTC Open or Short Circuit Contact service to have the NTC sensor checked
PART NO. DFR4020XTM
GROSS CAPACITY: 31L
CLIMATIC CLASS: T/ST/N/SN
RATED VOLTAGE - DC: 12V / 24V or 14.5V DC
RATED CURRENT - DC: Up to 6A
PROTECTION LEVEL: III
REFRIGERANT TYPE/AMOUNT: R134a - 26g
FOAM VESICANT: Cyclopentane
TEMPERATURE RANGE: -20ºC to +10ºC
NET WEIGHT: 18KG
For further information or assistance please contact customer service on 1300 174 876

12 12
04539 11/22
FOR SERVICE, SPARE PARTS
OR PRODUCT INFORMATION,
PLEASE CONTACT SITRO GROUP
AUSTRALIA PTY LTD.
Mon - Fri 8.00am - 5.00pm (AEST)
Do not return to place of purchase
Keep your purchase receipt, this will be required
to make any claims under the 2 Year warranty.
AUST. 1300 174 876
Manufactured in China for
SUPER RETAIL GROUP LIMITED
6 Coulthards Ave, Strathpine. Queensland 4500, Australia
DRAWER
FRIDGE
30L
PLU 653329
DFR4020XTM
This manual suits for next models
1
Table of contents
Other XTM Refrigerator manuals