Ya Lang YL600-1.5KW-220V User manual

1
Contents
Simple parameter setting................................................................................................................................................................. 2
1. Preface..........................................................................................................................................................................................4
1.1 Precautions for purchase:....................................................................................................................................................4
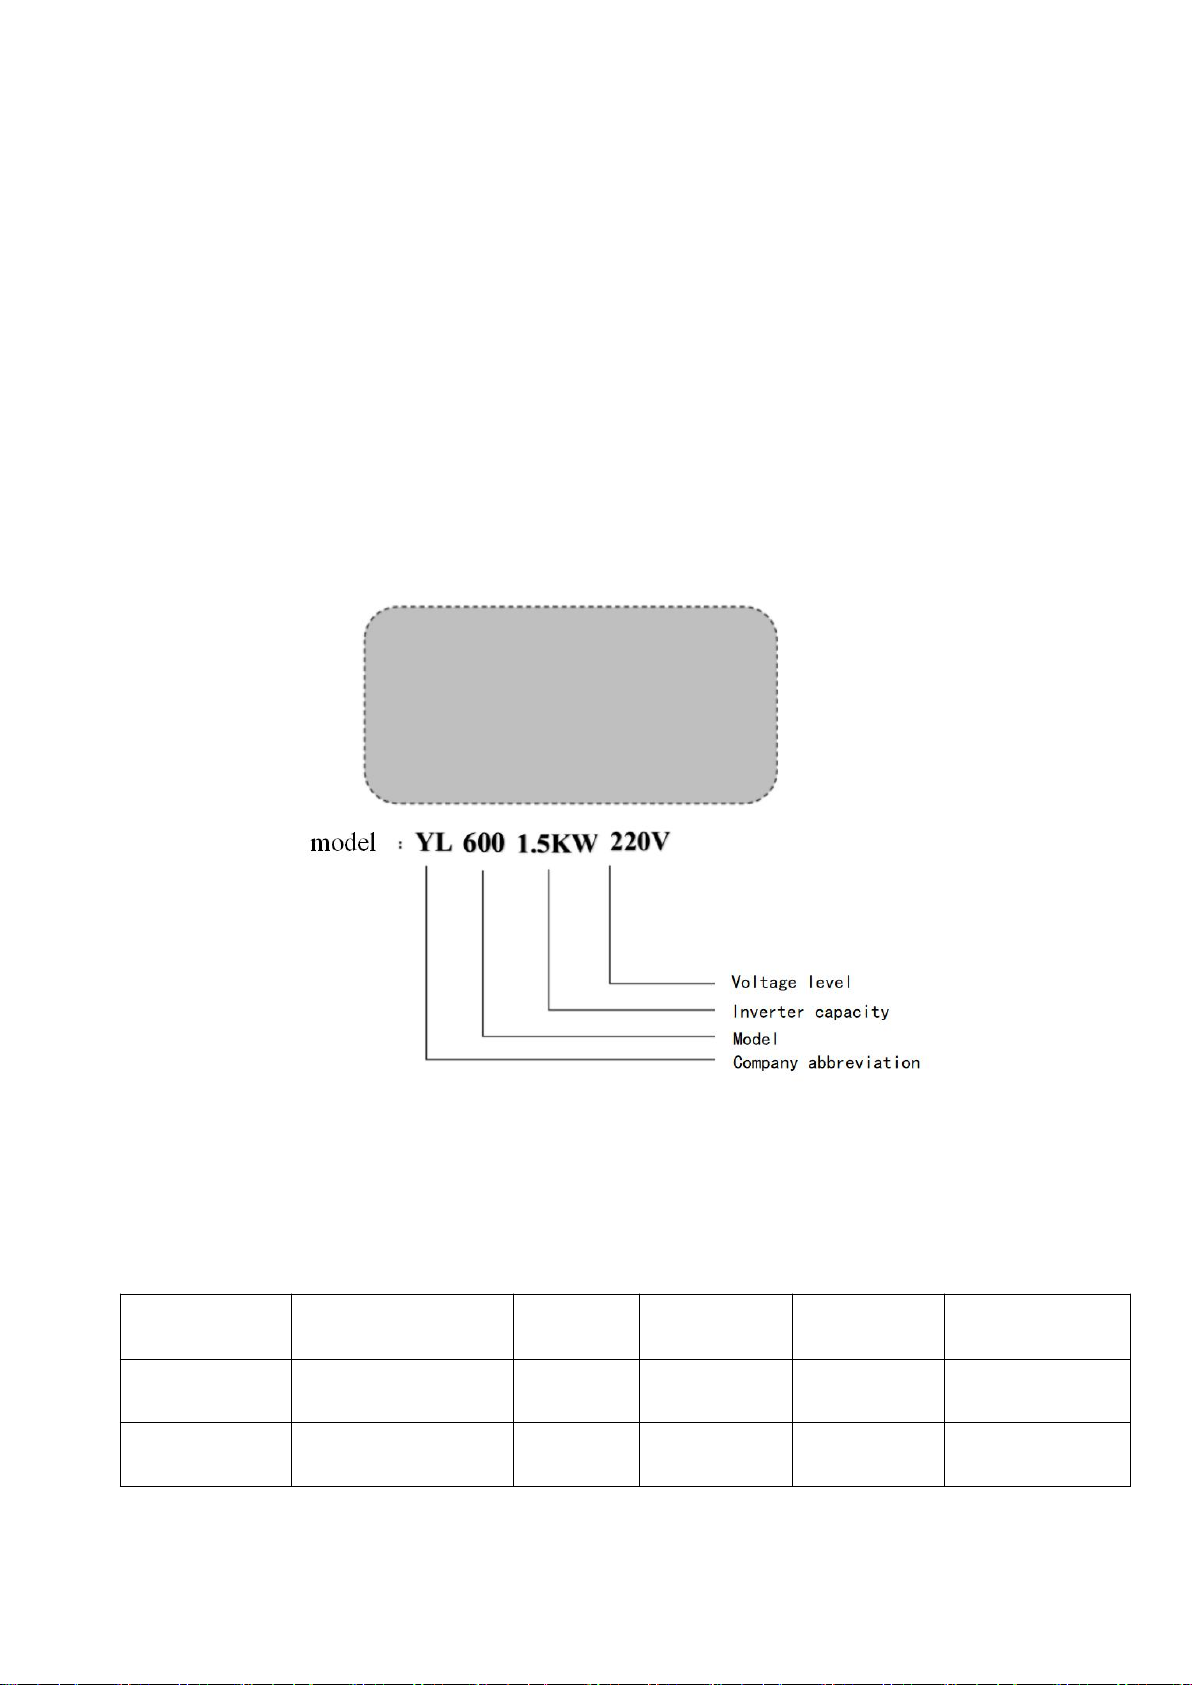
1.2 Inverter nameplate description:.......................................................................................................................................... 4
2. Product model and specification..................................................................................................................................................4
2.1 Product model and specification:....................................................................................................................................... 4
2.2 Schematic diagram:............................................................................................................................................................... 5
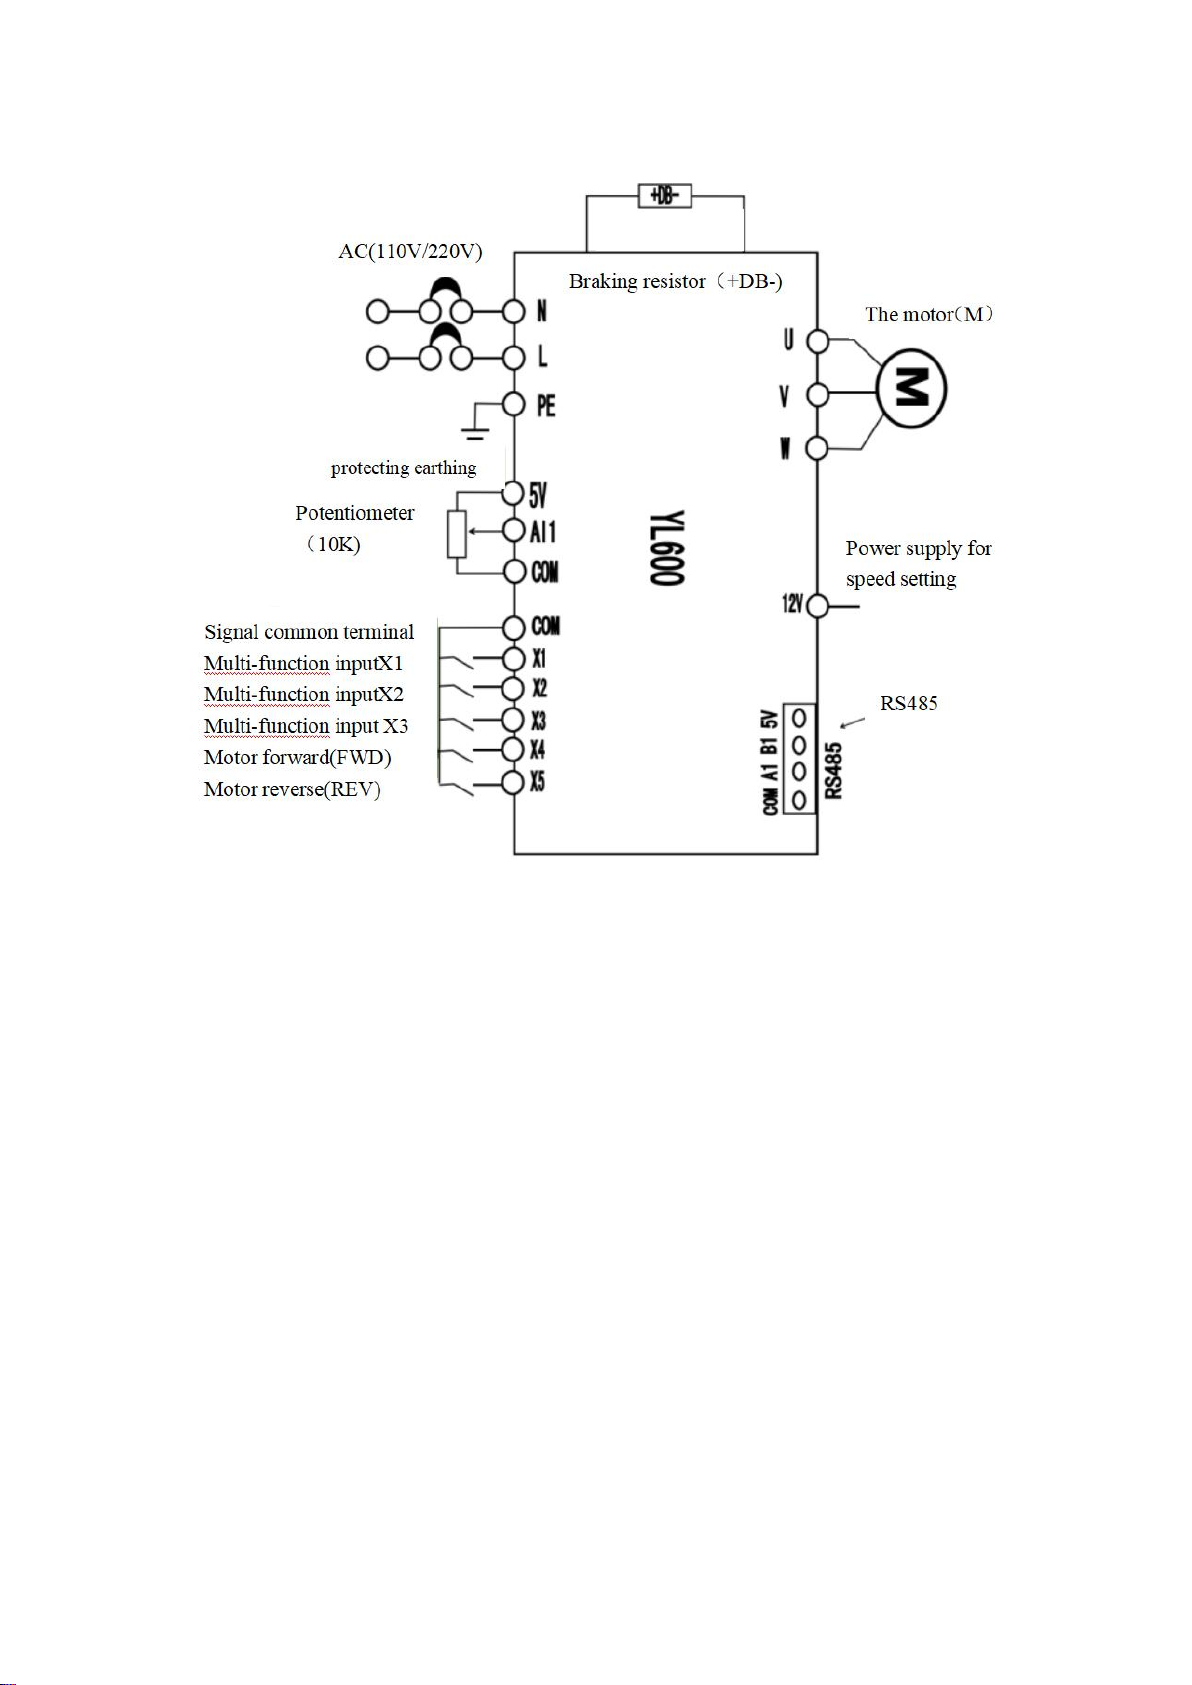
3. Wiring diagram and precautions for safe use..............................................................................................................................5
3.1 Installation location and environment:............................................................................................................................... 5
3.2 Main circuit terminal description:...................................................................................................................................... 6
3.3 Control terminal description:..............................................................................................................................................6
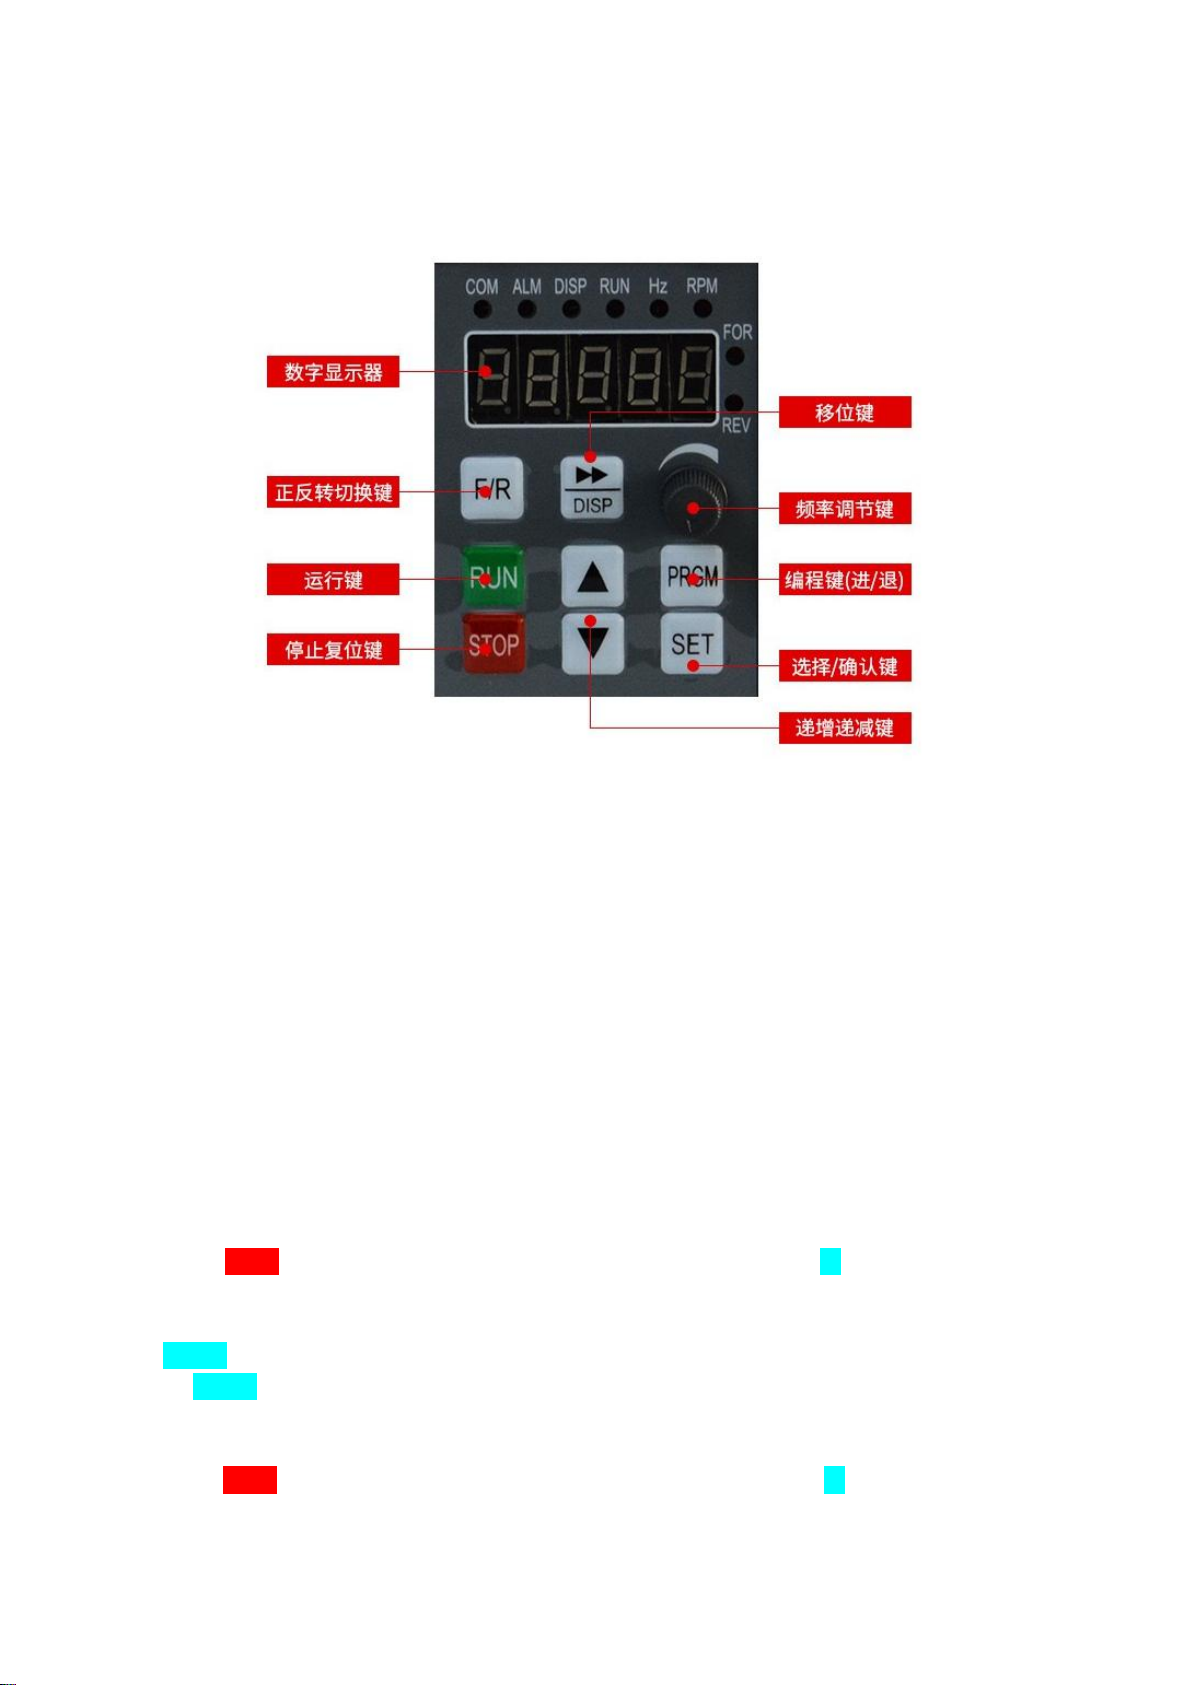
4. Digital operator description......................................................................................................................................................... 7
4.1 Description of digital operator panel:.................................................................................................................................7
4.2 Operation example:.............................................................................................................................................................7
5. Trial run....................................................................................................................................................................................... 8
5.1 Inspection and trial operation method before operation:................................................................................................... 8
6. Control function and parameter setting....................................................................................................................................... 9
6.1 Panel control wiring and parameter setting:..........................................................................................................................9
6.2 Three-wire control wiring and parameter setting:.................................................................................................................9
6.3 High, medium and low multi-speed control wiring and parameter setting.........................................................................10
6.4 Analog quantity control wiring and parameter setting:.......................................................................................................10
6.5 External potentiometer with switch control wiring and parameter setting:........................................................................11
7. Function description and list......................................................................................................................................................12
7.1 Function table:.................................................................................................................................................................. 12
8. Fault information and troubleshooting methods....................................................................................................................... 25
8.1 Fault information and troubleshooting methods:................................................................................................................ 25
9. Modbus485 communication protocol holding register address-inverter parameter correspondence table..............................26
10. External terminal two or three wire control motor wiring...................................................................................................... 30
11. Multi-speed command-frequency section-parameter item correspondence table.................................................................. 31
12. Toggle switch configuration table........................................................................................................................................... 31
13. Facilities selection configuration.............................................................................................................................................32
13.1 Braking resistor configuration:..............................................................................................................................................32
14. Customer feedback suggestions...............................................................................................................................................32
Due to the company's product updates, the content is subject to
change without notice

2
Simple parameter setting
Parameter
number
name
Setting range
and its
meaning
Motor rated frequency
Ordinary three-phase
asynchronous motor
Motor rated
frequency
High-speed spindle
Motor rated frequency
Ordinary three-phase
asynchronous motor
P00.00
Main digital
frequency
0-120HZ(40
0HZ)
50.0HZ
400.0HZ
60.0HZ
P00.04
VF curve:
maximum
output
frequency
1.0-120.0HZ
(600HZ)
50.0HZ
400.0HZ
60.0HZ
P00.05
VF curve:
output
frequency at
maximum
voltage
5.0-120.0HZ
(600HZ)
50.0HZ
400.0HZ
60.0HZ
P00.07
VF curve:
intermediate
frequency
1.0-120.0HZ
(600HZ)
5.0Hz
6.0Hz
6.0HZ
P00.08
VF curve:
intermediate
voltage
10.0%-100.0
%
10%
10%
10%
P00.09
VF curve:
minimum
output
frequency
0-120.0HZ(6
00HZ)
0.5Hz
4.0Hz
0.6Hz
P00.10
VF curve:
minimum
output
voltage
0%-100.0%
1%
1%
1%
P00.13
Parameter
recovery/lock
ing/read and
write
0:Allow
users to set
parameters
1:Forbid
users to set
parameters
(locked)
10:Restore
factory
parameters
(Need to
power off,
power on
again)
0
P03.09
Panel
potentiometer
0-120HZ(60
0HZ)
50Hz
400Hz
60Hz

3
, the upper
limit of
frequency
setting
P03.13
Analog input
1, the upper
limit of
frequency
setting(VI1--
0-10V)
0.0-400.0HZ
,See "JP1
Short Circuit
Block
Configuratio
n Table"
50.0HZ
400.0HZ
60.0Hz
P12.19
PWM
frequency
2.0-15.0KHZ
110V10.0KHz------220V8.0KHz
Note: If you need to restore the factory settings, set P00.13 to 10, press the confirm key, then
turn off the power supply and wait for the inverter lights to go out before powering on,
otherwise the restoration will be unsuccessful.
If you need to modify the parameters, you must set the inverter in a non-working state (such as
the RUN light is off). After the setting is completed, you must turn off the power and turn off
the inverter lights before powering on, otherwise the setting will be unsuccessful.

4
1. Preface
1.1 Precautions for purchase:
This machine is strictly packaged before leaving the factory, but considering various factors during transportation, please
pay special attention to the following matters before assembling. If there is any abnormality, please notify the distributor or
related personnel of the company.
● Whether it is damaged or deformed during transportation.
● Is there a YL series inverter and a manual when the package is unpacked?
● Whether the ordered specifications are consistent with the nameplate (Working voltage and KVA number).
● Whether the internal assembly parts, wiring and circuit board are abnormal.
● All terminals are locked tightly, and there is no foreign matter in the machine.
● Whether the buttons of the operator are normal.
● Are there additional accessories.
1.2 Inverter nameplate description:
2. Product model and specification
2.1 Product model and specification:
Model
Input voltage
power
(KW)
Drive capacity
(KVA)
Output current
(A)
Applicable motor
(KW)
YL600-1.5KW-22
0V
single-phase220V50Hz
1.5
3.0
7
1.5
YL600-2.2KW-22
0V
single-phase220V50Hz
2.2
4.0
10
2.2

5
2.2 Schematic diagram:
3. Wiring diagram and precautions for safe use
3.1 Installation location and environment:
● Ambient temperature: -5℃~40℃ and good ventilation;
● Places with no dripping water and low humidity;
● Places without sunlight, high temperature and severe dust;
● Location without corrosive gas and liquid;
● Places with less dust, oil gas and metal dust;
● No vibration, easy maintenance and inspection place;
● Places without electromagnetic noise interference;

6
● In order to facilitate cooling and maintenance, sufficient space must be left around the inverter.
● In order to achieve a good cooling effect, the inverter must be installed vertically and ensure smooth air circulation.
● If the installation is not secure, place a flat plate under the base of the inverter before installing. If installed on a
loose surface, the stress may cause damage to the main circuit parts, thus damaging the inverter;
● The installation wall should use non-combustible materials such as iron plates.
● When multiple inverters are installed in the same cabinet, pay attention to the spacing when installing them up and
down, and add a baffle plate in the middle.
● Be sure to correctly connect the inverter main circuit and control signal wires.
● Be sure to set the inverter parameters correctly.
Note: Power supply: Please pay attention to whether the voltage levels are consistent to avoid damage to the inverter.
The environment of the installation site will affect the service life of the inverter.
3.2 Main circuit terminal description:
3.3 Control terminal description:
Terminal symbol
Description
N L
Power input terminal (220V inverter is single-phase 220V input)
U.V.W
Inverter output terminal (220V inverter is three-phase 220V output)
+ DB -
Braking resistor connection end optional (see page 31 for details on braking resistor
configuration)
FG
Frame Ground
Terminal symbol
Description
Factory setting
X1
Multi-function input 1
X2
Multi-function input 2
X3
Multi-function input 3
X4
Forward
X5
Reverse
COM
Common terminal of digital control
signal
AI1
Analog current frequency command
5V
Power supply for speed setting
12V
Power supply for speed setting

7
4. Digital operator description
4.1 Description of digital operator panel:
数字显示器:Digital display
正/反转切换键:Forward/reverse switch key
运行键:Run key
停止复位键:Stop reset button
移位键:Shift key
频率调节键:Frequency adjustment key
编程键(进/退):Programming key (forward/backward)
选择/确认键:Select/confirm key
递增递减键:Up and down keys
4.2 Operation example:
Upload the inverter host parameters to the digital operator:
Press the (stop) STOP button and not release it, and then press the (up arrow) ▲ button, the digital operator will
automatically read all the parameters in the inverter host and save them in the digital operator, and the original parameters
will be overwritten. The digital operator can only save the last parameter uploaded. After uploading is complete, please press
(program) PRGM key to exit. During the upload process, if there is an error, its error number will be displayed. Please press
the (program) PRGM button to clear the error and try the above upload operation again.
Download the parameters in the digital operator to the inverter host:
Press the (stop) STOP button and not release it, and then press the (down arrow)▼ button, the digital operator will
automatically download all the parameters in the digital operator to the inverter host, and save it in the inverter host. The
original parameters are overwritten. The inverter host can only save the last downloaded parameter. After the digital operator

8
downloads the parameters, the parameters of the digital operator remain unchanged. After downloading is complete, please
press (program) PRGM key to exit. During the download process, if there is an error, its error number will be displayed.
Please press (program) PRGM to clear the error, and try the above download operation again.
Inverter cooling fan trial run:
Each time you press (stop) the STOP button, the cooling fan will be forced to run for about 30 seconds to facilitate the user to
observe the working status of the fan.
Parameter setting method:
1. Press the (programming) PRGM key until the inverter displays "Pyy.xx" to enter the parameter setting state. Where yy
represents the parameter group number, and xx represents the parameter number. For example, P01.12 indicates the 12th
parameter of the 01 group (for the specific meaning of each parameter, please refer to the parameter description table).
2. Press (plus or minus arrow)▲▼key to select the parameter group number and parameter number to be set. Press (data
function) SET key to enter the parameter value setting state, the display is 60.0; press (plus and minus arrow) ▲▼ keys to
modify the parameter value; at this time, press (data function) SET key to save the currently modified parameter value . You
can also press the (programming) PRGM key to exit the parameter setting state and abandon the modification of the
parameters.
When selecting the parameter group number and parameter number, you can press the (shift) DISP key to select the
parameter group number and parameter number (flashing display) to quickly select the parameter that the user is interested in.
Similarly, when modifying the parameter value, you can press the (shift) DISP key to select the digit of the parameter to be
modified (flashing display), so as to quickly modify the parameter value.
After modifying the parameters, press the (program) PRGM key to exit the parameter setting state.
Note that if the parameter table is locked (P00.13=1), all parameters can only be viewed but cannot be modified.
Please set its parameters when the inverter is stopped. When the inverter is running, the parameters you set can actually be
effective, but can only be saved after the inverter stops.
5. Trial run
5.1 Inspection and trial operation method before operation:
Is there a wiring error? In particular, check whether the power supply is incorrectly connected to the U.V.W terminal;
please note: the power supply should be input from the N\L terminal.
Whether there are any metal chips or wires remaining on the inverter substrate and wiring terminals that may cause short
circuits;
Are the screws tightly locked and the connectors loose?
Whether the output part has a short circuit or ground fault.

9
6. Control function and parameter setting
6.1 Panel control wiring and parameter setting:
6.2 Three-wire control wiring and parameter setting:

10
6.3 High, medium and low multi-speed control wiring and parameter setting
6.4 Analog quantity control wiring and parameter setting:

11
6.5 External potentiometer with switch control wiring and parameter setting:

12
7. Function description and list
7.1 Function table:
(YL600) Inverter parameter table
Parameter
number
name
Setting range and its meaning
Factory default
P00.00
Main frequency
0.0-600.0HZ
50.0HZ
P00.01
Start/stop command source
0:Operate the motor by the operation
panel
1:The motor is controlled by the external
terminal, and the STOP button on the
operation panel is effective
2:The motor is operated by the external
terminal, and the STOP button on the
operation panel is invalid
3:Motor controlled by Modbus Rs485
0
P00.02
Reserved
0
P00.03
Motor stop mode
0:Decelerate to stop
1:Free stop (deceleration time is invalid)
2:Immediate DC braking to stop (the
deceleration time is invalid)
0
P00.04
VF curve-maximum output
frequency
1.0-600.0HZ
50.0HZ
P00.05
VF curve-output frequency
at maximum voltage
5.0.0-600.0HZ
50.0HZ
P00.06
VF curve-maximum output
voltage
10.0%-150.0%
100.00%
P00.07
VF curve-intermediate
frequency
1.0-600.0HZ
3.5HZ
P00.08
VF curve-intermediate
voltage
10.0%-100.0%
10%
P00.09
VF curve-minimum output
frequency
0.0-600.0HZ
0.2HZ
P00.10
VF curve-minimum output
voltage
0%-100.0%
1.0%
P00.11
Use analog input 1 to control
multi-speed
0%-100%
100
P00.12
VF curve style selection
0-4
0
P00.13
Parameter
recovery/locking/read and
write
0:Allow users to set parameters
1:Forbid users to set parameters (locked)
10 :Restore factory parameters (need to
power off, power on again)
0

13
Other values: not available
P00.14
Reserved
0
P00.15
Disable external terminal
start when power on
0:When powering on, allow the existing
effective level of the external terminal to
start the motor operation
1:When powering on, the existing
effective level of the external terminals is
not allowed to start the motor. In other
words, after power-on, the effective level
input on the external terminal can start the
motor operation.
1
P00.16
External terminal start/stop
control mode selection
0: FWD (X5) is a forward running
command, REV (X4) is a reverse running
command
1: REV (X4) determines the direction:
open for forward rotation, closed for
reverse rotation; FWD (X5) is the start
command: open to stop, closed to run
2: EF(X3), REV(X4), FWD(X5,
self-holding). Three-wire control motor
operation (reference: LK380 wiring
diagram)
3: When stopping, FWD (X5) closes and
starts the motor forward; when running,
REV (X4) closes and stops instantly
When stopping, REV (X4) closes and
starts the motor reversely; when running,
FWD (X5) closes and stops instantly ""
4: FWD (X5) starts the motor forward at
the moment of closing action; REV (X4)
stops at the moment of closing action
5: FWD (X5) starts the motor forward at
the moment of closing action; REV (X4)
stops at the moment of opening action
6: When stopping, the FWD (X5) closing
action instantly starts the motor forward;
when running, the FWD (X5) closing
action instantly stops. When running, the
REV (X4) closing action instantly reverses
0

14
the motor direction.
7: When REV (X4) is open, FWD (X5)
closes and starts the motor in the forward
direction; when REV (X4) is closed, it is
forbidden to start the motor; when REV
(X4) closes, it stops instantly.
8: Wire cutting left and right limit
commutation mode (X3 function should be
set to "reserved", that is, P00.19=0. Refer
to "wire cutting left and right limit
commutation mode wiring diagram").
When START (X5) is open, stop. When
START is closed, the direction is
determined according to the current state
of the limit switch, and the motor is
started. When START is closed, if the state
of the two limit switches are both open, the
default is to the left Start the motor. During
running to the left, when the left limit
switch (X_LSL, namely X3) is closed
(limit), it changes to running to the right.
During running to the right, when the right
limit switch (X_LSR, namely X4) is closed
(limit), it changes to running to the left. If
the left and right limits are at the same
time, the machine will stop; Note:
Multi-function relay 1
The function (P04.03) is selected as 17
(powered at constant speed, otherwise
power is lost), and P04.05 and P04.06 are
set to realize the wire cutting "switch high
frequency" function.
P00.17
Multi-function input X1
function selection
0: reserved
1: Multi-speed command
5: Used as forward jog input
6: Used as reverse jog input
7: Used as a jog input (REV (X4)
determines the direction)
8: Shutdown instantly when closing action
9: Shut down instantly when disconnected
10: Disconnect, immediately stop with DC
braking (regardless of PV_StopMode
setting)
11: External terminal speed increase
1

15
command (only valid for main frequency
P00.00, speed reduction step is specified
by parameter P00.20)
12: External terminal speed reduction
command (only valid for main frequency
P00-00, speed reduction step is specified
by parameter P00-20)
13: External fault normally open input,
"external fault" is generated at the moment
of closing action
14: External fault normally closed input,
"external fault" is generated at the moment
of disconnection
15: External fault, closing produces
"external fault"
16: External fault, disconnection produces
"external fault"
17: Used as external fault reset input
P00.18
Multi-function input X2
function selection
1
P00.19
Multi-function input X3
function selection
0
P00.20
Multi-function input X4
function selection
0
P00.21
External terminal up/down
speed increment
0.0-600.0HZ
1.0HZ
P00.22
Time interval of external
terminal up/down
2
P00.23
Physical quantity display
proportional constant
0-999.9%
100.00%
P00.24
Display item selection after
power-on
0: Display the current target frequency
1: Display motor operating frequency
2: Display motor running current
3: Display the current input AC voltage
4: Display the current bus voltage
5: Display the current output voltage
6: Display the current speed segment
number SP x
7: Display the internal temperature of the
inverter t xx
8: Display input signal X1-X3/output
signal
9: Display user variables, namely: current
output frequency X P00.23
10: Display user count value
11: Display manufacturer's temporary
0

16
debugging variables
P00.25
Display item automatic
return delay (in 10 seconds
unit)
0 means no automatic return; 1-6 means
return after a delay of 10-60 seconds.
1
P01.00
Prohibit motor reverse
setting
0: Allow the motor to reverse;
1: Prohibit motor reverse rotation
0
P01.01
Waiting time of motor
commutation
0
P01.02
Anti-overvoltage setting
during deceleration (%)
140%
P01.03
Anti-overcurrent setting
during acceleration (%)
140%
P01.04
Over current setting (%)
P01.05
Overload protection setting
(%)
P01.06
Overload protection time
setting (s)
P01.07
Undervoltage protection
setting (%)
P01.08
Overvoltage protection
setting (%)
160%
P01.09
When stopping, start DC
braking voltage (%)
10%
P01.10
When stopping, the DC
braking voltage ends (%)
0%
P01.11
DC braking time during
shutdown (s)
2
P01.12
Start frequency of DC
braking at stop
10
P01.13
Before starting, start DC
braking voltage (%)

17
P01.14
Before starting, end DC
braking voltage (%)
P01.15
DC braking time before
starting
P01.16
Direct starting initial
frequency (increasing
starting torque)
P01.17
Direct start initial frequency
holding time
P01.18
Instantaneous power down
frequency reduction point
P01.19
Decrease rate of
instantaneous power failure
frequency
P01.20
Restart idle time
P01.21
Restart voltage rise time
P02.00
Torque increase during
acceleration (%)
P02.01
Torque boost during
deceleration (%)
P02.02
Acceleration curve selection
P02.03
Deceleration curve selection
P02.04
Avoidance frequency 1
P02.05
Avoidance frequency 2
P02.06
Avoidance frequency 3
P02.07
Avoidance frequency width
P02.08
Window frequency1
P02.09
Window frequency2
P03.00
RS485 communication baud
rate
0:1200Bps
1:2400Bps
2:4800Bps
3:9600Bps
4:19200Bps
5:38400Bps(For higher baud rate, please
contact the manufacturer)
4
P03.01
RS485 communication
address
1-254
10
P03.02
RS485 communication
format (Modbus protocol.
Only supports RTU mode,
not ASCII mode)
0: 8-bit data, 1 stop bit, odd parity
1: 8-bit data, 1 stop bit, even parity
2: 8-bit data, 1 stop bit, no parity
3: 8-bit data, 2 stop bits, odd parity
4: 8-bit data, 2 stop bits, even parity
2

18
5: 8-bit data, 2 stop bits, no parity
P03.03
Deal with RS485
communication error
0: Decelerate to stop
1: Free stop (deceleration time is invalid)
2: Immediately stop with DC braking (the
deceleration time is invalid)
3:Non-stop
0
P03.04
RS485 communication error
tolerance time (mS)
500
P03.05
4-20mA disconnection
detection time
P03.06
Panel potentiometer
Lower limit of AD value
specification
0-1023
3
P03.07
Panel potentiometer
The upper limit of AD value
specification
0-1023
1020
P03.08
Panel potentiometer
Frequency given lower limit
0.0-600.0HZ
0.0HZ
P03.09
Panel potentiometer
Upper limit of frequency
given
0.0-600.0HZ
50.0HZ
P03.10
Analog input 1
Lower limit of AD value
specification
0-1023, see "JP1 Short Circuit Block
Configuration Table"
3
P03.11
Analog input 1
The upper limit of AD value
specification
0-1023, see "JP1 Short Circuit Block
Configuration Table"
1020
P03.12
Analog input 1
Frequency given lower limit
0-1023, see "JP1 Short Circuit Block
Configuration Table"
0.0HZ
P03.13
Analog input 1
Upper limit of frequency
given
0.0-600.0HZ, see "JP1 Short Circuit Block
Configuration Table"
50.0HZ
P03.14
Reserved
P03.15
Reserved
P03.16
Reserved
P03.17
Reserved
P03.18
Analog output correlation
setting, see "JP1 Short
Circuit Block Configuration
Table"

19
P03.19
Analog output gain setting,
see "JP1 short-circuit block
configuration table"
P04.00
Mo analog multiplier output
frequency multiplier
P04.01
Mo1 function selection
P04.02
Mo2 function selection
P04.03
Multifunction relay 1
function selection
0: get power when fault occurs, otherwise
lose power
1: get power while running, otherwise lose
power
2:Reserved
3:When any frequency arrives, it will be
powered, otherwise it will lose power
(related to the setting of P02-10)
4:Get power when power is off, otherwise
lose power
5:Get power at low voltage, otherwise lose
power
6:Get power when overvoltage, otherwise
lose power
7:Get power when over current, otherwise
lose power
8:Power is available at non-zero speed,
otherwise power is lost*
9:Power on when DC braking, otherwise
lose power
10 :Power is applied when the torque is
over, otherwise power is lost*
11 :Power is supplied when external
interruption fault occurs, otherwise power
is lost
12 :Get power when rotating forward,
otherwise lose power
13 :Get power when reverse, otherwise
lose power
14 :Power when inching, otherwise lose
power
15 :Get power when accelerating,
otherwise lose power
16 :Get power when decelerating,
otherwise lose power
17:Get power at constant speed, otherwise
lose power
18 :When X1 is closed, power is on,
0
P04.04
Multifunction relay 2
function selection

20
otherwise power is lost
19 :When X2 is closed, power is on,
otherwise power is off
20 :When X3 is closed, power is on,
otherwise power is off
21 :When X4 is closed, power is on,
otherwise power is off
22 :When X5 is closed, power is on,
otherwise power is off
23 :When X6 is closed, power is on,
otherwise power is off
24:Forward, and the bus voltage is greater
than 400V,it is powered, otherwise it loses
power
25:Reverse, and the bus voltage is greater
than 400V,it is powered, otherwise it loses
power
P04.05
Multifunction relay 1 action
closing delay
0-65.5 秒
0
P04.06
Multifunction relay 1, action
disconnection delay
0-65.5 秒
0
P04.07
Multifunction relay 1, action
closing delay
0-65.5 秒
0
P04.08
Multifunction relay 1, action
disconnection delay
0-65.5 秒
0
P04.09
Locked rotor detection time
0-65.5 秒
1
P04.10
Switch (Di) sampling time
0-200mS
24
P04.11
Shutdown mode during
power failure
0:Decelerate to stop
1:Free stop (deceleration time is invalid)
2:Immediate DC braking to stop (the
deceleration time is invalid)
3:No shutdown when power off
0
P05.00
PID output upper limit
This manual suits for next models
1
Table of contents
Popular Inverter manuals by other brands

Schumacher Electric
Schumacher Electric BATTERY EXTENDER BE01257 owner's manual

Exide
Exide integra 700 User's manual & warranty card

Air Liquide
Air Liquide T 150i AC/DC owner's manual

PEDROLLO
PEDROLLO TISSEL-200 Original instructions for use

Altronics
Altronics M 8070 instructions

GMDE
GMDE GHESS 5.0_6.0KWH Installation and application manual