Yamaha DTR2 User manual

YAMAHA
Professional Series DigitalAudio Tape Recorder
OWNER'SMANUAL
MODED'EMPOl
BEDIENUNGSANLEITUNG

Thank you for purchasing the YAMAHA DTR2 Digital Audio Tape Recorder.
SAFETY INSTRUCTIONS
CAUTION: TO REDUCETHERISKOFELECTRIC
SHOCK,DONOTREMOVE COVER (OR BACK) NO
USER-SERVICEABLE PARTS INSIDE,REFER
SERVICING TO QUALIFIEDSERVICEPERSONNEL.
•ExplanationofGraphicalSymbols
Thelightningflashwitharrowheadsymbol,withinan
equilateraltriangle,isintendedto alertyou to thepresence
of uninsulated"dangerousvoltage"withintheproduct's
enclosurethatmaybeof sufficient magnitudetoconstitutea
riskofelectricshocktopersons.
Theexclamationpointwithinanequilateraltriangleis
intendedto alertyou tothepresence of importantoperating
andmaintenance(servicing)instructionsinthe literature
accompanyingtheappliance.
WARNING: CHEMICAL
CONTENTNOTICE!
The solderusedinthemanufactureofthisproductcontains
LEAD.Inaddition,theelectrical/electronicand/orplastic
(where applicable)componentsmayalsocontaintraces of
chemicalsfoundbytheCaliforniaHealthandWelfare
Agency (andpossiblyotherentities)tocause cancer and/or
birthdefects orotherreproductiveharm.
DONOTREMOVEANYENCLOSURECOMPONENTS!There
arenouserserviceablepartsinside.Allserviceshouldbe
performed bya service representativeauthorizedbyYamaha
toperformsuchservice.
IMPORTANTMESSAGE:Yamahastrivestoproduce
productsthatarebothusersafe andenvironmentally
"friendly".We sincerelybelievethatourproductsmeet
thesegoals.However,inkeepingwithboththespiritandthe
letterofvariousstatuteswe haveincludedthemessages
shownaboveandothersinvariouslocationsinthismanual.
FCCINFORMATION (U.S.A.)
1.IMPORTANTNOTICE:DONOTMODIFYTHISUNIT!
Thisproduct,when installedasindicatedIntheinstructions
containedinthismanual,meetsFCCrequirements.
ModificationsnotexpresslyapprovedbyYamahamayvoid your
authority,grantedbytheFCC,tousetheproduct.
2.IMPORTANT:Whenconnectingthisproductto accessories and/
oranotherproductuseonlyhighqualityshieldedcables. Cable/
ssuppliedwiththisproductMUSTbeused.Followallinstallation
instructions.Failuretofollowinstructionscould voidyourFCC
authorizationto usethisproduct intheUSA.
3.NOTE:Thisproducthasbeentested andfound to complywith
therequirementslistedinFCCRegulations,Part15for Class"B"
digitaldevices.Compliancewiththeserequirementsprovides a
reasonablelevelofassurancethatyouruseofthisproduct, ina
residentialenvironment,willnotresultinharmful interferencewith
otherelectronicdevices.
Thisequipmentgenerates/usesradiofrequenciesand,ifnot
installedandused accordingtotheinstructionsfound inthe
usersmanual,maycauseinterferenceharmfultotheoperation of
otherelectronicdevices.Compliancewith FCCregulations does
notguaranteethatinterferencewillnotoccur inallinstallations.If
thisproduct isfound tobethesource ofinterference,whichcan
bedeterminedbyturningthe product"OFF"and"ON",pleasetry
to eliminatethe problemusingoneofthe followingmeasures:
Relocateeithertheproductgeneratingtheinterference of the
devicethatisbeingaffected bytheinterference.
Utilizepoweroutletsthatareondifferent branch(circuitbreaker
orfuse)circuitsorinstallAC linefilter/s.
Inthecase ofradioorTV interference,relocate/reorientthe
antenna.Iftheantennalead-inis300ohmribbonlead,change
thelead-intocoaxialtype cable.
Ifthesecorrectivemeasuresdonotproducesatisfactoryresults,
pleasecontactyour localretailerthatisauthorizedto distribute
thistype of product.Ifyou cannotlocatetheappropriateretailer,
pleasecontactYamahaCorporationofAmerica, Electronic
ServiceDivision,6600OrangethorpeAve.,BuenaPark,CA90620
The abovestatementsapplyONLYtothoseproductsdistributed
byYamahaCorporation ofAmerica oritssubsidiaries.
ForCanadamodel
THISDIGITALAPPARATUSDOESNOTEXCEEDTHE'CLASSB"
LIMITSFORRADIONOISEEMISSIONSFROMDIGITAL
APPARATUS SETOUTINTHERADIOINTERFERENCE
REGULATIONOFTHECANADIANDEPARTMENTOF
COMMUNICATIONS.
2

CAUTION:READ THISBEFOREOPERATING
YOUR UNIT.
1.Thisunitisa sophisticated digitalaudiotape recorder. To
ensure proper operation for the best possibleperformance,
please read thismanualcarefully.
2.Before usingthisunitfor the first time,wait1 to 2 hoursafter
pluggingthe AC power cord intothewalloutlet.
3.Choose the installationlocation of yourunitcarefully. Avoid
placingitindirectsunlightorclose to a source of heat.Also
avoid locations subject to vibrationandexcessive dust, heat,
cold ormoisture.Keep itawayfrom sources ofhumsuch as
transformers ormotors.Ifinterference inTV orradio
reception occurs duringoperation, increase the distance
between the two components.
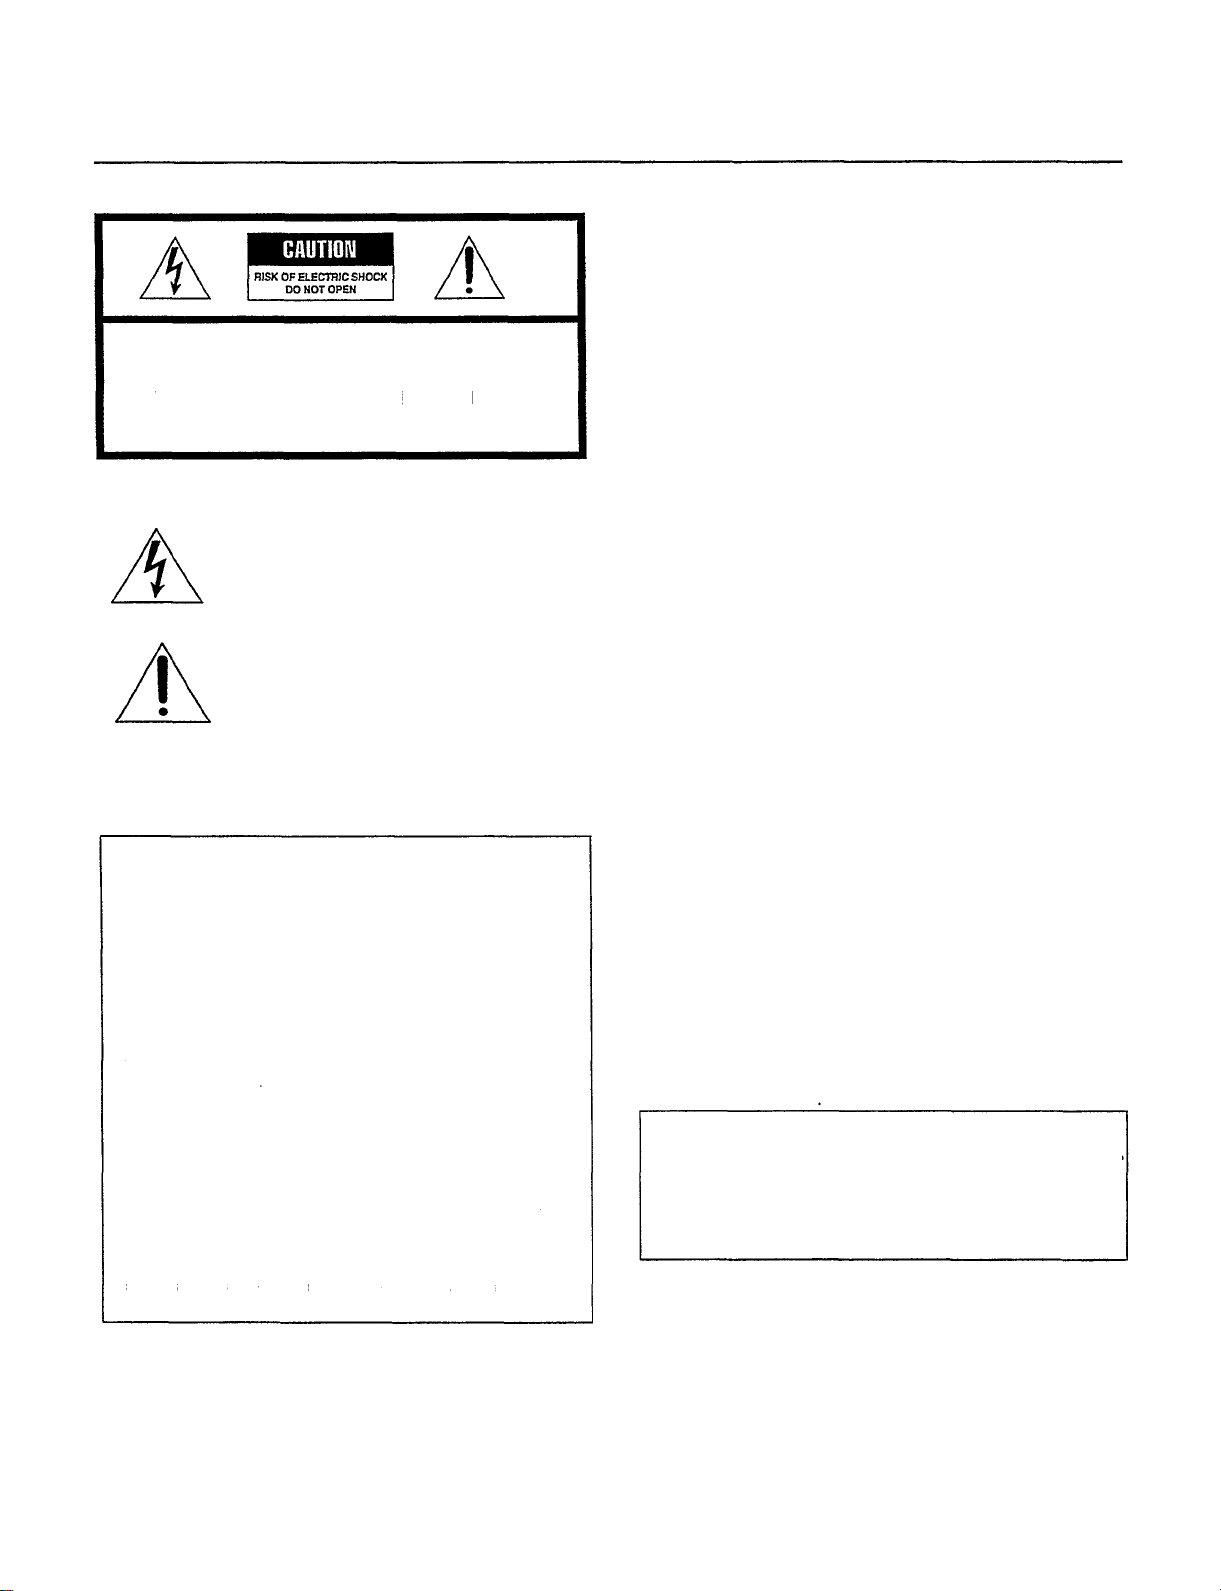
4.Donotopenthecabinetasthis may resultindamageto the
deck orelectricalshock. Ifa foreign object shoulddrop into
the deck, contact yourlocaldealer.
5.When removing the power plugfrom the walloutlet,always
pulldirectlyonthe plug;neverpullthe cord itself.
6.Donot apply excessive force when operating switches and
knobs.
7.When movingthe deck. besure to first pulloutthe power
plugandremove allcords connecting the decktoother
equipment.
8.Donotattempt to cleanthisunitwith chemicalsolvents as
thismay damagethe finish.Usea clean,dry cloth.
9.Iftheunitdoesnotwork properly whileinuse,afterturning
the POWERswitch OFF,disconnectthe AC power cord plug
from the AC outletandwaitfor about 30 seconds. After that,
connect itagainto operate.
10.Besure toread the"Troubleshooting" section ofthis manual
for adviceon common operating errors before concluding
that your unitisfaulty.
11.Keep thismanualina safe placefor future reference.
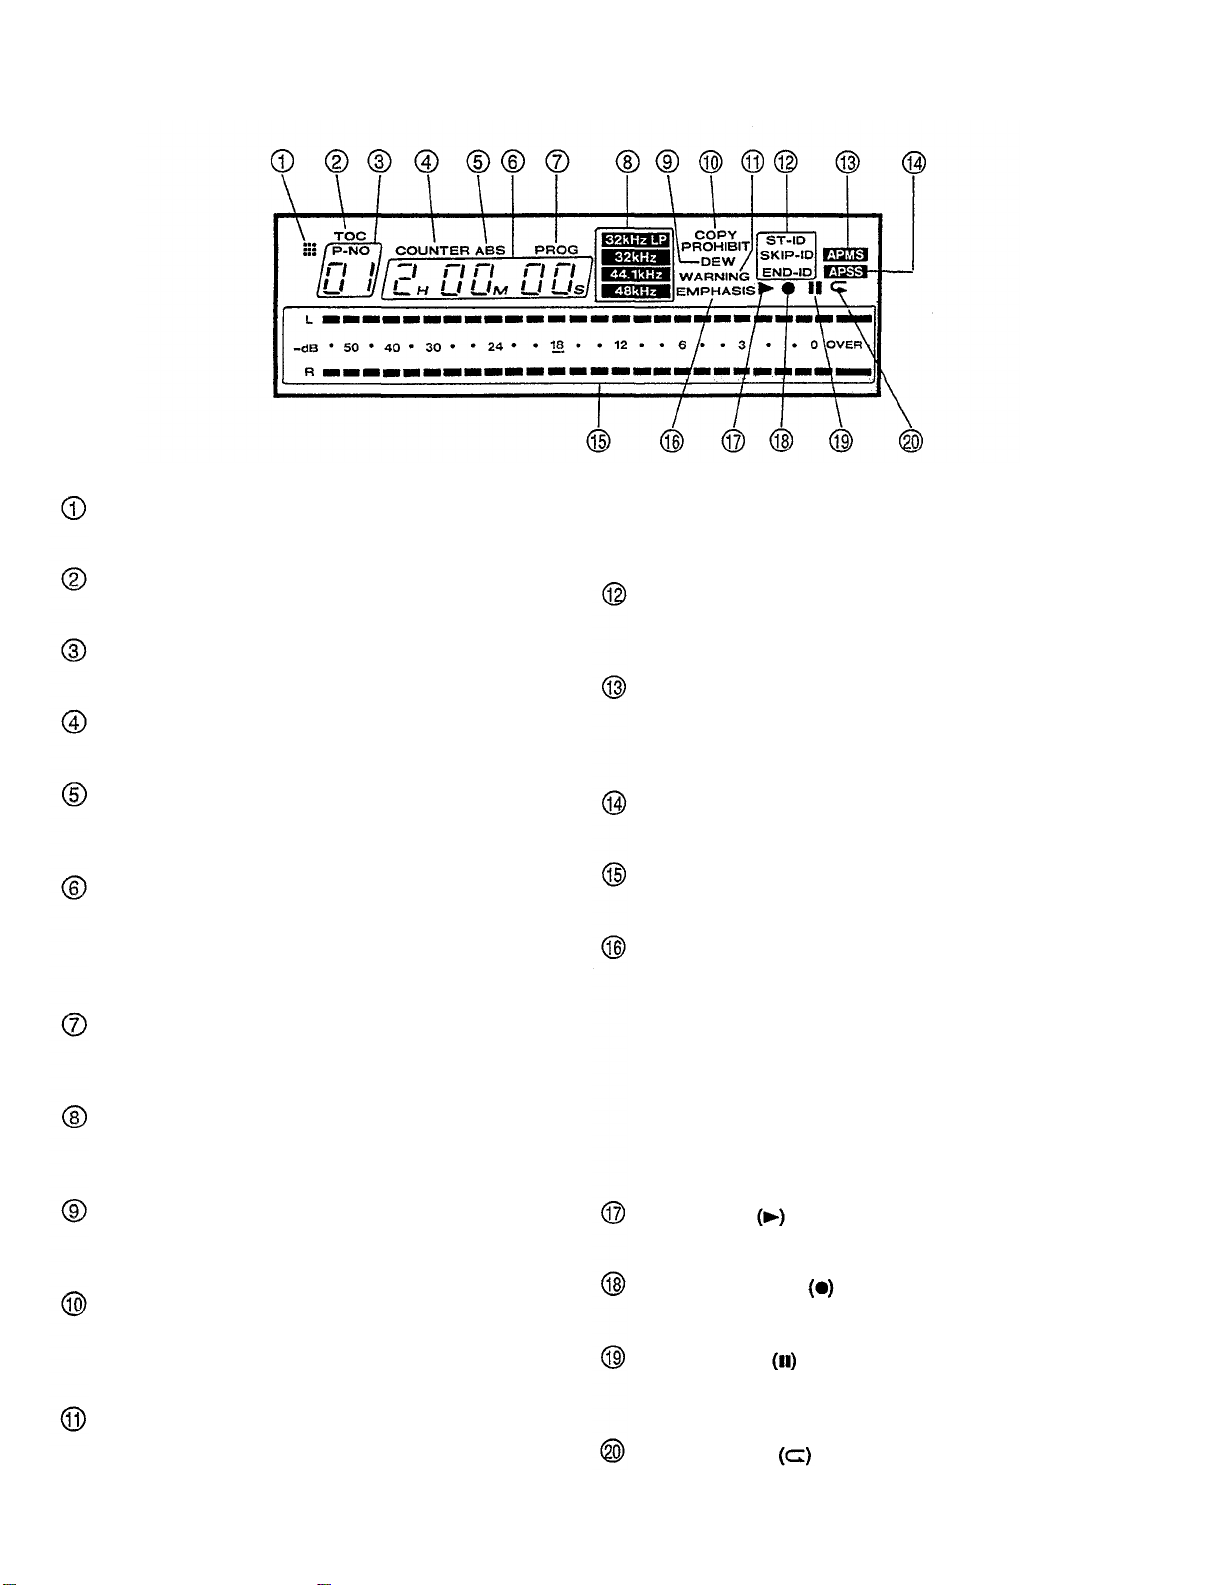
Cleaning the head
When the headisslightlydirty,noiseisheard ordropouts occur
duringplayback. Iftheheadbecomes excessively dirty, a signal
read error occurs duringplayback,andthe soundcannotbe
heard. Atthistime,the "WARNING" indicatorappears. Ifthis
occurs, use a commerciallyavailabledigitalaudio cleaningtape
orhaveyour Yamaha dealerclean thehead.After prolonged
use,the headmayrequire replacement dueto wear. Consult
your Yamaha dealer.
Ondrum life
Itisrecommended to replace the headdrumwith a newone
withinabout 1,500hours of use.
Dew condensation
Dew isthe moisturethatcollects ona cold object ina warm room.
Dew can form onthe drumand head insidethe tape deck
causingdamage to tapes andhead.Thisunitcontains a dew
prevention heater. Oncetheunitisconnected to anAC outlet,
the heaterturns onto prevent dew from forming. Ittakes from 1
to 2 hours to remove dew. When dew isdetected onthe drum
andhead,the "DEW"indicatorappears andthe unitdoes not
operate.Waitabout 1 to 2 hoursafter the display returns to
normalbefore usingtheunit.
Dewforms easily:
Inhighlyhumidandsteamy rooms.
When carrying the unitfrom a cold place to a warm room.
* Use the unit at room temperatures from 5° C to 35° C. Dew
forms especiallyeasilyincoldtemperatureregions.
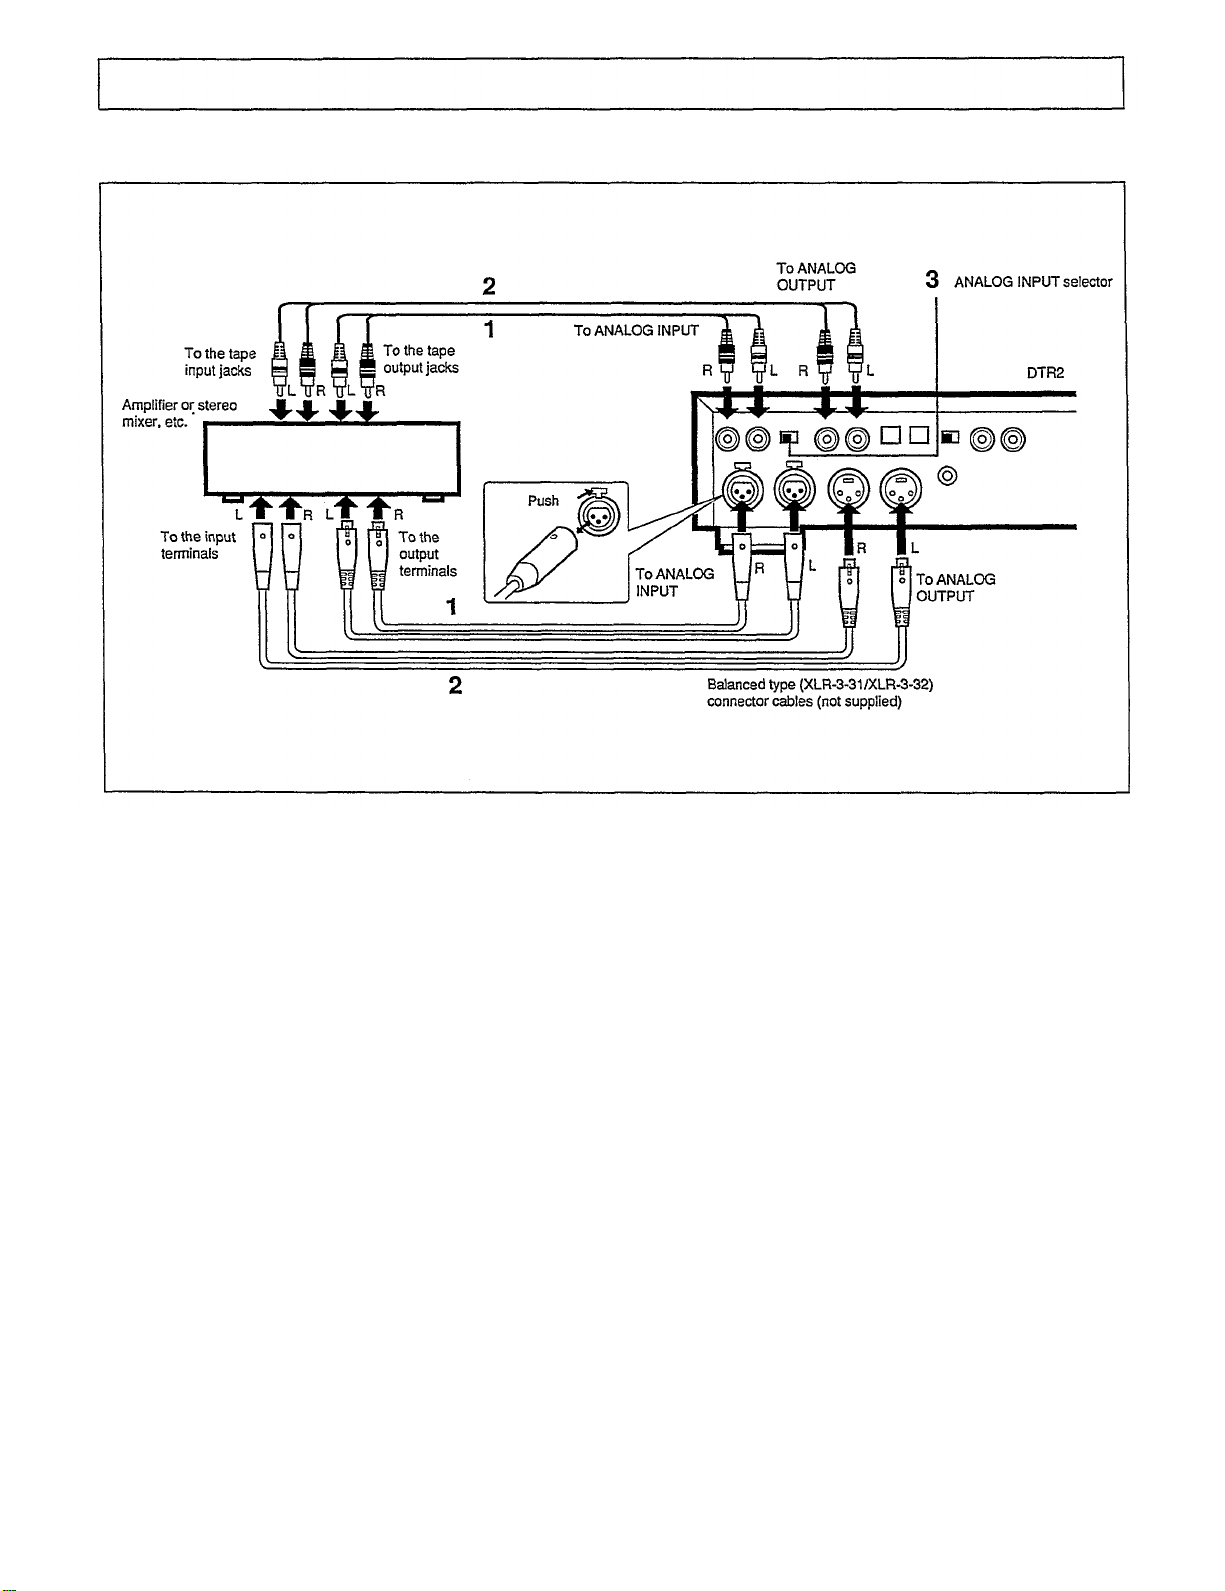
Amplifiervolumeadjustment
Digitalaudiotapes produce considerably lessnoisethan regular
records andcassette tapes, andare extremely quiet between
programs. Becareful notto raisethe volume too highand
exceed the amplifierandspeaker ratings.
Recommended amplifierinputimpedance is600ohms orhigher.
Connecting anamplifier(orother externalaudiodevice) having
aninputimpedance thatistoo lowmaydecrease the levelof the
output.
Rack mount
Thefront panelofthisunitconforms tothe 2Usizestandards and
can directly beinstalledinthe 19inchrack. However, ifthe
space of the rack issmall,remove 4 legs from the bottom panel,
theninstalltheunitinthe rack.Iftherack isnotwell ventilated,
the temperature insidetherack becomes high.Besure to keep
therack wellventilated.
WARNING:THISAPPARATUS MUSTBEEARTHED
IMPORTANT:Thewires inthismainsleadarecolouredin
accordancewiththefollowingcode:
Green-and-yellow:Earth
Blue:Neutral
Brown:Live
As the coloursof thewires inthemainsleadofthisapparatus
maynotcorrespondwith thecoloured markingsidentifyingthe
terminalsinyourplugproceed asfollows:
Thewirewhichiscolouredgreen-and-yellowmustbe
connected totheterminalintheplugwhichismarkedbythe
letterE orbythesafetyearthsymbol
orcolouredgreen or
green- and-yellow.
Thewire which iscolouredbluemustbeconnected to the
terminalwhichismarkedwith theletterN orcolouredblack.
Thewirewhichiscolouredbrownmustbeconnected to the
terminalwhichismarkedwiththeletterL orcolouredred.
3

TABLEOFCONTENTS
Features
4
Namesofcontrols5
Connections
10
DAT(DigitalAudioTape)
13
Loadingandunloadingcassettes
15
Recording
16
StartIDsignalsandtunenumbers
19
EndIDsignals
20
Playback
22
Troubleshooting
29
Specifications
30
FEATURES
•
•
•
•
•
•
•
•
APMSfunctionallowsyoutoprogramupto 30tunesin
anydesiredorder
APSSfunctionskipstothebeginningofprevious/
subsequenttunes
Directtuneselectionfunctionallowsyoutoquicklyplay
anytunebysimplyenteringitsnumber
ABS Searchfunctionallowsyoutolocateanydesired
positiononthetapebyitsabsolutetime(elapsedtime
fromthestartofthetape)
Repeatfunctionrepeatedlyplaysallthetunesonthe
tapeorina program
SkipPlaybackfunctionskipsundesirablesectionsof
thetape
Automatictunenumberrecordingfunction
automaticallywritestunenumbersonthetapeduring
recording
Convenientrenumberingfunctionallowsyouto
renumbertunesafterediting
EndSearchfunctionmakesiteasyto continuea
recordingfrom theendofa previousrecording
•
•
•
•
•
•
•
•
Cue/Reviewfunctionletsyoulistentothesoundwhile
fast-forwardingorrewinding
Fastsearchspeed ofupto 200timesthenormal
playbackspeed
Usablesamplingfrequenciesof48kHz,44.1 kHz,and
32 kHzallowyouto record/playawide varietyofdigital
sources
Equippedwithbalancedtype analoginput/outputjacks
(XLR-3-31/XLR-3-32)
Equippedwithtwo typesofdigitaljacks (coaxialpin
jack,opticalconnector)
Employsa theoreticallydistortion-free1-bitA/D
converterintheA/D convertercircuit,providinghigh-
grandsoundquality
Combinationofdigitalfilterand1-bit PDMD/A
converterprovidessuperiorsoundquality
Two directdrivemotorsprovidestabletapetransport
4

NAMESOFCONTROLS
Frontpanel
POWERswitch
Turnsthepoweronandoff.
Cassetteholder
Holdsthedigitalaudiotape.
INPUTselector
Setto DIGITALtorecordfrom anaudiosource
connected totheDIGITALINPUTterminals.Setto
ANALOGto recordfromanaudiosourceconnected to
theANALOG INPUTterminals.
RECfs (RecordingSamplingFrequency)selector
When recordingisperformed usingtheANALOG
INPUTterminals,thesamplingfrequencycanbe
switched to44.1 kHzor48kHz.
SKIPPLAYswitch
Switches theskipplayfunction.
OPEN/CLOSEbutton
Press to openthecassetteholder,pressagainto close
it.
DISPLAYbutton
Selectseitherabsolutetime(ABS)orindividualtune
playbacktime(PROG)ortapecounter(COUNTER).
Whentapes whichcontain"TOC"signalsareused,the
total numberoftunesandtotalplaybacktimeare
displayed.
COUNTERRESETbutton
Presstoresetthetapecounter(0000).
REPEATbutton
Pressto continuouslyrepeatplayback.
PROGRAMbutton
Usedforprogrammingtunes.
CLEARbutton
Pressto cleartheinputdigitorprogrammedtune No.
CALLbutton
Pressto check theprogramcontents.
ABS (Absolute)TIMEbutton
Pressto inputthespecified timefor absolutetime
search.
Digitbuttons
Usedto selectdesiredtunenumbersfor program
playbackordirect playback.Thesebuttonsarealso
usedtoinputthespecifiedtimefor absolutetime
search.
REC(Record)LEVELcontrol
Usedtoadjusttherecording levelwhen recordingfrom
anaudiosourceconnectedtotheANALOG INPUT
jacks. Thiscontrolcan adjusttheleftandrightchannels
independently.
PHONESjack
Connectstereoheadphonestothisjack,
Onlyeffective incounterdisplaymode.
5

STARTIDbuttons
AUTOWRITE:PresstoautomaticallywritethestartID
signalsandtheirtunenumbersduringrecording.
WRITE:Usedto writethestartIDsignalmanually
duringrecordingorplayback.
ERASE:PresstoerasethestartIDsignal.
RENUMBERbutton
Usedto renumberthetunesinsequencefromthe
beginningofthetape.
SKIPIDbuttons
WRITE:PresstowritetheskipIDsignal.When the
SKIPPLAYswitchissetto ON,playbackskipsfromthe
pointwhere thisbuttonwaspressed tothebeginningof
thenexttune.
ERASE:Pressto erasetheskipIDsignal.
STOPbutton
Pressto stopthetaperunning.
PLAY button
Presstostartplayback.When theRECbuttonis
pressed,pressingthisbuttonorthePAUSEbutton
initiatesrecording.
REW(Rewind)button
Presstorewindthetape.
Whenthisbuttonispressedduringplayback,playback
startsfrom thebeginningofthecurrenttune.To play
theprevioustune,pressthisbuttonagain(APSS).
FF(Fastforward)button
Presstofastforwardthetape.
Whenthisbuttonispressed duringplayback,playback
startsfromthebeginningofthenexttune(APSS).
REVIEWbutton
Pressto rewindthetapewhilelisteningtoitscontents at
approximately3timesthenormalspeed.
CUEbutton
Presstofastforward thetapewhilelisteningto its
contents atapproximately3timesthenormalspeed.
REC(Record)button
Presstoenterrecordstand-bymode.Tostart
recording,pressthePLAYbuttonorPAUSEbutton.
PAUSEbutton
Press to stopplaybackorrecordingtemporarily.To
resumeplaybackorrecording,pressthePLAYbutton
orthisbuttonagain.
RECMUTEbutton
Presstocreatea blanksection whilerecording.A
blanksectioncontinuesaslongasthebuttonis
pressed.
ENDIDbuttons
WRITE:Pressthisbuttonattheendofa recording.
TheendIDsignaliswrittentoindicatethatpoint.
ERASE:PresstoerasetheendIDsignal.
SEARCH:PresstosearchfortheendIDsignal.The
taperapidlygoestotheendofa recordingand
recordingcanbeeasilystartedfrom thatpoint.
PHONESLEVELcontrol
Adjusts thevolumeoftheheadphones.
6

Displaywindow
Remotecontroltransmitindicator
Lightswhentheremotecontroltransmitterisoperated.
TOC(TableofContents)indicator
Lightswhen atapecontainingaTOC isplayed.
Tunenumberdisplay
Indicatesthetunenumber.
COUNTERindicator
Lightswhenthedisplayisincountermode.
ABS(Absolutetime)indicator
LightswhenthedisplayshowsABS time(elapsed
playingtimefrom thebeginningofthetape).
Counter/ABStime/Tuneplayingtime/Programmed
tunenumberdisplay
Displaysthe tapecounterreading,ABS time,tune
playingtime(elapsedplayingtimefrom thebeginning
ofthecurrenttune)orprogrammedtunenumber.
PROGindicator
Lightswhen thedisplayshowstheelapsedplayingtime
from thebeginningofthecurrenttune.
Samplingfrequencyindicators
Lightaccordingtothesamplingfrequencyoftheaudio
signal.
DEWindicator
Appears when condensationoccursinthisunit(drum,
head,etc.).
COPYPROHIBITindicator
Appearswhenarecordingcannotbeperformedwitha
digitalsignal.Inthiscase,record thesource usingthe
ANALOGjacks.
WARNINGindicator
Iftheheadbecomesexcessivelydirty,a signalread
erroroccursduringplayback,andthesoundcannotbe
heard.At thistime,the"WARNING"indicatorappears.
Ifthisoccurs,usea commerciallyavailabledigitalaudio
cleaningtapeorhaveyourYamahadealercleanthe
head.
ST-ID/SKIP-ID/END-IDindicators
LightwhenthestartID,skipIDorend IDsignalis
detected,orflasheswhenitiswrittenorerased.
APMS(AutomaticProgrammableMusicSelector)
indicator
Appearswhen programmingorduringprogram
playback.
APSS(AutoProgramSearchSystem)indicator
Appearswhenthebeginningofatuneissearchedfor.
Peaklevelmeter
Displaystherecordinglevelorplaybacklevel.
EMPHASISindicator
Appearswhentapesrecordedwithemphasisare
played,orwhenrecordingfrom a digitalsource on
whichemphasisisapplied.Theemphasisfunction
reducesthenoiseofthehighfrequencyrevelby
boostingthe highfrequencylevelduringrecording
(Pre-emphasisfunction)andloweringitduring
playback(De-emphasisfunction).Thisunit
incorporatesonlythede-emphasiscircuit.Youcan
playorrecordemphasizedsignalsbutcannotnewly
applyemphasisto signals.
Playindicator
LightswhenthePLAYbuttonispressed.
Recordingindicator
LightswhentheRECbuttonispressed.
Pauseindicator
LightswhenthePAUSEbuttonispressed,orinrecord
stand-bymode.
Repeatindicator
Lightsduringrepeatplayback.
7

RearPanel
NAMESOFCONTROLS
ANALOG INPUTjacks(unbalancedtype pin-jacks)
When thesejacksareusedfor recording,adjustthe
inputlevelwiththeRECLEVELcontrol.
ANALOGINPUTselector
Usedtoselect theanaloginputjacks between
balancedtype(XLR) andunbalancedtype.
ANALOG OUTPUTjacks (unbalancedtype pin-jacks)
Maximumoutputlevelis2 V.
OPTICALDIGITALINPUT/OUTPUTjacks
TheseopticaldigitalI/Ojacks arebasedonEIAJCP
340specifications.
DIGITALINPUTselector
Usedtoselect the digitalinputjacks betweenOPTICAL
andCOAXIAL.
COAXIALDIGITALINPUT/OUTPUTjacks
ThesecoaxialdigitalI/Ojacks arebasedonIEC958
specifications.
ANALOG INPUTterminals(balancedtype Cannon-
jacks)
The second pinisHOT.
ANALOG OUTPUTterminals(balancedtype
Cannon-jacks)
Reference levelis+4dBm.
Pinassignmentofthebalancedtype (XLR-3-31/XLR-
3-32)connectors
REMOTEjack
Connectto theplugofthesuppliedremote control
transmitter.
* Neverconnect a remotecontrolunitotherthanthe
suppliedremotecontroltransmitter.
8

Wired remotecontroltransmitter
StartIDbuttons
SkipIDbuttons
EndIDbuttons
Clearbutton
Programbutton
Repeat button
Open/closebutton
Stopbutton
Playbutton
Recordbutton
Pausebutton
Remotecontrolcable
ConnecttotheREMOTEjack ontherearpanel.
Renumberbutton
Digitbuttons
Callbutton
Absolutetimebutton
Displaybutton
Counterresetbutton
Cuebutton
Reviewbutton
Fastforwardbutton
Rewindbutton
NOTES:
All buttonshavethesamefunctionsasthose onthe
frontpanel.
Theremotecontroltransmitterdoesnotrequireany
battery.Powerissuppliedfrom theREMOTEjack on
therearpanel.
9

Connectingananalogaudiocomponent
CONNECTIONS
•
•
Besureto disconnectthepowercords ofboth
componentsfrom the AC outletbeforeconnecting.
Thesamechannelsofthisunitandtheother
componentshouldbeconnectedproperly;rightto
right,andlefttoleft.
1ConnecttheANALOG INPUTjacks (balancedtype or
unbalancedtype)ofthisunittotheanalogoutputjacks
of theamplifierorstereomixer,etc.
2ConnecttheANALOG OUTPUTjacks (balancedtype or
unbalancedtype)ofthisunitto theanaloginputjacks
oftheamplifierorstereomixer,etc.
3SettheANALOG INPUTselector.Whenusingthe
balancedtypeterminals,setthisselectortotheXLR
position.Whenusingtheunbalancedtype jacks,set
thisselectorto thePINposition.
NOTE:
Makesureallconnectionsaresecurely made.Loose
connectionsmaycauseintermittentsoundornoise.
10

Connectingtoanotherdigitalaudiotapedeck,oranamplifier,etc.whichhasdigitaljacks
WhenthisunitisconnectedtoanotherDATdeck,
amplifierorother digitalsource,suchasa CD player
with digitaljacks,digital-to-digitalrecordingwillbe
carriedout.
Besuretodisconnectthe powercords ofboth
componentsfrom theAC outletbeforeconnecting.
NOTES:
WhenthePOWERswitch isturnedon,the insideofthe
OPTICALOUTPUTjack illuminatesred.Thisred light
(whichiscompletelyharmless)isusedto send the
digitalsignal.
Donotfold orbendthe opticalfiber cablebecauseit
damageseasily.
WhenusingtheCOAXIAL DIGITALjacks
1ConnecttheCOAXIAL DIGITALINPUTjacktothe
coaxial digitaloutputjackandtheCOAXIAL DIGITAL
OUTPUTjack to thecoaxialdigitalinputjackofanother
DATdeck,oramplifier,etc.usingthecoaxialcables.
2Setthe DIGITALINPUTselectorto theCOAXIAL
position.
WhenusingtheOPTICALDIGITALjacks
1ConnecttheOPTICALDIGITALINPUTjack to the
opticaldigitaloutputjack andtheOPTICALDIGITAL
OUTPUTjack to theopticaldigitalinputjackofanother
DATdeck, oramplifier,etc.usingtheopticalfiber
cables.
2SettheDIGITALINPUTselector to theOPTICAL
position.
11

Connectingtheremotecontroltransmitter
ByconnectingtheremotecontrolcabletotheREMOTEjackontherearpanel,thisunitcanbeoperatedwiththeremote
controltransmitter.
NOTES:
Donotstrikeordroptheremotecontroltransmitter.
Also, donotgettheremotecontroltransmitterwetor
placeitina humidlocation.
Donotconnectthisremotecontroltransmittertoother
equipment.
Connectonlythesuppliedremotecontroltransmitterto
theREMOTEjack.
Connectingheadphones
Forbestresults,use8-ohmto 32-ohmheadphoneswitha
standardstereoheadphoneplug1/4" (6.3mm).
TheheadphonevolumecanbeadjustedwiththePHONES
LEVELcontrol.
ConnectingtheACpowercord
12
Afterconnectingallequipment,connecttheAC powercord
plugtoanAC walloutlet.

DAT(DigitalAudioTape)
DATcassettes
ADATcassettemeasures2-7/8"x7/16"x2-1/8"(73mmx
10.5 mmx54 mm),nearlyhalfthesizeofanalogaudio
cassettes.Furthermore,thecaseisconstructedtoprevent
thetapefrom beingscratchedorsoiled.
DATrecordingscheme
IntheDATsystem,theheadisrotatedathighspeed and
mountedatananglewithrespectto thedirectionoftape
travel.
ThePCM(audiosignal)areaisrecordedwiththedigital
signalwhichhasbeenconverted from theaudiosignal.
(PCM=PulseCodeModulation).Thesubcodeareasare
recorded withinformationsuchasthetunenumber,
individualtuneelapsedtimeandabsolutetime.The
subcodeareasenableaccuratetunesearchingsincethe
signalsinthesubcodeareasarereadwhile thetapeis
moving.
Samplingfrequencies
Thereare3 samplingfrequenciesusedwhen converting
analogaudiosignalsto digitalsignals:48kHz,44.1kHz
and32kHz.
48kHz:UsedforcommerciallyavailableDATmusictapes
orstandardrecorded DATtapes.
44.1kHz:UsedforcommerciallyavailableDATmusictapes
andCDs.
32kHz:Usedforsatellitebroadcasts.
At32kHz,thisDATdeckcannotrecordanalogsignals.
13

Preventingaccidentalerasure
To preventaccidentalerasure,slidethetabto theleftto
openthehole.Thetapecannotberecorded evenifthe
RECbuttonispressed.SeeFig.A.
Toallowrecordingonthetapeagain,slidethetabto
therighttoclosethehole.See Fig.B.
Handlingdigitalaudiotapes
Digitalaudiotapesarepreciselyconstructedtorecord
andplaybackhighlyaccuratedata.Neveropenthe
cassettelidandtouchthetape.Touchingthetapemay
damagedit.
Donotusescratched,dirtyorwrinkledtapes.Useof
suchtapesmaycausesounddropoutsordamagethe
head.
Storingdigitalaudiotapes
Alwayskeeptapesthatarenotinuseintheircases.
Avoid storingtapesindirectsunlight,nearheat
generatingequipmentorinhumidlocations.
Avoidstoringtapesindustylocations.
Donotstorenearstrongmagneticfields(e.g.near
electricclocks, toys usingmagnets,etc.).Magnetic
fieldswilldamagerecordings.
Donotdroporsubjectthetapeto strongvibrations.
Rewindthetapeafteruse.Ifthereisanyslackinthe
tape,rewindagain.
SerialCopyManagementSystem(SCMS)
Mostdigitalsources containa copy prohibitcode. This
unitutilizesthe serialcopy managementsystem that
permitsdigital-to-digitalrecordingfor atleastone
generation.
Evenwhenatapewhich hasbeenrecorded from analog
sources isdubbed,thissystem regards the source asa
digitalsourcecontainingthecopy prohibitcode sincethe
dubbingwasperformed throughtheA/D converter, and
permitsdigital-to-digitalrecording onlyfor one generation.
14

LOADINGANDUNLOADINGCASSETTES
Loadinga cassette
1TurnthePOWERswitchON.
2PresstheOPEN/CLOSEbuttontoopenthe
cassetteholder.
"OPEN"flashesonthedisplay.
3Placea DATcassette inthecassetteholder.
Besurethewindowofthecassettefacesyouandthe
slidetabfaces you ontherightside.
4PresstheOPEN/CLOSEbuttonagaintoclose
thecassetteholder.
Unloadingthecassette
1PresstheOPEN/CLOSEbuttontoopenthe
cassetteholder.
2Removethecassettefromthecassetteholder.
3PresstheOPEN/CLOSEbuttonagaintoclose
thecassetteholder.
NOTES:
Thecassette holderwillnotclose completelyifthetape
isinsertedimproperly.Inthiscase,presstheOPEN/
CLOSEbutton
to openthecassetteholderand
insertagain.
Ifthecassetteholderdoesnotclose completely,itwill
automaticallyopenafterabout10seconds evenifthe
OPEN/CLOSEbutton
isnotpressed.
Donotattempttoopenorclosethecassette holderby
hand.Doingsowilldamageit.
15

RECORDING
Introductionto DATrecording
Unlikeordinaryaudiocassettetapes,variouscontrolcodes
calledsubcodescanbewrittenontheDATcassettetape
separatelyfrom theaudiosignal.Thesubcodes arewritten
for a varietyofconvenientplaybackandtape editing
functions.Youcanwritethree types ofsubcodes;startID,
endIDandskipID.
StartID:Indicatesthebeginningofeachtuneandisused
for programmingandsearchingfor tunes.
EndID:Indicatestheend oftherecording.
SkipID:Indicatesthebeginningofa section tobe
skipped.
Inaddition,absolutetimeisautomaticallywrittenafterthe
recordingiscompleted.
Before makinganimportantrecording,itis
recommended thatyoumakeatrialrecordingtoensure
thatthedesiredaudioisbeingrecorded properly.
Recordingfrom the digitalinputjacks (coaxialoropticaljack)
Thisprocedureisrecommendedwhenrecording from anotherDATdeck
orotherdigitalaudiosource.
1Turnthe POWER switchON.
WheneverthePOWERswitchisturnedON,theSTART
IDAUTOWRITEbuttonissettoonandthebutton
lightsup.Thetunenumberswillbewritten
automaticallyduringrecording.Ifthetunenumbersare
notnecessary,presstheSTARTIDAUTOWRITEbutton
so thatthe lightofthebuttongoesoff.
2SettheINPUTselectortotheDIGITALposition.
3SettheDIGITALINPUTselectorontherearpanel
accordingtothejacks tobeused.
Coaxialjacks:SettotheCOAXIALposition.
Opticaljacks:SettotheOPTICALposition.
4Loada DATcassetteinthecassetteholder.
5PresstheRECbutton
Theunitentersrecord stand-bymode.Whenrecording
fromthebeginningofthetape,asoundmutedsection
ofabout7 seconds isautomaticallyrecorded beforethe
deck entersrecord stand-bymode.
6Setthesourcetoberecordedto playmodeand
DressthePLAYbuttontostartrecording.
WhentheSTART IDAUTOWRITEbuttonissettoon
andtheunitencountersa soundmutedsectionofmore
than2 seconds,astartIDiswrittenandthetuneis
numberedautomatically.
7Whentherecordingiscompleted,presstheENDID
WRITEbutton.
AftertheendIDsignaliswritten, thetape stops
automatically.
NOTES:
IftheendIDsignaliswritten,itiseasyto continuea
recordingfrom theend ofa previousrecording.See
page20.
Whendigitalsourcesarerecorded from a DATdeck
whichcansendcategorycode"DATandthestartID
andskipIDsignalstodigitaloutputs,makesurethe
STARTIDAUTOWRITEbuttonisturnedon(lit).The
unitrecordsstartIDandskipIDsignals,which are
containedinthesource,astheyare.
Ifthepowerofthesource toberecordedisturnedoff,
theunitentersrecordstand-bymodeandthe tape
runningstops.Inthisstate,turningonthepowerofthe
sourcetoberecorded resumesrecordingstartingfrom
thenexttunenumber.
When recordingthroughthedigitalinputjacks, no
signalisoutputto thedigitaloutputjacks.
BesuretosettheINPUTselectorandDIGITALINPUT
selectorbeforerecording.Iftheyareswitchedduring
recording,theunitenterspausemode.
Thesamplingfrequencyisautomaticallyswitched
accordingtothesource beingrecorded.
Whenrecordingfrom thedigitalinputjacks,thereisno
needtoadjusttherecordinglevel.
16

Recordingfrom theanaloginputjacks
Thisprocedureisrecommendedwhenmakinga recording
from a mixingconsole,analogtapedeck,tuner,
phonographorothersimilarexternalaudiosource.
Whenrecordingfromthesesources,thetunenumbersmay
notbewrittenproperlywiththeStartIDAutoWritefunction.
Inthiscase,youcanmanuallywritestartIDsignalsduring
recordingorafter recording.Seepage19.
1TurnthePOWERswitchON.
2SettheSTART IDAUTOWRITE button.
Ifthesource to berecordeddoesnotcontaina sound
mutedsection
of
about2 seconds between tunes,
presstheSTARTIDAUTOWRITEbuttonsothatthe
lightofthebuttongoesoff.
3SettheINPUTselectorto theANALOGposition.
4SettheRECfs selector.
5SettheANALOG INPUTselectorontherearpanel
accordingtothejackstobeused.
Unbalancedpinjacks:Setto thePINposition.
Balancedpinjacks: SettotheXLR position.
6Loada DATcassette.
7PresstheRECbutton
Theunitentersrecord stand-bymode.Whenrecording
from thebeginningofthetape,a soundmutedsection
ofabout7 seconds isautomaticallyrecordedandthe
unitentersrecordstand-bymode.
8Playthesource toberecordedandadjustthe
recordinglevelwiththeRECLEVELcontrol.See
below.
9PressthePLAY buttontostartrecording.
10Whenrecordingiscompleted,presstheENDID
WRITEbutton.
AftertheendIDsignaliswritten,thetapestops
automatically.
IftheendIDsignaliswritten, itiseasyto continuea
recordingfrom theendofa previousrecording.See
page20.
NOTE:
BesuretosettheINPUT,ANALOG INPUTandRECfs
selectorsbeforerecording.IftheINPUTorRECfsselector
isswitchedduringrecording,theunitenterspausemode.
IftheANALOG INPUTselectorisswitched,aseveral-
second blanksectionisrecorded.
Toadjusttherecordinglevelwhenrecording
from theanaloginputjacks
As a guide,adjusttherecordinglevelsothatthepeaklevel
meterisbetween"-18dB"and"0".Besurethepeaklevels
donotreach"OVER".Ifthepeaklevelsexceed"0","OVER"
lightsanddistortedsoundmayresult.
Iftherecordinglevelsfor theleftandrightchannelsare
different,adjusttheleftandrightchannelsseparately
(Seethefigure.)
17

Tostoprecordingtemporarily
1PressthePAUSEbutton
Recordingstopstemporarily.
2PressthePLAYbuttonorPAUSEbutton
againtoresumerecording.
When theSTART IDAUTOWRITE buttonisON(lit),the
startIDsignaliswrittenatthepointwhere recording
resumes.
NOTE:
To protectthetapeandthehead,theheadwillseparate
from thetapeafterabout5 minuteshavepassedin
recordingpausemode.
Blanksectionsandsoundmutedsections
Withconventionalanalogaudiotapes,the sectionson
whichnorecordinghaseverbeenmade(blanksection
createdwithfast-forwarding,etc.)andthesections on
whicharecordinghasbeenmadebutthe soundismuted
(soundmutedsectioncreatedwiththerecord muting
function)aretreatedthesame,andtheyareused to search
fortunes,sincenosoundcanbeheardfrom thesesections.
Conversely,theDATdeckdistinguishesbetween blank
sections andsoundmutedsections.Ifblanksections
remainonthetape,searchoperationusingtheAPSS
function maytakequitea longtimeandsearchoperation
usingabsolutetimemaynotbecarriedoutproperly.
Therefore,when recording,besurethatnoblanksections
areleftonthetape.
Inaddition,sinceno-soundsections betweentunesmustbe
recordedonanalogaudiotapesfortunesearchoperation,
recordingno-soundsections(soundmutedsections)
betweentunesisrecommended consideringdubbingfrom
DATcassettes toanalogaudiotapes.
Toinsertsilencebetweentunes,presstheRECMUTE
buttonduringrecording.A soundmutedsectionwillbe
createdaslongasthebuttoniskeptpressed.Itis
recommendedtocreateasoundmutedsectionof
about4 seconds for dubbingontoananalogaudiotape
lateron.Donotcreatea blanksectionbyadvancing
thetapewiththeFFbuttonorPLAYbutton
To startrecordingfrom themiddleofthetape,usethe
endsearchfunction(page20)tolocatetheendofthe
previousrecording.Thiswillavoidleavinga blank
section.
18

START IDSIGNALSAND TUNENUMBERS
Theactualnumberofa recordedtuneona tapeandthe
tunenumberdisplayedontheunitmaynotbethesame,
even ifthetunenumbersarewrittenautomaticallywith the
STARTIDAUTOWRITEfunction.Thismayoccurduetothe
contentsoftherecorded tune.
Thetunenumbersmaynotberecorded properlywhen
recording from sourcesthatcontainthefollowing:
Conversationswith breaksinthem.
Lowoverallrecording level.
Shortintervals(i.e.,2secondsorless)between tunes.
Longquietpianissimopassages.
Noiseorhumbetweentunes.
Ifthetunenumbersarenotwritten properly,itmaybe
necessaryto addorerasethetunenumbers.
Whenrecordingisperformedfromsourceswithoutsilence
betweentunes,itisrecommendedtowritethetune
numbersmanuallyduringrecordingorafterrecording.
Towrite tunenumbersmanuallyduring
recording
PresstheSTARTIDWRITE button(thebuttonlights)at
thebeginningofeach tune.
EverytimetheSTARTIDWRITEbuttonispressed,thestart
IDsignaliswrittenandthetunenumberisswitchedto next
number.WhilethestartIDsignaliswritten,theST-ID
indicatorflashes.
Manuallywritingthetunenumbersispossible
regardlessofthe settingoftheSTART IDAUTO WRITE
button.
Upto99tune numberscanbewritten. Ifatapewhich
containsmorethan99tunes isplayed,thetunenumber
isnotdisplayedafterthe100th tune.
TowritestartIDsignalsmanuallyduring
playback
AstartIDsignalindicatesthebeginningof a tune.Ifthis
signalandcorrespondingtunenumberarenotwritten, tune
selectionbyAPSS,APMSanddirectselectionis
impossible.
IfstartIDsignalsandtunenumbersarenotwritten properly
onatape,insertstartIDsignalsaccording to the following
procedure,andthenrenumberthem(page20).
1Duringplayback,presstheSTART IDWRITE button
(thebuttonstartsflashing)atthepointwhere the
startIDsignalistobeinserted.
Thetapeisplayedbackfor 3 seconds andthen
rewoundtoapoint2secondsbeforetheSTARTID
WRITEbuttonwaspressed.Playbackstartsfrom this
pointfor5 seconds andrepeats10times(Test
playback).SincetheST-IDindicatorlightswhen the
tapeencountersthestart-IDsignal,theplacementof
thestart IDsignalcanbeverified.Checktheposition
ofthestartIDsignalwhile listeningto the test playback.
2IfthestartIDsignalisnotcorrectlyinsertedatthe
beginningofthetune, moveitbackwardorforward
with the REW or FF button.
EachtimetheREWbuttonisDressed,thestartID
signalmovesbackward0.3seconds. Eachtimethe FF
buttonispressed,the start IDsignalmoves
forward0.3seconds.
3WhenthestartIDsignaliscorrectlyinserted,press
theSTARTIDWRITE buttonagainduringtest
playback.
Thebuttonlightsandthe tapeisrewoundtothe
beginningofthetune,andthestartIDsignaliswritten.
(Whilewriting,theST-IDindicatorflashes.)Playback
resumesafterthestartID)signaliswritten.
19

NotesonwritingstartIDsignals
IfastartIDsignaliswrittenona pointwhere a skipID
signalhasbeenwritten,theskipIDsignaliserased.
TheintervalbetweenstartIDsignals(playingtimeofa
tune)shouldbe9secondsormore.This9-second
intervalisnecessarytoensureproperoperationofthe
APSSfunction,APMSfunctionandrenumberingtunes.
ToerasestartIDsignals
IfastartIDsignaliswrittenona undesirablepoint,you can
eraseitduringplayback.Besuretorenumberthetunes
aftererasingastartIDsignal.
PresstheSTARTIDERASEbutton(thebuttonflashes)
whentheST-IDindicatorappearsonthedisplay.
Thetaperewindsto thebeginningofthetunebeingplayed
andthestartIDsignaliserased.Whileerasing,theST-ID
indicatorflashes.PlaybackresumesafterthestartID
signaliserased.
IfatunenumberisalsowrittenwiththestartID,both
signalswillbeerasedatthesametime.
Torenumbertunenumbers
WhenstartIDsignalsareinsertedorerased,tunenumbers
aredisplaced.Renumberthetunenumbersfollowingthis
procedure.
PresstheRENUMBERbuttoninstopmode.
Thetapeisrewoundtothebeginningofthetape,andthe
tunenumbersareautomaticallyrenumberedathighspeed.
Whenevertheunitencountersa startIDsignal,theproper
tunenumberiswrittenstartingfrom P-NO1.
When renumberingiscompletedattheendofthetape,
thetapeautomaticallyrewindstothebeginning.
ENDIDSIGNALS
An endIDsignalindicatestheendofa recording.The tape
does notadvancebeyondthepointwhere thissignalis
written.Therefore,itiseasyto continuearecordingfrom
theendofa previousrecording.Also,thiswillavoidmaking
ablanksectionbetweenrecordings.
20
TowriteanendIDsignal
Duringrecording,presstheENDIDWRITE button.
Asoundmutedsectionisautomaticallyinsertedandthe
endIDsignaliswritten.WhiletheendIDsignalisbeing
written,theEND-IDindicatorflashesandthenthetape
automaticallystops.
When theunitencountersanendIDduringplayback,
fast-forwardingorcueing,thetunenumberchangesto
"EE",andthetapestopsautomatically.
DonotwriteanendIDsignaliftheintervalbetween
startIDsignalsisshorterthan9 seconds.APSS and
renumberingfunctionsmaynotbecarriedoutproperly.
Other manuals for DTR2
3
Table of contents
Other Yamaha Cassette Player manuals

Yamaha
Yamaha TC800GL User manual

Yamaha
Yamaha KX-800/U User manual

Yamaha
Yamaha KX 380 User manual

Yamaha
Yamaha MT3X User manual

Yamaha
Yamaha TC800GL User manual

Yamaha
Yamaha MT3X User manual

Yamaha
Yamaha KX-330 User manual

Yamaha
Yamaha KX-500A User manual

Yamaha
Yamaha KX-W392 User manual

Yamaha
Yamaha DTR2 User manual

Yamaha
Yamaha MT50 User manual

Yamaha
Yamaha MT120S User manual

Yamaha
Yamaha KX-260 RS User manual

Yamaha
Yamaha KX-W262 User manual

Yamaha
Yamaha MT1X User manual

Yamaha
Yamaha MT120S User manual

Yamaha
Yamaha K-540 User manual

Yamaha
Yamaha MT3X User manual

Yamaha
Yamaha MT8X User manual

Yamaha
Yamaha KX-650 User manual