Yamaha TSX-120 User manual

DESKTOP AUDIO SYSTEM
TSX-120
OWNER’S MANUAL
MANUAL DE INSTRUCCIONES
TL

i En
1 To assure the finest performance, please read this manual
carefully. Keep it in a safe place for future reference.
2 Install this unit in a well ventilated, cool, dry, clean place
with at least 15 cm on the top, 10 cm on the left and right,
and 10 cm at the back of this unit — away from direct
sunlight, heat sources, vibration, dust, moisture, and/or
cold.
3 Locate this unit away from other electrical appliances,
motors, or transformers to avoid humming sounds.
4 Do not expose this unit to sudden temperature changes
from cold to hot (or vice versa), and do not locate this
unit in an environment with high humidity (i.e., a room
with a humidifier) to prevent condensation inside this
unit, which may cause an electrical shock, fire, damage to
this unit, and/or personal injury.
5 Avoid installing this unit where foreign object may fall
onto this unit and/or this unit may be exposed to liquid
dripping or splashing. On the top of this unit, do not
place:
– Other components, as they may cause damage and/or
discoloration on the surface of this unit.
– Burning objects (i.e., candles), as they may cause fire,
damage to this unit, and/or personal injury.
– Containers with liquid in them, as they may fall and
liquid may cause electrical shock to the user and/or
damage to this unit.
6 Do not cover this unit with a newspaper, tablecloth,
curtain, etc. in order not to obstruct heat radiation. If the
temperature inside this unit rises, it may cause fire,
damage to this unit, and/or personal injury.
7 Do not plug in this unit to a wall outlet until all
connections are complete.
8 Do not operate this unit upside-down. It may overheat,
possibly causing damage.
9 Do not use force on switches, knobs and/or cords.
10 When disconnecting the power cable from the wall outlet,
grasp the plug; do not pull the cable.
11 Do not clean this unit with chemical solvents; this might
damage the finish.
12 Only voltage specified on this unit must be used. Using
this unit with a higher voltage than specified is dangerous
and may cause fire, damage to this unit, and/or personal
injury. Yamaha will not be held responsible for any
damage resulting from use of this unit with a voltage
other than specified.
13 To prevent damage by lightning, keep the power cable
and outdoor antennas disconnected from a wall outlet or
this unit during a lightning storm.
14 Do not attempt to modify or fix this unit. Contact
qualified Yamaha service personnel when any service is
needed. The cabinet should never be opened for any
reasons.
15 When not planning to use this unit for long periods of
time (i.e., vacation), disconnect the AC power plug from
the wall outlet.
16 Be sure to read the “TROUBLESHOOTING” section on
common operating errors before concluding that this unit
is faulty.
17 Before moving this unit, press ON/OFF to set the system
to off, and disconnect the AC power plug from the wall
outlet.
18 Condensation will form when the surrounding
temperature changes suddenly. Disconnect the power
cable from the outlet, then leave this unit alone.
19 When using this unit for a long time, this unit may
become warm. Turn the system off, then leave this unit
alone for cooling.
20 Install this unit near the wall outlet and where the AC
power plug can be reached easily.
21 The batteries shall not be exposed to excessive heat such
as sunshine, fire or the like.
Caution: Read this before operating your unit.
This unit is not disconnected from the AC power source as
long as it is connected to the wall outlet, even if this unit itself
is turned off by ON/OFF. In this state, this unit is designed to
consume a very small quantity of power.
WARNING
TO REDUCE THE RISK OF FIRE OR ELECTRIC SHOCK, DO
NOT EXPOSE THIS UNIT TO RAIN OR MOISTURE.
CAUTION
Use of controls or adjustments or performance of procedures
other than those specified herein may result in hazardous
radiation exposure.
CAUTION
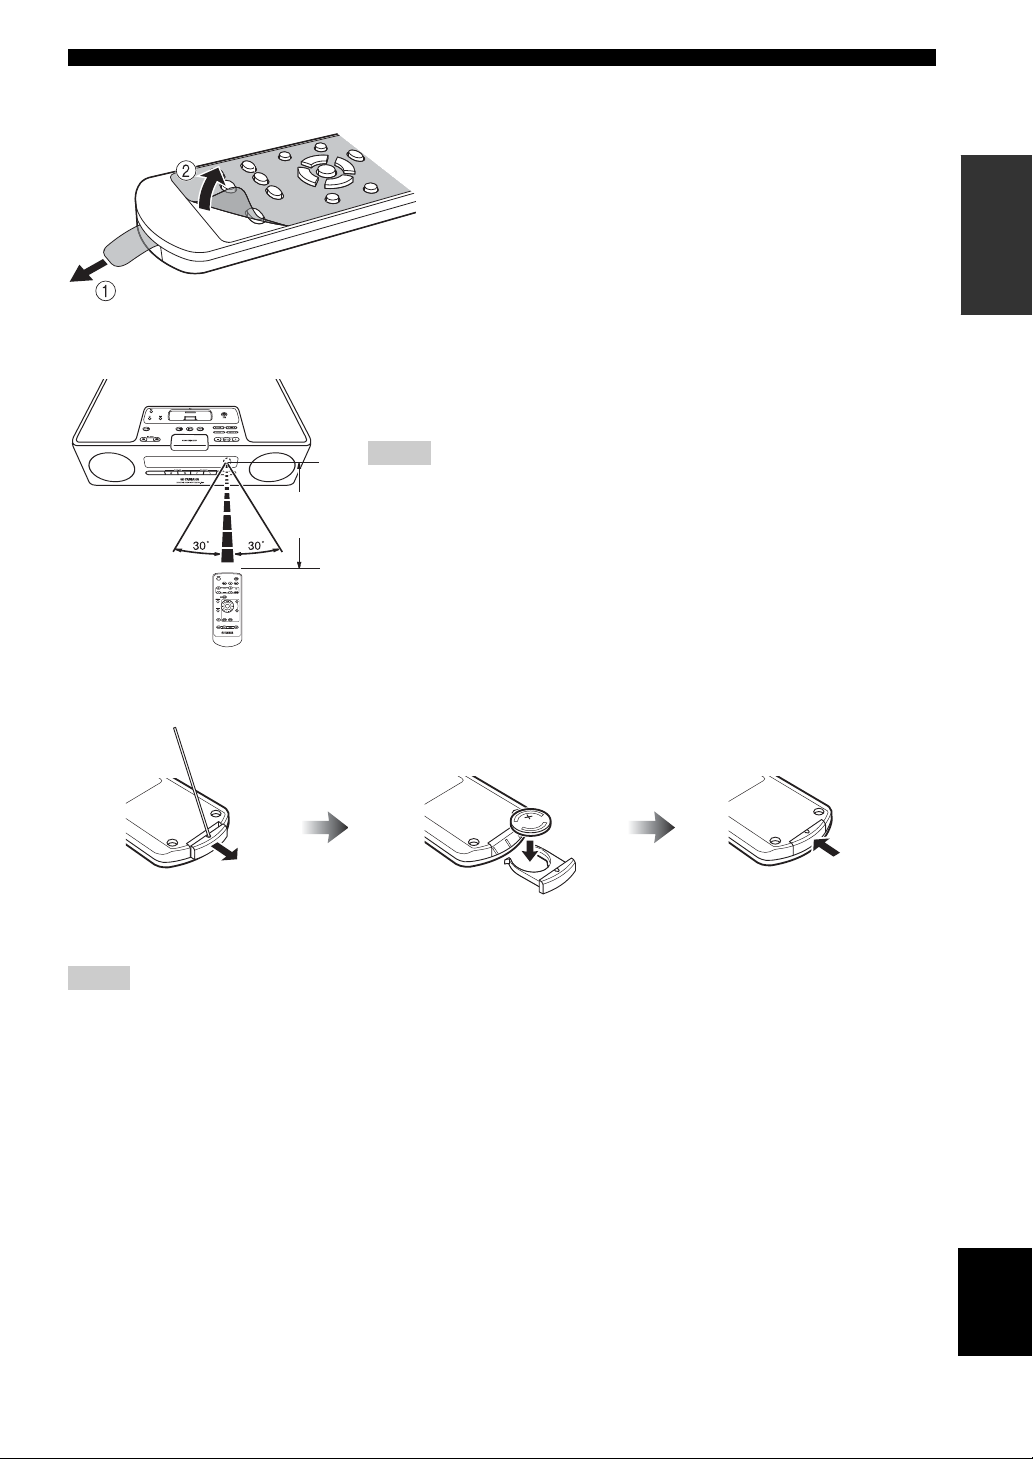
Danger of explosion if battery is incorrectly replaced. Replace
only with the same or equivalent type.
Taking care of the unit
When you wipe this unit, use a clean dry cloth.
●The name plate is located on the bottom of the unit.

1 En
English
PREPARATION OPERATION
ADDITIONAL
INFORMATION
PREPARATIONS BEFORE USING THIS UNIT
.............................................................................. 2
Turning on/off the system.......................................... 4
Adjusting the clock.................................................... 4
USING USEFUL FUNCTIONS ............................ 5
Using the alarm functions.......................................... 5
Setting sleeping mode................................................ 8
Setting Dimmer mode................................................ 8
Switching DSP mode................................................. 8
BASIC OPERATION............................................. 9
LISTENING TO iPod™ AND EXTERNAL
SOURCES ......................................................... 10
Listening to your iPod™ ......................................... 10
Playing back external sources.................................. 12
LISTENING TO FM RADIO STATIONS ........ 13
Connecting antennas................................................ 13
Tuning radio stations ............................................... 13
Presetting radio stations........................................... 13
Selecting preset radio stations (Preset tuning)......... 14
TROUBLESHOOTING .......................................15
General..................................................................... 15
iPod™...................................................................... 15
Radio reception........................................................ 16
Remote control ........................................................ 16
SPECIFICATIONS...............................................17
CONTENTS
PREPARATION
OPERATION
ADDITIONAL INFORMATION
■About this manual
• In this manual, operations that can be performed with either this unit or its remote control are explained using the unit.
• The symbol “☞” with page number(s) indicates the corresponding reference page(s).
• Notes contain important information about safety and operating instructions. yindicates a tip for your operation.
• This manual is printed prior to production. Design and specifications are subject to change in part as a result of
improvements, etc. In case of differences between the manual and the product, the product has priority.
■Supplied accessories
This product includes the following accessories. Make sure you have all of the following parts.
DESKTOP AUDIO SYSTEM
TSX-120
OWNER’SMANUAL
MANUAL DE INSTRUCCIONES
TL
Indoor FM antenna
(1.4 m (55-1/8”))
Remote control Owner’s manual

2 En
PREPARATION
1Source buttons: AUX, FM, iPod (☞P. 9)
2ON/OFF: System on/off (☞P. 4)
3VOLUME: Volume control buttons (☞P. 9)
4Audio control buttons (☞P. 9)
5iPod dock (☞P. 10)
6AUX in (☞P. 12)
7Alarm control buttons (☞P. 5)
8SNOOZE/SLEEP (☞P. 7, 8)
9Speakers
0FM control buttons (☞P. 13)
AFront panel display (☞P. 4)
BTo the wall outlet
CCLOCK SET (☞P. 4)
DFUNCTION
EDISPLAY (☞P. 11)
FDSP: DSP mode switching (☞P. 8)
GInfrared signal transmitter (☞P. 3)
HSLEEP: Sleep time setting (☞P. 8)
IMENU S/T/Center buttons*(☞P. 10)
JRANDOM/REPEAT: Changing the playback mode for
iPod (☞P. 10)
* The round shaped button on the center is called Center in this
manual.
PREPARATIONS BEFORE USING THIS UNIT

PREPARATIONS BEFORE USING THIS UNIT
English
3 En
PREPARATION
■Before using the remote control
■Using the remote control
■Replacing the battery in the remote control
Change the battery when the operation range of the remote control decreases.
• Insert the battery according to the polarity markings (+ and –).
• If the batteries run out, immediately remove them from the remote control to prevent an explosion or acid leak.
• If a battery starts leaking, dispose of it immediately. Be careful not to let the leaking battery acid touch your skin or clothing.
• Before inserting new batteries, wipe the compartment clean.
• Dispose of batteries according to your regional regulations.
Notes
1Remove the battery insulation sheet before using the remote
control.
2Remove the transparent sheet before using the remote control.
Use the remote control within 6 m (20’) of this unit and point it
toward the remote control sensor.
• Do not spill liquid on the remote control.
• Do not drop the remote control.
• Do not leave the remote control in the following places:
– hot or humid places such as a bathroom or near a heater
– extremely cold places
– dusty places
Notes
Within 6 m
(20’)
Use a straight pin to remove
the cover.
Replace the battery with
a new CR2025 battery.
Close the cover.

PREPARATIONS BEFORE USING THIS UNIT
4 En
1Connect the power cable to the wall
outlet.
2Press ON/OFF to turn on the system.
y
• This unit has an auto off function, which will automatically
switch the system to off if the system is left turned on for 1 hour
without playback or any other operation being performed. This
function is only available when the source is set to iPod.
• Press and hold ON/OFF on the top of the unit for more than 3
seconds to set the system to standby mode. All the information
on the front panel display is not displayed in standby mode.
This can reduce the power consumption. To cancel standby
mode, press ON/OFF.
• Even in system off/standby mode, the alarm function is
available.
• The memory back-up circuit prevents stored data such as the
time setting from being lost even in system off/standby mode.
The clock is not set at the factory.
1Press CLOCK SET.
2Select each setting with MENU S/T
and confirm with Center.
You can set YEAR →MONTH →DAY →TIME.
• This operation can be performed only with the remote control.
• Time appears in 12-hour notation (AM/PM), depending on the
model. For example, “4:00PM”.
• You can switch 12-hour/24-hour notation by pressing
FUNCTION →MENU S/T→Center to select TIME
FORMAT, then pressing MENU S/T→Center to select
12H/24H.
• The time settings are lost after one week when the power cable
is disconnected from the wall outlet.
Turning on/off the system
When the system is on: “Hello” appears, then clock and
other information are displayed.
When the system is off: “Good-bye” appears, then only
date and time are displayed.
Example: iPod playback mode display
Adjusting the clock
Notes

English
5 En
OPERATION
OPERATION
The unit has the dual alarm function. Each alarm time
always appears on the right/left sides of the clock on the
front panel display. When the alarm is set to on, the alarm
indicator and time light up.
You can set the different music to the alarm from what
you listen to during the setting.
This operation can be performed only with the buttons on the top
of the unit.
■Setting the alarm time and sound
To cancel the alarm function setting during the operations, press
SETUP1/SETUP2. The alarm is not set.
1Start setting ALARM1/ALARM2.
When you want to set the alarm to ALARM1, set on
SETUP1, and SETUP2 is for ALARM2.
2Set the alarm time.
1While setting the alarm function, the alarm
indicator blinks.
2The item you are setting also blinks.
3The > mark on the right side means that you have
other menu items on the following screens. You
can go to the next menu item setting by pressing
ENTER.
3Select and set TYPE →BEEP →
SOURCE →VOLUME.
1After setting the alarm time, select the alarm type
from BEEP/BEEP+MUSIC/MUSIC.
– BEEP: beep sound only
– BEEP+MUSIC: beep sound and music selected
in an input source, iPod/FM
– MUSIC: music only
If you set TYPE to BEEP+MUSIC, you can play
back the desired music in an input source, iPod/
FM and beep sound together at the time you set.
The music volume gradually increases to wake
you up comfortably, and then the beep sound
plays back at the time you set.
USING USEFUL FUNCTIONS
Using the alarm functions
Note
Note

USING USEFUL FUNCTIONS
6 En
2Select the beep sound.
5 kinds of beep sounds are stored on the unit.
The BEEP screen is skipped automatically if you
select MUSIC/BEEP+MUSIC in step 1.
y
You can preview the currently displayed beep sound by
pressing SNOOZE/SLEEP when you select the beep
sound. To stop the beep sound, press SNOOZE/SLEEP
again.
3Select the music source from iPod/FM or LAST
SET.
The SOURCE screen is skipped automatically if
you select BEEP in step 1.
iPod
You can select PLAYLIST or RESUME PLAY.
The music starts from the beginning of the
playlist. Before this operation, make a playlist on
your iPod (☞P. 7).
Select and set RESUME PLAY when you want to
resume the music, which you listen to last time, as
the alarm sound.
FM
Set preset number/frequency.
LAST SET
Keep the setting you set last time.
If the SOURCE is not set completely or the music device is
not set, the unit plays back the beep sound instead. For
example, if the unit cannot read your iPod, the beep sound
plays back.
4Set the alarm volume.
The volume is set with ENTER in step 4, then the
alarm setting is complete. The alarm is set to on
automatically.
■Switching on/off the alarm
You can switch on/off the alarm with ALARM1/
ALARM2, but the alarm settings are not deleted with this
operation.
Switch on/off the alarm function.
When the alarm is on, the alarm indicator and time light
up.
Select and set PLAYLIST.
Select and set the desired playlist.
Note

USING USEFUL FUNCTIONS
English
7 En
OPERATION
■Using the snooze function
When the beep sound, music, or both are played back, you
can set the snooze function.
Set the snooze function.
The function differs depending on the alarm type you set
in TYPE (☞P. 5).
BEEP: The beep sound stops by pressing SNOOZE/
SLEEP, and resumes after 5 minutes.
MUSIC: The music stops by pressing SNOOZE/SLEEP,
and resumes after 5 minutes.
BEEP+MUSIC: With one click of SNOOZE/SLEEP,
you can stop the beep sound and keep playing back the
music. The beep sound resumes after 5 minutes.
y
You can also set the snooze function by pressing SLEEP on the
remote control instead of SNOOZE/SLEEP on the unit.
■Stopping the alarm sound
You can stop the alarm sound in the 3 ways as follows.
When you stop alarm sound, the system is set to off.
Press ALARM1/ALARM2.
Press ON/OFF.
Press and hold SNOOZE/SLEEP for 2
seconds.
y
• If you do not stop the alarm, the alarm stops after 60 minutes
automatically.
• When you stop the alarm, the alarm indicator disappears. To
activate the alarm function again, press ALARM1/ALARM2 to
set the alarm to on.
• When you stop the alarm, the time setting, etc., is saved for
convenient use next time.
Any operations other than setting the snooze function, stopping
the alarm sound, or adjusting the volume control are not available
while playing back the alarm sound.
■About Playlist
You can collect your favorite songs in the library on your
iPod and make a list. This is a playlist. If you select a
playlist for playback, the songs in the playlist will be
played back. Even if you delete a song in a playlist, it is
not deleted from the library.
y
For more details on playlists, refer to the instruction manual of
your iPod.
Note

USING USEFUL FUNCTIONS
8 En
You can set the time to turn off the system automatically.
Select the sleep time.
When the sleep function is on, the SLEEP indicator lights
up.
y
You can also operate this function with SLEEP on the remote
control.
You can change the brightness of the front panel.
If you set DIMMER to AUTO, the dimmer level is
adjusted automatically, depending on the brightness of the
room. If your room is dark, the front panel becomes
darker.
y
The default setting is AUTO.
1Select DIMMER from the FUNCTION
menu.
y
After you select DIMMER with Center, < appears on the
left side of the front panel display. You can go back to the
FUNCTION menu by pressing MENU on the remote
control.
2Select the desired dimmer level.
You can switch the sound mode according to the
environment or your preference.
Switch DSP mode.
Each time you press DSP the setting switches as follows:
NORMAL: For normal sound
↓
MILD: For natural and mild sound
↓
HEAVY: For more powerful sound
(default setting)
↓
LIVE: For wide realistic sound
↓
Back to NORMAL
Setting sleeping mode
Setting Dimmer mode
Press repeatedly.
Switching DSP mode
Press repeatedly.

English
9 En
OPERATION
* Even when the system is off, you can start playback of the desired source by pressing one of the Source buttons, without pressing
ON/OFF.
BASIC OPERATION
:Press to turn off the
sound. Press again to
resume the volume.
:Press one of the Source buttons to select the desired source.*
:Press to play/pause.
: Press to skip backward/forward.
:Press to control the volume.

10 En
• The unit is compatible with iPod touch, iPod (Click Wheel
including iPod classic), iPod nano and iPod mini.
• You can remove your iPod whenever you want.
• Some features may not be available depending on the model or
the software version of your iPod.
■Playing back normally
1Set your iPod into the iPod dock.
• A compatible Dock Adapter (not supplied) is required to
attach to the unit.
• The iPod may not be set in the iPod dock securely if it is in
its protective case.
2Select iPod.
Playback starts.
y
For operations of your iPod, refer to the instruction manual of
your iPod.
■Selecting music on iPod with the remote
control
You can also operate with your iPod only when LIST
DISP is set to iPod (☞P. 11).
MENU: Go back to the previous menu.
Center: Confirm.
S/T: Select menu or items.
■Using shuffle/repeat mode
After the above steps 1 and 2, you can enjoy shuffle and
repeat mode.
Press RANDOM to switch shuffle mode
for iPod.
You cannot set ALBUM when you use an iPod touch.
Switch repeat mode.
LISTENING TO iPod™ AND EXTERNAL SOURCES
Listening to your iPod™
Notes
Notes
iPod
Dock Adapter
Note
Press repeatedly.
Press repeatedly.

LISTENING TO iPod™ AND EXTERNAL SOURCES
English
11 En
OPERATION
■Switching the playback information
display
Switch the display in iPod playback
mode.
You can change the information display as follows.
Song number and elapsed time (default setting)
↓
Song number and remaining time
↓
Song name
↓
Artist name
↓
Album name
↓
Back to the default setting
• This function is available for iPod touch, iPod classic, iPod 5th
generation or later, and iPod nano. However, even with these
models, this function may not be available depending on the
software version of your iPod.
• If you intend to disconnect the power cable of the unit for a long
time, remove the iPod from the unit.
■Switching the playback list display
LIST DISP allows you to select iPod or the front panel
display of the unit to display the list.
If you set LIST DISP to iPod, you can also control
playback operations and display the menu list on the iPod.
y
The default setting is iPod.
When LIST DISP is set to F.PANEL, the menu list appears only
on the front panel display of the unit, and all playback operations
except stop are available only on the unit. These operations are
not available with your iPod.
1Select LIST DISP from the
FUNCTION menu.
2Select iPod/F.PANEL.
Notes
Press repeatedly.
Note
Example: When LIST DISP is set to F.PANEL

LISTENING TO iPod™ AND EXTERNAL SOURCES
12 En
■Playing back normally
1Connect your portable audio device
to the AUX terminal using a
commercially available 3.5 mm mini
plug cable.
Turn down the volume of this unit and your portable audio device
before connection.
2Select AUX.
3Start playback on the connected
portable audio device.
y
For operations of the portable audio device, refer to the
instruction manual of the device.
Playing back external sources
Note

English
13 En
OPERATION
• The antenna should be stretched out.
• If radio reception is poor, change the height, direction, or
placement of the antenna.
• If you use an outdoor antenna instead of the supplied FM
antenna, reception will be better.
1Turn on FM.
2Start automatic tuning.
y
• If the signal received from the station you want to select is
weak, you can also tune into radio stations manually by
pressing TUNING<</>> repeatedly.
• You can also use TUNING<</>> on the front of the unit.
If you tune to a station manually, the sound is monaural.
You can store your favorite FM stations with the preset
function.
■Auto preset
1Press and hold MEMORY for more
than 2 seconds in FM mode.
2Start the auto preset.
■Manual preset
1Tune into a favorite radio station.
2Press MEMORY.
3Select the preset number you want
to store to.
To cancel the manual preset, press MEMORY again.
LISTENING TO FM RADIO STATIONS
Connecting antennas
Notes
Tuning radio stations
Note
Indoor FM antenna
(supplied)
Press and hold.
Presetting radio stations
Note

LISTENING TO FM RADIO STATIONS
14 En
4Complete the manual preset.
y
• You can preset up to 30 FM stations.
• You can delete a preset station by pressing FUNCTION →
MENU S/T→Center to select PRESET DELETE.
When you perform the auto preset, all stored stations are cleared
and the new stations are stored.
Select the preset radio station in FM
mode.
y
You can also use PRESET</> on the front of the unit.
Note
Selecting preset radio stations
(Preset tuning)

English
15 En
ADDITIONAL
INFORMATION
ADDITIONAL INFORMATION
In case of a problem with the unit, check the following list first. If you cannot solve your problem with the suggested
solutions or if your problem is not listed below, turn off and unplug the unit, and consult the nearest authorized Yamaha
dealer or service center.
TROUBLESHOOTING
General
Problem Cause Solution
The system turns on but
immediately shuts off.
The power cable may be connected
improperly.
Make sure the power cable is plugged
into the wall outlet firmly.
The unit may have received a strong
electrical shock such as lightning or
excessive static electricity.
Set the system to off, and disconnect
the power cable. Wait about 30
seconds, reconnect the power cable, and
turn on the system.
The speakers make no
sound.
The volume may be set to the
minimum level.
Adjust the volume level (☞P. 9).
The mute function may be on. Cancel the mute function (☞P. 9).
The source may be incorrect. Select the correct source (☞P. 9).
Sound suddenly turns off. The sleep timer (☞P. 8) may be set. Turn on the system and play the source
again.
The unit does not operate
properly.
The unit may have received a strong
electrical shock such as lightning or
excessive static electricity, or power
supply may have dropped.
Set the system to off, and disconnect
the power cable. Wait about 30
seconds, reconnect the power cable, and
turn on the system.
A digital or high-frequency
equipment produces noises.
The unit may be placed too close to
the digital or high-frequency
equipment.
Place the unit farther away from the
equipment.
The clock setting has been
cleared.
The unit is left more than one week
after you disconnect the power cable
from the wall outlet.
Plug the power cable into the wall
outlet firmly, and set the clock again
(☞P. 4).
iPod™
Problem Cause Solution
“iPod Connect Error”
appears on the front panel
display.
There is a problem with
communication between the unit and
your iPod.
Turn off the system and reconnect your
iPod to the unit.
The iPod does not charge
up.
The iPod is set in the iPod dock
improperly.
Remove the iPod from the unit, then set
it in the iPod dock again.
“iPod Not Connected”
appears on the front panel
display after you set the
iPod.
The iPod makes no sound.
The iPod sounds, but you
cannot operate it with the
unit or the remote control.

TROUBLESHOOTING
16 En
You cannot operate from the
iPod.
LIST DISP is set to F.PANEL. Set LIST DISP to iPod from the
FUNCTION menu (☞P. 11).
The playback information is
not displayed on the front
panel display.
The iPod you set is not compatible
with the playback information
display.
Only iPod touch, iPod classic, iPod 5th
generation or later, and iPod nano are
compatible with the function.
“Unknown iPod” appears on
the front panel display after
you set the iPod.
The iPod being used is not supported
by the unit.
Only iPod touch, iPod (Click Wheel,
including iPod classic), iPod nano and
iPod mini are supported.
Radio reception
Problem Cause Solution
The preset selecting
function does not work.
The preset (memory) may have been
erased.
Preset radio stations again (☞P. 13).
Too much noise during
stereo broadcast.
The FM antenna may be connected
improperly.
Make sure the FM antenna is connected
properly (☞P. 13).
The radio station you selected may be
far from your area, or the radio wave
reception is weak in your area.
Try manual tuning to improve the
signal quality (☞P. 13) or use a multi-
channel outdoor antenna.
Even with an outdoor
antenna, radio wave
reception is weak. (Sound is
distorted.)
Multipath reflection or other radio
interferences may have occurred.
Change the height, direction, or
placement of the antenna.
Remote control
Problem Cause Solution
The remote control does not
work properly.
The remote control may be operated
outside its operation range.
For information on the remote control
operation range, refer to “Using the
remote control” (☞P. 3).
The remote control sensor on the unit
may be exposed to direct sunlight or
lighting (inverted fluorescent lamps).
Change the lighting or orientation of the
unit.
The battery may be worn out. Replace the battery with a new one
(☞P. 3).
There are obstacles between the
sensor of the unit and the remote
control.
Remove the obstacles.

English
17 En
ADDITIONAL
INFORMATION
■PLAYER SECTION
iPod
• Supported iPod.......... iPod touch, iPod (Click Wheel including iPod
classic), iPod nano, iPod mini
AUX IN
• Input connector.................STEREO L/R: 3.5 ΦSTEREO mini Jack
■AMPLIFIER SECTION
• Minimum RMS output power per channel...................15 W + 15 W
(6 Ω1 kHz, 10% THD)
• Driver unit..........................................8 cm (3”) full-range driver × 2
■TUNER SECTION
• Tuning range
U.S.A. model.................................................87.50 to 107.90 MHz
Other models.................................................87.50 to 108.00 MHz
■GENERAL
• Power Supply
U.S.A. model....................................................... AC 120 V, 60 Hz
Other models ............................................AC 220 to 240 V, 50 Hz
• Power consumption................................................................... 20 W
• Standby Power consumption......................................... 1.0 W or less
• Dimensions (W × H × D)................................. 350 × 120 × 240 mm
(13-3/4 × 4-3/4 × 9-7/16 in)
• Weight.................................................................. 3.7 kg (8 lbs. 3 oz)
Specifications are subject to change without notice.
iPod™
“iPod” is a trademark of Apple, Inc., registered in the U.S. and
other countries.
“Made for iPod” means that an electronic accessory has been
designed to connect specifically to iPod and has been certified by
the developer to meet Apple performance standards.
Apple is not responsible for the operation of this device or its
compliance with safety and regulatory standards.
SPECIFICATIONS

i Es
1 Para asegurar el mejor rendimiento de este aparato, lea
atentamente este manual. Y luego guárdelo en un lugar
seguro para poder consultarlo en el futuro en caso de ser
necesario.
2
Instale esta unidad en un lugar bien ventilado, fresco, seco
y limpio con al menos 15 cm en la parte superior, 10 cm
en las partes izquierda y derecha, y 10 cm en la parte
posterior de esta unidad, alejada de la luz solar directa,
fuentes de calor, vibraciones, polvo, humedad y/o frío.
3 Coloque este aparato lejos de otros aparatos eléctricos,
motores o transformadores, para evitar así los ruidos de
zumbido.
4 No exponga esta unidad a cambios bruscos de
temperaturas, del frío al calor (o viceversa), ni la coloque
en lugares muy húmedos (una habitación con
deshumidificador, por ejemplo), para impedir así que se
forme condensación en su interior, lo que podría causar
una descarga eléctrica, un incendio, daños en la unidad
y/o lesiones a las personas.
5 Evite instalar este aparato en un lugar donde puedan
caerle encima objetos extraños o donde quede expuesto al
goteo o a la salpicadura de líquidos. Encima de este
aparato no ponga:
– Otros componentes, porque pueden causar daños y/o
decoloración en la superficie de este aparato.
– Objetos con fuego (velas, por ejemplo), porque
pueden causar un incendio, daños en el aparato y/o
lesiones a las personas.
– Recipientes con líquidos, porque pueden caerse y
derramar el líquido, causando descargas eléctricas al
usuario y/o dañando el aparato.
6 No tape este aparato con un periódico, mantel, cortina,
etc. para no impedir el escape del calor. Si aumenta la
temperatura en el interior del aparato, esto puede causar
un incendio, daños en el aparato y/o lesiones a las
personas.
7 No enchufe este aparato a una toma de corriente hasta
después de haber terminado todas las conexiones.
8 No ponga el aparato al revés. Podría recalentarse y
posiblemente causar daños.
9 No utilice una fuerza excesiva con los conmutadores, los
controles y/o los cables.
10 Cuando desconecte el cable de la alimentación de la toma
de corriente, sujete la clavija y tire de ella; no tire del
propio cable.
11 No limpie este aparato con disolventes químicos porque
podría estropear el acabado.
12 Utilice solamente la tensión especificada en este aparato.
Utilizar el aparato con una tensión superior a la
especificada resulta peligroso y puede producir un
incendio, daños en el aparato y/o lesiones a las personas.
Yamaha no se hará responsable de ningún daño debido al
uso de este aparato con una tensión diferente de la
especificada.
13 Para evitar daños provocados por rayos, mantenga el
cable de alimentación y las antenas exteriores
desconectadas de una toma de corriente o de la unidad
durante una tormenta eléctrica.
14 No intente modificar ni arreglar este aparato. Póngase en
contacto con el personal de servicio Yamaha cualificado
cuando necesite realizar alguna reparación. La caja no
deberá abrirse nunca por ninguna razón.
15 Cuando no piense utilizar este aparato durante mucho
tiempo (es decir, cuando se ausente de casa por
vacaciones, etc.) desconecte el cable de alimentación de
la toma de corriente.
16 Asegúrese de leer la sección “SOLUCIÓN DE
PROBLEMAS” antes de dar por concluido que su
aparato está averiado.
17 Antes de mover esta unidad, pulse ON/OFF para apagar
el sistema y, a continuación, desconecte el cable de
alimentación de CA de la tomacorriente de pared.
18 La condensación se formará cuando cambie de repente la
temperatura ambiental. Desconecte en este caso el cable
de alimentación de la tomacorriente y no utilice la
unidad.
19 Esta unidad se calentará cuando la utilice durante mucho
tiempo. Desconecte en este caso el sistema y, a
continuación, no utilice la unidad para permitir que ésta
se enfríe.
20 Instale esta unidad cerca de la tomacorriente de pared,
donde se pueda llegar fácilmente al cable de alimentación
de CA.
21 Las pilas no deberán exponerse a un calor excesivo como,
por ejemplo, la luz solar directa, el fuego o algo similar.
Precaución: lea las indicaciones siguientes antes de utilizar este aparato.
Esta unidad no se desconecta de la fuente de alimentación de CA
si está conectada a una toma de corriente, aunque la propia unidad
esté apagada con
ON/OFF
. A este estado se le llama modo de
espera. En este estado, está unidad ha sido diseñada para que
consuma un cantidad de corriente muy pequeña.
ADVERTENCIA
PARA REDUCIR EL RIESGO DE INCENDIO O DESCARGA
ELÉCTRICA, NO EXPONGA ESTA UNIDAD A LA LLUVIA
NI A LA HUMEDAD.
PRECAUCIÓN
El uso de los controles, los ajustes o los procedimientos que no
se especifican enste manual pueden causar una exposición
peligrosa a la radiación.
PRECAUCIÓN
Si la pila se reemplaza incorrectamente existe el riesgo de que
se produzca una explosión.
Sustitúyala por una del mismo tipo o una equivalente.
Cuidado de la unidad
Al limpiar esta unidad, utilice un paño limpio y seco.
Other manuals for TSX-120
2
Table of contents
Languages:
Other Yamaha Stereo System manuals

Yamaha
Yamaha MCR-B043 User manual

Yamaha
Yamaha TSX-112 User manual

Yamaha
Yamaha MCR-140 User manual

Yamaha
Yamaha TSX-112 User manual

Yamaha
Yamaha TSX-130 User manual

Yamaha
Yamaha YHT-493BL User manual

Yamaha
Yamaha CDX-E400 User manual

Yamaha
Yamaha GX-500 User manual

Yamaha
Yamaha TSX-120BL User manual

Yamaha
Yamaha Relit LSX-700 User manual

Yamaha
Yamaha YAS-81 User manual

Yamaha
Yamaha TSX-D232 User manual

Yamaha
Yamaha CRX-E150 User manual

Yamaha
Yamaha GX-700 User manual

Yamaha
Yamaha MCR-230 User manual

Yamaha
Yamaha GX-707VCD User manual

Yamaha
Yamaha TSX-100 User manual

Yamaha
Yamaha TSX-W80 User manual

Yamaha
Yamaha ISX-80 User manual

Yamaha
Yamaha MCR-B043D User manual