Yamato RFC201 User manual

LAB FREEZER / REFRIGERATOR COMBINATION
RFC201 / RFC301
MODEL
INSTRUCTION MANUAL
- FIRST EDITION –
•Thank you for purchasing RFC201/301 Laboratory Freezer /
Refrigerator Combination of Yamato Scientific.
•To use this unit properly, read this "Instruction Manual" thoroughly
before using this unit. Keep this instruction manual around this unit
for referring at any time.
WARNING: Carefully read and thoroughly understand the important
warning items described in this manual before using this unit.
Yamato Scientific America Inc.
Santa Clara, CA

IMPORTANT SAFEGUARDS
WARNING: Keep ventilation openings in the appliance’s cabinet or in the built-in structure clear
of obstruction.
WARNING: Do not use other mechanical devices or other means to accelerate the defrosting
process than those recommended by the manufacturer.
WARNING: Do not damage the refrigerant system.
WARNING: Do not use electrical appliances inside the refrigerated storage compartment
unless they are of a type recommended by the manufacturer.
WARNING: Do not expose the appliance to rain.
WARNING: This appliance is not intended for use by young children or infirm persons unless
they have been adequately supervised by a responsible person to ensure that they can use
the appliance safely. Young children should be supervised to ensure that they do not play
with the appliance.
WARNING: Risk of child entrapment.
Before you throw away your old refrigerator or freezer:
Take off the doors.
Leave the shelves in place so that children may not easily climb inside.
Always keep the keys in a separate place and out of reach of children.
Before servicing or cleaning the appliance, disconnect the electrical power supply.
If the power supply cord is damaged, it must be replaced by the manufacturer, its service
agent, or similarly qualified persons in order to avoid a hazard.
Frost formation on the interior evaporator wall and upper parts is a natural phenomenon.
Therefore, the appliance should be defrosted during normal cleaning or maintenance.
Directions for replacing the light bulb are included in the instructions.
Please note that changes to the appliance construction will cancel all warranty and product
liability.

Before your first use
This appliance is for indoor use only.
On receipt, check to ensure that the appliance has not been damaged during transport.
Transport damage should be reported to the local distributor before the appliance is put
to use.
Wash the cabinet and inner lining with a mild unscented detergent and wipe it dry. Do
not use scouring powder, steel wool or similar abrasive material.
Before operating your new appliance, please read the following instructions carefully as
they contain important information on safety, installation, operation and maintenance.
Keep the instructions for future reference.
If during transport the appliance has been laid down, or if it has been stored in cold
surroundings (colder than 41°F, or 5°C), it must be allowed to stabilize in an upright
position for at least an hour before being switched on.

Electrical Connection
The technical information for the appliance can be seen on the rating plate on the right
inner wall of the refrigerator compartment.
Important: Wiring and connections in power supply systems must be in accordance
with all applicable (local and national) electrical codes. Consult these code lengths and
sizes prior to cabinet installation.
Power supply: (Grounded through 3 wire power supply cord) 115V ac, 60 Hz single
phase
Maximum fuse size: 10 amps
This appliance is equipped with a three-prong (ANSI type 5-15P grounded) plug for your
protection against shock hazards. The appliance should be plugged into a properly
grounded three-prong receptacle
Do not under any circumstances cut or remove the round grounding prong from the
appliance plug.
Do not under any circumstances use extension cords.

Installation and Start-up
Placement
For safety and operational reasons, the appliance must not be installed outdoors. The
appliance should be placed on a level surface in a dry, well ventilated room (max. 75%
relative air humidity). Never place the appliance close to sources of heat such as ovens
or radiators, and avoid placing it in direct sunlight.
Installation
The surface on which the appliance is to be placed must be level.
If two appliances are placed side by side, there must be at least
30 mm (just over 1") clearance between them.
After installation, the plug should be accessible.
fig. 3
6

The appliance viewed from above
If the appliance is placed beside a wall,
there must be sufficient room for the
freezer door to be opened wide enough
to allow the drawers to be pulled out
Spacers
The spacers on the rear of the appliance
ensure sufficient air circulation. Fit the two
spacers supplied with the appliance as
Ventilation
It is important that the appliance be well
ventilated and that air can circulate unhindered
above, below and around it. The figures to the
right illustrate how the necessary air circulation
can be ensured.

Setting up
It is important that the appliance be absolutely level. To level the appliance, remove the
kick plate below the door and screw the adjustable feet up or down (figs. 8 and 9). If
necessary, it is possible to adjust the back feet before the upright is installed. Use a
spirit level to check that the appliance is absolutely level.
If the appliance is to be placed on a soft surface, e.g. floorboards or a carpet, it is best
to recheck whether the appliance is still level after a period of time as the underlying
surface may give under the weight of the appliance.
Do not tilt the upright more than 7 degrees to avoid damaging the floor (figs. 10 and 11).

Reversing the Doors
The doors can be changed from right-hinged to left-hinged and vice versa as follows:
1. Lay the
appliance on its
back with the
doors
uppermost.
2. Remove the
upper hinge.
3. Move the plastic plugs to where the
upper hinge was fitted.
4. Lift off the upper door and lay it aside.
5. Remove the middle hinge by
unscrewing the screws.
6. Lift off
the lower
door and
lay it aside.
9.
R
emove the
lower
hinge.
Rotate the
hinge
through
180° and
refit it on
the
opposite side of the appliance.
10. Refit the kick plate
7. Remove the kick plate by pulling it
outwards and upwards.
8. Loosen lock nut with the fork
wrench enclosed and move the
pin.
11. Remove the door-closer and refit
it on
the opposite side.
12. Remember to pull the pin in the
door closer
towards
the side
before
fitting the
door.
13. Fit the
upper door.
14. Fit the
upper hinge.
15. Remove the
door handles
and refit
them on the
opposite
side.
Refit the
caps.
16. The
appliance
must be
allowed to
stabilise in an
upright
position for at
least 1 hour
before being
switched on.
17. After
reversing the
door(s), it is
important to
check that the
sealing strip
provides a
tight seal all
the way
round.
If it
does not,
carefully
heat the
strip all the
way round
using a hair
dryer. Then
ease the
strip
outwards
slightly so
that it forms
a tight seal
against the
cabinet. Be
careful not
to heat the
strip so
much that it
melts!

10
Operation and Function
Refrigerator section
The thermostat button can be set from 1(min.) to 7(max.). A suitable setting must be
found by trial and error. Start by setting the button to 4. Check the temperature, then
adjust the setting upwards or downwards as required. Usually, a temperature of 41°F
(5°C) is recommended for items stored in a refrigerator. To check the temperature,
place a thermometer in a glass of water positioned in the center of the cabinet for 12
hours. An average temperature of 41°F should be found in the center of the cabinet.
Freezer section
Always maintain a correct storage temperature.
The thermostat button can be set from 1(min.) to 7(max.). A temperature of 0°F
(-18°C) is recommended for items stored in a freezer. (Maintaining a temperature lower
than this consumes additional energy.) The temperature in the freezer is displayed on
the thermometer.
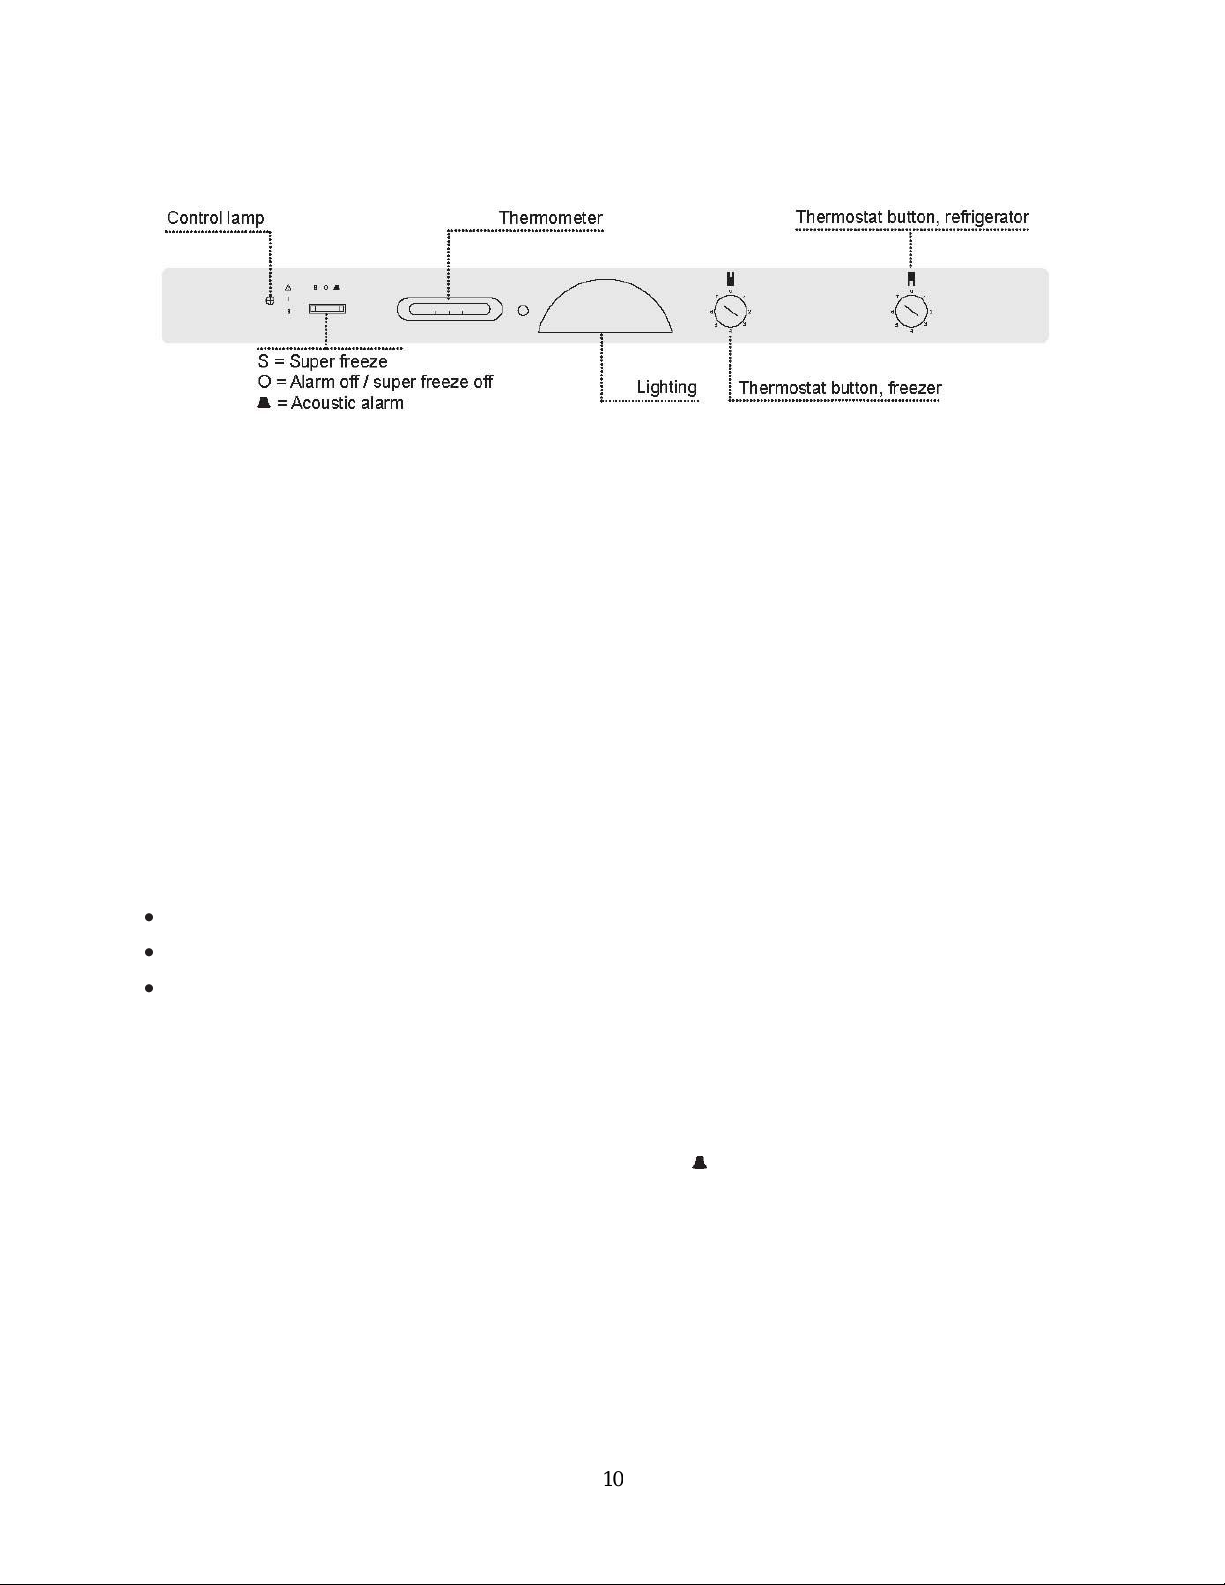
The control lamp lights green when the power supply is connected correctly.
The control lamp lights yellow when Super Freeze is activated.
The indicator lamp lights red and the acoustic alarm sounds if the temperature in the
freezer is too high. To switch off the acoustic alarm, set the freeze button to O(see
fig. 12). The indicator lamp continues to light red as long as the temperature in the
freezer remains too high.
When starting the freezer for the first time, switch off the acoustic alarm by setting the
freeze button to O. Once the recommended temperature (0°F, or -18°C) has been
achieved in the freezer, set the freeze button to the symbol. This will allow the
acoustic alarm to sound if the temperature in the freezer becomes too high.
It is normal that the indicator lamp lights red when the freezer is started for the first time.
It will also occasionally light red when large quantities of fresh material are put in the
freezer simultaneously.
fig. 12

Glass shelves
The shelves are made of tempered glass and can be repositioned within the cabinet. To
move the shelves, the door must be opened 90°. To remove a shelf, pull it forwards and
lower it. The shelf can then be removed and placed in the desired position. From the top
and downwards.
Storage boxes
The storage boxes can either be placed in the door
or on the glass shelves. Their tight-fitting lids
prevent the products stored in them from drying out
and saves the need for further packaging.
Bottle rack
The bottle rack is ideal for both large and small bottles.
Bins
The shelf above the bins functions as a lid, maintaining humidity and preventing
the items stored in the bins from drying out.
Glass shelf with slide damper
The slide damper above the crisper bins allows
the temperature and humidity in the bins to be
regulated.
Opening the damper reduces the temperature
and humidity.
Closing the damper increases the temperature and humidity.
Shelves in the door
The shelves in the door are practically positioned with the
box shelf at the top and door shelves at the bottom. They
provide ample space for storing large and small items.

Defrosting
Automatic defrosting of refrigerator section
The refrigerator is defrosted automatically. Defrost water runs through a pipe and is
collected in a tray above the compressor where the heat generated by the compressor
causes it to evaporate. The defrost water tray should be cleaned at intervals.
Defrosting the freezer
The items stored and the humidity of the air gradually cause frost and ice to form in the
freezer. A thin layer of frost or ice does not affect freezer performance, but the thicker
the layer, the higher the energy consumption. Loose frost can be removed using a
plastic or wooden scraper.
Never use a knife or other sharp implement that might damage the inside of the freezer.
When the layer of frost and ice exceeds 1/4 inch, the freezer should be completely
defrosted.
Proceed as follows:
1. Switch the freezer off.
2. Pull out the drain spout at the bottom of the cabinet and place a bowl under it to
collect defrost water (fig. 16). If the spout is frozen in place, lay a cloth which has
been soaked in hot water over it for a few minutes.
3. Remove the items.
4. Place a bowl of hot (but not boiling) water in the freezer.
5. To prevent the floor from becoming wet during defrosting, check progress from time
to time and lay towels around the bowl on the floor to protect against ice and
splashes. When all the frost and ice have melted, clean the inside of the cabinet with
a mild detergent solution. Dry the freezer with a soft cloth.
6. Restart the freezer.
7.

Cleaning and Maintenance
Cleaning
Disconnect the power supply before cleaning the inside of the cabinet.
The cabinet is best cleaned using warm water (max. 150°F) with a little mild detergent.
Never use cleaning agents that scour. Use a soft cloth. Rinse with clean water and dry
thoroughly. It is important to prevent water from entering the control panel.
The defrost water channel, in which condensation from the evaporator runs, is located
on the rear wall of the cabinet and must be kept clean. Add a few drops of disinfectant
to the defrost water drain a couple of times a year, and clean the drain using a pipe
cleaner or the like. Never use sharp or pointed implements.
The sealing strip around the doors must be cleaned regularly to prevent discoloration
and prolong service life. Use clean water. After cleaning the sealing strip, check that it
continues to provide a tight seal.
Dust collecting on the compressor and in the compressor compartment is best removed
using a vacuum cleaner. It is possible to clean beneath the appliance by removing the
kick plate.
Stainless steel or aluminum doors are best cleaned using a soft cloth with a spray made
for cleaning metallic surfaces. Various suitable products are available from most house-
hold appliance distributors.
If the appliance is not to be used for any length of time, switch it off, empty it, clean the
cabinet and fittings, and leave the doors slightly open to allow air circulation and prevent
smells.
Replacing the light bulb
Unscrew the bulb without removing the shade.
Bulbs with an output of more than 12 W must not
be used.
fig. 17
Disposal
Environmental regulations on disposal must also be observed. When disposing of the
appliance you should contact your local authority technical department who will inform
you of how collection and recycling of such units take place in your area. By ensuring
that this product is disposed of correctly, you will help prevent potential negative
consequences for the environment and human health, which could otherwise be caused
by inappropriate waste handling of this product. Disposal must be carried out in
accordance with local environmental regulations for waste disposal.
For more detailed information about treatment, recovery and recycling of this product,
please contact your local city office, your household waste disposal service or the shop
where you purchased the product.

Yamato Scientific America warrants, from the date of shipment from warehouse in
Cincinnati, Ohio, U.S.A., for a period of one (1) year. All products, parts and materials shall
be free of defects in material and workmanship under normal use consistent with the
product instructions. This product warranty does not apply to products purchased from
unauthorized resellers/distributors.
Yamato reserves the right to inspect the product under claim before having an obligation
to repair or replace the defective unit covered by this warranty. All costs of shipping to
Yamato for inspection shall be borne solely by the purchaser. Products repaired or
replaced under the terms of the warranty may be refurbished or new product will be
provided at the discretion of Yamato.
Warranty Conditions
This warranty shall have force and effect only if all items are used with proper circuits,
voltages, and frequencies and the operation thereof is in accordance with instructions
furnished by the manufacturer.
This warranty shall not extend to such parts as refrigerants, finishes, belts, and dryers.
This warranty shall not extend to ordinary wear and tear, or ordinary refrigeration service
and refrigeration adjustments, unless specifically included in the equipment purchase
contract.
This warranty does not apply to equipment or parts which fail because of abuse, accident,
alteration, misuse, erosion, improper installation, or improper replacement of a repaired
item.
The buyer assumes all risks for results obtained from these products, whether used alone
or in combination with other items. It is expressly understood that we are not responsible
and will not be held liable for damage and/or injury caused using our products.
WARRANTY POLICY
WARRANTY INFORMATION

Product Return Policy
If you are not satisfied with your purchase and wish to make a return, contact our customer
service to inquire about a Return of Merchandise Authorization Number (RMA).
Merchandise returned without an RMA number will not be accepted and will be returned
to the sender. Return requests must be made within 15 days of the customer’s receipt of
the merchandise.
All returns must be unused and in unopened original packaging and include all items and
manuals originally shipped.
The purchaser is responsible for the shipping cost of return shipment. Insurance on the
return shipment is required. Damage or loss of merchandise during shipping is the
responsibility of the sender. Returned shipments that arrive damaged will be returned to
the sender, and credit will not be rendered.
All returned products, parts and materials are subject to a 25% restocking fee. Shipping
and handling cost are non-refundable. All retrofitted, customized and special order item
sales are final and non-returnable.
In Case of Request for Repair
If the failure occurs, stop the operation, turn OFF the power switch, and unplug the power
plug. Please contact the sales agency that this unit was purchased, or Yamato Scientific's
sales office.
< Check following items before contact >
◆Model Name of Product
◆Serial Number
◆Purchase Date
◆Issue (as detailed as possible)
Responsibility
Please follow instructions in this document when using this unit. Yamato Scientific has no
responsibility for accidents or breakdown of device due to failure to comply. Never conduct
what this document forbids as unexpected accidents or breakdown may result.
Yamato Scientific America Inc.
925 Walsh Ave, Santa Clara, CA 95050
Tel: 1-800-292-6286 / 408-235-7725
http://www.yamato-usa.com
For customer service:
Email: customerservice@yamato-usa.com
For technical support:
Email: technical@yamato-usa.com
WARRANTY POLICY CONTINUED
WARRANTY INFORMATION
This manual suits for next models
1
Table of contents
Other Yamato Refrigerator manuals
Popular Refrigerator manuals by other brands

PowerPac
PowerPac PPFZ150 quick start guide

Kenwood
Kenwood KSBS4DX17 Installation instructions manual

Kuppersbusch
Kuppersbusch IKE 257-4-2T operating instructions

WC Wood
WC Wood R05 Energy guide

Miele
Miele KT 3534 Sed OPERATING AND INSTALLATION Manual

Bushman
Bushman DC-X Series Owner's manual & operating instructions