manuals.online logo
Brands
  1. Home
  2. •
  3. Brands
  4. •
  5. Yanes
  6. •
  7. Tent
  8. •
  9. Yanes Kuche User manual

Yanes Kuche User manual

GARANTIE LIMITÉE DE CINQ ANS
À son choix, MBS-AIM Canadienne Ltée réparera ou remplacera cette tente ou toute pièce se révélant par suite d’un
dé aut de abrication ou de matières premières, au cours des cinq années qui suivent la date d’achat au détail. (Les
ermetures à glissière sont garantie pour trois ans) Gardez votre acture, une preuve de la date d’achat doit être ournie
pour obtenir le service sous garantie.
Ne sont pas couverts: Les rais d’expédition à MBS-AIM Canadienne Ltée; L’usure normal, y compris la décoloration
ou l’alteration de la couleur par suite de l’emploi; ainsi que les dommages causer par la moisissure, ou l’inobservation
des soins ou des directives d’entretien donnés; LES DOMMAGES INDIRECTS, LES DOMMAGES FORTUITS; LES FAUX
FRAIS ET LES DOMMAGES MATÉRIELS.
CETTE GARANTIE VOUS DONNE DES DROITS LÉGAUX SPÉCIFIQUES ET VOUS POUVEZ AUSI AVOIR D’AUTRES
DROITS VARIANT D’UNE PROVINCE À L’AUTRE.
Pour obtenir le service sous arantie: Attachez une étiquette portant votre nom, adresse et numéro de téléphone,
ainsi qu’une description du problème à l’article et joignez-y une copie de la acture originale. Empaquetez
soigneusement l’article et postez le colis assuré à: YANES CANADA, 260 Guizot Ouest, Montréal, Québec H2P 1L5
LIMITED FIVE YEAR WARRANTY
MBS-AIM Canadian Limited will repair or replace, at its option, this tent or any component ound to be de ective in
materials or workmanship or a period o ive years. Zippers are warranted or three years only.
This warranty is valid or the original retail purchaser rom the date o purchase. Keep your original sales receipt, proo
o purchase is required to obtain warranty service.
The followin are not covered: Cost o shipment to MBS-AIM Canadian Ltd.; normal wear and tear including ading or
discoloration; damage caused by mildew; damage caused by misuse, abuse, alteration, or ailure to ollow
recommended care or maintenance instructions; CONSEQUENTIAL DAMAGES;INCIDENTAL DAMAGES
OR EXPENSES INCLUDING DAMAGES TO PROPERTY.
SOME PROVINCES MAY NOT ALLOW THE EXCLUSION OR LIMITATION OF INCIDENTAL OR CONSEQUENTIAL
DAMAGES, SO THE ABOVE LIMITATION OR EXCLUSION MAY NOT APPLY TO YOU.
To obtain warranty service care ully pack the product and send it prepaid to:
YANES CANADA, 260 Guizot West, Montreal, Quebec H2P 1L5. You must include a copy o the original sales
receipt as well as a note with your name, address, telephone number, and description o the problem.
Kuche
Mod. 1200
CARE & MAINTENANCE / ENTRETIEN ET NETTOYAGE
We have designed and manufactured this screen tent to
provide you with years of trouble free enjoyment. The
amount of service you will receive from your tent will go
hand-in-hand with the type of care you give it. With this in
mind, please adhere to the following care and maintenance
instructions whenever possible:
- Never store a wet tent. If when brea ing camp you are
forced to roll up your tent in a damp or wet condition, you
must at your first opportunity re-erect your tent and allow it
to dry thoroughly. A tent which is pac ed wet will develop
mildew which may severely damage the nylon fabric. Tents
are never warranted against mildew damage.
- Although the polyester of your tent is more resistant to the
sun’s ultraviolet rays than is nylon, over time, U.V. rays can
cause any fabric to bleach or fade. If you are leaving your
tent erected for a long period of time, fading can be
minimized by choosing a shaded location.
- Always store your tent in a dry and cool place. Do not
leave it pac ed directly on a cement floor.
- Always eep your tent in good order by having any holes
or tears repaired as soon as possible.
- Tents may be cleaned with a mild detergent and a soft
cloth. Never machine wash a tent. Zippers and poles
may be wiped with a cloth dampened with a silicon
lubricant. With use, sections of your poles may retain their
arc. This is normal and will not affect their usage.
- Do not try to sqeeze a full size picnic table through the
screen tent’s doors. After the screen tent has been erected
you can simply lift it over the table and then peg it into
place.
The fabric of your tent has been treated with multiple
coatings of polyurethane, a water repellent. Fabrics with
water column ratings of 2000 mm are used throughout.
Although these tents should eep you dry even in the most
severe weather, they are not waterproof. Some hints on
staying dry:
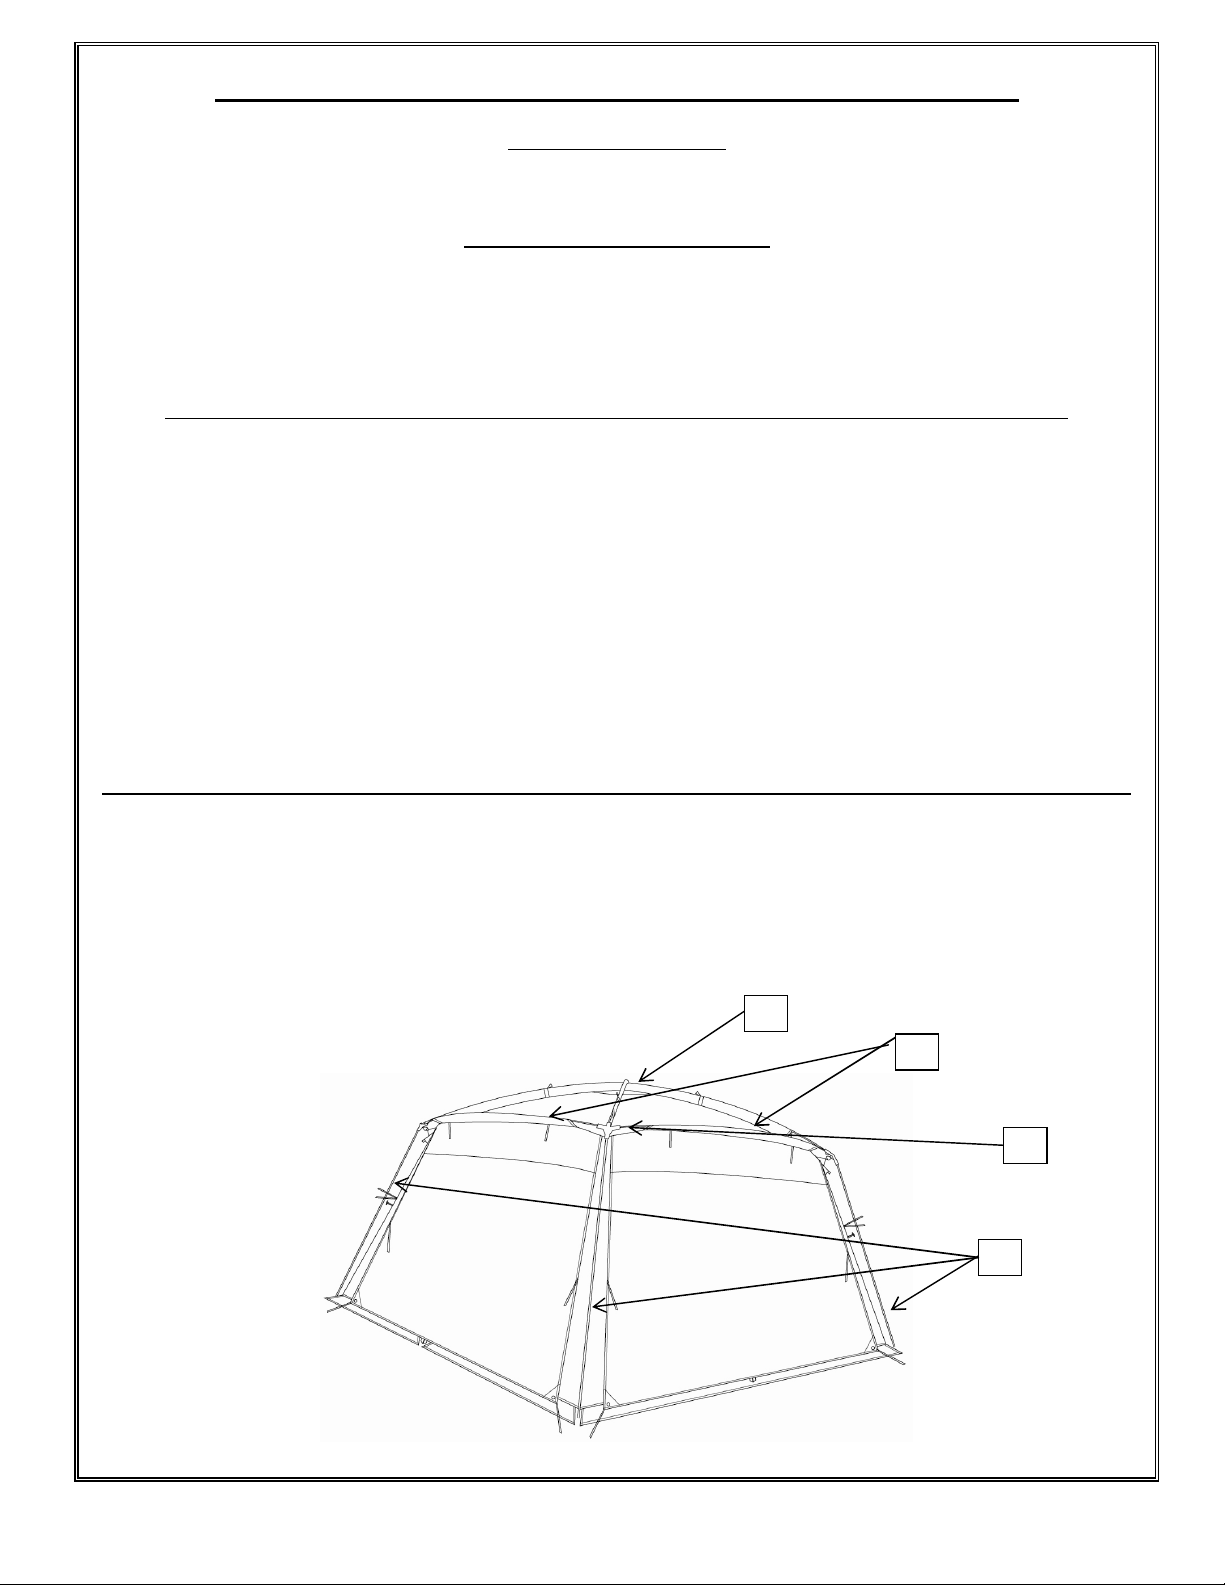
- Properly peg out your tent maximizing your interior space
while insuring that no poc ets of sagging fabric remain
where water may “pool”.
- Attach all guy ropes and peg all elastic loops to ensure
that the rain fly does not rub against the inner walls.
- Maximize ventilation. Similar to being inside a car with
the windows rolled up, fairly large volumes of water can
form inside your tent due to condensation. This can be
minimized by properly ventilating your tent.
- There may be points in your tent that due to elastics,
screening, or webbing it was not possible to apply seam
tape. Should dripping occur from any of these points it can
easily be corrected with use of a liquid seam sealer such as
SEAM GRIP

.
Cette tente cuisine a été concue et fabriquée pour vous
servir pendant de nombreuses années. Cepandant si vous
voulez posséder et utiliser pendant des années une tente
vous devrez en prendre soin. Dans cet esprit, nous avons
mis au point des instructions pour l’entrtien et utilisation de
votre tente.
- Ne jamais ranger une tente humide ou mouillée. Le
détaillant décline toute responsabilité à l’égard des
dommages causés par la moisissure. La moisissure est
une végétation parasitaire causée par l’humidité. La
moindre humidité peut causer de la moisissure.
- Le polyestere de votre tente est plus resistant contre les
rayons ultra-violet du soleil qu’un double toit en nylon. Mais
en bon temp le soleil et les rayons untra-violet cause des
dommages au tissus des tente. Si vous devez assembler
votre tente pour une longue période de temps nous vous
conseillons de le faire dans une endroit ou ils y’a de
lombres une partie de la journée.
- Toujours ranger la tente dans un endroit sec et frais.
- Assurrez-vous que tous les trous, déchirures, etc. de
votre tente soient réparés immédiateement.
- Ne nettoyez votre tente que si cela est nécessaire, à
l’aide d’un savon doux et non décapant ainsi qu’une brosse
douce. Ne lavez jamais à la machine.
Le tissu de votre tente a été traité avec un couche de
polyurethane, un produit d’hydrofuge. Toutes les tentes
Yanes ultilise de couche 2000 mm. Ces tentes devraient
vous protégé dans les condition les plus severe, mais une
tente n’est pas imperméable. Voici quelque conseils quis
pourrais vous aidez rester au sec:
- Instaler tout les piquets en suivant les instructions dans le
manuel pour eliminer des poches ou l’eau peut s’accumler.
Soyez sur que le double toit est piqué proprement pour
assurer que les murs de la tente ne touchert pas le double
toit.
- Dans certains cas il peut se former de la condensation
sur les parois interne de la tente. Par une ventilation
adequate, on peut eliminer celle-ci.
ASSEMBLY INSTRUCTIONS / INSTRUCTIONS DE MONTAGE
CONTENTS / CONTENU:
Tent, fiberglass poles (6 shock-corded sets), steel poles (4+2 sets), corner joints (4), pegs, and carry bag.
Tente, mâts en fibre de verre (6 jeux), mâts en acier (4+2 jeux), jointures (4), piquets, & sac de transport.
PLEASE NOTE / AVIS IMPORTANT:
Set yo r tent p at home before yo r first se, a dark campsite is no place to learn how to set p yo r tent or
to discover missing components.
ontez votre tente à la maison la première fois, car un terrain de camping la nuit n'est pas l'endroit idéal
pour apprendre à le faire.
SET UP / MONTAGE:
Ensure that the small square cap rain cover on the top of the tent is in place prior to mounting.
(1)
Remove yo r tent from its bag. Lay it flat on a clear level s rface, free of roots, rocks, or other debris.
(2)
Unfold and assemble each of the two longest fiberglass pole sets. Make s re that the fiberglass sections
f lly enter the opposite collar. Flexing a section which is not completely inserted can ca se the ends to split.
Slide each of these longer pole assemblies thro gh the sleeves which intersect over the peak of the tent (A .
Assemble the fo r remaining fiberglass poles and slide them thro gh the fo r sleeves along the perimeter of
the roof (B .
(3)
At the fo r corners of the roof insert the pole ends into the plastic corner joints. (C
(4)
Lift
p each corner and insert the assembled steel pole into the remaining slot. (D (5 WITH THE DOOR ZIPPERS
CLOSED, stretch o t and peg down yo r tent. Peg down all g y ropes. If the tent is pegged with the zippers
open the shape may be stretched and the zippers may not be able to close properly.
Attaching the 4 small metal hooks from the tent into the 4 corner joints (Parts C) prior to inserting the fiberglass
poles may facilitate the assembly. L'attachement des 4 petits crochets métalliq es de la tente dans les 4
joints de coin (des Parties C) avant d'insérer les potea x(pôles) de fibre de verre pe t faciliter l'assemblée.
Assurez que la petite couverture e pluie carrée soit en place sur le sommet e la tente avant le montage.
(1)
Sortez la tente de son sac et placez-la sur une surface propre, libre des branches, des cailloux, et dse
morceaux de verre.
(2
) Glisser les arceaux en fibre de verre (2 plus longue) dans les manches qui
s’entrecroisent au centre se la tente (A). Glisser les 4 arceaux plus court dans les manches qui traverse la
tente. (B)
(3)
Insérer les pointes des arceaux dans les jointures au quate coins de la tente ( C).
(4)
Lever la
structure, insérer les 4 mâts en acier (D). (
5)
Avec les portes fermé, insérer tout les piquets & cordes.
A
B
C
D
WARNING!
KEEP ALL FLAME AND HEAT
SOURCES AWAY FROM THIS TENT
FABRIC!
This tent is made o lame-retardant abric.
It is not fireproof! The abric will burn i le t
in continuous contact with a lame source.
THE FOLLOWING PRECAUTIONS SHOULD BE
TAKEN WHEN CAMPING:
A) Do not use candles, matches, or open flames of
any ind in or near a tent.
B) Do not coo inside a tent.
C) Build camp fires down wind and several meters
away from a tent and be sure to fully extinguish
camp fires before leaving a campsite or retiring for
the night.
D) Exercise extreme caution when using fuel
powered lanterns or heaters inside a tent. Always
be sure to provide recommended minimum fresh
air openings when using fuel powered, oxygen
consuming devices. Use battery powered lanterns
whenever possible.
E) Do not refuel lamps, heaters, or stoves inside a
tent.
F) Extinguish or turn off all lamps or lanterns
before going to sleep.
G) Do not smo e inside a tent.
H) Do not store flammable liquids inside a tent.
Dist. in Canada by/par Yanes
Tel: 1-800-663-7770 or/ou www.yanes.ca
CA 07094
MISE EN GARDE!
TENIR LE TISSU DE CETTE TENTE
LOIN DE TOUTE FLAMME ET DE
TOUTE SOURCE DE CHALEUR
Cette tente est abriquée d’un tissu
résistant au eu, mais qui n’est pas
ininflammable! Ce tissu brûlera s’il est
laissé en contact continu avec une source
d’in lammation.
LES PRÉCAUTIONS SUIVANTES DOIVENT
ÊTRE PRISES EN CAMPING:
A) Ne jamais utiliser de bougies, d’allumettes, ni
aucune autre flamme nue à l’intérieur ou á
proximité de la tente.
B) Ne pas faire de cuisson à l’intérieur de la tente.
C) Faire les feux de camp à plusieurs mètres de la
tente, du côté autre que celui d’où souffle le vent;
s’assurer de toujours bien éteindre les feux de
camp avant de quitter le terrain ou de se coucher.
D) Etre extrèment prudent lorsque des lanternes
ou des appareils de chauffage à combustible sont
utilisés à l’intérieur de la tente et se servir autant
que possible de lanternes à piles.
E) Ne jamais remplir le réservoir des lampes, des
appareils de chauffage ou des poêles à l’intérieur
de la tente.
F) Eteindre toutes les lanternes avant de se
coucher.
G) Ne pas fumer à l’intérieur de la tente.
H) Ne jamais ranger des liquides inflammable à
l’intérier de la tente.

This manual suits for next models

1

Popular Tent manuals by other brands

Costway NP10835 manual

Costway

Costway NP10835 manual

Crivit 290255 Instructions for use

Crivit

Crivit 290255 Instructions for use

TMG GH3080 product manual

TMG

TMG GH3080 product manual

Adlonco Holdings SU 8X10WP manual

Adlonco Holdings

Adlonco Holdings SU 8X10WP manual

Kiwi Camping KC077-003 manual

Kiwi Camping

Kiwi Camping KC077-003 manual

Coleman TIOGA 9273C128 instructions

Coleman

Coleman TIOGA 9273C128 instructions

Eureka Tundern Cove 4 Assembly instructions

Eureka

Eureka Tundern Cove 4 Assembly instructions

Coleman AMERICAN HERITAGE WEATHERMASTER 2000000148 instructions

Coleman

Coleman AMERICAN HERITAGE WEATHERMASTER 2000000148 instructions

GigaTent Speed Devil owner's manual

GigaTent

GigaTent Speed Devil owner's manual

E-Z UP Instant Shelter Eclipse II owner's manual

E-Z UP

E-Z UP Instant Shelter Eclipse II owner's manual

PartySpace bonbo PAGODA manual

PartySpace

PartySpace bonbo PAGODA manual

Quik Shade Shade Tech Set-up and Safety Instructions

Quik Shade

Quik Shade Shade Tech Set-up and Safety Instructions

EURO E90BCSS Installation, use & maintenance instruction manual

EURO

EURO E90BCSS Installation, use & maintenance instruction manual

Wenzel 36512 Assembly instructions

Wenzel

Wenzel 36512 Assembly instructions

Mammoth Tents Classic+ 240L Assembly guide

Mammoth Tents

Mammoth Tents Classic+ 240L Assembly guide

Ohenry Productions Premium 10x30 quick start guide

Ohenry Productions

Ohenry Productions Premium 10x30 quick start guide

TentCraft X Series Setup instructions

TentCraft

TentCraft X Series Setup instructions

Coleman 2000013261 Setup instructions

Coleman

Coleman 2000013261 Setup instructions

manuals.online logo
manuals.online logoBrands
  • About & Mission
  • Contact us
  • Privacy Policy
  • Terms and Conditions

Copyright 2025 Manuals.Online. All Rights Reserved.