YOULUNG YL-20T88 User manual

0
YL-20T88, GRM-G300
ELECTRIC COOKER
Note: Before use please read this manual carefully.
Thanks for using our cooker. Please kindly read this user manual carefully before use it, and please
well-keep the user manual for future reference. We believe the excellent performance will make your
life much more easy and comfortable.
As we are continuously improving our products, so if there is any change to technical specifications
without prior notice.
INSTRUCTION MANUAL
You could download the manual in our website.
Our website is www.youlong-china.com

1
SAFETY PRECAUTIONS
When using electrical appliances, basic safety precautions should always be followed:
1. Check the voltage on the rating plate in correspondence with your supply voltage before
plugging the appliance in.
2. This appliance should not be used by anyone (including children) with reduced physical,
sensory or mental capabilities or by those lacking experience or knowledge. They should
always be supervised by someone who is responsible for their safety and well-being.
3. Children should be supervised to ensure they do not play with the appliance.
4. Do not operate the appliance if it has a damaged cord or plug, if it is not working properly, or if
it has been damaged or dropped. If the supply cord is damaged, it must be replaced by the
manufacturer, its service agent or a similarly qualified person.
5. Use this appliance only for its intended use as detailed in this manual.
6. Do not leave the appliance unattended while it is in use.
7. Do not immerse the appliance in water or any other liquid.
8. Do not attempt to move the appliance while it is in use.
9. Do not allow water to get onto the electrical connections. If the connections get wet, unplug
from the socket immediately and dry thoroughly before use.
10. The hob should be unplugged from the power supply after use, and while maintenance or
any cleaning.
11. Always use this appliance on a stable, heat resistant surface.
12. Always ensure there is sufficient ventilation around the appliance when in use.
13. Care should be taken to ensure the air inlets and outlets are not blocked. When heating,the
hob must be placed at least 10cm from the wall.
14. This appliance is intended for household use only, but not suitable for use outdoors.

2
COMPONENTS
Product
Control Panel
Parts Name
1. Heating Zone
2. Oil Leak
3. Detachable Oil Box
4. Cover
5. Control Panel
6. Height Adjusting Knob
7. Menu Button
1
3
4
2
6
5
12
13
14
7
8
9
10
11
8. BBQ LED
9. Cooker LED
10. Timer LED
11. On/Off Button
12. Decrease Button
13. LED Screen
14. Increase Button

3
SPECIFICATIONS
Product Name : Electric Cooker
Model No. : YL-20T88, GRM-G300
Rated Voltage : 220V~
Rated Frequency : 60Hz
Rated Power : 2000W
FEATURES
The infrared cooker uses an infrared element to heat the surface. It is designed for modern
family cooking. The main features are as follow:
1. Energy saving and environment protection. It uses the far infrared heating, fast and even
heating, no electromagnetic radiation, no flame, no smoke, no carbon monoxide during both
warming and many cooking functions.
2. Any pot could be used. Such as the pot made of stainless steel, aluminum, copper, ceramic,
iron, heat-resistant glass and any other heat-resistant utensils.
3. Safety protection. Self-detect function makes automatic protection to the surface and inside
overheating, high-voltage and low-voltage circumstances.
4. Multi functions. Not only include the traditional uses, such as steam, fry and soup, but also you
could use with grill to BBQ or to use as a electric warming oven in winter.
5. Easy to clean. The whole glass design is good for cleaning and maintenance.
LEVEL SETTINGS OF POWER
Electric Cooker CM-RT100
LED
Screen
1
2
3
4
5
6
7
8
9
10
BBQ
Power(W)
100
200
300
400
500
600
700
800
900
1000
Cooker
Power (W)
200
400
600
800
1000
1200
1400
1600
1800
2000

4
HOW TO OPERATE
1. Power On
1) Plug in, the cooker alerts “Bi”, all indicators flicker and then disappear.
2. Switch On
1) After power on, press “On/Off Button”, LED screen shows “----”, the cooker is ready for
heating.
2) Press reference button to enter reference heating mode.
3) The cooker will return to the state of power on if without any operation for 1 minute after
switch on.
3. Switch Off
1) When in heating or switch on, press “On/Off Button”, the cooker will stop working and
enters into power on condition.
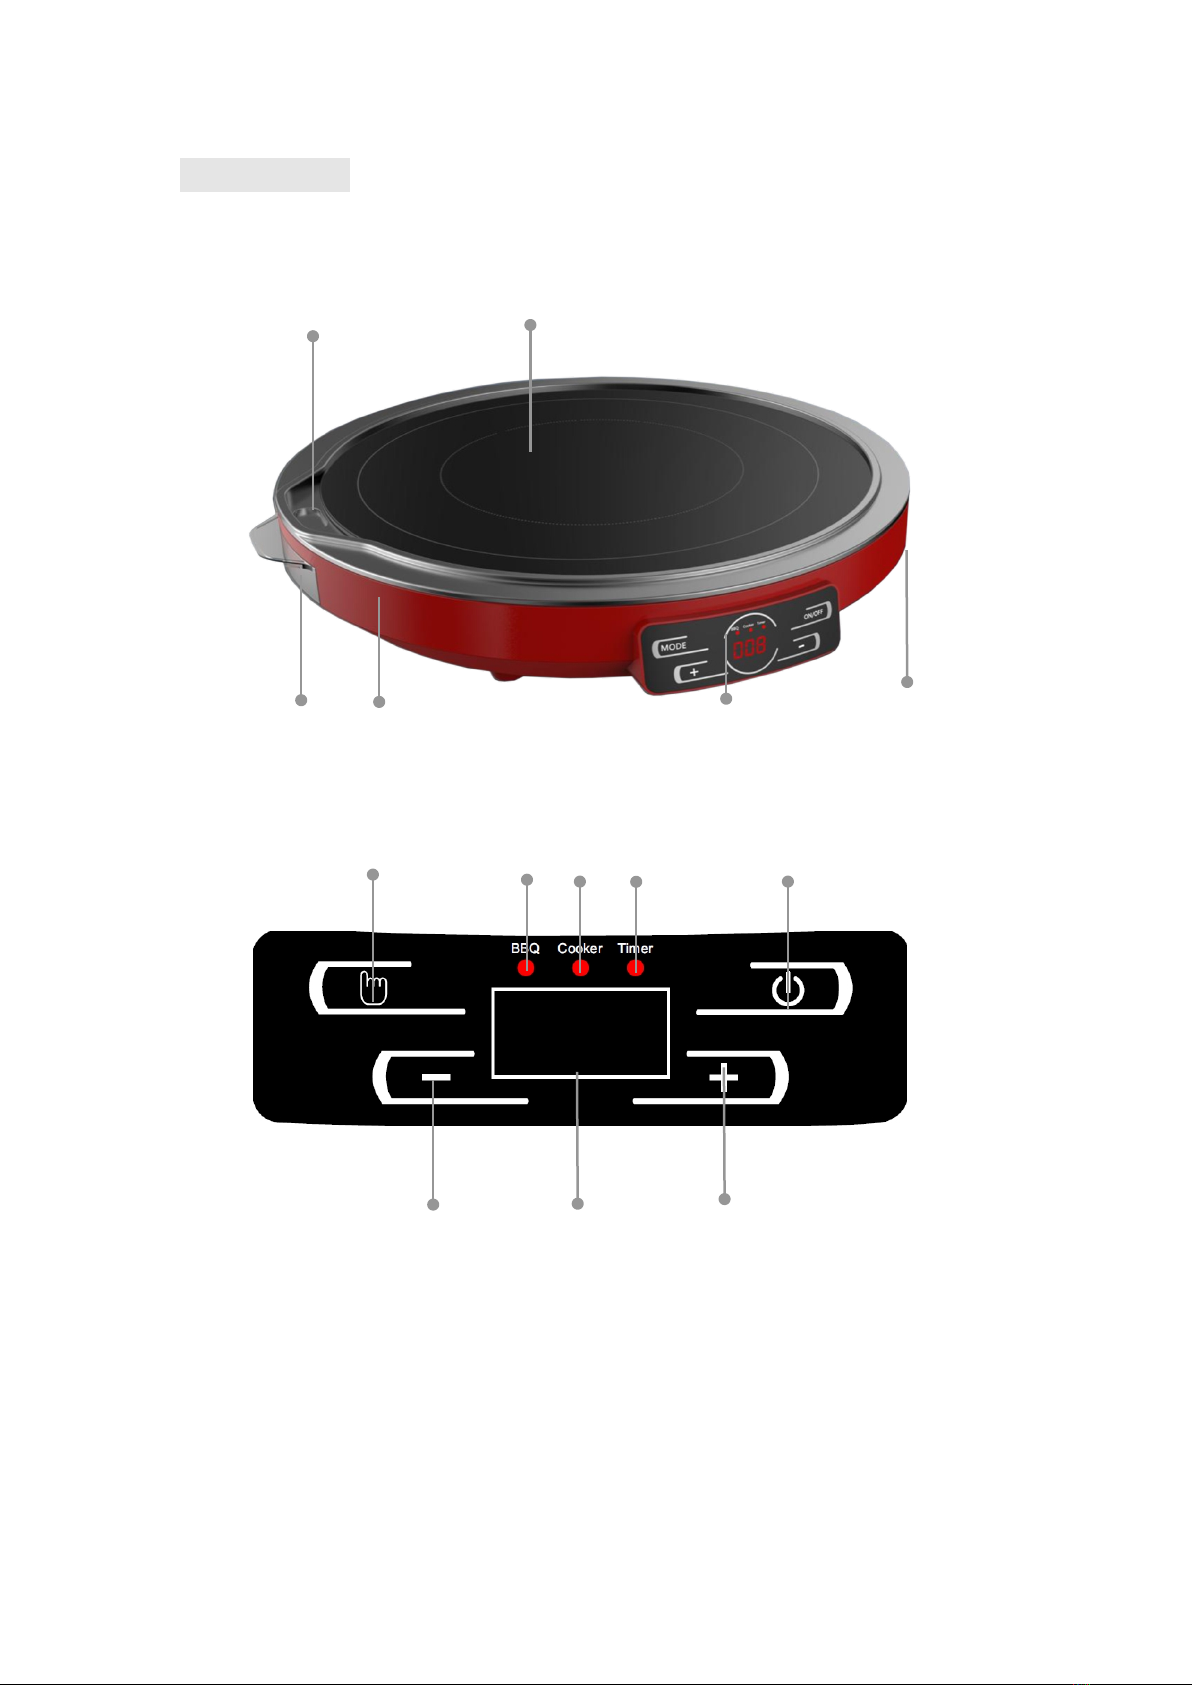
4. BBQ Function
1) When in switch on, press “Menu Button” to choose “BBQ LED”, “BBQ LED” keeps consistent
on, the LED screen will show Power “3”, press “Increase Button” or “Decrease Button” to
adjust the power.
2) Or press “Decrease Button” or “Increase Button” to enter into BBQ function.
3) Timer is not available in this mode.
5. Cooker Function
1) When in switch on, press “Menu Button” to choose “Cooker LED”, “Cooker LED” keeps
consistent on, press “Increase Button” or “Decrease Button” to adjust the power.
2) Timer is available in this mode.
6. Timer
1) Timer is only available for cooker function. Time range from 1 minute to 10 hours.
2) In cooker function, press “Menu Button” again, “Cooker LED” and “Timer LED” keep
consistent on. The LED screen shows “0:10” (it means 10 minutes) with flicker.
3) Press “Increase Button” or “Increase Button” to adjust the time at the rate of one minute.
Keep pressing “Increase Button” or “Increase Button” to adjust the time at the rate of ten
minutes.
4) It will be automatically confirmed in 5 seconds after you set the time.
5) In timer mode, the LED screen shows timer and power level alternately.
6) It will return to power off after the time elapse.
7. High Temperature Indicator
1) After finish cooking, the LED screen shows “-H-”, it will disappear until the glass surface
temperature below 50°C.
9. Fan Keeps Working
1) The fan will keep working for 5 minutes for heat dissipation after finish cooking. It will stop
automatically until the glass surface temperature below 50°C.

5
10. Automatically Switch Off When No Operation for 2 Hours
1) In working mode, the cooker will automatically switch off if without any operation after 2
hours except the mode of timer and preset.
CLEANING AND MAINTENANCE
1. Turn off the appliance by pressing “Knob” and wait until the light turns off. Once off, unplug
the power cord properly.
2. Wait for some time and let the appliance cool down.
3. You can use mild detergent or dishwashing liquid with a soft cloth to remove dirt.
4. Do not clean it with running water or immerse it in water as water will get inside and
damage the appliance.
5. Always make sure that the top plate and the pan/pot is clean before cooking as the dirt from
the pan/pot will stick to the plate and plate will get discolored.
6. You may clean the air vent by vacuum cleaner to suck up the dirt or you can use cotton if the
dirt is with oil.
7. Toothbrush with little soap can also be used to clean the surface as long as you use it gently
on the appliance.
8. Do not use abrasives or strong detergents as it may get chemical reaction.
9. After dirt has been removed, use a dry, soft cloth to wipe dry the appliance.

6
TROUBLE SHOOTING
TROUBLE
POTENTIAL CAUSES
RESOLUTION
Power indicator not on
Power cord is not connected
well
Please ensure the plug
inserted into the socket
Power off automatically
1. Spare parts over heat
2. No operation in two hours
Please restart the cooker,
otherwise, return it to the
service center for checking
and repairing
LCD shows E2
Temperature sensor or
Thermistor open circuit or
short circuit
Please return the cooker to
the service center for checking
and repairing
LCD shows E3
High voltage protection
Please ensure 150V <voltage
<270V, 220V~240V is
preferred.
LCD shows E4
Too low voltage protection
Please ensure 150V <voltage
<270V, 220V~240V is
preferred.
LCD shows E5
High temperature protection
Start again after the
temperature cool down
LCD shows E6
SCR overheat
Please check if the air intake
and outlet is jammed. If not,
please return the cooker to
the service center for checking
and repairing
Note: If the faults can not be resolved, please do not disassemble the appliance by yourself, but
return it to the service center for repairing. If you disassemble the appliance by yourself, we have
the right to make the warranty invalid. Dangers or other safety accidents caused by this will also
be charged to the user.

7
This manual suits for next models
1
Table of contents