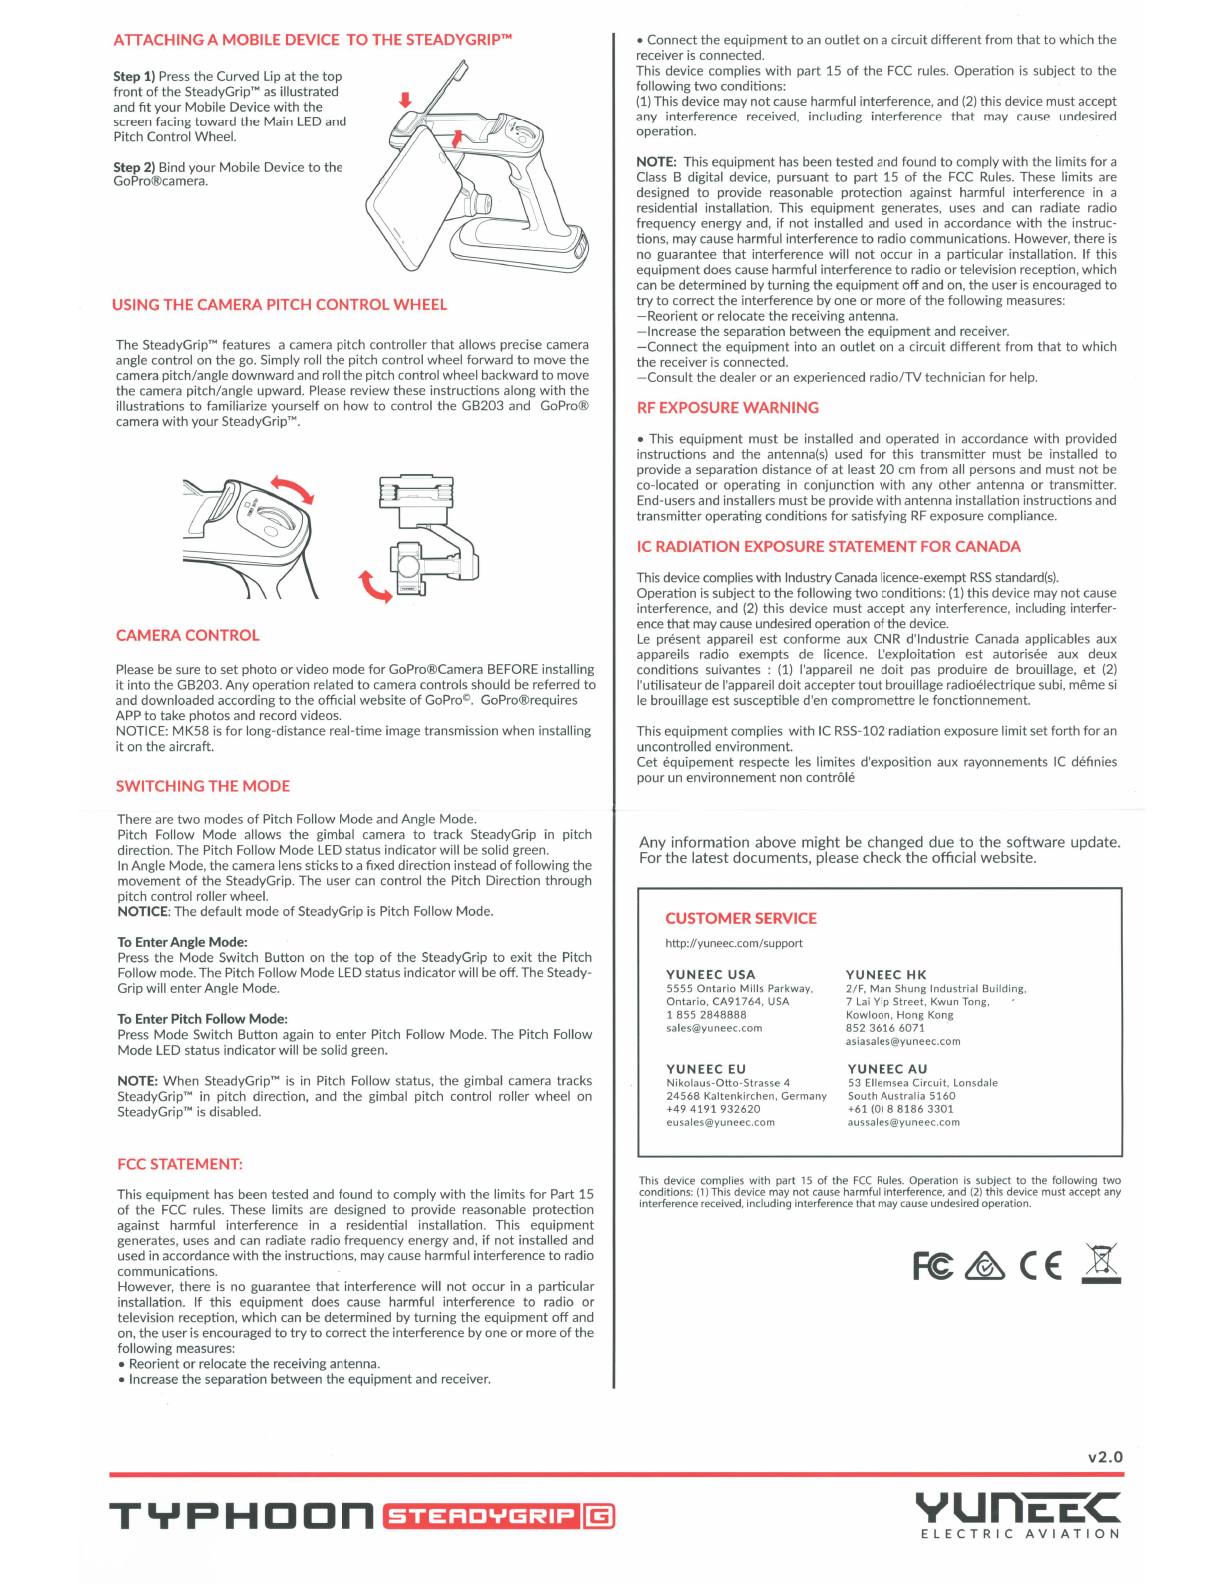
YUNEEC TYPHOON STEADYGRIP G User manual


INTRODUCTION
The
SteadyGrip"'
is
a grou
nd
handle designed
to
extend the
Go
Pr
o®camera from
the sky to the ground, allowing you
to
ca
pture amazing action shots
eas
i
er
than
eve
r
be
fore. The camera P.itch contro
ll
er allows precise camera angle control on
the
go us
in
g
yo
ur mob
il
e device as a d
is
p
lay.
The SteadyG
ri
p's ergonomic design
is
capable
of
holding up
to
a 6.4 inch m
ob
ile device.
Th
e GB203 is a 3·Axis
bru
sh
less
self-stabilizi
ng
gimbal,
compatible with
GoPr
o®
H
ero
3,
Hero
3+, Hero 4 Black and H
ero
4 Silver, extend
in
g
the
use of
the
GoPr
o®Ca
mera to capture sm
oot
h a
nd
fluid
ph
ot
og
r
ap
hsand video footage on
the
ground,and am
az
i
ng
vi
d
eo
footage
in
t
he
sky
as
wel
l.
Pl
ease
take the
tim
e to r
ea
d through this en
ti
re instruction manual for more
i
nf
orm
ation
on
sa
fety, b
attery
charging, camera co
ntr
ols and
more
before fil
ming
yo
ur
first
hit
video. Please also visit www.Yuneec.com for additional
information
including product updates.
bu
lletins, videos and more.
WINDOWS
SYSTEM
REQUIREMENTS
Wi
n
dows
XP (Service Pack 2 or later)
or
Vista
3.2GHz Pentium 4
or
faster
Minimum
4GB
of
system RAM
GoPro®COMPATIBLE DEVICES
Android
:
Depending
on
devices
Windows
Phone (8 & 8.1)2
MAC
SYSTEM
REQUIREMENTS
Mac OS® X 10.4.11
or
l
ater
2.0GHz Intel Core
Duo
or
faster
Min
i
mum
4GB
of
system RAM
Appl
eiOS:
iphone/
i
pad/ipod
touch
NO
TI
CE:
Please refer
to
the official website
of
GoPro®for
the
latest
information.
SPECIFICATIONS
STEADYGRIP
"'
Height:
223
mm (8.78 in)
Depth (fro
nt
to back): 182mm (7.17 in)
Width:
70
mm (2.76 in)
Weight (w
ithout
gimbal/ba
tt
eries): 254g (8.96 oz)
A ngle C
ontro
l Ran
ge
{Pitc
h)
:
30"
to
-8
5"
Ru
ntim
e:
2
40
min (depending on usage)
GB203
Dimension
s:
lto•
8o•
tt
5mm(4
.33.
3.82"4.53in)
Weig
ht
:
145
g(5.
11
oz)
Pi
tc
h
Cont
rol Ran
ge:
3Q"
....
-9
Q"
Roll Co
ntr
ol Range: -4
5"-+
45"
Y
aw
Co
ntr
ol Range: -4
5"-+
45
"
Compa
tibl
e Device: GoPr
o®
Hero 3, Hero 3+, Hero 4
Bl
ac
k, Hero 4
Silver
NOTICE: If u
se
MK5
8, GoPro®Hero4
Bl
ac
k is suggested
to
ac
hieve
be
tt
er
r
ea
l-
tim
e image transm
iss
ion.
NOTICES
AND
WARNINGS
IMPORTANT
NOTE
: All safety precautions and warnings, instructions, warranties
and
other
collateral
information
is
subject
to
change at
the
sole discretion
of
Yuneec.
Fo
r
the
most
up-to-
date
information
please
visit
the
co
rr
esponding
product
page
at
www.Yuneec.com
or
contact
the
nearest
Yuneec:
office
or
aut
ho
rized
dist
ributor.
The
fo
ll
owing
special language terms are used through
out
the
produ
ct
literature to
indicate various levels
of
potential harm
when
operating th
is
product:
NOTICE: Procedur
es,
which if n
ot
proper
ly followed, create a possibil
ity
of
property
damage
and/or
l
itt
le
to
no possibi
lity
of
injury.
CAUTION
: Procedu
res.
which
if
not
properly followed. create
the
probability
of
property
damage
and/or
a possib
ility
of
serious injury.
WARNING
: Procedures,
which
if
not
properly
followed, create
the
probability
of
property
damage, collateral damage
and/or
serious injury
or
create a high probability
of
superficial injury.
WARNING
: Read
the
ENTIRE
instruction
manual
to
become familiar
with
the
features
of
the
product
before operating. Failure
to
operate
the
product
correctly
can result in damage
to
the
product,
property
and/or
cause serious injury.
WARNING
: This is a sophisticated consumer product. It
must
be operated
with
caution and common sense, and requires some basic mechanical ability. Failure
to
operate this
product
in a safe and responsible mannercould result in damage
to
the
product,
property
and/or
cause serious injury. This
product
is
not
intended
for
use
by
children
without
direct adult supervision. Do
not
use
with
incompatible
components
or
alter this
product
in
any
way
outside
of
the
instructions provided
by
Yuneec. The i
nstruction
manual contain instructions
for
safety,
ope
ration and
maintenance.
It
is
essential
to
read and
follow
all
the
instructions and warnings
prior
to
assembly, setup
and/o
r use in
order
to
operate
the
product
correctly
and
avoid damage
or
serious injury.
AGE RECOMMENDATION:
NOT
FOR CHILDREN
UNDER
14
YEARS.
TH
IS
IS
NOT
ATOY.
GENERALSAFETY PRECAUTIONS
AND
WARNINGS
WARNING
:
Fa
il
ur
e
to
use this
product
in
the
intended
manner
as
described
in
instruction
manual can result in damage
to
the product.
property
and/o
r cause
serious injury. This
product
is
not
a toy!
If
misused it can cause serious
bodily
harm
and damage
to
property.
WARNING
: As
the
user
of
this pr
oduct
you are solely and
wholly
responsible
for
operating
it
in
a manner
that
does
not
endanger yourself and others
or
result in
damage
to
the
product
or
the
property
of
others.
Always
allow
GB203
and SteadyGri
p'"
to
initialize
properly
by
setting
the
Steady-
Gr
ip'"
on
a
flat
and stable surface
pr
i
or
to
switching
it
on
and
allow
ing
the
Steady-
Grip"'
and
GB203
to
initialize
prope
rly
which
sometimes takes
about
12
seconds.
Always operate
your
SteadyGrip
"'
in a respectful and safe manner.
OVERVIEW
SteadyGr
ip"'
and
GB203
for
GoPro®Cameras
1.
GB203
2.
Main
Status LED
3.
Pitch
Contro
l Roller
Wheel
4.
Mode
Switch
Button
5. Rubberized Er
gonomic
Grip
6.
On/Off
Swi
tch
7.
Sx
AA
Battery
Compartment
BATTERYWARNINGSAND
USAGE GUIDELINES
WARNING
: Alkaline Batteries
Ma
y explode
or
leak, and cause
burn
i
njury
if
recharged, disposed
of
in
fi
r
e,
mixed
wit
h a
di
ff
er
ent
battery type, inserted
backwards
or
disassembled. Replace all
batte
ries at the same time.
Do
not
carry
batteries loose
in
yo
ur pock
et
or
purse.
Do
not
remove the
battery
label.
WARNING
: All instruc
ti
ons and precau
ti
ons must be read and
followed
exactly
and
yo
u m
us
t
fo
ll
ow
instruc
ti
ons
of
the
battery
manu
fact
urer.
WARNING:
procedures, which if not property
followe
d, create
the
probabili
ty
of
pr
operty
damage, collateral damage and
se
rious
injury
or create a high
probability
of superficial injury.
Failure
to
exercise care
while
using
th
is
product
and
comply
with
the
following
conditions and guidance could result in
product
ma
lfunction, excessive heat, fire,
property
damage, and
ultimate
ly injury.
Li
thium lon batteries are
not
toys.
Fo
r
the
purpose
of
the
document
Li-lon, Li-Po,
Li-Fe, NiCd or
NiMH
batteries
wi
ll be described
as
"Batteries".
Ha
ndling
and Storage:
• Neveralter,
puncture
or
impact Batteries
or
related components.
•
Do
not
directly
connect
the
terminals
with
metal objects. This
will
short·circuit
Batteries, resul
ting
in
heat
and electrical discharge.
• Never store loose Batteries together,
the
Batteries' terminals may contact one
another causing a
short
circuit.
• Never expose Batteries
to
ext
reme temperatures
or
direct
sunlight.
• Always disconnect Batteries
when
not
in use.
Before
th
e
First
Charge:
• Ensure batteries are
not
damaged,
as
this maycause a short circuit
of
lire.
• Always refer
to
your charger's manual
to
ensure safe operation.
•
fJN.r.:r.(s
charge
Batteries
in
an
open
area
<1>N<rf
from
flammable
materials,
liquids
and
surfaces.
•
Never
char
ge
Batteries
that
are
hot
to
the
touch
(above 120°F)
• Never make
wrong
po
lar
ity
connection
when
charging and discharging
battery
packs. Always
doub
le check
polarity
of
battery
's
connector
to
make sure red
wire
to
red
wire
and black
wire
to
black wire.
• Please always use a smart charger
(with
automatic
power
cut-off
function
)
to
charge
Ni
MH
battery
; charging
NiMH
battery
without
an
attention
may cause
battery explode.
•
When
charging
NiM
H battery, please always
put
the
battery in a
water
-
proof
place
to
avoid any accident happen.
• For larger
battery
pack
(10Ah
or
larger),
please always use a smart charger
with
temperature
sensor
to
avoid
over
heating
which
may cause
the
accident.
NiMH
batteries have higher energy than NiCd battery,
but
they
have higher
se
lf discharg-
ing rate and
shorter
shelf life. Therefore, please always keep
NiMH
cells I battery
pack
in
charged
condition
after
using
or
before
storing them.
• Suggest you charging
NiMH
batteries and packs
at
least
ev
e
ry
six months,
otherwise
NiM
H
battery
will
reduce capacity
or
dead. For safety reason,
NiMH
battery is usually shipped
without
fully
charged. You
must
charging
NiMH
battery
before use, and
allow
3·5 cycles
of
charging and discharging
for
battery capacity
to
Additional
Guidelin
es and
Warning
s:
•
In
the
event
of
acrash, always
quickly
and safely disconnect and remove Batteries
from
the
model. Then f
ollow
the
previouslylisted safety procedures.
•
If
the
internal
contents
of
Batteries come
into
contact
with
your
skin, wash
the
affected area(s)
with
soap and
water
immediately. If
it
comes
into
contact
with
your
eye(s), flush
them
wit
h generous amounts
of
water
fo
r
15
minutes and seek
immediately medical
attention.
INSTALLINGTHE
AA
BATTERIES
WARNING
: Alkaline Batteries
May
explode
or
leak, and cause burn injury
if
recharged, disposed
of
in fire, mixed
with
a
different
battery
type
, inserted
backwards
or
disassembled. Replace all batteries at
the
same
time
.
Do
not
carry
batteries loose in
your
pocket
or
purse.
Do
not
remove
the
battery
label.
STEP
1)
Remove
the
Battery
C
ove
r I D
oo
r
from
the
bottom
of
the
Ste
adyGrip
...
Hold
the
bottom
of
the
SteadyGrip"'
toward
yourself
with
the
front
part
facing
downward.
Slide
the
battery
coverI
door
upward
with
slight force and inspect
the
AA
battery compartment.
STEP 2) Ins
tall
8x
AA
Batterie
s
Install
8x
AA
Batteries
as
illustrated.
STEP 3) Re-installing
the
Batt
e
ry
Co
ve
r I
Door
on
th
e
bottom
of the S
tea
dyGrip
"'
Once
you've installed 8 fresh
AA
batteries,
Hold
the
bottom
of
the
SteadyGrip"'
toward
yourself
with
the
front
part
facing
downward.
Slide
the
battery
cover I
door
downward
wit
h slight force and ensure you hear and feel a noticeable 'click'
indicating
the
battery
coverI
door
has been closed securely.
ATTACHING THE
GB203
TO THE STEADYGRIP-
WARNING
: Before
sw
i
tching
on
the
5teadyGrip
"'
it
is highly recommended
to
first
securely attach
the
GB203
to
your
SteadyGrip'
".
QUICK
TIP: Make sure
that
you have
your
microSD card
with
lots
of
space
for
ph
otos
and videos handy.
STEP 1) Remove
the
protective
cover
for
the
contactor
as
illustrated.
STEP 2) Caref
ully
sl
i
de
the top
part
of
the
GB203
(that also attaches
below
the
nose
of
the
TYPHOON)
onto
the
mount
below
the
front
part
of
the SteadyGrip"'. A
corresponding 'click'
will
be noticed once
the
GB203
has securely been installed
into
the
slide-in
mount
on
the
SteadyGrip"'.
STEP 3) Powering
on
and initialization. Place your
SteadyGrip"'
on
a
flat
and stable surface, then switch
on
the
SteadyGrip"' and
it
will
initialize after
12
seconds
of
nO
movement
or
vibration. The
LEO
Status
indicator
on
the
GB203
will
blink green
slowly
when
initialization is completed.
NOTICE: The
GB203
can
be
supplied
with
power
through SteadyGrip""
by
the
Lipo
Balance
Connetor
Charge Lead (sold seperately)
when
the
contact
is
damaged.
SteadyGrip"" LED STATUS:
Main
Status LED:
Upon Powering on: Green LEO blinking
for
twice
and 00
then
so
l
;d
GREEN
0
-
m
·
~
---
LowVoltage
Warning: RED LED blinking
slowly
Power
Cut-off:
RED LED blinking
quick
ly
Pitch
Fo
ll
ow
Fu
nction
on: GREEN LED solid
Pitch
Fo
ll
ow
Function
off:
GR
EEN LED blinking
GB203
LED Statu
s:
GB203
Connecting
with
the
SteadyGrip: LED
blinking
green
slowly
GB
203
Failing
to
Connect
with
the
SteadyGri
p:
LEO
off
GB
203
Conn
ecting
with
the
Remote Controller: LED blinking green
slowly
GB203
Error: LED blinking r
ed

ATTACHING
A MOBILE DEVICE
TO
THE STEADYGRIP™
Step 1)
Press
the Curved Lip at
the top
front
of
the SteadyGrip""
as
illustrated
and
fit
your Mobile Device
with
the
screen facing toward the Main
LED
and
Pitch Control Wheel.
Step 2) Bind your Mobile Device
to
the
GoPro®camera.
USING THE CAMERA PITCH CONTROL WHEEL
The
SteadyGripTM
features a camera pitch controller
that
allows precise camera
angle control on the go. Simply roll the pitch control wheel forward
to
move the
camera pitch/angle downward and roll
the
pitch control wheel backward
to
move
the camera pitch/angle upward.
Please
review these instructions along
with
the
illustrations
to
familiarize yourself on
how
to
control
the
GB203 and GoPro®
camera
with
your
SteadyGripTM.
CAMERA CONTROL
Please be sure
to
set photo orvideo mode
for
GoPro®Camera
BEFORE
installing
it
into
the
GB203.
Any
operation related
to
camera controls should be referred
to
and downloaded according
to
the official website
of
GoPro
©.
GoPro®requires
APP
to
take photos and record videos.
NOTICE:
MK58
is
for
long-distance real-time image transmission when installing
it
on
the
aircraft.
SWITCHING
THE
MODE
There
are
two
modes
of
Pitch Follow Mode and Angle Mode.
Pitch Follow Mode allows the gimbal camera
to
track SteadyGrip in pitch
direction.The Pitch Follow Mode
LED
status indicatorwill be solid green.
In
Angle Mode, the camera lens sticks
to
afixed direction instead
of
following
the
movement
of
the SteadyGrip. The user
can
control the Pitch Direction through
pitch control roller wheel.
NOTICE: The default mode
of
SteadyGrip
is
Pitch Follow
Mode
.
To
EnterAngle Mode:
Press
the Mode Switch Button on
the
top
of
the SteadyGrip
to
exit the Pitch
Follow mode.The Pitch Follow Mode
LED
status indicatorwill be off. The Steady-
Grip will enterAngle Mode.
To
Enter Pitch Follow Mode:
Press
Mode Switch Button again
to
enter Pitch Follow Mode. The Pitch Follow
Mode
LED
status indicatorwill be solid green.
NOTE: When
SteadyGripTM
is
in
Pitch Follow status, the gimbal camera tracks
SteadyGripTM
in
pitch direction, and the gimbal pitch control roller wheel on
SteadyGripTM
is
disabled.
FCC
STATEMENT:
This equipment
has
been tested and found
to
comply
with
the
limits
for
Part
15
of
the
FCC
rules. These limits
are
designed
to
provide reasonable protection
against harmful interference
in
a residential installation. This equipment
generates,
uses
and
can
radiate radio frequency energy and,
if
not
installed and
used in accordance
with
the
instructions, may cause harmful interference
to
radio
communications.
However, there
is
no guarantee
that
interference will
not
occur in a particular
installation. If this equipment does cause harmful interference
to
radio
or
television reception, which
can
be determined by turning the equipment
off
and
on, the user
is
encouraged
to
try
to
correct the interference by one
or
more
of
the
following measures:
• Reorient
or
relocate the receiving antenna.
• Increase the separation between
the
equipment and receiver.
TYPHCCn
STEADYGRIP
• Connect the equipment
to
an
outlet
on a circuit different from
that
to
which the
receiver
is
connected.
This device complies
with
part 15
of
the
FCC
rules. Operation
is
subject
to
the
following
two
conditions:
(1)
This device may
not
cause harmful interference, and
(2)
this device must accept
any interference received, including interference
that
may cause undesired
operation.
NOTE: This equipment
has
been tested and found
to
comply
with
the limits
for
a
Class
B digital device, pursuant
to
part 15
of
the
FCC
Rules.
These limits are
designed
to
provide reasonable protection against harmful interference
in
a
residential installation. This equipment generates, uses and
can
radiate radio
frequency energy and,
if
not
installed and used in accordance
with
the instruc-
tions, may cause harmful interference
to
radio communications. However, there
is
no guarantee
that
interference will
not
occur in a particular installation. If this
equipment does cause harmful interference
to
radio
or
television reception, which
can
be determined by turning
the
equipment
off
and on,
the
user
is
encouraged
to
try
to
correct the interference by one or more
of
the following measures:
-Reorient
or relocate
the
receiving antenna.
-Increase
the
separation between the equipment and receiver.
-Connect
the
equipment into
an
outlet
on a circuit different from that
to
which
the receiver
is
connected.
-Consult
the dealer
or
an
experienced radio/TV technician
for
help.
RF
EXPOSURE
WARNING
• This equipment must
be
installed and operated in accordance
with
provided
instructions and
the
antenna(s) used
for
this transmitter must
be
installed
to
provide a separation distance
of
at least 20
em
from all persons and must
not
be
co-located
or
operating in conjunction
with
any other antenna or transmitter.
End-users and installers must be provide
with
antenna installation instructions and
transmitter operating conditions
for
satisfying
RF
exposure compliance.
IC RADIATION EXPOSURE STATEMENT FOR
CANADA
This device complies with Industry
Canada
licence-exempt
RSS
standard(s).
Operation
is
subject
to
the
following
two
conditions:
(1)
this device may
not
cause
interference, and
(2)
this device must accept any interference, including interfer-
ence that may
cause
undesired operation
of
the device.
Le
present appareil est conforme aux CNR d'lndustrie Canada applicables aux
appareils radio exempts de licence. L'exploitation est autorisee aux deux
conditions suivantes :
(1)
l'appareil
ne
doit
pas
produire de brouillage,
et
(2)
l'utilisateurde l'appareil do
it
accepter
tout
brouillage radioelectrique subi, meme
si
le
brouillage est susceptible d'en compromettre
le
fonctionnement.
This equipment complies
with
IC
RSS-102 radiation exposure limit set
forth
for
an
uncontrolled environment.
Cet equipement respecte
les
limites d'exposition aux rayonnements
IC
definies
pour un environnement non contr61e
Any information above might
be
changed due
to
the
software update.
For the latest documents, please check the official website.
CUSTOMER SERVICE
http
://
yuneec.com
/
support
YUNEEC USA
5555
Ontario
Mills
Parkway,
Ontario
,
CA91764,
USA
1
855
2848888
YUNEEC
EU
YUNEEC
HK
2/
F,
Man Shung
Industrial
Building
,
7
Lai
Yip Street, Kwun Tong,
Kowloon
, Hong Kong
852
3616
6071
YUNEEC AU
Nikolaus-Otto·Strasse
4 53 Ellemsea
Circuit
, Lonsdale
24568
Kaltenkirchen
, Germany South Australia
5160
+49
4191932620
+61 (0) 8
8186
3301
This device complies
with
part
15
of
the
FCC
Rules.
Operation
is
subject
to
the
following
two
conditions: (1) This device may
not
cause harmful interference, and
(2)
this device must accept any
interference received, including interference
that
may cause undesired operation.
~&CE
R
-
v2.0
YUnc.c.~
ELECTRIC
AVIATION
This manual suits for next models
1
Other YUNEEC Camera Accessories manuals