Zanussi ZBM150 User manual

BUILT-IN OVEN
ZBM 150
INSTRUCTION BOOKLET
Please read this instruction booklet before using the appliance
AU

2
Important Safety Information
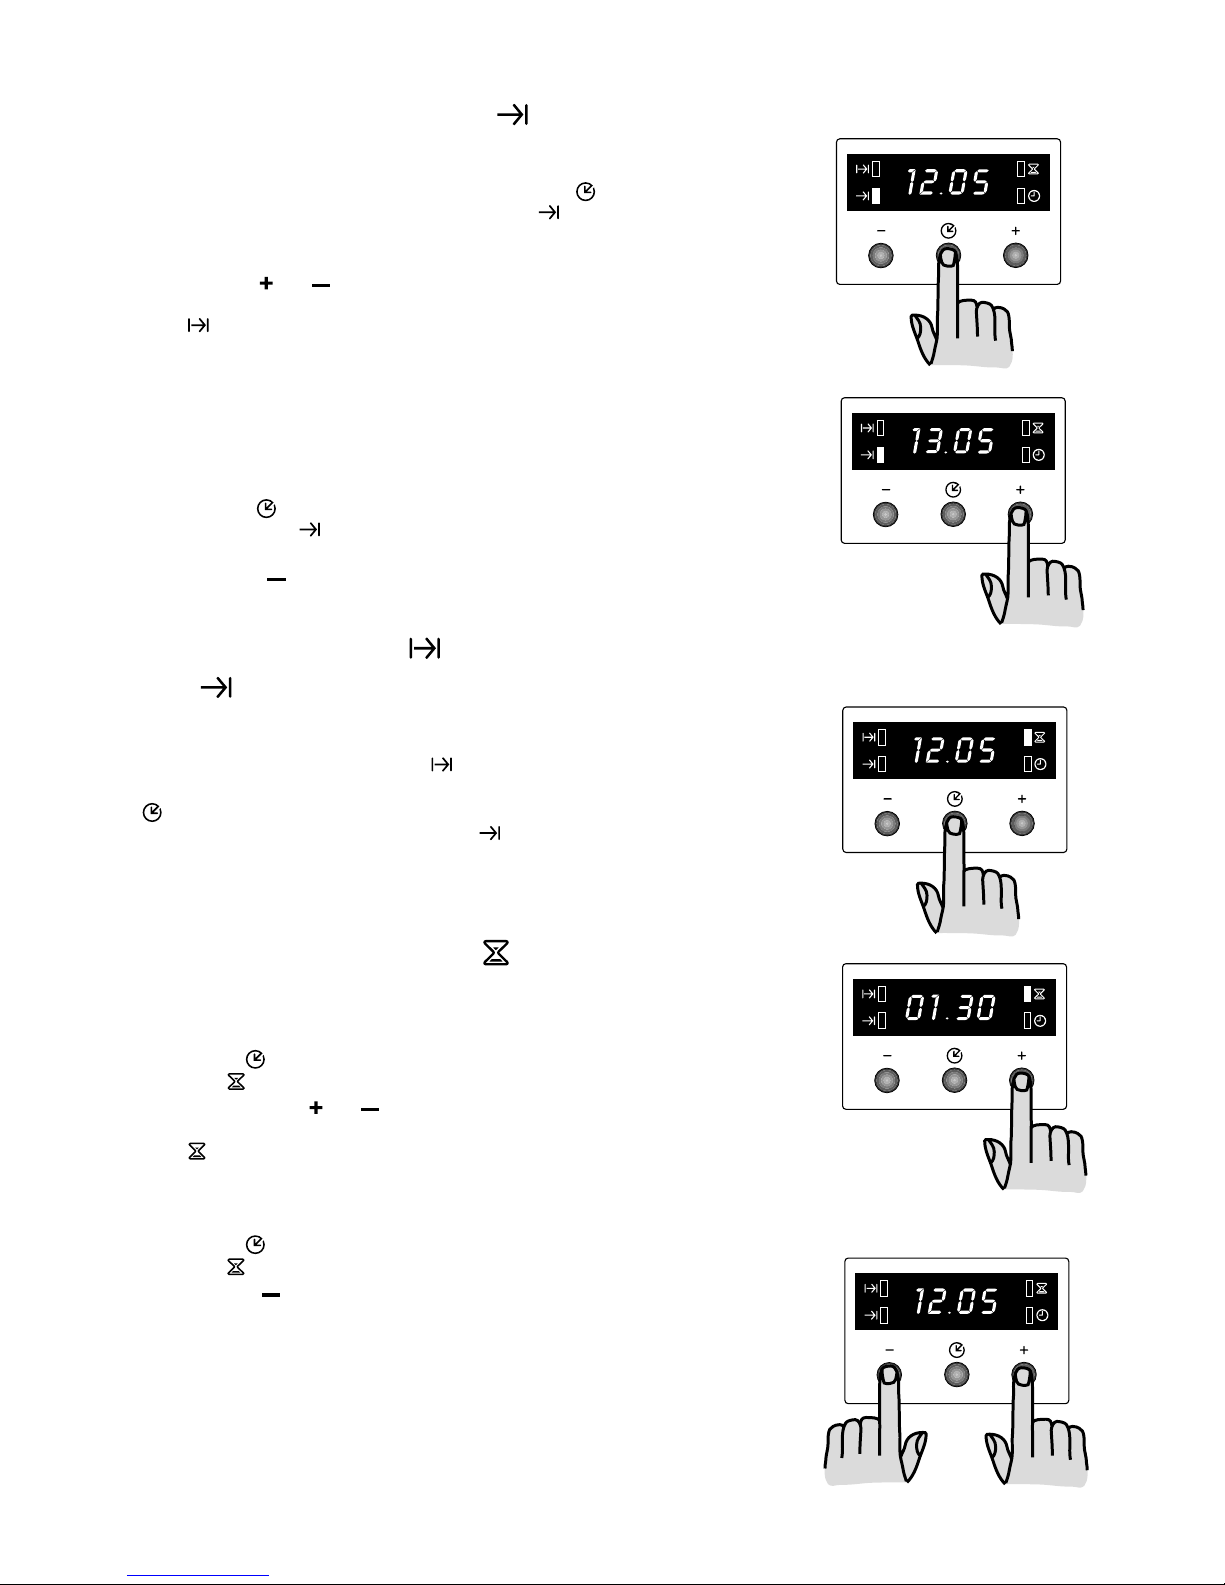
Guide to Use the instructions
The following symbols will be found in the text to guide
you throughout the Instructions:
Safety Instructions
Step by step instructions for an operation
Hints and Tips
Environmental information
F
It is most important that this instruction book should be retained with the appliance for future reference.
Should the appliance be sold or transferred, always ensure that the book is left with the appliance in order
that the new owner can get to know the functions of the appliance and the relevant warnings.
These warnings are provided in the interest of safety. You MUST read them carefully before installing or
using the appliance.
Installation
This oven is heavy and care must be taken when
moving it
Ensure that all packaging, both inside and outside
the oven, has been removed before the oven is
used
The oven must be installed according to the
instructions supplied Any electrical work must be
undertaken by a qualified electrician
It is dangerous to alter the specifications in any
way
After installation, please dispose of the packaging
with due regard to safety and the environment
Child Safety
The appliance is not intended for use by young
children or infirm persons without supervision Young
children must not be allowed to tamper with the
controls or play near or with the oven
Ovens become very hot, and retain their heat for a
long period of time after use Children should be
kept well away from the oven until it has cooled
AUTION - accessible parts will become hot when
in use To avoid burns and scalds children should
be kept away
During Operation
Do not use this oven if it is in contact with water
and never operate it with wet hands
Ensure that the oven shelves are installed in the
correct way
Take great care when heating fats and oils as they
will ignite if they become too hot
This oven has been designed for cooking edible
foodstuffs only and must not be used any other
purposes
Never place plastic or any other material which may
melt in or on the oven
Only clean this oven in accordance with the
instructions
Take care to follow the recommendations given for
tending the food when grilling Use the handles
provided in the recommended way
Always grill with the oven door closed.
Always use oven gloves to remove and replace food
in the oven
Ensure that you support the grill pan when removing
it from the oven
Never line any part of the oven with aluminium foil
Do not allow heatproof cooking material, e g
roasting bags, to come into contact with oven
elements
Always stand back from the oven when opening
the oven door, to allow any build-up of steam or
heat to release
Stand clear when opening the drop down oven door
Do not allow it to fall open - support it using the
door handle, until it is fully open
Do not place sealed cans or aerosols inside the
oven They may explode if they are heated
Do not hang towels or clothes from the oven or its
handle They are a safety hazard
After Use
Ensure that all control knobs are in the OFF position
when not in use
For hygiene and safety reasons, this oven should
be kept clean at all times A build-up of fats or other
foodstuffs could result in a fire, especially in the grill
pan
Only clean this oven in accordance with the
instructions
Always allow the oven to cool down before switching
off at the wall prior to carrying out any cleaning or
maintenance work
Do not leave utensils containing foodstuffs, e g fat
or oil in or on the oven in case it is inadvertently
switched ON
Under no circumstances should you attempt to
repair the appliance yourself Repairs carried out
by inexperienced persons may cause injury or
serious malfunctioning Refer to your local Service
Centre Always insist on genuine spare parts
Environmental Information
After installation, please dispose of the packaging
with due regard to safety and the environment
When disposing of an old appliance, make it
unusable, by cutting off the cable Remove any
door catches, to prevent small children being
trapped inside

3
For the User For the Installer
Contents
Your safety is of paramount importance.
Therefore, if you are unsure about any of the
meanings of these WARNINGS, contact the
ustomer are Department.
Keep this instruction book for future reference
and ensure it is passed on to any new owner.
Description of the Oven
1
2
3456
7
8
9
10
1. Control panel
2. Thermostat Control Light
3. Mains on Light
4. Thermostat Control Knob
5. Electronic Programmer
6. Oven Function Control Knob
7. Oven Light
8. Grill
9. Oven Fan
10. Rating Plate
11. Anti-tip helf
12. Baking Tray
13. Dripping Pan
14. Grill/Roasting pan
15. Grill Trivet
Important Safety Information 2
Description of the Oven 3
Controls 4
Before the First Use 5
Using the Oven 5
Electronic programmer
Using the Conventional Oven 8
The Fan Oven 10
Grilling 12
Defrosting 13
Cleaning the Oven 14
Cleaning the Hinged Grill 15
Replacing the Oven Light 15
Something not Working 1
Service and Spare Parts 1
Installation 17
Electrical Connection 18
Building In 19
14 15
12
13
11

4
100
150
200
50
max
FO 2630
Controls
Oven Function Control Kno
Conventional cooking - The heat comes from
both the top and bottom element, ensuring even
heating inside the oven
Bottom heating element - The heat comes from
the bottom of the oven only
Fan cooking - This allows you to roast or roast
and bake simoultaneously using any shelf,
without flavour transference
Inner grill element only - Can be used for grilling
small quantities
Full Grill - The full grill element will be on
Defrost Setting - This setting is intended to
assist in thawing of frozen food
Thermostat Control Kno (°C)
Turn the thermostat control knob clockwise to select
temperatures between 50°C and 250°C (MAX)
Mains on Light
The mains on light will come on when the oven function
control knob is set
Thermostat Control Light
The thermostat control light will come on when the
thermostat control knob is turned The light will remain
on until the correct temperature is reached It will then
cycle on and off to show the temperature is being
maintained
The Safety Thermostat
This oven is provided with a safety thermostat In case
of malfunctioning of the main thermostat, and
consequent over-heating, the safety device will stop
the power supply to the appliance If this happens, call
your local Service Force Centre Under no
circumstances should you attempt to repair the
appliance yourself
The cooling fan
The cooling fan operates during cooking Air is expelled
through vents between the oven door and the control
panel, as shown in the diagram
The cooling fan may run on after the oven is switched
off to keep the controls cool This is quite normal
FO 2259
FO 2572
Push-push control kno s
This model is provided with push-push control knobs
These knobs can be completely sunken inside the
control panel when the oven is not working
FO 0350

5
Before the First Use
Remove all packaging, both inside and outside
the oven, before using the oven.
Before first use, the oven should be heated without
food During this time, an unpleasant odour may be
emitted This is quite normal
The oven will work only if the time of day
has been set.
1 Set the time of day with the electronic programmer
(see chapter "Electronic Programmer")
2 Switch the oven function control knob to fan cooking
3 Set the thermostat control knob to MAX
4 Open a window for ventilation
5 Allow the oven to run empty for approximately 45
minutes
This procedure should be repeated with the grill
function for approximately 5-10 minutes
Hints and Tips
Condensation and steam
When food is heated it produces steam in the same
way as a boiling kettle The oven vents allow some of
this steam to escape However, always stand back
from the oven when opening the oven door to allow
any build up of steam or heat to release
If the steam comes into contact with a cool surface on
the outside of the oven, e g a trim, it will condense
and produce water droplets This is quite normal and is
not a fault with the oven
To prevent discolouration, regularly wipe away
condensation and also soilage from surfaces
Cookware
Use any oven proof cookware which will withstand
temperatures of 250°C
Baking trays, oven dishes, etc should not be placed
directly against the grid covering the fan at the back
of the oven, or placed on the oven base
Do not use baking trays larger than 30 cm x 35 cm
(12 in x 14 in) as they will restrict the circulation of
heat and may affect performance
The effects of dishes on cooking results
Dishes and tins vary in their thickness, conductivity,
colour, etc which affects the way they transmit heat to
the food inside them
AAluminium, earthenware, oven glassware and bright
shiny utensils reduce cooking and base browning
BEnamelled cast iron, anodized aluminium, aluminium
with non-stick interior and coloured exterior and
dark, heavy utensils increase cooking and base
browning
Using the Oven
Always cook with the oven door closed.
Stand clear when opening the drop down oven
door. Do not allow it to fall open - support the
door using the door handle, until it is fully open.
The oven has four shelf levels The shelf
positions are counted from the bottom of the oven
as shown in the diagram
4
3
2
1
Attention! Do not place pans, dripping pans, biscuit
pans or aluminium foil on the oven bottom This could
cause a heat build-up which would affect the baking
results and damage the oven enamel
NO
YES

6
Electronic programmer
1. Push button for selecting a function
2. Decreasing control button
3. Increasing control button
4. Display
5. Cooking Duration pilot lamp
6. End of cooking pilot lamp
7. Minute minder pilot lamp
8. Time of day pilot lamp
The oven will work only if the time of day has been set.
However, the oven can also be operated without any programme
Setting the time of day
When the power supply is switched on, or after a power failure, the Time of
day pilot lamp will flash on the display
To set the correct time of day:
1. Press button or
2. After the setting is carried out, wait for 5 seconds: the Time of day pilot
lamp will go out and the display will show the set time The appliance
is ready for use
To reset the correct time of day:
1. Press button repeatedly to select the Time of day function The
relevant pilot lamp will start flashing Then proceed as described above
The time of day can only be reset if no automatic function (cook duration
or end of cooking ) has been set
Cooking Duration function
This function allows the oven to automatically switch off at the end of a
programmed cooking duration time Place food in the oven, select a cooking
function and adjust the cooking temperature Press button repeatedly to
select the Cooking Duration function The relevant pilot lamp will start
flashing Then, proceed as follows:
To set the duration time:
1. Press button or
2. After the setting is carried out, wait for 5 seconds: the "Cooking Duration"
pilot lamp will come on and the display will revert to the time of day
3. When cooking time is over, the oven will be switched off automatically
and an acoustic alarm will be heard, while the pilot lamp will start flashing
Turn the oven function and the thermostat control knob to zero
To switch off the acoustic alarm, press any button
NOTE: turning the acoustic alarm off will reset the oven to manual, and
if the oven function and the thermostat knobs are not set to zero the
oven will start to heat again
To cancel the duration time:
1. Press button repeatedly to select the Cooking Duration function
The relevant pilot lamp will flash and the display will show the remaining
cooking time
2. Press button until the display shows 0:00 After 5 seconds the
pilot lamp will go out and the display will revert to the time of day
4
5
1
23
6
7
8
FO 2571

7
End of cooking function
With this function, you can set the oven to switch off automatically when a
programmed end of cooking time is over Place food in the oven, select a cooking
function and adjust the cooking temperature Press button repeatedly to select
the End of cooking function The relevant pilot lamp will start flashing Then,
proceed as follows:
To set the End of cooking time:
1. Press button or
2. After the setting is carried out, wait for 5 seconds: the End of cooking pilot
lamp will come on and the display will revert to the time of day
3. When cooking time is over, the oven will be switched off automatically and an
acoustic alarm will be heard, while the pilot lamp will start flashing Turn the
oven function and the thermostat control knob to zero
To switch off the acoustic alarm, press any button NOTE: turning the acoustic
alarm off will reset the oven to manual, and if the oven function and the
thermostat knobs are not set to zero the oven will start to heat again
To cancel the End of cooking time:
1. Press button repeatedly to select the End of cooking function The
relevant pilot lamp will flash and the display will show the programmed
End of cooking time
2. Press button until the display shows the current time of day The
programmer will beep and the pilot lamp will go out
Cooking duration and End of cooking
time com ined
The functions Cooking duration and End of cooking time can be used
simultaneously to set the oven to switch on and off automatically at a later time.
1. With the Cooking duration function (carry out the cooking duration setting
as described in the relevant chapter) set the duration time Then, press button
: the display will show the programmed setting
2. With the End of cooking time function (carry out the End of cooking
setting as described in the relevant chapter) set the end of cooking time
The relevant pilot lamps will come on and the display will show the time of
day The oven will switch on and off according to the set programmes
Minute minder function
The minute minder alarm will sound at the end of a timed period, but THE OVEN
WILL REMAIN ON, if it is in use
To set the minute minder:
1. Press button repeatedly to select the Minute minder function The relevant
pilot lamp will start flashing
2. Then, press button or (maximum: 2 hours, 30 minutes)
3. After the setting is carried out, wait for 5 seconds: the Minute minder pilot
lamp will come on
4. At the end of the timed period, the pilot lamp will start flashing and an acoustic
alarm will be heard To switch off the acoustic alarm, press any button
To cancel the minute minder:
1. Press button repeatedly to select the Minute minder function The relevant
pilot lamp will flash and the display will show the remaining time
2. Press button until the display shows 0:00 After 5 seconds the pilot
lamp will go out and the display will revert to the time of day
How to switch off the display
1. Press two or three programmer push buttons simoultaneously and keep
them pressed for about 5 seconds The display will switch off
2. To switch on the display, press any button
The display can be switched off only if no other functions have been
set.

8
Using the Conventional Oven
When using this setting, heat comes from both the top
and bottom elements This allows you to cook on a single
level and is particularly suitable for dishes which require
extra base browning such as pizzas, quiches and flans
Gratins, lasagnes and hotpots which require extra top
browning also cook well in the conventional oven This
form of cooking gives you the opportunity to cook without
the fan in operation
FHow to Use the
Conventional Oven
1 Turn the oven function control knob to the required
cooking function ( )
2 Turn the thermostat control to the required tempera-
ture
THINGS TO NOTE
l
The oven light will come on when the oven function
control knob is set
l
The thermostat control light will remain on until the
correct temperature is reached It will then cycle on
and off to show that temperature is being maintained
Bottom oven element only
This function is particularly useful when blind-baking
pastry or cooking pizza It may also be used to finish off
quiches or flans to ensure the base pastry is cooked
through
The Cooling Fan
The cooling fan will operate continually during cooking
It may run on after the oven is switched off to keep
the controls cool This is quite normal
NOTE
The action of the cooling fan will depend on how long the
oven has been used and at what temperature It may not
switch in at all at lower temperature settings nor run on
where the oven has only been used for a short time
Hints and Tips
- The middle shelf position allows for the best heat
distribution To increase base browning simply lower
the shelf position To increase top browning, raise the
shelf position
- The material and finish of the baking trays and dishes
used will affect base browning Enamelware, dark,
heavy or non-stick utensils increase base browning,
while oven glassware, shiny aluminium or polished
steel trays reflect the heat away and give less base
browning
- Always place dishes centrally on the shelf to ensure
even browning
- Stand dishes on suitably sized baking trays to prevent
spillage onto the base of the oven and make cleaning
easier
-Do not place dishes, tins or baking trays directly on
the oven base as it becomes very hot and damage
will occur
- For faster preheating use the fan oven function to
preheat the oven until the oven indicator neon goes
out, then swich the selector to the conventional oven
setting
- Single level cooking gives best results If you require
more than one level cooking use the fan oven function

9
Meat ooking Time
Beef 20-35 mins per 1/2kg (lb) + 20-35 mins
Beef, boned 25-35 mins per 1/2kg (lb) + 25-35 mins
Mutton and Lamb 25-35 mins per 1/2kg (lb) + 25-35 mins
Pork and Veal 30-40 mins per 1/2kg (lb) + 30-40 mins
Ham 30-40 mins per 1/2kg (lb) + 30-40 mins
Chicken 15-20 mins per 1/2kg (lb) + 20 mins
Turkey and Goose 15-20 mins per 1/2kg (lb) up to 3 5kg (7lb)
+ 15 mins per 1/2kg over 3 5kg (7lb)
Duck 25-35 mins per 1/2kg (lb) + 20 mins
When roasting, ensure the meat is
cooked thoroughly, use a meat
thermometer if preferred to check the
centre temperature has reached the
required temperature (see table
below)
MEAT TEMPERATURES
Beef Rare - 60°C
Medium - 70°C
Well Done - 80°C
Pork Well Done - 80°C
Lamb Medium - 70°C
Well Done - 80°C
Meat and Poultry Roasting Chart
(Conventional Oven + Fan Oven)
Cooking Chart - Conventional Oven
NOTE: Shelf positions are counted from bottom of the oven These charts are intended as a guide only and should be
adjusted according to taste
Food Temperature (° ) Runner ooking
Positions Time (mins)
Biscuits 170-200 2 25-30
Bread, buns, yeast, doughs 200-230 2 35-45
Casseroles 140-170 1 - 2 90-180
Cakes - small, Queen Victoria sponge 170-190 1 - 2 18-25
Cakes - madeira, rich fruit 130-180 2 90-150
Choux pastry, eclairs 200-230 2 30-35
Fish 200-230 2 20-40
Fruit pies, plate tarts, crumbles 180-210 2 50-65
Meringues 90-100 2 90-150
Milk puddings 140-160 2 90-150
Pate, terrine (in baine-marie) 160-180 1 - 2 60-90
Pizzas 200-230 1 - 2 25-30
Puff pastry, sausage rolls, vol-au-vents 230-250 2 15-25
Quiches, flans 170-200 1 - 2 50-60
Scones 230-250 2 8-12
Souffle 200-230 2 35-45
Stuffed vegetables 230-250 2 35-45
Roast meat & poultry 180-200 2
Yorkshire pudding 200-230 2 40-50
Keep food warm, heat dishes 90-100 2
see meat + poultry
roasting chart

10
The air inside the oven is heated by the element around
the fan situated behind the back panel The fan circulates
hot air to maintain an even temperature inside the oven
The advantage of cooking with this function is
energy saving through:
lFaster Preheating
As the fan oven quickly reaches temperature, it is
not usually necessary to preheat the oven although
you may find that you need to allow an extra 5-7
minutes on cooking times For recipes which require
higher temperatures, best results are achieved if the
oven is preheated first, e g bread, pastries, scones,
souffles, etc
lLower Temperatures
Fan oven cooking generally requires lower
temperatures than conventional cooking
Follow the temperatures recommended in the cooking
chart Remember to reduce temperatures by about
20-25°C for your own recipes which use conventional
cooking
lEven Heating for Baking
The fan oven has uniform heating on all shelf positions
This means that batches of the same food can be
cooked in the oven at the same time However, the
top shelf may brown slightly quicker than the lower
one This is quite usual There is no mixing of flavours
between dishes
How to use the Fan Oven
1 Turn the oven function control knob to
2 Turn the thermostat control to the required temperatu-
re
Things to note
The oven light will come on when the oven function
control knob is set
The oven fan will operate continually during cooking
The thermostat control light will remain on until the
correct temperature is reached It will then cycle on
and off to show the temperature is being maintained
The cooling fan
During cooking the cooling fan will operate continually
It may run on after the oven is switched off to keep the
controls cool This is quite normal
NOTE
The action of the cooling fan will depend on how long the
oven has been used and at what temperature It may not
switch in at all at lower temperature settings nor run on
where the oven has only been used for a short time
The Fan Oven
FO 0351
F
Hints and Tips
- Shelf positions are not critical, but make sure the
shelves are evenly spaced
- When cooking more than one dish in the fan oven,
place dishes centrally on the shelves rather than
several dishes on one shelf
- When the oven is full, you may need to allow slightly
longer cooking time
- When the oven is full of the same food, e g equal
trays of small cakes or equal size victoria sandwich
cakes, then they will be cooked in the same time and
removed from the oven together When different sizes
of trays or types of food, e g biscuits and cakes are
cooked, they will not necessarily be ready together
- The fan oven can be used to heat foods through without
thawing first, e g fruit tarts, mince pies, sausage rolls,
and other small pastry items Use a temperature of
190-200°C and allow 20-40 minutes (depending on
the quantity of food in the oven)
- The use of too high temperatures can cause uneven
browning Check with the recommendations for oven
temperatures given in the cooking charts, but be
prepared to adjust the temperature, if necessary
Remember to reduce temperatures by about 20-25°C
for your own conventional recipes
- When roasting do use the trivet in the meat tin Fat
and meat juices will drain into the meat tin below and
can be used to make gravy The trivet also prevents
splashes of fat from soiling the oven interior
- The meat tin should not be placed on a heated
hotplate as this may cause the enamel to crack

11
Food Shelf ooking
Position Temp (° )
Biscuits 180-190
Bread 210-220
Casseroles 130-140
Cakes: Small and queen 160-170
Sponges 160-170
Madeira 140-150
Rich Fruit 130-140
Christmas 130-140
Meringues 90-100
Fish 170-190
Fruit Pies and Crumbles 190-200
Milk Puddings 130-140
Pastry: Choux
Shortcrust
Flaky 190-200
Puff
Plate Tarts 180
Quiches/Flans 170-180
Scones 210-220
Roasting: Meat & Poultry 160-180
Cooking Chart - Fan Oven
This chart is intended as a guide only It may be necessary to increase or decrease the temperature to suit your
individual requirements Only experience will enable you to determine the correct setting for your personal requirements
When roasting, ensure the meat is cooked thoroughly, use a meat thermometer if preferred to check the centre
temperature has reached the required temperature
}
Shelf
positions
are not
critical but
ensure that
oven
shelves are
evenly
spaced
when more
than one is
used

12
Grilling
Grilling must be carried out with the oven door
closed.
Always use oven gloves to remove and replace
food in the oven.
Ensure that you support the grill pan when
removing it from the oven.
FHow to Use the Grill
1 Turn the oven control function knob on
2 Turn the thermostat control knob on the required tem-
perature
3 Adjust the grid and grill pan runner position to allow
for different thicknesses of food Position the food
close to the element for faster cooking and further
away for more gentle cooking
Preheat the grill on a full setting for a few minutes before
sealing steaks or toasting Adjust the heat setting and
the shelf as necessary, during cooking
During cooking, the cooling fan and the thermostat
control light will operate in the same way as described
for the fan oven function
FHow to Use the Inner Grill
Element
The inner grill provides quick direct heat to the central
area of the grill pan By using the inner grill element for
cooking small quantities, it can help to save energy
1 Turn the oven control function knob on
2 Turn the thermostat control knob on the required
temperature
3 Adjust the grid and grill pan runner position to allow
for different thicknesses of food and follow the
instructions for grilling
Hints and Tips
- Food should be thoroughly dried before grilling to
minimise splashing Brush lean meats and fish lightly
with a little oil or melted butter to keep them moist
during cooking
- When toasting bread, we suggest that the top runner
position is used with the grid in its 'high' position
- The food should be turned over during cooking, as
required
The grill element is controlled by the thermostat.
During cooking, the grill cycles on and off to
prevent overheating.
OI
L
Cooking chart
Cooking time depends on the thickness of the meat and
not on its weight
Type of food Mins per side
Bacon rashers 2 - 5
Chicken joints 15 - 20
Gammon rashers 5 - 8
Lamb chops 6 - 12
Pork chops 10 - 15
Sausages (turning as required) 10 - 12
Steaks (average thickness) Rare 3 - 6
Medium 6 - 10
Well done 8 - 12
Toast 1 - 11/2

13
The oven fan operates without heat and circulates the
air, at room temperature, inside the oven This increases
the speed of defrosting However, please note that the
temperature of the kitchen will influence the speed of
defrosting
This function is particularly suitable for delicate food which
could be damaged by heat, e g cream filled gateaux,
iced cakes, pastries, bread and other yeast products
How to Use Defrosting
1 Turn the oven function control knob to
2 Ensure the thermostat control knob is in the OFF
position
Defrosting
Hints and Tips
Cover food with a lid, aluminium foil or plastic film to
prevent drying out during defrosting
ALWAYS COOK THOROUGHLY IMMEDIATELY
AFTER THAWING
Frozen food should be placed in a single layer when
ever possible and turned over half way through the
defrosting process
Only joints of meat and poultry up to 2 kg (4 lb ) are
suitable for defrosting in this way
Refer to the following table for approximate defrosting
times
Chicken 1000 g 100-140 20-30 Place the chicken on an inverted
saucer on a large plate Defrost open
and turn at half time or defrost
covered with foil Remove giblets
as soon as possible
Meat 1000 g 100-140 20-30 Defrost open and turn at half time or
cover with foil
Meat 500 g 90-120 20-30 As above
Trout 150 g 23-35 10-15 Defrost open
Strawberries 300 g 30-40 10-20 Defrost open
Butter 250 g 30-40 10-15 Defrost open
Cream 2 x 200 g 80-100 10-15 Defrost open (cream is easy to whip even
if parts of it are still slightly frozen)
Cake 1400 g 60 60 Defrost open
Food Defrosting time
(Mins)
Standing time
(Mins) Notes
The times quoted in the chart should be used as a guide only, as the speed of defrosting will depend on the kitchen
temperature For example, the colder the ambient temperature, the longer the defrosting time
F

14
Oven Cavity
The enamelled oven cavity is best cleaned whilst the
oven is still warm
It is preferable/advisable to wipe the oven over with a
soft cloth soaked in warm soapy water after each use
However, from time to time it will be necessary to do a
more thorough cleaning using a proprietary oven
cleaner, do not use abrasive scourers or steel wool
NOTE: Do NOT use caustic base oven cleaners
Oven Shelves and Shelf
Supports
To clean the oven shelves and the shelf supports, soak
in warm soapy water and remove stubborn marks with
a well wetted soap impregnated pad Rinse well and dry
with a soft cloth
The shelf supports can be removed for easy cleaning (see
diagram) Please, ensure the retaining nuts are secure
when refitting the shelf support
Before cleaning always allow the cooling fan to
cool the oven down before switching off at the
electricity supply
This appliance cannot be cleaned with steam or
with a steam cleaning machine.
The oven should be ept clean at all times. A
build-up of fats or other foodstuffs could result in
a fire, especially in the grill pan.
Cleaning materials
Before using any cleaning materials on your oven,
check that they are suitable and that their use is
recommended by the manufacturer
Cleaners that contain bleach should NOT be used as
they may dull the surface finishes Harsh abrasives
should also be avoided
External cleaning
Regularly wipe over the control panel, oven door and
door seal using a soft cloth well wrung out in warm
water to which a little washing up liquid has been added
To prevent damaging or wea ening the door glass
panels avoid the use of the following:
Household detergent and bleaches
Impregnated pads unsuitable for non-stick
saucepans
Steel wool pads
Chemical oven pads or aerosols
Rust removers
Bath/Sin stain removers
Clean the outer and inner door glass using warm soapy
water
DO NOT clean the oven door while the glass
panels are warm. If this precaution is not
observed the glass panel may shatter.
If the door glass panel becomes chipped or has
deep scratches, the glass will be wea ened and
must be replaced to prevent the possibility of the
panel shattering. Contact your local Service
Centre who will be pleased to advise further.
Cleaning the Oven
FO 0145

15
eplacing the Oven Light
Disconnect the appliance.
If the oven bulb needs replacing, it must comply with the
following specifications:
- Electric power: 15W,
- Electric rate: 230-240 V (50 Hz),
- Resistant to temperatures of 300°C,
- Connection type: E14
These bulbs are available from your local Service Force
Centre
F To replace the faulty bulb:
1 Ensure the oven is disconnected from the electrical
supply
2 Turn the glass cover anticlockwise
3 Remove the faulty bulb and replace with the new one
4 Refit the glass cover
5 Reconnect to the electrical supply FO 0287
This model has been fitted with a hinged grill element
to enable you to clean the roof of the oven easily
Before proceeding ensure the oven is cool
and is disconnected from the electricity
supply.
1) Undo the screws which holds the grill in place (see
diagram) When doing this operation for the first
time, we recommend using a screwdriver
2) Then gently pull the grill downward to allow access
to the oven roof (see diagram)
3) Clean the oven roof with a suitable cleaner and wipe
dry before replacing the hinged grill element
4) Gently push up the grill element into place and firmly
screw into place the holding nuts
Ensure the grill holding nuts are firmly in place to
avoid the grill falling down when in use.
Cleaning the Hinged Grill

16
Something not working
SYMPTOM
nThe oven does not come on
nThe oven temperature light does not
come on
nThe oven light does not come on
nIt takes too long to finish the dishes,
or they are cooked too fast
nSteam and condensation settle on
the food and the oven cavity
nThe electronic programmer does not
work
nThe oven fan is noisy
SOLUTION
uCheck the oven is in manual operation and that both a cooking
function and temperature have been selected
uCheck the oven is wired in properly, and the socket switch or the
switch from the mains supply to the oven are ON
uSelect a temperature with the thermostat control knob
uSelect a function with the oven function control knob
uCheck the light bulb, and replace it if necessary (see "Replacing
the Oven Light")
uThe temperature may need adjusting
uRefer to the contents of this booklet, especially to the chapter
Using the Oven
uLeave dishes inside the oven no longer than 15-20 minutes after
the cooking is completed
uCheck the instructions for the timer
uCheck that shelves and bakeware are not vibrating in contact
with the oven back panel
If the appliance is not working correctly, please carry out the following checks before contacting your local Service
Force Centre
In the event of your appliance requiring service, or if
you wish to purchase spare parts, please contact your
Service Centre
For your nearest Authorised Service Centre please
contact:
Electric Blue Service & Installation P/L
324 Frankston Dandenong Rd,
Dandenong. VI 3175
Phone: 1300 654 488
Service and Spare Parts

17
This oven must be installed according to
standards and regulation currently in force.
Installation
The oven must be installed according to the
instructions supplied.
Heating elements rating
Oven elements 1880 W
Top element 835 W
Bottom element 1045 W
Convection element 2090 W
Inner Grill element 1830 W
Double Grill element 2660 W
Oven Light 15 W
Cooling Fan 20 W
Convection Fan 30 W
Total Rating 2 7 kW
Supply voltage (50 Hz) 230-240 V
Technical Data
Dimensions of recess
Height 580 mm
Width 560-570 mm
Depth 550 mm
Dimensions of the oven cavit
Height 325 mm
Width 420 mm
Depth 390 mm
Oven capacity 53 litres

18
Electrical Connection
Fig. 1
FO 2159
Terminal lock
The oven has an easily accessible terminal block (Fig 1),
which is meant to work with an electric single-phase rate
of 230-240 V
The manufacturer disclaims an
responsabilit should all the safet
measures not be carried out.
The oven is designed to be connected to 230 -240 V (50
Hz) electricity supply
The oven has an easily accessible terminal block which
is marked as follows
Letter L Live terminal
Letter N Neutral terminal
Earth
The cable used (of the types: H05 V2V2-F T90, H05 BB-
F T90) must have a min cross section of 1 5 mm2
In order to connect it to the oven it is necessary to
remove the hatch at the back of the oven to reach the
terminal block
For direct connection to the mains supply a two pole
switch with a minimum rating of 13 A and a minimum
distance of 3 mm between its contacts must be fitted
between the supply and appliance
This switch must not break the yellow/green earth cable
at any point
The appliance must be earthed
Important
After installation and connecting, the cable must be
placed so that is cannot at any point reach a tempera-
ture more than 50°C above the ambient temperature
Before the appliance is connected check that:
- the main fuse and the domestic installation can
support the load;
- the power supply is properly earthed;
- the double pole switch used to connect the appliance
to the supply is easily accessible after installation

19
Building In
It is important that the dimension and materials of the
surround or cabinet into which the oven will be built are
correct and that proper arrangements are made for a
continuous supply of air to the oven so it does not
overheat
NOTE: The outer cabinet should have a 600mm width
Dimensions of the oven and recess required are given
in the relevant diagrams
Securing The Oven To The
Ca inet
1 Fit the oven into the cabinet recess,
2 Open the oven door,
3 Secure the oven to the kitchen cabinet with four wood
screws, which fit the holes provided in the oven fra-
me
FO 0290
FO 0374
FO 0039
FO 0292

Grafiche MDM - Forlì
35 78-4801 10/02
From the Electrolux Group. The worlds No.1 choice.
The Electrolux Group is the worlds largest producer of powered appliances for kitchen, cleaning and outdoor use. More
than 55 million Electrolux Group products (such as refrigerators, cookers, washing machines, vacuum cleaners, chain
saws and lawn mowers are sold each year to a value of approx. USD 14 billion in more than 150 countries around the
world.
Other manuals for ZBM150
1
Other Zanussi Oven manuals

Zanussi
Zanussi ZOU10411XU User manual

Zanussi
Zanussi ZOHCX3K2 User manual

Zanussi
Zanussi ZOHNX3K1A User manual

Zanussi
Zanussi easyPlus User manual

Zanussi
Zanussi ZOD35802BK User manual

Zanussi
Zanussi ZOHXX3X2 User manual

Zanussi
Zanussi ZBF 360 User manual

Zanussi
Zanussi ZBS 703 A User manual

Zanussi
Zanussi ZOPNX6K2 User manual

Zanussi
Zanussi ZBN 722 User manual

Zanussi
Zanussi FBI 543 User manual

Zanussi
Zanussi ZHM 755 User manual

Zanussi
Zanussi ZOF35501 User manual

Zanussi
Zanussi ZOU 643 User manual

Zanussi
Zanussi ZOPNH7XN User manual

Zanussi
Zanussi ZOCND7K1 User manual

Zanussi
Zanussi Z66BME User manual

Zanussi
Zanussi ZOU 575 User manual

Zanussi
Zanussi ZHQ 575 User manual

Zanussi
Zanussi ZOP37972 User manual