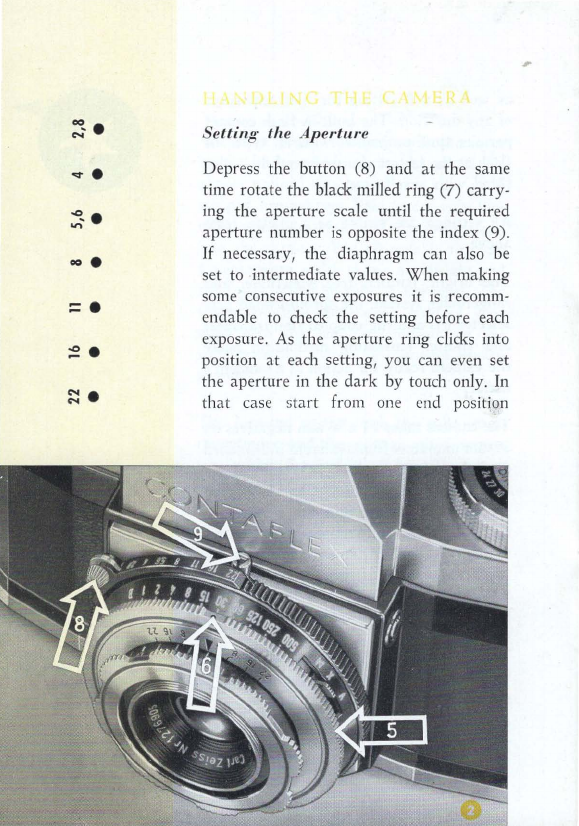
manuals.online logo
Brands
  1. Home
  2. •
  3. Brands
  4. •
  5. ZEISS IKON
  6. •
  7. Digital Camera
  8. •
  9. ZEISS IKON CONTAFLEX I User manual

ZEISS IKON CONTAFLEX I User manual

INSTRUCTIONS
FOR
USE
THE
CONTAFLEX
I
CONTROLS
1 Focusing mount
2 Focusing scale
3 Distance setting index
4 Depth of field scale
5 Shutter speed setting ring
6 Shutter speed setting index
7 Aperture ring
8 Aperture setting knob
9 Aperture setting index
10 Synchronizing lever
For
further
camera
controls
see
page
42
made
by
ZEISS
IKON
AG.,
STUTTGART,
combines
the
advantages
of a
miniature
with those of a reflex camera. Its de-
sign
is
based
on
many
years
of expe-
rience
in
the
manufacture
of precision
cameras.
While
it has been produced
for the
advanced
amateur,
it
is
of equal value to the pro-
fessional worker, the scien-
tist,
and
the technical photo-
grapher.
The
sensible lay-out of
the
various controls
and
scales,
and
the
coupled
shutter
ten-
sioning
and
film
transport,
are
designed for efficient
operation of this small
and
handy
camera
even
under
the most difficult conditions.
The
large, bright,
parallax-free
finder
is
combined
in
one eyepiece with the range-
finder systems. These,
together
with
the
outstanding
performance of the world-
famous
13
/ 4 inch (45 m:n)
ZEISS
TESSAR
f/
2.8
lens, ensure
pin-sharp
pictures every-
time which will always give pleasure.
To
make
the most of all
the
new fe
atures
4
of your
CONTAFLEX
please study this in-
struction booklet carefully.
While
doing
so, open out the front
and
back cover pages
for easier comparison of the description
with the illustrations of the camera.
Start
by
practising the various operations
of picture taking without a film in the ca-
mera.
If
you are doubtful
on
any point,
your photo dealer will be glad to help you
with further advice and information.
We
are sure
that
you have made a wise
choice in buying the
CONTAFLEX
.
We
would
like to share your enjoyment,
and
we
shall
appreciate it if you care
to
send us some
of the outstanding pictures you have taken
with your
CONTAFLEX
.
The
pictllre
on
page
2 of
the
cover
was
taken
with
the
CONTAFLEX
at
'/
250
s
ecolld
at
f 4
ill
bright
s,,,,light.
5
The
most prominent feature
is
the
large
bright finder which shows the picture in
almost
natural
size before you take it. A
stepped Fresnel-type field lens evenly illu-
minates the parallax-free finder image right
into the corners. You observe it through
a pentaprism which shows
an
upright
and
right-way round picture
at
eye-
le
vel.
The
finder indicates the correct field of view
even with the lens attachments or the
supplementary lenses for close-up photo-
graphy.
The
focusing system with the
split~image
rangefinder
and
the ground glass screen
ring within the finder measures the exact
distance
and
automatically sets the lens.
The
world-famous
ZEISS
TESSAR f1
2.8
lens
with a focal length of
F!4
inches (45 mm)
yields pin-sharp images on black-and-white
or colour film. It
is
of course colour cor-
rected
and
coated.
The
Syn&ro-
Compur
shutter, model MXV,
has shutter speeds from 1 to
1/;00
second
6
as well as a B setting for time exposures
of
any
duration.
The
bailt-in flash contact
permits synchronization with all types of
flash
at
the fastest shutter speed. It
is
also
fitted with a self-timer.
All settings are visible
at
a glance from
above.
The
bright, parallax-free, viewfinder
and
rangefinder system, the spring-loaded
pre-
selector
iris
and
the coupled film transport
and
shutter tensioning mechanism make
the camera
ready
for action
at
a moment's
notice.
The
camera takes 24 x
36
mm negatives on
35mm miniature film available
in
standard
daylight cassettes, daylight refills, dark-
room refills, or as bulk film.
With
the
special
cassettes the film can be changed
in
daylight after
any
number of exposures
without rewinding.
The
removable
baCk
simplifies loading and
unloading as well as cleaning of the camera.
The
all-metal
body guarantees the utmost
mechanical precision of all components -
the hall-mark of
ZEISS
IKO
N products.
7
o
~.
....
~.
00.
~.
;2.
~.
Setting
the
Ape
rture
Depress the button (8)
and
at the same
time rotate the black milled ring (7) carry-
ing the aperture scale until the required
aperture number
is
opposite the index (9).
If
necessary, the diaphragm can al
so
be
set to intermediate values.
When
making
some consecutive exposures it
is
recomm-
endable to check the setting before each
exposure.
As
the aperture ring clicks into
position
at
each setting, you can
eve
n set
the aperture
in
the
dark
by
touch only.
In
th
at
case st
art
from one end position
and
countthe clicks
to
the required setting.
The
aperture can be adjusted whether the ·
shutter
is
tensi~ned
or not (see next
section).
Setting
the
Shutter
Speed
Rotate the chromium plated milled ring (5)
until the black dot (6)
is
opposite the re-
quired speed figure (see Fig. 2).
The
milled
ring clicks into position
at
each settingi this
precludes intermediate speeds.
The
num-
bers indicate fractions of a second (thus
60 stands for 1/
60
second,
and
so
on).
When
set
to
B,
the shutter remains open as long
as the release button(14)
is
depressed (see
page 20). For setting the self-timer see
page
24.
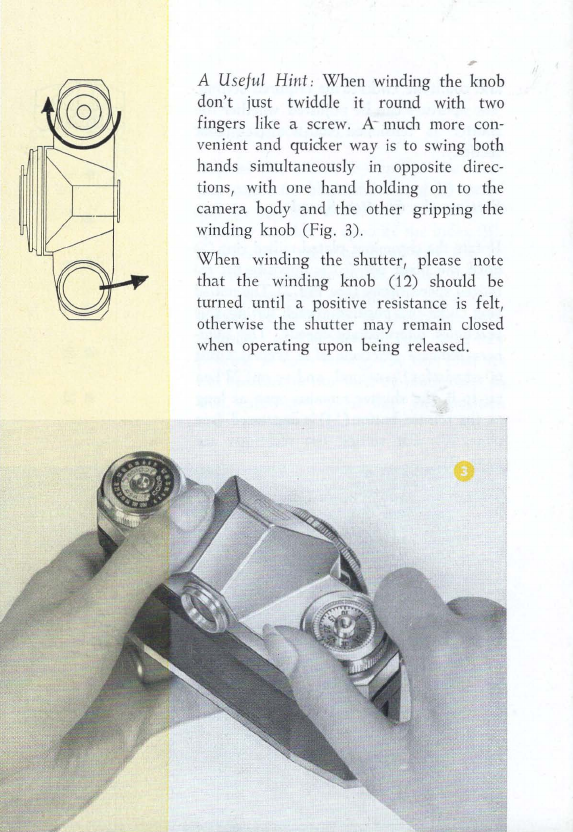
To tension the Synchro-Compur shutter
turn
the winding knob (12) in the direc-
tion of the arrow as far as it will go. This
at
the same time advances the film
by
one
frame.
The
coupling of the film transport
and shutter tensioning makes double
ex-
posures
and
blank frames impossible. All
shutter speeds can be set either before or
after winding the film. Keeping the shutter
tensioned does not harm it
in
any
way.
9
~
Imp""an'
A Useful Hint:
When
winding the knob
don
't
just twiddle it round with two
fingers like a screw. A- much more con-
ve
nient
and
quicker way
is
to swing both
hands simultaneously in opposite direc-
tions, with one
hand
holding on to the
camera body
and
the other gripping the
winding knob (Fig. 3).
When
winding the sh
utt
er, please note
that
the winding knob (12) should be
turned
until a positive resistance
is
felt,
otherwi
se
the
shutter
may remain closed
when operating upon being released.
Setting
the distance
The
built-in coupled rangefinder system
sets the camera to the correct distance.
When
you look through the finder eye-
piece (20) you will see a clear circle en-
closed by a ground glass screen ring in the
centre of the field of view. This circle
is
cut in two
by
a horizontal line (Figs. 4
and
5). You can measure the subject di-
stance in two ways:
1.
Sigbt a vertic
al
line
(
e.
g.
tbe
edge
of
a
wall,
or
a
tree
trunk) tbrougb tbe
finder.
On
turning the
focu
s
ing
mount
(1), the
image
in
the upper half of tbe
circle
will
mo
ve relative
to
tbe
lower
balf.
When the
two
halve
s of the
image
are
exactly
aligned,
the
len
s
is
set
to
the
correct
distan
ce.
2.
if
tbe subject
shows
no
prominent
ver-
ticals,
observe
tbe
image
in
tbe
ground
glas
s
ring.
Turn tbe
focu
s
ing
mOlmt
(1
)
to
or
fro
until tbis
image
on
tbe
ground
gla
ss is
pin
sbarp.
11
It
is
immaterial which method you use ; in
either case the lens is automatically set to
the
required
di
s
tan
ce.
The
Depth
of
fieLd
scaLe
The
sh
arp
definition of
th
e lens
is
not
limited to subjects
at
the exact focused
distance,
but
also covers a certain
range
in
front of,
and
behind, this point.
That
zone of s
harpn
ess
is
comparatively small
at
full
aperture
(/
12.8),
but
increases
the
more you stop down the lens.
The
depth of field scale (4) shows the
extent of this zone
at
various
aperture
setting
s.
Two series of
aperture
numbers
are engraved for this purpose to
the
left
and right of
the
distance setting index (3).
The
figures on the focusing scale (2) op-
posite these
aperture
numbers then in-
dicate the extent of
the
depth of field. For
o
instance, with the lens set to 6 feet (Fig. 6),
the left-hand figure 8
is
op!:,osite about
41/ 2 feet, and the right-hand figure 8 op-
posite about 9 feet.
Thus
for a subject
6 feet away
and
with the lens stopped
down to fl
8,
everything between about
41
/2 and 9 feet will be sharp.
Th
e table
on
page 16 gives more exact values.
You can equally go about it the other
way round
and
measure with the range-
finder the nearest
and
farthest points of
the subject
that
have to be sharp.
Then
simply find the required aperture from
the depth of field scale.
For
technical
reasons
there
is a
seco
nd
scale
belo
w
the
focusing
scale
(2),
but
it
has
no
bearing
on
the
operation
on
the
CONTAFLEX
.
The
Correct E.xposure
can be obtained from tables or determined
more accurately with the ZEISS
IKON
IKO
-
PI-lOT
RAPID
photo-electric exposure meter.
Th
e exposure time (shutter speed) depends
on the speed of the film, the general
subject brightness, the aperture,
and
the
factor of any filter
that
may be used.
Do
not stop down further than necessary to
14
make sure of the depth of field you want.
Otherwise you may need long exposure
times which increase the risk of camera
shake, for the smaller the aperture the
longer you have to expose.
The
ZEISS
IKON
IKOPJ-[OT
RAPID
exposure meter directly
shows the shutter speed corresponding to
each aperture. A special model
is
available
calibrated for the shutter speeds of the
CONTAFLEX
I.
Rem.em.ber these
Basic-Settings:
Outdoor
shots
in
bright sunshine, with 26°
BSl (32 ASA) film:
Aperture f/8
Shutter speed '/
125
second
Outdoor shots with overcast sky,
with 26°
BSI
(32 ASA) film:
Aperture f/5.6
Shutter speed '/
60
second
15
CONTAFLEX
depth-of-field
table
Di
S-I
Depth of
fi
eld at ape
rt
ur
e,
tan
ce
I I I I I I
l
eet
f,2.8
f:
4 f : 5.6
f:
8
f:
11 f : 16
f:
22
'"
48'
00
33'6"
00
24'
00
1
6'9"
00
12'3"
00
8'6"
00
6'3"
00
20' 1
4'1"
33'2"
12'5" 41'3" 10'1
0"
107'
92"
00
1'6"
00
6'1"
00
4'9"
'"
10'
8'2"
12'1"
1'5"
1
3'9"
1'2"
1
8'4"
6'3"
22'
11
" 5'7"
46'3"
4'8"
00
4'
00
6'
5'9"
7'6"
5'7"
8'
4'7"
8'2"
4'1"
9'
1
0"
3'8"
1
2'9"
3'1"
25'7"
3'2"
00
4'
3'8"
4'4"
3'1" 4'1"
3'6"
4'8"
3'3"
4'
11
"
3'
1"
5'7"
2'9"
6'11"
2'4"
9'
1"
I
3'
2'10"
3'2"
2'8"
3'3"
2'7"
3'6"
2'6"
3'
8"
2'4"
4'
2'2"
4'9"
I '
ll
"
6'
1"
I
---
()\
Holding
the
camera
Hold the
CONTAPLEX
perfectly still while
exposing. Support the camera body with
the palm of both hands
and
firmly grip it
with the fingers (Fig. 7). Press the thumbs
against the back of the camera.
Us
e the
second finger of the left
hand
to rotate the
lens mount (1) for focusing, and the right
index finger to press the release button
(14). Press the elbows lightly against the
body. You can use either the left or the
right eye to look through the finder (Figs.
8 and 9).
17
This
is
the position for horizontal shots
with the
CONTAFLEX.
For upright pictures turn the camera
through 90 degrees,
and
press the upper
end gently against the forehead with the
left hand. The second finger again ope-
rates the focusing mount (1).
The
right
hand supports the camera from under-
neath, with the thumb on the release but-
ton (14). See Figs. 10 and
11.
18
Alternatively, you can take
upright
shots
with the right
ha~d
end of the camera on
top (Figs.
12
and
13).
In
this case the
right index finger operates the release but-
ton (14),
and
the second finger of the
right
hand
the focusing mount (1).
Use
the
left
hand
to support the
CONTAFLEX
from
below.
The
illustrations on these pages show
the various ways of holding the camerai
so
select the one
that
suits you best.
19
Releasing
To
release the shutter, press the release
button (14). Use either the tip of the in-
dex finger (Fig. 14) or the first joint of
the finger (Fig. 15), squeezing it down-
wards. This method of releasing
is
special-
ly recommended, as experience has shown
that
it
is
least liable to cause camera
shake.
If
by
any
chance the winding knob
(12)
was not wound to its fullest extent,
thus advancing the film only
part
of the
way, the
shutter
will not open when you
press the release. This prevents double
exposures.
20

Other ZEISS IKON Digital Camera manuals

ZEISS IKON CONTAFLEX II User manual

ZEISS IKON

ZEISS IKON CONTAFLEX II User manual

ZEISS IKON Box-Tengor 54 Installation and operation manual

ZEISS IKON

ZEISS IKON Box-Tengor 54 Installation and operation manual

ZEISS IKON Contaflex Super B User manual

ZEISS IKON

ZEISS IKON Contaflex Super B User manual

ZEISS IKON bessy as User manual

ZEISS IKON

ZEISS IKON bessy as User manual

ZEISS IKON CONTRAFLEX BETA User manual

ZEISS IKON

ZEISS IKON CONTRAFLEX BETA User manual

Popular Digital Camera manuals by other brands

Rollei XF35 manual

Rollei

Rollei XF35 manual

Sony cuh-zey2 instruction manual

Sony

Sony cuh-zey2 instruction manual

Genius DSC-1.3M Smart manual

Genius

Genius DSC-1.3M Smart manual

Canon EOS 3 instructions

Canon

Canon EOS 3 instructions

Nikon COOLPIX L1OO user manual

Nikon

Nikon COOLPIX L1OO user manual

FujiFilm instax mini 70 user manual

FujiFilm

FujiFilm instax mini 70 user manual

Spycentre Security 6817-4K manual

Spycentre Security

Spycentre Security 6817-4K manual

Kodak SNAP KIDS CIS-217 instructions

Kodak

Kodak SNAP KIDS CIS-217 instructions

Sony DSLR-A100 operating instructions

Sony

Sony DSLR-A100 operating instructions

Kodak C713 - EASYSHARE Digital Camera user guide

Kodak

Kodak C713 - EASYSHARE Digital Camera user guide

Camera Bullet 6S quick guide

Camera

Camera Bullet 6S quick guide

Nikon CoolPix S600 user manual

Nikon

Nikon CoolPix S600 user manual

Kodak C1013 - EASYSHARE Digital Camera user guide

Kodak

Kodak C1013 - EASYSHARE Digital Camera user guide

SVP DC-1037 Specifications

SVP

SVP DC-1037 Specifications

Olympus Sigital Vision D-620L instructions

Olympus

Olympus Sigital Vision D-620L instructions

Olympus PT-050 instruction manual

Olympus

Olympus PT-050 instruction manual

Medion LIFE E43005 manual

Medion

Medion LIFE E43005 manual

ASA Electronics Voyager VAVS360A1 quick start guide

ASA Electronics

ASA Electronics Voyager VAVS360A1 quick start guide

manuals.online logo
manuals.online logoBrands
  • About & Mission
  • Contact us
  • Privacy Policy
  • Terms and Conditions

Copyright 2025 Manuals.Online. All Rights Reserved.