manuals.online logo
Brands
  1. Home
  2. •
  3. Brands
  4. •
  5. ZEISS IKON
  6. •
  7. Film Camera
  8. •
  9. ZEISS IKON CONTAFLEX III User manual

ZEISS IKON CONTAFLEX III User manual

INSTRUCTION BOOK
Controls of the Contafler lll
1 Filrn wind knob
2 Frorne counler
3 Shutter releose knob
4 Distunce setting scole
5 Depth-of-field scole
6 Rewind knob with film
type indrcotor
7 Eyelets for corrying strop
8 Setting mork for dislonce,
operture cnd shuiter speed
9 Focusing knobs
10 Aperture ond shutter
speed setting ring
1l Synchro-lever for f losh
ond deloyed oction
mechonism (self-timer).
For further controls see inside bock cover
,1
The Gontaflex lll
The Contqflex lll mode by Zeiss lkon AG., Stutt-
gort, combines oll the odvontoges of the two
most populor types of comero: minioture ond
reflex. Behind this ochievement lie yeors of
experience in the monufocture of precision
comeros. The Contoflex wos originolly designed
for the odvonced omoteur, but its omozing ver-
sotility hos ropidly mode it indispensoble to
professionol, scientif ic ond technicol photo-
grophers.
The outomotic coupling of mony operotions ond
the cleor orrongement of oll controls ond scoles,
the new exposure-volue shutter (coupling of
shutter speed ond stop) moke this smqll ond
ottroctive comero instontly reody for oction. Two
coupled rongef inder systems ensure occurote
focusing of the world-fomed 50 mm Zeiss Tessor
f /2.8 lens, with oll its interchongeoble converter
units. The lorge cleor viewfinder imoge is un-
offected by porollox even of the shortest dis-
tonces. With the extensive ronge of Contoflex
occessories of your disposol (see the lost poges
of this booklet), there is virtuolly no limit to the
foscinoting subiects you con sofely cover.
So thot you con get the best out of your Conto-
flex lll ond enioy the pleosure of corefree phoio-
grophy, pleose study this instruction book
thoroughly. Open out the front ond bock covers
ond follow the monipulotions with the oid of the
detoiled diogroms. Stort by proctising the
vorious operotions of picture toking without o
film in the comero. lf you still hove difficulties,
see your photo deoler for free informotion.
We cqn only congrotulote you on buying o
Contoflex lll. You hove mode o wise choice
your comero will give you lifelong pleosure. We
would like to shore your enioyment, ond would
oppreciote it if you were to send us some of the
most outstonding pictures you hove token with
your Contoflex lll.
The picture inside the front cover wos token with the
Contoflex of sunset; exposure l/co sec. oI fl4.
5
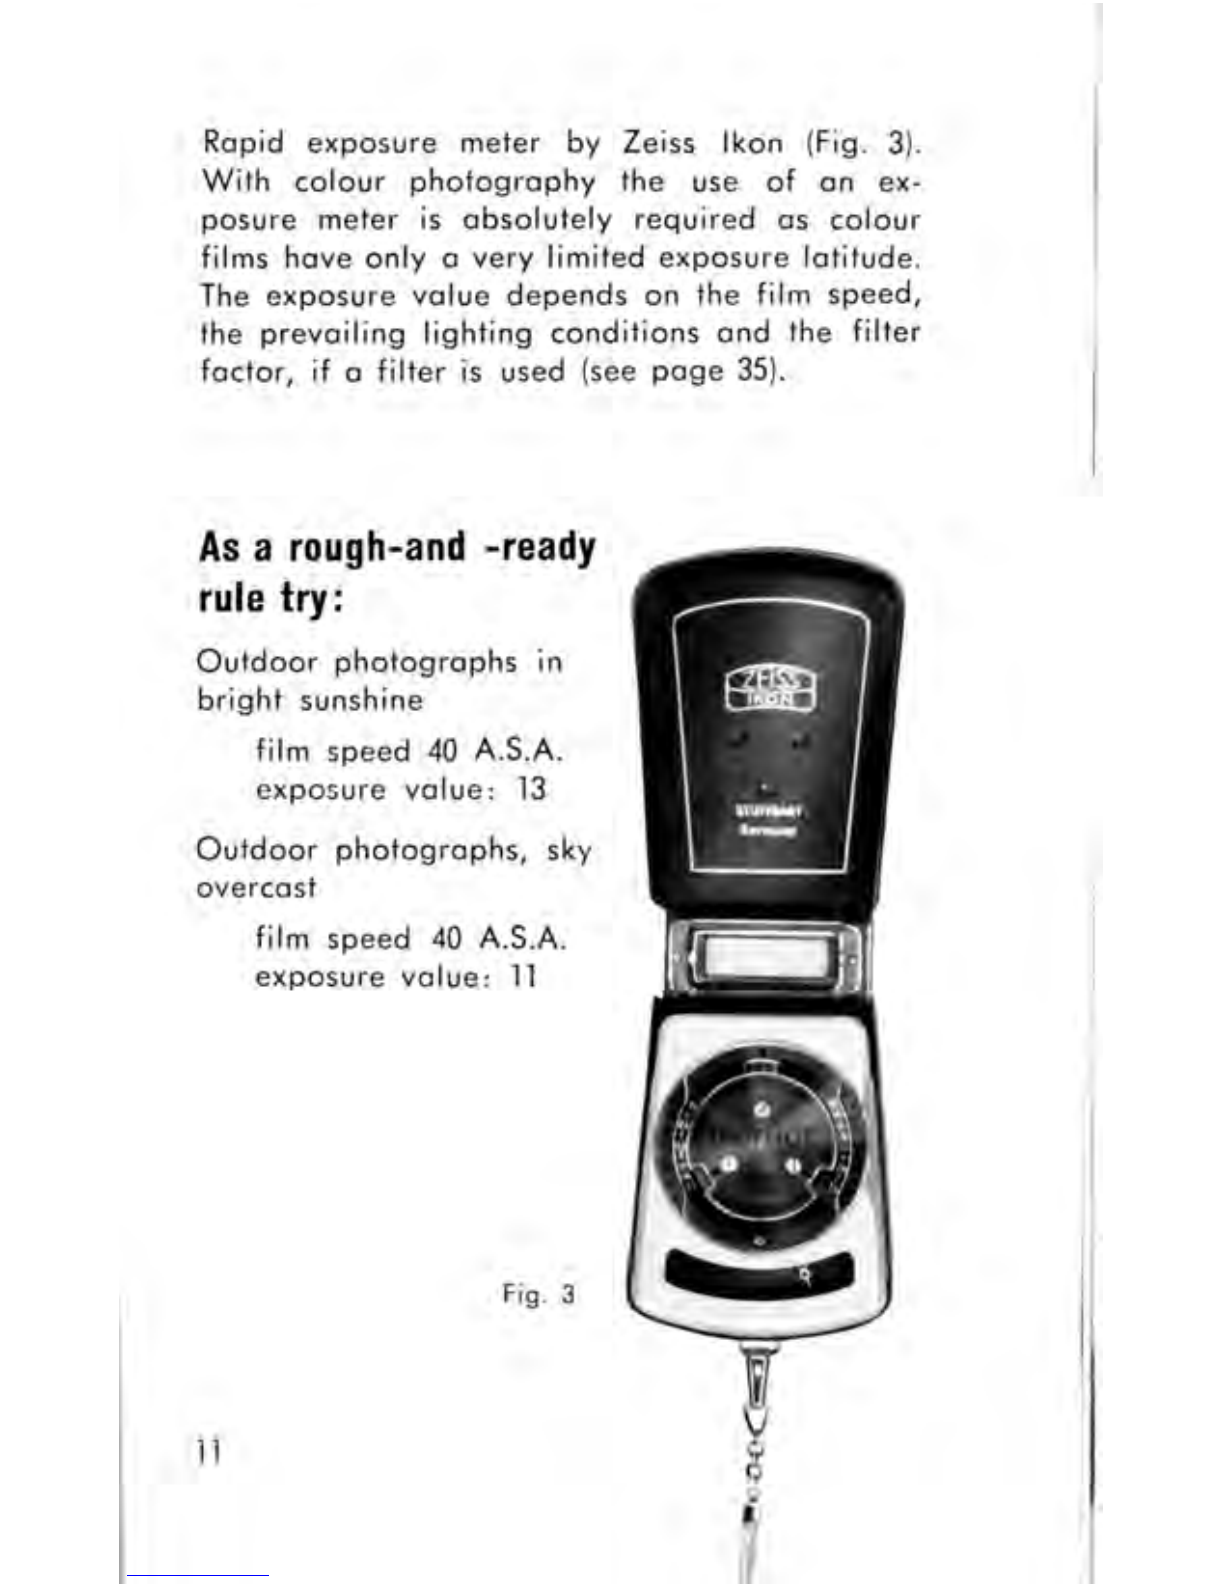
Gontaflex lll features
The lorge, bright finder shows the finol picture
in olmost noturol size right up to the moment of
exposure. The built-in Fresnel lens renders o
finder imoge thot is bright even in the corners;
furthermore, it is seen of eye-level, upright ond
the right woy round, thonks to the pentoprism.
Another odvontoge of fhrough-the-lens sighting
is thot the finder imoge is olwoys free from
porollox, even when supplementory lenses ore
used. Whqt you see, you tqke!
The focusing system shows cleorly in the view-
finder the point of shorpest definition by meons
of o split-imoge rongefinder ond ground gloss
screen, both coupled with the lens.
The stondord lens is the fomous Zeiss Tessor
f/2.8,50 mm. By exchonging the front element for
either the Pro-Tessor f/4,35 mm or the Pro-Tessor
f/4, 85 ffiffi, the complete lens is converted to o
wide-ongle or tele-lens respectively. The Steritor-B
stereo ottochment con olso be used os o front
element. All these interchongeoble elements ore
fitted with boyonet mounts. All opticol compo-
nents ore cooted ond colour corrected, ond yield
high-definition photogrophs in monochrome or
colour.
The Synchro-Compur Shutter, with deloyed oction
releose mechonism, is fully synchronized for
f losh ond hos o ronge of speeds f rom I to
1lsoo sec. ond o oB" setting for time exposures.
It employs the exposure volue system of coupled
operture settings ond shutter speeds.
All scoles con be cleorly reod from obove. The
spring-looded pre-set diophrogm ond the cou-
pled film-wind ond shutter tensioning mechonism
moke the comerq reody for immediote oction.
The comero tokes 24 x 36 mm negotives on 35 mm
minioture film, ovoiloble in stondord cortridges,
doylight refills, dorkroom refills or os bulk film.
By using speciql cqssetles the film con be chong-
ed in doylight ofter ony number of exposures,
without rewind ing.
The removoble bqck simplifies looding ond un-
looding os well os cleoning of the comero.
The qll-metql body guorontees the uimost me-
chonicol precision of oll components - the holl-
mork of Zeiss lkon products.
Handling the camera
Setting the exposure value
By pressing knob (.|5) towords the body of the
co mero, the od iocent red dot con be moved
until it coincides with the desired volue on the
red exposure volue scole (16) (see Fig. 1). lt is
olso possible to set holf exposure volues.
As the ring with the red dot con only be moved
th roug h o lim ited rod ius, it wil I sometimes be
necessory to move the operture/shulter speed
7
.:qr
Fig. I setting ring (10) os well, in order to set the
exposure volue required.
By setting the exposure volue, the diophrogm
ond shutter speed selector mechonism ore cou-
pled. The omount of light necessory for correct
exposure is controlled by the lens opening (oper-
ture or f lnumber) ond the time the f ilm is exposed
to light (shutter speed). The exposure volue ob-
toined, which con be reod off from the setting
mork (8) (see Fig.2l, represents o definite omount
of I ig ht thot remo i ns the so me no motter whot
f/nvmber cr shutter speed is chosen. lf , ofter
hoving determined ond set the exposure volue,
the shutter speed setting ring (10) is turned to o
higher or lower volue (17), the lens operture {18)
will be outomoticolly re-odiusted to give the
some exposure. The shutter speed is likewise re-
><3 r
odjusted outomoticolly when the operture is
cho nged.
Shutter speed: The correct shutter speed to
choose depends on whether or not the subiect
is movitrg, ond if so, how ropidly. The foster the
subject-movement, the shorter should be the ex-
posure time. The block figures on scole (17)
denote f roctions of seconds (60 meons 1/eo th
second, etc.). When set to the green "8" , the
shutter will remoin open os long os the releose
knob (3) remoins depressed (see poge l8). The
green figures denote full seconds ond connot be
set ogoinst the setting mork (8); their signifi-
conce will be exploined loter on.
Aperture selting: The correct operture of the
lens diophrogm, or "stop", for short, depends on
the depth of f ield desired (see poge 14). The
I
Fis.2
smoller the f lnvmber, the lorger is the octuol
operture of the diophrogm opening. The required
volue on the scole (18) should be set ogoinst
the setting mork (8). So long os the correct ex-
posure volue remoins set, ony combinotion of
shutter speed ond lens operture will result in o
perfectly-exposed negotive. The setting ring (.|0)
con only be turned sufficiently to ollow the
mork (8) to be set ogoinst the finol volues of the
operture ond shutter speed scoles. The f inol
volue of the right-hond end of the shutter speed
scof e is "8".
lf, ofter setting the exposure volue, the lens is
stopped down until the shutter speed is set to
the green "8", on exposure time of 2 seconds
will be required. lf it is necessory to stop down
even further, the required exposure time in full
seconds (green figures) con be reod off opposite
the selected operture. Then set the diophrogm to
the required figure; To do this, depress the
knob (.|5) os when setting the exposure volue.
The exposure time con then be controlled by
depressing the shutter releose knob (3) for the
required number of seconds. When chonging
from time exposures on oBu to outomotic expo-
sures, the exposure volue must be resef.
The correct exposure Yalue
con be oscertoined from exposure tobles or,
more exoctly, with the photo-electric lkophot
t0
Ropid exposure meter by Zeiss lkon (Fig. 3).
With colour photogrophy the use of on ex-
posure meter is obsolutely required os colour
films hove only o very limited exposure lotitude.
The exposure volue depends on the film speed,
the prevoiling lighting conditions ond the filter
foctor, if o filter is used (see poge 35).
As a rough-and -ready
rule try:
Outdoor photogrophs in
bright sunshine
film speed 40 A.S.A.
exposure volue: 13
Outdoor photogrophs, sky
overcost
film speed 40 A.S.A.
exposure volue: I I
Fis. 3
Fis.4
Tensioning the Shutter
The Synchro-Compur shutter is tensioned by
turning the f ilm wind knob (l ) in the direction
of the orrow os for os it will go. This one
operotion olso odvonces the film by one frome
ond mokes the viewfinder imoge visible. This
coupling mokes double exposures ond blonk
fromes o thing of the post" lt does not motter
whether the shutter speed is set before or ofter
odvoncing the film. Keeping the shutter tensioned
does not horm it in ony woy.
A usef u I h int : when tu rn ing the f i lm wind knob
don't iust twiddle it round with two fingers like
o screW; o much more convenient method is to
swing both honds in opposite directions, holding
the comero body with one hond ond gripping
the winding knob with the other (Fig. 4). The
soving in time is reolly surprising.
t2
.:;H
u nshorp sho rp
Setting the Distance
The built-in coupled rongefinder system outo-
moticolly f ocuses the comero f or the correct
distonce. When you look through the viewfinder
eypiece (22), you will see in the centre of the
field of view o cleor circulor oreo enclosed
within o ground gloss ring. The cleor circle is
divided into two holves by o horizontol line
(see illustr. on left). The subiect distonce con be
meosu red in two wols :
l. Select o verticol line (such os the edge of o
woll or o tree trunk) seen in the finder imoge.
Then turn the reor block ring by the two knobs
(9) on the left ond right, odioining the distonce
setting scole (4). Now you will see the imoge
in the upper holf of the circle move in relotion
to the lower holf. When the two holves of the
imoge ore exoctly oligned, the lens is set for
the correct distonce.
2. lf the sublect hos no distinct verticol lines,
observe the imoge in the ground gloss ring. Turn
the two knobs (9) to ond fro until the imoge
oppeors perfectly shorp.
r3
It is immoteriol which method of focusing you
us€; in either cose the lens is outomoticolly set
to the correct distonce, which con be reod off
from scole (4).
Depth-of-field Scale
The lens does not only define shorply those
objects of the exoct focused distooc€; it will olso
produce o shorp imoge of obiects o certoin
distonce in front ond behind. This zone of shorp
definition, known os the depth of fierd, is com-
porotively norrow ot full operture (f/2.9) but
becomes greoter the more you stop down the
lens.
The depth-of-field scole (5) shows the extent of
this zone of vorious operture settings ond diston-
ces. Locote the operture setting to be used from
omong the f/numbers to the right ond left of the
distonce setting mork (8). The distonce volues
on the distonce setting scole (4) opposite the
chosen flnumbers represent the neor ond for
limits of the depth-of-f ield zone. For exomple:
ossuming you ore using on operture of f/g ond
hove f ocused on o d isto nce of 5 f t. (Fig. 5), the
figure 8 on the left is opposite 7 ft. while the
f igure 8 on the right is opposite 4 ft. This tells
you thot of o distonce setting of 5 ft. ond on
operture of f /8, eveything will be shorp f rom 4 ft
to 7 ft. Exoct volues con be found in the toble
on poge 16.
l4
You con equolly well meosure with the ronge-
f inder the neorest ond forthest points of the
zone to be recorded shorply, ond then select
the oppropriote stop on the depth-of-field scole.
Do not, however, stop down further thon is
necessory to ensure the depth of field you re-
quire. Otherwise you moy need long exposure
times, which increose the risk of comero shoke
(see poge 22).
Fis. 5
><
.ly
6oN
.o(e
: , ='
..-.r : --{
cc- @
-s-
i., ;')
-:*
'sl :-
\O-
CD C-{
aa
t-f \
t:
F\ C\
-
\O-
rlf)
:_ _,
t.:\(Y)
(o co
::
8 8T=
(\'l
ttaa
\t
i"n=:=r
:o'sh
o
o-
o
o
L
f
io
o-
o_
o
L
f
o
o-
c,
f
t-
o
o-
c)
3
c,
o.
;vrl
i5J
E
E
c,
r&,
€9
6l
lts
L
CS
U'
0
qt
F
a-
r-
?-
-
x
ot
-
rts
Cg
+.
E
ct
C'
qt
a-
-
+t
L
C'
rh
ct
-
tr
CS
+t
E
-ot
a-
rF
!
rts
ct
T
a-
-
+,
trL
qt
trl
@
ci
ol
l-l
3(\l I
tall
o.|l
o-l
I
I
El
i.ol
t-Fl
o>l
cLl
b .:- :t :r
RilPa;Da,+il
v\OF\=\-is F--b+coc{
., -, _, O\ a | . I
0..=i::E..-=3i
Ngbi.
g' !D ;', i.t it
rr)
::
;.. 4" =t
8:V6$ei'b
rr)-c,(oscDc\
rtrtalll
+b-rb:1-:!=r
il:&;3f..6v
F\Sof)C\(rf
o;
c
o
o-
E
o)
E
o
E
c)
1-
f
an
o
o
E
.2
E
a')
o
g,
o-
c)
.lf,
c)
-c,
C\
cf)
1
a
i ,.f)
rnt(f) (\T
8 n i- f +
@-
N-Nto
Itllr
i+ln,r.,.t
\\
$:F3s6\O
s\
SPPF{G-+
tr)C\li-
(r)-@rnS
tttlll t-
r- :!e{{{
3@-Pt9 \o '<r cf)
o
o
c\.l
Fis. 6
Taking the Picture
Holding the camera
Alwoys hold the Contoflex lll perf ectly steody
whilst toking o picture. Support the body of the
comero with the polms of both honds ond grip
;t firmly with the fingers (Fig. 6). The thumbs
should be pressed ogoinst the comero bock, ond
the middle fingers of both honds should rest
on the focusing knobs (9). Use the index finger
of the right hond to press the shutter releose (3).
Press the elbows lightly ogoinst your body
(Fig.7). You con use either the left or the right
eye to look through the f inder. This is the normol
position for toking horizontol pictures with the
Contoflex lll.
17
Fis. 7Fis. 8
For upright pictures, turn the Contoflex lll
through 90 degrees, ond press it lightly ogoinst
the foreheod with the right hond. The middle
finger rests on the right-hond focusing knob (9),
whilst the index finger works the shutter releose.
The left hond supports the comero from below;
it is olso possible to use the index finger of
this hond to operote the focusing knob (9)
(Fig.8).
Upright picturcs con, of course, be token with
the comero supported by the right hond. In this
cose the shutter is releosed with the thumb.
Releasing the shutter
The shutter releose knob (3) should be depressed
genlly with either the tip of the index f inger
(Fig. 9) or the f irst ioint (Fig. 10). This method
of releosing the shutter is speciolly recommended
l8
Fis.9 Fig. 10
os being the leost likely to couse comero shoke.
lf, by ony cho nce, the f ilm wind knob (l ) hos
not been wou nd to its f u I lest extent, meo n ing
thot the film hos not been odvonced by o full
f rome, the shutter connot be releosed. This
effectively prevents double exposures.
The viewfinder
The finder imoge is only visible ofter the film
wi nd knob (1 ) hos been tu rned to odvo nce the
film ond tension the shutter. This operotion
simultoneously lets down the reflex mirror inside
19
the comero; merely by gloncing through the
finder you con tell whether the comero is reody
for oction.
So long os you con see the lorge bright finder
imoge, the lens operture outomoticolly remoins
fully open, permitting eosy ond occurote focus-
ing. On pressing the releose knob, the spring
looded diophrogm closes immediotely to its pre-
selected setting before the shutter opens to
expose the film. The Contoflex is the first comero
to utilize this ingenious system.
The finder imoge is completely free from porol-
lox ond olwoys shows the exoct field of view,
even when using the Pro-Tessors for tele- or
wide-ongle pictures or supplementory lenses
for close-ups. For ropid oction shots you con
eosily follow the movement of your subiect with
the comero, since the imoge in the finder is
seen of eye level, upright ond the right woy
round.
20
The block ring on the eyepiece mount (22lr con
be unscrewed for the insertion of correction
lenses (Order No. 902) to compensote for defects
of vision. Even if you normolly weor spectocles
you con frome ond focus your pictures without
the oid of glosses. When ordering, pleose quote
your opticion's prescription for distonce glosses.
Snapshot Setting
So os to be reody for ropid oction snopshofs,
first set the correct exposure volue ond then set
the operture to tl9 ond the distonce to 20 ft.
(Fig. I I ). For eosier setting, both these f igures
ore red. This combinotion results in everything
between l0 ft. ond @ being shorply recorded.
Another useful woy of deoling with moving sub-
iects is os follows: if, for instonce, you wont to
toke o shot of children of ploy, set the operture
ond exposure time ond focus the lens of the
most suitoble distonce. Now wotch your subiects Fig. ll

Other ZEISS IKON Film Camera manuals

ZEISS IKON Icarex 35 S User manual

ZEISS IKON

ZEISS IKON Icarex 35 S User manual

ZEISS IKON Contina LK User manual

ZEISS IKON

ZEISS IKON Contina LK User manual

ZEISS IKON CONTINA IIA User manual

ZEISS IKON

ZEISS IKON CONTINA IIA User manual

ZEISS IKON Contaflex Super User manual

ZEISS IKON

ZEISS IKON Contaflex Super User manual

ZEISS IKON SUPER IKONTA User manual

ZEISS IKON

ZEISS IKON SUPER IKONTA User manual

ZEISS IKON IKOFLEX 1c User manual

ZEISS IKON

ZEISS IKON IKOFLEX 1c User manual

ZEISS IKON Contessa 35 User manual

ZEISS IKON

ZEISS IKON Contessa 35 User manual

Popular Film Camera manuals by other brands

Canon AF 35 J Sprint Instruction booklet

Canon

Canon AF 35 J Sprint Instruction booklet

Canon EF-M instructions

Canon

Canon EF-M instructions

Elenco Electronics AK-540 Assembly and instruction manual

Elenco Electronics

Elenco Electronics AK-540 Assembly and instruction manual

Mamiya C330 instructions

Mamiya

Mamiya C330 instructions

Pentax Espio Operation manual

Pentax

Pentax Espio Operation manual

Minolta MAXXUM_FLASH_5400XI - PART 2 manual

Minolta

Minolta MAXXUM_FLASH_5400XI - PART 2 manual

Minolta ZOOM 160C manual

Minolta

Minolta ZOOM 160C manual

Pentax Spotmatic Spotmatic F user guide

Pentax

Pentax Spotmatic Spotmatic F user guide

Canon EOS-1 brochure

Canon

Canon EOS-1 brochure

Kodak Advantix 3200AF user guide

Kodak

Kodak Advantix 3200AF user guide

CHINON 35FA super Instruction and Illustrated manual

CHINON

CHINON 35FA super Instruction and Illustrated manual

Nikon One-touch instruction manual

Nikon

Nikon One-touch instruction manual

Minolta XE-5 - IR REMOTE CONTRO LRC-3 manual

Minolta

Minolta XE-5 - IR REMOTE CONTRO LRC-3 manual

Polaroid ProPalette 7000 Installation and quick reference

Polaroid

Polaroid ProPalette 7000 Installation and quick reference

BOLEX H 16 EBM Electric instruction manual

BOLEX

BOLEX H 16 EBM Electric instruction manual

Minolta Vectis 100 BF instruction manual

Minolta

Minolta Vectis 100 BF instruction manual

Canon EOS Elan II - EOS Elan II 35mm SLR Camera instructions

Canon

Canon EOS Elan II - EOS Elan II 35mm SLR Camera instructions

Kodak Cine Ektanon Reliant Camera How to use

Kodak

Kodak Cine Ektanon Reliant Camera How to use

manuals.online logo
manuals.online logoBrands
  • About & Mission
  • Contact us
  • Privacy Policy
  • Terms and Conditions

Copyright 2025 Manuals.Online. All Rights Reserved.