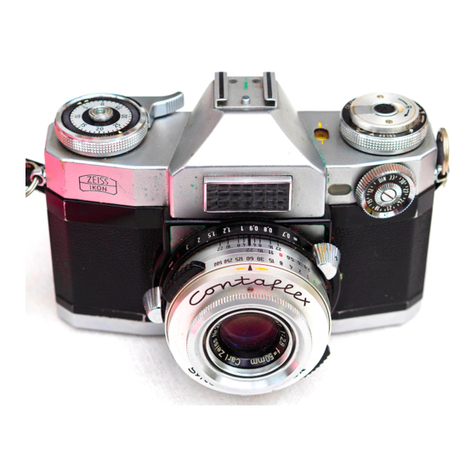
ZEISS IKON CONTINA IIA User manual

@ rNsTRucTroNs x.oR usE @
CONTINA IIc
35 mrn
AGl. STUTTGiART
Z EISS rtrION

-l.
t[)perutionq,l, Parts of the CONTINA IItt,
(See illustrations on the two inner cover pages)
1 Release knob
2 Frame counter
3 Rapid wind lever
7 Accessory shoe
8 Rewind knob
9 Viewfinder
13 Distance setting ring
14 Distance setting mark
15 Depth-of-field scale
19 Diaphragm scale in f/numbers
20 Knob for opening the flap of the
exposure meter
4 Setting mark for exposure meter 16 Shutter speed setting ring
5 Knob for setting film speed 17 Shutter speed scale
6 Pointer of exposure meter 18 Diaphragm setting ring
10 Flashlight contact nipple 21 Tripod bush
11 Locking bar for camera back 22 Locking knob for film rervind
12 Synchro Iever
2
t
f, r - j-
www.orphancameras.com


www.orphancameras.com

COr-Tf NA If n i|Ernrn
Owing to its rapid film wind, the coupling between the film wind and shutter
tensioning and the clear lay-out of all operational scales the GoNTINA Ira
is very easy to operate. The highly efficient NovARanastigmat f :3.5/45 mm
or theNovlCARanastigmat f:2.8/45 mm lenses give needle-sharp photo-
graphs on black and white and colour films. The built-in photo-electric
exposure meter can be relied upon to indicate the correct exposure time, even
under difficult lighting conditions.
In order to make every CONTINA exposure a success right from the beginning,
it would be to your benefit to study this booklet with the utmost care. This
will enable you to utilize the obvious advantages of your 66NTINA to the full.
If you still have some doubts or difficulties, do not hesitate to ask your photo-
dealer for advice.

Measuring the efrIromrre tirne
The dependable built-in exposure meter indicates the correct exposure time
and stop for black and white and colour film, for negative as well as for
reversal^ film. First the speed of the film to be used mlust be set. Turn the
inner disc by means of -the small knob (5) until the relevant qpee4 value
appears opposite the black mark of the DIN or ASA window. The disc can
also be set to intermediate speeds (ill. 1).
If the film manufacturer has rated the film speeds in other than DIN or ASA
ratings, the corresponding values can be found in the table on page 5.
Ibeib'eed of coloir reoelsal film cannot be determined so easily.ior reoersal
colour film ihe uposure depends on tLte brigbtness of tbe. brightest biqltligbt
tbat tb'e pbotographer wisb'es to record and- not on tbe d.epth of tbe deepest
sbadow. Jor tlbtis reason tbe film manufacturers coDer the speed r.alingt. pf
their reoersal colour films witb upressions like, " . . . to be expo.sed like f ilm
of xx ASA". jn den'eral, tbese indications are reasonably reliable and gioe
riood results. Jor ihis reAson colour neQatioe f ilms can be used witb t.be speed
"oalue printed on tlte box. lf you want to make absolutely sure, make a f ew
test exposures witb difterent'exposure times on tlte colour film you intend to use.
4
www.orphancameras.com

o
_o
z=
tr
o
(rl
(u
3<
'6 a.
E7
(n
bq)
tra
'Ee
*3
ct) -
'ct
<.8
v)
rYl
o
q)
(J
tr.
q)
q)v)
as
:v,
sx
'R v)
9\1
A.s
Sx
i-- u
Sv)
av1
(/rL
ux
h !r..t
O - Ol eO -tr rn \O N 6 O\ O - Ol cO -i. r., \O N
-i - - - -{ - - - -. C\ Ol Ol Ol C.l Ol C.l e{
r^ \o @ c c.t \c o {. c-t o o .+ c c r^ o o o
F F - Cl C.t Cr) -+ r.r \O OO O Ot \O O rrl
-r -. -r (\ C.l
co-+r.r\oN@oro-r
c.l c\l ol c.l t\l ol c.l co co
O -r (^l
c.l (\l c.l
CO + rat
cf) ef) cY)
-(\c(t
cl (-l c.l +rat\Ol.-€OtO-rOl
cl cl C\l ct ot (^l eo co eo
O -tr O O r., O O.O O
rn\c@c)c\\oc)r.'ol
-F-(.lClff)
\oN@
co cf) ct?
\C@OC_t\OOrnolO
-Fr-C.l(\lCO+

For measuring the exposure time, the CONTINA IIa should be aimed at the
subject in the way you actually want to take it. \7hen the light is good, the
r,yhit_e pointer on the indicator scale (6) deflects immediately. "Ho*.u".r, when
the-light is poor, the flap of the exposure meter must be opened first with
a slight pressure on the knob (20). Now the setting ring with the black
triangle mark (a) is turned to the figure engraved in green or black on the
scale indicated by the pointer (6). $7hen doing this, the following rule must
be observed t
closed flap - green mark visible on the flup - set triangle
mark to green figures.
Open flap no mark visible on the flup set triangle
. mark to black figures.
After setting the triangle mark, the correct exposure time (outer ring) can
be read off for every stop (inner ring) and vice versa. The shutter ipeeds
to the left of l/s stand for fractions ol a second (thus 10 means 1/ro second).
6
www.orphancameras.com

The red figures to the right of r/z stand for
full seconds. As described in the following
pages, the values found must then be
transferred to the diaphragm and the
shuter of the coNTrNA rr a.
when filters are used (see page 23), the
red or green figures on the exposure scale
corresponding to the reading of the poin-
ter (6) should not be aligned opposite the
black triangle, but opposite the relevant
filter factors (red figures beside the
triangle mark). You are then able to read
off the stop and exposure time without
having to convert figures by means of the
filter factor.
Jll. t

Jll. z
Settin,g the diaPhrag??o
Turn the rear chrome-plated milled ring
(18) until its red mark is opposite the
f/number (19) required (ill. 2). The higher
the figure the smaller the stoP.
Settittg the efrPos?,ore timte
(shutter speed)
Turn the red mark on the milled front
ring (16) to the desired shutter speed
shown on the scale (17) (ill. 3). The
figures denote fractions of a second
lll. z
www.orphancameras.com

("25" stands {or t/zs second etc.). ,Jfhen set to ,,8,', the shutter
o_pen as long as the release knob is depressed. It does not matter
the shutter speed setting is carried out before or after i.i.ioning tr.,.
by means of the rapid wind lever (3)
(see page 18). ii:o-,t"i:;,-.:;.," r,. *.;,:,rr,:.,.:;...,.,,r..
remalns
whether
shutter
Setti"t,g the distcr,?oee
Turn the setting ring bearing the
scale (13) until the setting mark
opposite the distance (in feet or
required (ill. 4).
Tor te&tnical reasons, the underside of tbis
setting ring of tbe coNTrNA witltNovrcAR
lens bears anotlter scale uthicb is of no irn-
portance in the operation of the coNTrNA.
distance
(r4) is
metres) ',;';#.,;.*;',ii.i'.
;iiiil,l+ft++;$
Tu. t

I)ep th - of-fr,el d seal, e
Every lens focused for a definite distance gives sharp pictures of objects
onlv-in a limited space before or beyond the -distance fdr i,vhich it is focused.
This zone of sharp definition becomei deeper the more the lens is stopped down.
This so-called depth of field f6r any lens_
aperture and diitance can be read off
fiom the depth-of-field scale (1 5). The
zone of sharp definition can be read off
from the dis[ance scale bv means of the
diaphragm figures on the right and left
side of the distance setting mark (14). In
illustration 5, for instance,' the distance is
set to 9 feet. Then the depth-of-field scale
indicates that the depth of field extends
from 5 feet in the foreeround to 30 feet in
the background at a "stop of f : 1 1. The
exact depth-of-field values can be founcl
in the table on page 17.
Jll. s
www.orphancameras.com

I)e7tth-of-field table
Dis-
tance
@
30'
75'
9',
6'
5',
4',
3',
47',8" - o
18'5" -80'
7l'60 -27'9,
7'7t' -71'7n
5',4' - 6'9,
4t7I - 5t6t,
3t9't - 4t4n
2',lor- 3,2u
3.5l4
39,7" -a
16'170 -737'6"
10'100- 24,4u
7'3" - 77'9"
5',3',- 7'7'
4',6' - 5'go
3',80 - 4'5"
2'10, - 3,3'
73'5,, -o
9',4,, -39'2,
6'60 -74'40
4',70r- 7,70u
4t2t, - 6t2tl
3t6n - 4tgt,
2t8tt - 3,4t'
76'9" -o
10'10,,- o
8' -729'6,
5',loo -79,70,
4',6' - g'7u
3'77',- 6'17"
3'3n - 5,7"
2'7n - 3,7't
12,30 - o
g'go - o
6'10,,-o
5'2't -32'gn
4'2n -77t3tl
3'80 - 9,7,
3t7,t . 5,gn
2t6tt - 3,70t,
8t4,t - @
6',8" -o
5',6' -o
4'4't -63t2n
3'8' -19'10'
3t3n -77'4n
2t70n- 7t7tl
2t4't - 4t4t,
6',2"-a
5',2',-o
4t6,,- o
3t4n - @
3'2'-7W'7n
2t17il -22t7n
2'8"- 70tln
2'7u - 5'4n
2.8 DIA
5.6
t1O"- a
HRA
8GM11
Jbe smaller tbe aperture tbe longer bas to be tbe exposure. Jbe lens sbould, tberefore, be
stopped down only so mu&t as is necessary for obtaining tbe reQuired deptb of field, in order
to auoid blurred pictures due to tbe motion of tbe subject.
ll

1Il. o
B,ed, dot settirog
In order not to lose time over distance and
diaphragm settings wbeq rapid snapshots
rn.rit be" taken, tfie red-dot setting ihould
be used. The distance should be set to the
red dot and the diaph ragm, to the red
figure 8 (ill.6), whereupon ali obiects from
B Jeet to oo (infinity) -will be sharp. The
correct exposure time for this setting . is
ferrnci in fhe usual way by means of the
built-in exposure meter.
Flashl,ight and, seAf ffi??oer'
The speed svnchronised Prontor - SVS
shutter can be coupled to flashguns of eveiy type. r\4,oreover, it has a built-in
seli-timer (delaved action releise). The Proritbr-SVS shutter permits three
different settings of the synchro-lever (12) (ill.7).
12
www.orphancameras.com

flt. 7
with the ,"rt""- settirg, the shutter fires
the flash automatically the moment the
shutter blades are fully open. \zith this
setting flashbulbs and flash capsules can
be fired with shutter speeds of rlzs seconcl
and longer. Electronic flashes must always
be fired with the tt xtt setting, even to the
Jrrvr L'DL JrrLlLLtrr SPeeC[s' ,.,iiii....i.i'il.i.'i'i'i.i.i.'.....l.i,,.'.
With the $M"- setti[g, there is a delay '.t*..-.'.u..,..
flashbulbs. \ilurhen set to "M" the fastest h@J==bLh%=9,&%3r-.ru rg1ffi;;
shutter speeds can be used to fire a flashburb of the ,,M,, crassificati
,rqqrvsru vr Llrc lvl crasslrlcatlon,
with the "v"-setting, the delayed action release or self-timer can be
operated. After depressing the rerease knob (t), a retarding movement is set
shortest shutter speeds.
t3

in motion which releases the shutter after about 8 seconds. Time exposures
("8") cannot be made with the self-timer. If, by mistake, a flashbulb is fired
with the "V"-setting it will act as though the shutter were set to "X".
The synchro-lever (12) can be set either with cocked or uncocked shutter.
For flashlight exposures, distance and diaphragm should be set in the usual
w?y, then the flash lead from the flashgun connected to the flash contact
nipple (10). Only then insert a flashbulb into the sociket of the gun. \7hen
the shutter is released by depressing the knob (1) the flashbulb will be fired
in synchronisation with the shutter. For further particulars study the instruc-
tions for the use of the various flashguns and flashbulbs. The correct exposure
times for the "X" , tt Mtt and "Y" - settings can be found in the table on page 15.
14
www.orphancameras.com

Tnble of Eupoter,re ?.i'nt t's for Ftashbutbs and, Eleet,ronie f;ash u,ttite
Type of flashbulb Synchro-lever
set to
XandVl MType of flashbulb Synchro-lever
set to
XandVj M
Osram Vacublitz
xP, xo
F1, F2
so, s1
S2
Philips Photoflux
Pf3
Pf14, Pf25l
Pf45, Pt56l
Pf24, Pf100
Gen. Electric
Vestinghouse
SM
Nr. 5, 6, 77, 22
Gen. Electric
V'estinghouse
Nr.31
Nr.50
lylvania Superflash,
Vabash
SF
Nr. 0, 21
Press 25 l
Press 40 |
Nr.3
Electronic flash
units
1 - r/so
l-rl:*-
7-rllx,
l-rlrc
l-rllx
1-rlx
1-rlrc
7-rlrc
1-1lla
:
llw-tlgn
'llr.-rlgn
rlm-tl:rm
l,'so-l1gm
rlN-rlso
I /.r.-r lsoo
1-rlrc
7-rlrc
1-rllrrr
7-1lle'
1-rlrc
1-|/soo
rllzs
rlN-llm
r/m-risoo
rlzs-rlm
t5

Ifold,ing the ea??oeycr,
The camera must be held firmly during
the exposure. The body of the camera
should be held with both hands (ill. 8).
The right-hand index finger operates the
shutter release (1). The elbows should be
pressed slightly against the body. It does
not matter whether the right or the left
eye is used to look through the view-
finder (9).
In this way horizontal pictures will be
taken. To take vertical pictures, the camera
is rotated through 90 o (ill. 9). The left
hand holds the camera from above while
the right hand serves as a support for the
CONTINA. In this case the thumb of the
JlI. 8
www.orphancameras.com

right hand rests on the body shutter
release (1).
lxposures with the hand - held camera
should be made onry when the ,t uir.,
speed is set betwe.n 1/roo and t/zs ,..""a
(at the outside). For lo'ger shutte, ,o..a,
or when the self-timer is ils.diL-';b*fiNA
should be placed on a firm support or
screwed to a tripod by means of tfiJ iripoa
bush (?t). For verticir pictures a bal and
socket head must be inierpolated bet*".n
the camera and the tripod. AIr .*p*.rr.,
longer than r/zs second rrt"rrj, u, a matter
of plinciptre, be made with u- iubl. release
which can be screwed into the thread of
the release knob (1). This pr.u.nts camera
shake.
7ll. g
Table of contents
Other ZEISS IKON Film Camera manuals

ZEISS IKON
ZEISS IKON Icarex 35 S User manual

ZEISS IKON
ZEISS IKON Contessa 35 User manual

ZEISS IKON
ZEISS IKON IKOFLEX 1c User manual

ZEISS IKON
ZEISS IKON Contaflex Super User manual

ZEISS IKON
ZEISS IKON Contina LK User manual

ZEISS IKON
ZEISS IKON CONTAFLEX III User manual

ZEISS IKON
ZEISS IKON SUPER IKONTA User manual
Popular Film Camera manuals by other brands

Olympus
Olympus View Zoom 90 QD - Accura Viewzoom 90 QD Date 35mm... instructions

Pentax
Pentax IQZoom 130M operating instructions

Pentax
Pentax efina AF50 operating manual

Minolta
Minolta HEXAR SILVER manual

Pentax
Pentax IQZoom 130M operating manual

KRASNOGORSK
KRASNOGORSK KRASNOGORSK-3 Operating instruction